Android
FloatingActionButton
말 그대로 떠다니는 액션버튼을 의미합니다. 우리는 종종 앱을 사용할 때 왼쪽 아래에 있는 화면과는 약간 분리되있는 느낌을 가지는 버튼을 볼 수 있습니다. 보통 무언가를 추가하는 등의 작업을 할 때 그 버튼을 클릭하곤 합니다. 이번에는 그 버튼이 무엇인지 알아봅시다.
FloatingActionButton 만들기
<RelativeLayout ... 중략>

    <com.google.android.material.floatingactionbutton.FloatingActionButton
        android:layout_width="wrap_content"
        android:layout_height="wrap_content"
        android:src="@drawable/baseline_add_24"
        app:tint="@null"
        android:layout_alignParentBottom="true"
        android:layout_alignParentRight="true"
        android:layout_margin="16dp"
        app:backgroundTint="@color/purple_500"/>
</RelativeLayout>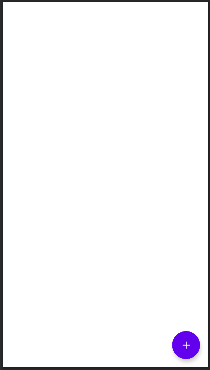
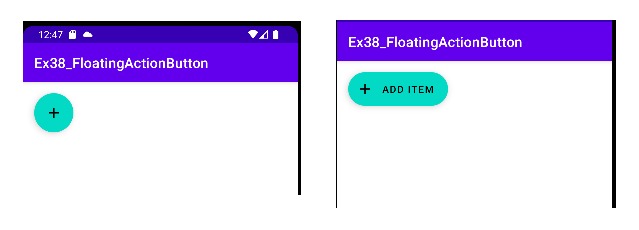
tint 속성은 안쪽 아이콘의 색상을 지정할 수 있으며, backgroundTint 는 버튼 자체의 색을 지정할 수 있습니다. FloatingActionButton 에서는 두 속성 모두 app 으로 지정해주어야 한다는 사실을 참고합시다.
또한 FloatingActionButton 은 이미지뷰를 상속받는 버튼입니다. 따라서, text 와 같은 속성은 사용할 수 없습니다.
FloatingActionButton 이벤트
FloatingActionButton 역시 버튼이므로 클릭 이벤트 설정이 가능합니다.
public class MainActivity extends AppCompatActivity {

    FloatingActionButton fab;

    @Override
    protected void onCreate(Bundle savedInstanceState) {
        super.onCreate(savedInstanceState);
        setContentView(R.layout.activity_main);

        fab = findViewById(R.id.fab);
        fab.setOnClickListener(new View.OnClickListener() {
            @Override
            public void onClick(View view) {
                Toast.makeText(MainActivity.this,"버튼이 눌렸습니다.",Toast.LENGTH_SHORT).show();
            }
        });
    }
}
FloatingActionButton 의 클릭이벤트로 토스트 메시지를 하나 띄웠습니다.
확장된 FloatingActionButton
앞서 FloatingActionButton 은 이미지뷰를 상속받는다고 이야기 했습니다. 즉, 텍스트는 표현할 수 없다는 이야기도 됩니다. 그래서 확장된 FloatingActionButton 기능을 지원합니다. 이 클래스를 이용하면 글씨를 작성해줄 수 있습니다. 또한 버튼의 확장과 축소 또한 가능합니다.
<com.google.android.material.floatingactionbutton.ExtendedFloatingActionButton
    android:id="@+id/ext_fab"
    android:layout_width="wrap_content"
    android:layout_height="wrap_content"
    app:icon="@drawable/baseline_add_24"
    android:text="ADD ITEM"
    android:layout_margin="16dp"/>
버튼 이벤트
extFab = findViewById(R.id.ext_fab);
extFab.setOnClickListener(new View.OnClickListener() {
    @Override
    public void onClick(View view) {
        if( extFab.isExtended()){
            extFab.shrink();
        }else{
            extFab.extend();
        }
    }
});
버튼 이벤트와 if 문을 이용하여, 버튼이 확장되어 있으면 축소하고 그렇지 않다면 확장하는 코드입니다.
Snackbar
토스트의 대체로 나온 클래스입니다. 안드로이드에서는 토스트는 더 이상 개발을 하지않으며 대신에 스낵바를 개선하고 있습니다.
스낵바 만들기
만드는 방식은 토스트와 유사합니다.
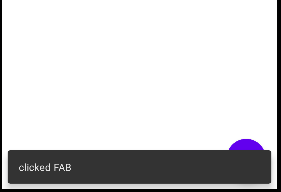
Snackbar.make(view,"clicked FAB",Snackbar.LENGTH_LONG).show();
첫번째 파라미터는 스낵바를 붙일 view 를 의미합니다. 두번째파라미터는 스낵바에 표시할 문구, 마지막 파라미터는 얼마동안 스낵바를 보여줄 지 결정합니다.
스낵바의 버튼 이벤트
fab = findViewById(R.id.fab);
fab.setOnClickListener(new View.OnClickListener() {
@Override
public void onClick(View view) {
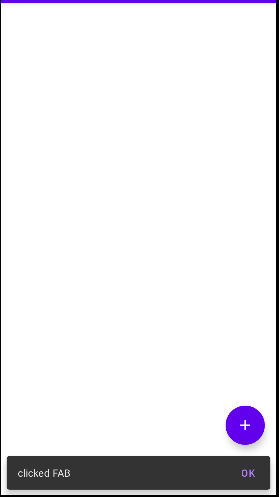
Snackbar.make(view,"clicked FAB",Snackbar.LENGTH_INDEFINITE).setAction("OK", new View.OnClickListener() {
@Override
public void onClick(View view) {
}
}).show();
}
});스낵바의 setAction() 메서드를 이용하면 버튼을 붙일 수 있습니다. setAction() 메서드의 첫번째 파라미터로는 버튼의 글자를, 두번째 파라미터로는 버튼의 리스너를 전달합니다. 그리고 버튼의 onClick() 메서드를 구현하여 이벤트를 처리할 수 있습니다.

CoordinaterLayout
스낵바를 사용하다 보니, 위 그림에서도 볼 수 있듯 스낵바가 버튼을 가리는 현상이 발생했습니다. 버튼 뿐 아니라 채팅 메시지등의 중요한 정보라면 문제가 될 수 있겠죠. 그래서 스낵바가 올라오면 그에 따라 뒷쪽의 뷰들 또한 올라가게 해주고 싶습니다. 그래서 나온 개념이 CoordinaterLayout 입니다.
SnackBar 위치 지정해주기
<androidx.coordinatorlayout.widget.CoordinatorLayout
    android:id="@+id/snackbar_container"
    android:layout_width="match_parent"
    android:layout_height="wrap_content"
    android:layout_gravity="center"/>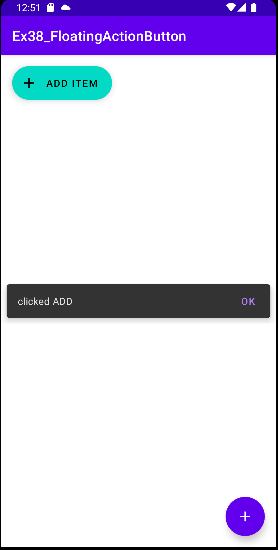
스낵바를 위치시킬 곳에 레이아웃 하나를 만들고, 스낵바를 붙일 레이아웃으로 지정하면 스낵바가 레이아웃이 위치된곳에서 생성됩니다.
SnackBar 크기 줄이기
   <androidx.coordinatorlayout.widget.CoordinatorLayout
    android:id="@+id/snackbar_container"
    android:layout_width="match_parent"
    android:layout_height="wrap_content"
    android:layout_gravity="center"
    android:layout_marginLeft="50dp"
    android:layout_marginRight="50dp"/>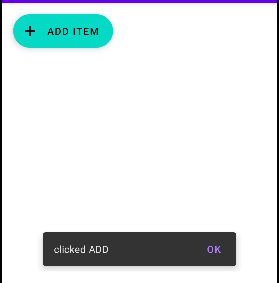
그리고 그 레이아웃의 크기를 margin 을 이용하여 줄이면, 스낵바의 크기 또한 줄어들게 됩니다.
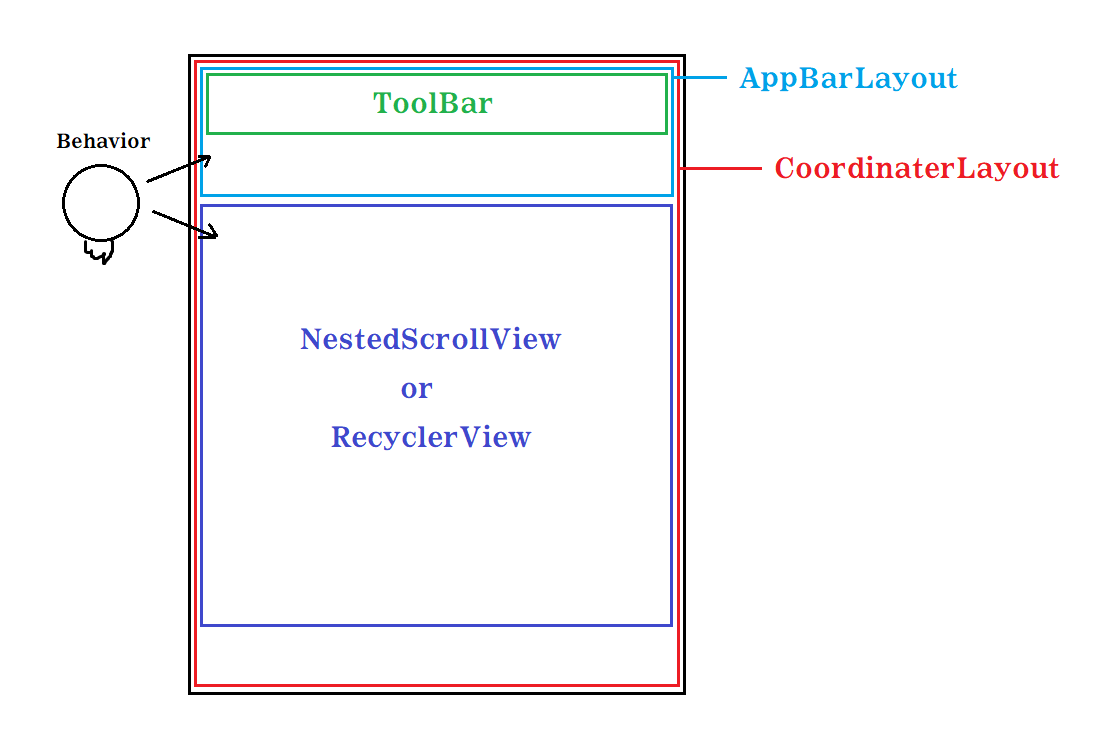
NestedScrollView
NestedScrollView 는 ScrollView 와 개념이 거의 동일합니다. 물론 사용방법 또한 스크롤뷰와 매우 흡사합니다. 이 둘의 차이는 리사이클러뷰를 사용할 때 나타나는데, 이 부분은 다른 포스팅에서 따로 정리해보겠습니다.
일단은 NestedScrollView 의 사용법 부터 알아봅시다.
NestedScrollView 의 사용법
NestedScrollView 의 사용법과 함께, 앞서 배웠던 코디네이터 레이아웃, 앱바 레이아웃, 툴바 등과 함께 xml 을 구성해보았습니다.
<androidx.coordinatorlayout.widget.CoordinatorLayout xmlns:android="http://schemas.android.com/apk/res/android"
    xmlns:app="http://schemas.android.com/apk/res-auto"
    xmlns:tools="http://schemas.android.com/tools"
    android:layout_width="match_parent"
    android:layout_height="match_parent"
    tools:context=".MainActivity">

    <com.google.android.material.appbar.AppBarLayout
        android:layout_width="match_parent"
        android:layout_height="wrap_content">

        <androidx.appcompat.widget.Toolbar
            android:id="@+id/toolbar"
            android:layout_width="match_parent"
            android:layout_height="?actionBarSize"
            app:titleTextColor="@color/white"
            app:layout_scrollFlags="scroll"/>

        <Button
            android:layout_width="match_parent"
            android:layout_height="wrap_content"
            android:backgroundTint="@color/teal_700"/>

    </com.google.android.material.appbar.AppBarLayout>

    <androidx.core.widget.NestedScrollView
        android:layout_width="match_parent"
        android:layout_height="match_parent"
        app:layout_behavior="com.google.android.material.appbar.AppBarLayout$ScrollingViewBehavior">

        <LinearLayout
            android:layout_width="match_parent"
            android:layout_height="wrap_content"
            android:orientation="vertical">

            <TextView
                android:layout_width="match_parent"
                android:layout_height="350dp"
                android:background="#FFFF0000"/>
            <TextView
                android:layout_width="match_parent"
                android:layout_height="350dp"
                android:background="#FF00FF00"/>
            <TextView
                android:layout_width="match_parent"
                android:layout_height="350dp"
                android:background="#FF0000FF"/>

        </LinearLayout>
    </androidx.core.widget.NestedScrollView>


</androidx.coordinatorlayout.widget.CoordinatorLayout>- 앱바의 경우 기본적으로 스크롤이 되지 않기 때문에 툴바등의 뷰를 사용할 때, 스크롤과 관련된 속성을 사용하여야 합니다. 이러한 스크롤 관련 속성들은 앱바 내부에서만 사용이 가능합니다.
app:layout_scrollFlags 속성중 scroll 을 속성값으로 주면 스크롤이 될 때 숨겨집니다. enterAlways 속성값을 주게되면 스크롤이 되더라도 숨겨지지 않고 그대로 자리를 차지합니다. 추가적으로 위 코드에서도 볼 수 있듯, 스크롤 속성을 준 뷰가 아래쪽에 있고, 윗쪽뷰는 스크롤 속성을 주지 않았다면, 아래쪽 뷰 또한 스크롤이 불가합니다.
- NestedScrollView 를 하나 설정하고 그 안쪽에 리니어 레이아웃, 레이아웃의 자식뷰로 텍스트뷰 3개를 설정했습니다. 실행시켜보면 스크롤이 제대로 되는걸 확인할 수 있습니다. 스크롤뷰의 자식뷰는 1개만 가능하며, width 와 height 모두 wrap 으로 처리된다는걸 다시 한번 생각합시다.
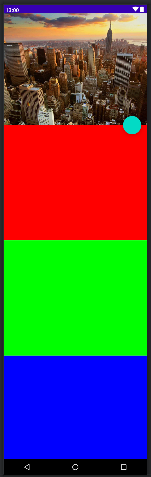
CollapsingToolbarLayout
CollapsingToolbarLayout 또한 우리가 사용하는 앱에서 많이 볼 수 있는 구조 입니다. 스크롤을 내리게 되면 CollapsingToolbarLayout 이 줄어들면서 툴바와 같은 구조로 무너집니다. 우리가 스크롤을 내리면서 보게될 정보를 가리지 않고 편하게 스크롤을 할 수 있게 도와주는 레이아웃입니다.
CollapsingToolbarLayout 만들기
<androidx.coordinatorlayout.widget.CoordinatorLayout xmlns:android="http://schemas.android.com/apk/res/android"
    xmlns:app="http://schemas.android.com/apk/res-auto"
    xmlns:tools="http://schemas.android.com/tools"
    android:layout_width="match_parent"
    android:layout_height="match_parent"
    tools:context=".MainActivity">

    <com.google.android.material.appbar.AppBarLayout
        android:id="@+id/appbar_layout"
        android:layout_width="match_parent"
        android:layout_height="340dp"
        android:theme="@style/appbar">

        <com.google.android.material.appbar.CollapsingToolbarLayout

            android:layout_width="match_parent"
            android:layout_height="match_parent"
            app:layout_scrollFlags="scroll|exitUntilCollapsed"
            app:contentScrim="@color/purple_500">

            <ImageView
                android:layout_width="match_parent"
                android:layout_height="match_parent"
                android:src="@drawable/newyork"
                android:scaleType="fitXY"/>

            <androidx.appcompat.widget.Toolbar
                android:id="@+id/toolbar"
                android:layout_width="match_parent"
                android:layout_height="?attr/actionBarSize"
                />
        </com.google.android.material.appbar.CollapsingToolbarLayout>

    </com.google.android.material.appbar.AppBarLayout>

    <com.google.android.material.floatingactionbutton.FloatingActionButton
        android:layout_width="wrap_content"
        android:layout_height="wrap_content"
        app:fabSize="normal"
        app:layout_anchor="@id/appbar_layout"
        app:layout_anchorGravity="bottom|right"
        android:layout_margin="16dp"/>

    <androidx.core.widget.NestedScrollView
        android:layout_width="match_parent"
        android:layout_height="match_parent"
        app:layout_behavior="com.google.android.material.appbar.AppBarLayout$ScrollingViewBehavior">

        <LinearLayout
            android:layout_width="match_parent"
            android:layout_height="wrap_content"
            android:orientation="vertical">

            <TextView
                android:layout_width="match_parent"
                android:layout_height="350dp"
                android:background="#FFFF0000"/>
            <TextView
                android:layout_width="match_parent"
                android:layout_height="350dp"
                android:background="#FF00FF00"/>
            <TextView
                android:layout_width="match_parent"
                android:layout_height="350dp"
                android:background="#FF0000FF"/>
        </LinearLayout>
    </androidx.core.widget.NestedScrollView>

</androidx.coordinatorlayout.widget.CoordinatorLayout>
구조는 별다르게 볼 부분은 없습니다. 상단바에 앱바를 하나 만들었으며, 앱바 내부에 CollapsingToolbarLayout 을 하나 넣었고, CollapsingToolbarLayout 의 자식뷰로 이미지뷰 하나와 툴바 하나를 넣어주었습니다. 그리고 하단쪽에는 스크롤이 가능하도록 NestedScrollView 하나와 텍스트뷰 세개를 넣어주었습니다.
이제 실행을 시켜 스크롤을 해보면 윗쪽의 CollapsingToolbarLayout 이 줄어들면서 제목줄만 남게됩니다. 그로 인해 우리는 스크롤시에 정보를 훨씬 보기좋게 볼 수 있게됩니다.
BottomNavigationView
이 또한 우리가 사용하는 앱들에서 거의 필수적으로 사용되는 뷰입니다. 카카오톡만 보더라도, 채팅창과 친구목록 등의 하단바 메뉴가 BottomNavigationView 로 이루어져 있습니다. 이번 예제에서는 BottomNavigationView 을 이용한 예제인데, 지금까지 배웠던 안드로이드의 기술들을 종합해서 예제를 구성해보겠습니다.
전체 구성
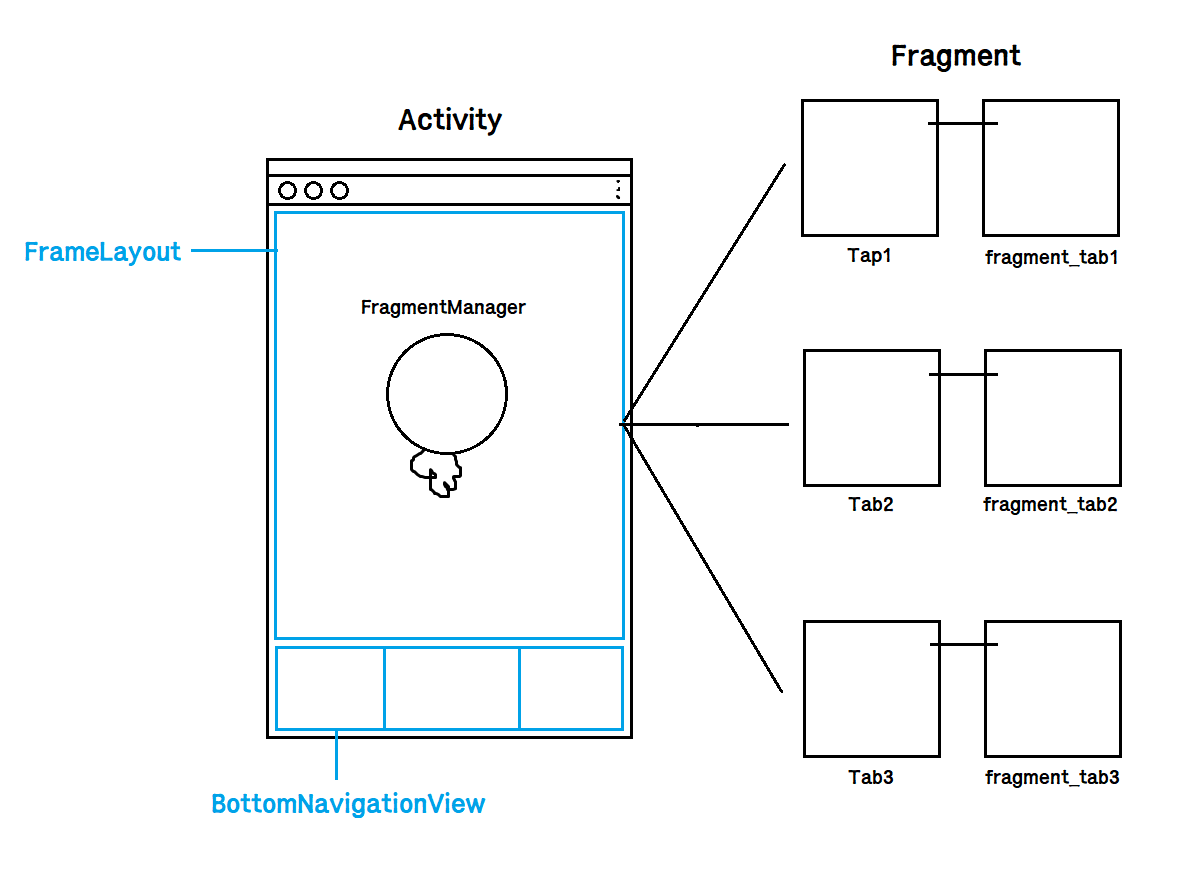
전체 Activity 안에 FrameLayout 하나와 BottomNavigationView 를 구성하였습니다. 그리고 각 네비게이션뷰를 선택하면 그에 맞는 프래그먼트를 생성하여 FrameLayout 에 띄워줍니다.
먼저, 각 프래그먼트들을 만들어주고 난 뒤 마지막에 네비게이션 뷰의 아이템 선택 리스너를 이용하여 각 프래그먼트를 FrameLayout 에 띄워주도록 합시다.
activity_main.xml
--------- activity_main.xml
<LinearLayout ... 중략 >

    <FrameLayout
        android:id="@+id/container_fragment"
        android:layout_width="match_parent"
        android:layout_height="wrap_content"
        android:layout_weight="1">
    </FrameLayout>

    <com.google.android.material.bottomnavigation.BottomNavigationView
        android:id="@+id/bnv"
        android:layout_width="match_parent"
        android:layout_height="wrap_content"
        app:menu="@menu/bnv"
        app:itemTextColor="@color/bnv_item_color"
        app:itemIconTint="@color/bnv_item_color"
        app:labelVisibilityMode="unlabeled"/>

</LinearLayout>
---------- bnv.xml
<menu xmlns:android="http://schemas.android.com/apk/res/android">

    <item android:id="@+id/bnv_tab1"
        android:title="TAB1"
        android:icon="@drawable/ic_action_home"/>
    <item android:id="@+id/bnv_tab2"
        android:title="TAB2"
        android:icon="@drawable/ic_action_favorite"/>
    <item android:id="@+id/bnv_tab3"
        android:title="TAB3"
        android:icon="@drawable/ic_action_user"/>
</menu>
메인 액티비티의 화면 구성입니다. 프래그먼트를 띄워줄 FrameLayout 하나와 네비게이션뷰 하나를 설계했습니다. 그리고 네비게이션의 메뉴 구성을 별도의 xml 파일로 만들어주었습니다. BottomNavigationView 의 메뉴 아이템은 최대 5개 까지만 구성이 가능합니다. 그리고 권장하는 아이템의 개수는 3개에서 5개 사이이며, 2개 이내일때는 TabLayout 을 사용할것을 권장하고 있습니다.
첫번째 Fragment
프래그먼트 화면 구성하기
-------------- fragment_tab1.xml
<RelativeLayout xmlns:android="http://schemas.android.com/apk/res/android"
    android:layout_width="match_parent"
    android:layout_height="match_parent">

    <Button
        android:id="@+id/btn"
        android:layout_width="wrap_content"
        android:layout_height="wrap_content"
        android:layout_centerInParent="true"
        android:layout_below="@id/tv"
        android:text="Change Text"/>

    <TextView
        android:id="@+id/tv"
        android:layout_width="wrap_content"
        android:layout_height="wrap_content"
        android:text="TAB1"
        android:textColor="@color/black"
        android:textSize="40sp"
        android:textStyle="bold"
        android:layout_centerInParent="true"
        android:layout_marginBottom="40dp"/>

</RelativeLayout>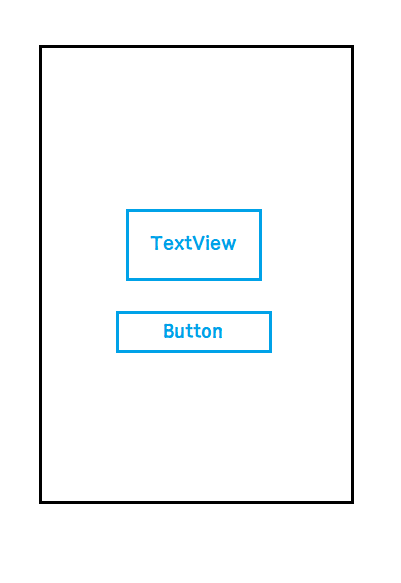
첫번째 프래그먼트는 간단합니다. 텍스트뷰 하나와 버튼하나를 설계했으며, 버튼을 누르면 텍스트뷰의 글씨가 변경되는 작업을 할겁니다.
첫번째 프래그먼트 생성하기
------------ Tab1Fragment.java
public class Tab1Fragment extends Fragment {

    TextView tv;
    Button btn;

    @Nullable
    @Override
    public View onCreateView(@NonNull LayoutInflater inflater, @Nullable ViewGroup container, @Nullable Bundle savedInstanceState) {
        View view = inflater.inflate(R.layout.fragment_tab1,container,false);
        return view;
    }

    @Override
    public void onViewCreated(@NonNull View view, @Nullable Bundle savedInstanceState) {
        super.onViewCreated(view, savedInstanceState);
        tv = view.findViewById(R.id.tv);
        btn = view.findViewById(R.id.btn);

        btn.setOnClickListener(new View.OnClickListener() {
            @Override
            public void onClick(View view) {
                tv.setText("New Text");
            }
        });
    }
}
프래그먼트를 생성하는 코드입니다. 앞서 배웠던 내용으로 크게 어렵지 않으니 보고 넘어가면 될것같습니다.
두번째 Fragment
Fragment 화면 구성하기
------------ fragment_tab2.xml
<RelativeLayout xmlns:android="http://schemas.android.com/apk/res/android"
    android:layout_width="match_parent"
    android:layout_height="match_parent">

    <com.google.android.material.tabs.TabLayout
        android:id="@+id/tab_layout"
        android:layout_width="match_parent"
        android:layout_height="wrap_content"/>

    <androidx.viewpager2.widget.ViewPager2
        android:id="@+id/pager"
        android:layout_below="@id/tab_layout"
        android:layout_width="match_parent"
        android:layout_height="match_parent"/>

</RelativeLayout>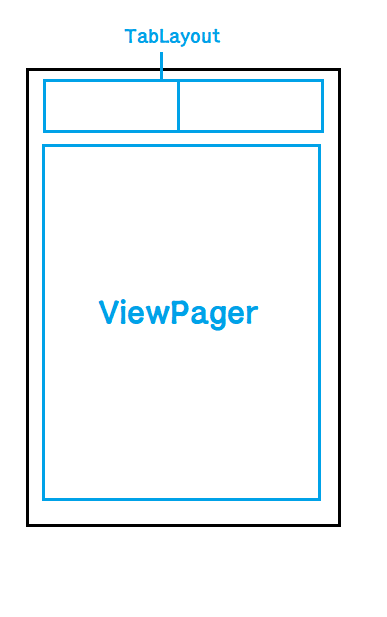
두번째 Fragment 는 좀 더 복잡한 구조입니다. 상단에 TabLayout 하나와 나머지 부분은 ViewPager 가 차지하게 설계해주었습니다. 각각의 탭에 맞게끔 뷰페이져의 화면을 구성할 예정입니다. 뷰페이져를 만들었으니, 각 뷰페이져에 들어갈 화면들을 구성해줍시다.
ViewPager 화면구성
- Tab1 화면구성

------------ fragment_tab2_aa.xml
<RelativeLayout xmlns:android="http://schemas.android.com/apk/res/android"
    android:layout_width="match_parent"
    android:layout_height="match_parent">

    <Button
        android:id="@+id/btn"
        android:layout_width="wrap_content"
        android:layout_height="wrap_content"
        android:layout_centerInParent="true"
        android:text="page1"/>

</RelativeLayout>
간단하게 버튼하나 있는 구조 입니다. 나중에 버튼을 누르면 BottomNavigationView 의 위치를 변경하는 작업을 해보겠습니다.
- Tab2 화면구성
------------ fragment_tab2_bb.xml
<RelativeLayout xmlns:android="http://schemas.android.com/apk/res/android"
    android:layout_width="match_parent"
    android:layout_height="match_parent">

    <androidx.appcompat.widget.Toolbar
        android:id="@+id/toolbar"
        android:layout_width="match_parent"
        android:layout_height="wrap_content"/>

    <androidx.core.widget.NestedScrollView
        android:id="@+id/nsv"
        android:layout_width="match_parent"
        android:layout_height="match_parent"
        android:layout_below="@id/toolbar">

        <LinearLayout
            android:layout_width="match_parent"
            android:layout_height="wrap_content"
            android:orientation="vertical">

            <TextView
                android:layout_width="match_parent"
                android:layout_height="350dp"
                android:background="#FFFF0000"/>
            <TextView
                android:layout_width="match_parent"
                android:layout_height="350dp"
                android:background="#FF00FF00"/>
            <TextView
                android:layout_width="match_parent"
                android:layout_height="350dp"
                android:background="#FF0000FF"/>

        </LinearLayout>
    </androidx.core.widget.NestedScrollView>
</RelativeLayout>
이 역시도 간단합니다. 앞서 배웠던 Toolbar 를 상단에, 하단에는 NestedScrollView 를 배치하고 자식뷰로 텍스트뷰 3개를 배치해 스크롤이 가능하도록 설계했습니다.
뷰페이져 어댑터 만들기
--------------- Tab2PagerAdapter.java
public class Tab2PagerAdapter extends FragmentStateAdapter {

    Fragment[] fragments = new Fragment[2];

    public Tab2PagerAdapter(@NonNull FragmentActivity fragmentActivity) {
        super(fragmentActivity);
        fragments[0] = new AATab2Fragment();
        fragments[1] = new BBTab2Fragment();
    }

    @NonNull
    @Override
    public Fragment createFragment(int position) {
        return fragments[position];
    }

    @Override
    public int getItemCount() {
        return fragments.length;
    }
}
구조를 한번 잘 생각해봅시다. 우리는 Tab2 의 프래그먼트를 만들었습니다. 그리고 그 프래그먼트는 뷰페이저 하나와 탭 레이아웃 하나를 가지고 있습니다. 우리가 뷰페이져를 만들때, 뷰페이져를 화면에 띄우기 위해 어댑터가 필요했습니다. 뷰페이져 어댑터는 대량의 데이터와 아이템의 시안을 받아 어댑터뷰에 뿌려주는 역할을 합니다. 그러면, 여기에서 대량의 데이터는 Tab2의 aa 프래그먼트와 bb 프래그먼트 이며, 아이템의 시안은 fragment_tab2_aa.xml 와 fragment_tab2_bb.xml 입니다. 그리고 어댑터뷰는 fragment_tab2.xml 이 되는 구조입니다. 조금 헷갈릴수 있는 구조이나, 도식을 잘 생각해보면 그리 어렵지 않습니다.
두번째 Fragment 생성하기
------------- Tab2Fragment.java
public class Tab2Fragment extends Fragment {

    TabLayout tabLayout;
    Tab2PagerAdapter adapter;
    ViewPager2 pager2;

    @Nullable
    @Override
    public View onCreateView(@NonNull LayoutInflater inflater, @Nullable ViewGroup container, @Nullable Bundle savedInstanceState) {
        View view = inflater.inflate(R.layout.fragment_tab2,container,false);
        return view;
    }

    @Override
    public void onViewCreated(@NonNull View view, @Nullable Bundle savedInstanceState) {
        super.onViewCreated(view, savedInstanceState);
        tabLayout = view.findViewById(R.id.tab_layout);
        pager2 = view.findViewById(R.id.pager);
        adapter = new Tab2PagerAdapter(getActivity());
        pager2.setAdapter(adapter);

        String[] titles = new String[] {"AA","BB"};
        new TabLayoutMediator(tabLayout, pager2, new TabLayoutMediator.TabConfigurationStrategy() {

            @Override
            public void onConfigureTab(@NonNull TabLayout.Tab tab, int position) {
                tab.setText(titles[position]);
            }
        }).attach();
    }
}
onCreateView() 메서드를 이용하여 프래그먼트를 생성해주고, onViewCreated() 메서드를 이용하여 프래그먼트가 생성된 뒤의 작업을 처리해줍니다.
두번째 프래그먼트 내부에는 탭레이아웃과 뷰페이져를 배치해야합니다. 그래서 onViewCreated() 메서드 내부에서 각 뷰들을 생성해줍시다. 한가지 주의할 점은, 우리가 이 뷰들을 만드는 곳이 프래그먼트 내부라는 점입니다. 어댑터를 생성할때 생성자로 FragmentActivity 객체를 전달해주어야 합니다. 여기서 FragmentActivity 객체는 프래그먼트를 가지고 있는 Activity 를 의미하므로, MainActivity 를 의미하는게 됩니다. 그렇기 때문에 getActivity() 메서드를 이용하면 MainActivity 를 소환할 수 있게됩니다. 그외에 탭레이아웃을 만드는 방법은 앞서 배운 내용과 동일하므로 넘어갑시다.
세번째 Fragment
<RelativeLayout xmlns:android="http://schemas.android.com/apk/res/android"
    android:layout_width="match_parent"
    android:layout_height="match_parent"
    xmlns:app="http://schemas.android.com/apk/res-auto">

    <androidx.core.widget.NestedScrollView
        android:layout_width="match_parent"
        android:layout_height="match_parent">

        <LinearLayout
            android:layout_width="match_parent"
            android:layout_height="match_parent"
            android:orientation="vertical">
            <LinearLayout
                android:layout_width="match_parent"
                android:layout_height="wrap_content"
                android:orientation="vertical"
                android:padding="32dp">

                <TextView
                    android:layout_width="wrap_content"
                    android:layout_height="wrap_content"
                    android:text="TITLE1"
                    android:textSize="20sp"
                    android:textColor="@color/black"
                    />

                <androidx.recyclerview.widget.RecyclerView
                    android:id="@+id/recyclerview1"
                    android:layout_width="match_parent"
                    android:layout_height="100dp"
                    app:layoutManager="androidx.recyclerview.widget.LinearLayoutManager"
                    android:orientation="horizontal"
                    />

            </LinearLayout>

            <LinearLayout
                android:layout_width="match_parent"
                android:layout_height="wrap_content"
                android:orientation="vertical"
                android:padding="32dp">

                <TextView
                    android:layout_width="wrap_content"
                    android:layout_height="wrap_content"
                    android:text="TITLE2"
                    android:textSize="20sp"
                    android:textColor="@color/black"
                    />

                <androidx.recyclerview.widget.RecyclerView
                    android:id="@+id/recyclerview2"
                    android:layout_width="match_parent"
                    android:layout_height="100dp"
                    app:layoutManager="androidx.recyclerview.widget.LinearLayoutManager"
                    android:orientation="horizontal"
                    />

            </LinearLayout>

            <LinearLayout
                android:layout_width="match_parent"
                android:layout_height="wrap_content"
                android:orientation="vertical"
                android:padding="32dp">

                <TextView
                    android:layout_width="wrap_content"
                    android:layout_height="wrap_content"
                    android:text="TITLE3"
                    android:textSize="20sp"
                    android:textColor="@color/black"
                    />

                <androidx.recyclerview.widget.RecyclerView
                    android:id="@+id/recyclerview3"
                    android:layout_width="match_parent"
                    android:layout_height="100dp"
                    app:layoutManager="androidx.recyclerview.widget.LinearLayoutManager"
                    android:orientation="horizontal"
                    />

            </LinearLayout>
        </LinearLayout>

    </androidx.core.widget.NestedScrollView>

</RelativeLayout>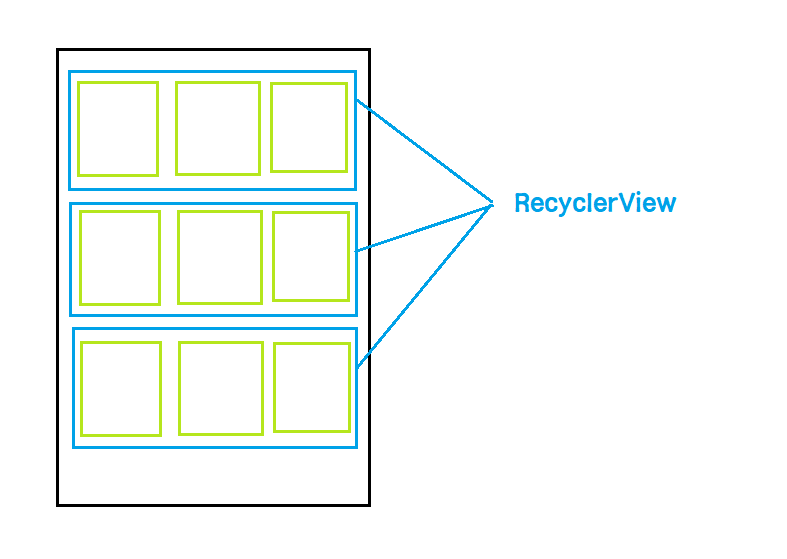
앞선 두개의 프래그먼트에 비해 많이 복잡해보입니다. 일단은 우리가 배치하고 싶은것은 리사이클러뷰가 수직으로 3개가 배치되었으면 합니다. 그래서 가장 최상위 레이아웃으로 RelativeLayout 을 배치하였으며, 안쪽 자식뷰들의 스크롤이 가능하도록 NestedScrollView 를 배치하였습니다. 그리고 LinearLayout 을 배치하여 각 리사이클러뷰가 수직으로 배치되게끔 설계하였으며, 자식뷰로 LinearLayout 3개를 배치하였습니다. 각 리니어 레이아웃의 자식뷰들로 각 리사이클러뷰의 제목들을 적어주기 위한 텍스트뷰와 리사이클러뷰를 배치했습니다.
리사이클러뷰의 화면을 구성해주었으니, 리사이클러뷰 각 아이템의 시안을 그려봅시다.
-
리사이클러뷰 아이템 시안
<androidx.cardview.widget.CardView xmlns:android="http://schemas.android.com/apk/res/android"
   android:layout_width="150dp"
   android:layout_height="match_parent"
   xmlns:app="http://schemas.android.com/apk/res-auto"
   app:cardCornerRadius="8dp"
   android:layout_margin="4dp">

   <ImageView
       android:id="@+id/iv"
       android:layout_width="match_parent"
       android:layout_height="120dp"
       android:src="@color/black"/>

   <TextView
       android:id="@+id/tv"
       android:layout_width="wrap_content"
       android:layout_height="wrap_content"
       android:text="BLACK"
       android:textColor="@color/black"
       android:layout_gravity="bottom|center"
       android:textSize="15sp"/>

</androidx.cardview.widget.CardView>
너무 복잡하지 않게 이미지뷰 하나와 텍스트뷰 하나로 아이템뷰의 시안을 설계해주었습니다.
이제 리사이클러뷰를 프래그먼트에 띄워주어야 하므로 앞서 리사이클러뷰를 만드는 방법을 이용하여 만들어봅시다.
대량의 아이템 준비하기
아이템으로는 이미지뷰 하나와 텍스트뷰 하나를 띄워주도록 합시다.
public class Tab3RecyclerViewItem {
    String name;
    int img;

    public Tab3RecyclerViewItem(String name, int img) {
        this.name = name;
        this.img = img;
    }
}
아이템 시안 준비하기
아이템의 시안은 바로 위쪽에서 만들어보았으므로 넘어갑시다.
리사이클러뷰 어댑터 만들기
public class Tab3RecyclerAdapter extends RecyclerView.Adapter<Tab3RecyclerAdapter.VH> {

    ArrayList<Tab3RecyclerViewItem> items;
    Context context;

    public Tab3RecyclerAdapter(ArrayList<Tab3RecyclerViewItem> items, Context context) {
        this.items = items;
        this.context = context;
    }

    @NonNull
    @Override
    public VH onCreateViewHolder(@NonNull ViewGroup parent, int viewType) {
        return new VH(LayoutInflater.from(context).inflate(R.layout.itemview_recyclerview_tab3,parent,false));
    }

    @Override
    public void onBindViewHolder(@NonNull VH holder, int position) {
        Tab3RecyclerViewItem item = items.get(position);
        holder.iv.setImageResource(item.img);
        holder.tv.setText(item.name);
    }

    @Override
    public int getItemCount() {
        return items.size();
    }

    class VH extends RecyclerView.ViewHolder{

        ImageView iv;
        TextView tv;

        public VH(@NonNull View itemView) {
            super(itemView);
            iv = itemView.findViewById(R.id.iv);
            tv = itemView.findViewById(R.id.tv);
        }
    }
}
리사이클러뷰의 뷰홀더 클래스를 상속받은 뷰홀더 클래스를 이용하여 이미지뷰와 텍스트뷰의 id 값을 가지는 참조변수를 만들고, onCreateViewHolder() 콜백메서드를 이용하여 뷰홀더 객체를 만들어줍니다. 만들어진 뷰홀더 객체를 onBindViewHolder() 메서드의 파라미터로 전달하여 메서드 내부에서 뷰홀더가 가지고 있는 뷰들의 객체를 이용해 값을 넣어주는 작업을 합니다. 이러한 콜백메서드들은 어댑터뷰가 호출하는 메서드들 입니다.
어댑터 붙이기
--------- Tab3Fragment.java
public class Tab3Fragment extends Fragment {

    ArrayList<Tab3RecyclerViewItem> items = new ArrayList<>();

    ArrayList<Tab3RecyclerViewItem> items2 = new ArrayList<>();

    ArrayList<Tab3RecyclerViewItem> items3 = new ArrayList<>();
    Tab3RecyclerAdapter adapter,adapter2,adapter3;
    RecyclerView recyclerView,recyclerView2,recyclerView3;

    @Override
    public void onCreate(@Nullable Bundle savedInstanceState) {
        super.onCreate(savedInstanceState);

        items.add(new Tab3RecyclerViewItem("BLACK", R.drawable.ic_action_favorite));
        items.add(new Tab3RecyclerViewItem("BLUE", R.drawable.ic_action_favorite));
        items.add(new Tab3RecyclerViewItem("RED", R.drawable.ic_action_favorite));

        items2.add(new Tab3RecyclerViewItem("BLACK", R.drawable.ic_action_favorite));
        items2.add(new Tab3RecyclerViewItem("BLUE", R.drawable.ic_action_favorite));
        items2.add(new Tab3RecyclerViewItem("RED", R.drawable.ic_action_favorite));

        items3.add(new Tab3RecyclerViewItem("BLACK", R.drawable.ic_action_favorite));
        items3.add(new Tab3RecyclerViewItem("BLUE", R.drawable.ic_action_favorite));
        items3.add(new Tab3RecyclerViewItem("RED", R.drawable.ic_action_favorite));
    }

    @Nullable
    @Override
    public View onCreateView(@NonNull LayoutInflater inflater, @Nullable ViewGroup container, @Nullable Bundle savedInstanceState) {
        View view = inflater.inflate(R.layout.fragment_tab3,container,false);
        return view;
    }

    @Override
    public void onViewCreated(@NonNull View view, @Nullable Bundle savedInstanceState) {
        super.onViewCreated(view, savedInstanceState);
        recyclerView = view.findViewById(R.id.recyclerview1);
        adapter = new Tab3RecyclerAdapter(items,getActivity());
        recyclerView.setAdapter(adapter);

        recyclerView2 = view.findViewById(R.id.recyclerview2);
        adapter2 = new Tab3RecyclerAdapter(items,getActivity());
        recyclerView2.setAdapter(adapter2);

        recyclerView3 = view.findViewById(R.id.recyclerview3);
        adapter3 = new Tab3RecyclerAdapter(items,getActivity());
        recyclerView3.setAdapter(adapter3);
    }
}
onCreateView() 와 onViewCreated() 메서드를 이용하여 프래그먼트를 생성해주고 뷰가 생성된뒤 어댑터를 붙여주는 작업을 해주었습니다. 그러면 대량의 데이터를 어댑터에게 전달해야 하는데 대량의 데이터는 어디에서 만들어주어야 할까요?
프래그먼트도 MainActivity 와 마찬가지로 onCreate() 콜백 메서드를 가지고 있습니다. 이 메서드는 onCreateView() 메서드가 호출되기 이전에 호출되는 메서드입니다. 그래서 이 메서드의 내부에서 대량의 데이터를 준비해주면 됩니다.
BottomNavigationView 선택 이벤트
-------------- MainActivity.java
public class MainActivity extends AppCompatActivity {

    Fragment[] fragments = new Fragment[3];
    BottomNavigationView bnv;

    @Override
    protected void onCreate(Bundle savedInstanceState) {
        super.onCreate(savedInstanceState);
        setContentView(R.layout.activity_main);

        fragments[0] = new Tab1Fragment();
        fragments[1] = new Tab2Fragment();
        fragments[2] = new Tab3Fragment();
        getSupportFragmentManager().beginTransaction().add(R.id.container_fragment,fragments[0]).commit();

        bnv = findViewById(R.id.bnv);
        bnv.setOnItemSelectedListener(new NavigationBarView.OnItemSelectedListener() {
            @Override
            public boolean onNavigationItemSelected(@NonNull MenuItem item) {
                if(item.getItemId() == R.id.bnv_tab1) getSupportFragmentManager().beginTransaction().replace(R.id.container_fragment,fragments[0]).commit();
                else if(item.getItemId() == R.id.bnv_tab2) getSupportFragmentManager().beginTransaction().replace(R.id.container_fragment,fragments[1]).commit();
                else if(item.getItemId() == R.id.bnv_tab3) getSupportFragmentManager().beginTransaction().replace(R.id.container_fragment,fragments[2]).commit();

                return true;
            }
        });
    }
}
만들어진 프래그먼트를 프래그먼트 매니저를 이용하여 프로그램을 처음 실행했을 때 첫번째 프래그먼트가 FrameLayout 에 붙여질 수 있도록 합니다. 그리고 BottomNavigationView 각각의 탭을 클릭시, 알맞은 프래그먼트가 생성되도록 코드를 짜주었습니다. 그리고 선택리스너 내부 콜백메소드의 리턴값으로 true 를 설정해야 한다는 점 잊지맙시다. 그렇지 않을 경우 탭이 변경되는 UI 가 반영되지 않습니다.