카카오로 로그인하기 기능을 구현해보려 한다.
워낙 여기저기서 쉽게 접하는 기능이라 금방 뚝딱할 줄 알았는데
생각보다 어려웠다.
진행한 과정을 같이 살펴보자.
전체적인 흐름
1. 애플리케이션 등록
먼저 kakao developers에서 애플리케이션을 등록해준다.
그 다음 인증이 완료되었을 때 사용자를 리디렉션 시킬 Redirect URI와
플랫폼 등을 설정한다.
2. application.properties
application.properties에 관련 설정을 추가한다.
implementation 'org.springframework.boot:spring-boot-starter-oauth2-client'
implementation 'org.springframework.boot:spring-boot-starter-security'
3. Spring Security Config 클래스 설정
로그인과 관련된 인증을 SecurityConfig에서 설정할 수 있다.
public class WebSecurityConfig {

    private final JwtAuthenticationFilter jwtAuthenticationFilter;
    private final OAuth2UserServiceImplement oAuth2UserService;
    private final OAuth2SuccessHandler oAuth2SuccessHandler;

    @Bean
    protected SecurityFilterChain configure(HttpSecurity httpSecurity) throws Exception {

        httpSecurity
                .cors(cors -> cors
                        .configurationSource(corsConfigurationSource())
                )
                .csrf(CsrfConfigurer::disable)
                .httpBasic(HttpBasicConfigurer::disable)
                .sessionManagement(sessionManagement -> sessionManagement
                        .sessionCreationPolicy(SessionCreationPolicy.STATELESS)
                )
                .authorizeHttpRequests(request -> request
                        .requestMatchers(HttpMethod.POST, "/api/**").authenticated()
                        .requestMatchers("/user/**").hasRole("USER")
                        .requestMatchers("/admin/**").hasRole("ADMIN")
                        .anyRequest().permitAll()
                )
                .oauth2Login(oauth2 -> oauth2
                        .redirectionEndpoint(endpoint -> endpoint.baseUri("/oauth2/callback/*"))
                        .userInfoEndpoint(endpoint -> endpoint.userService(oAuth2UserService))
                        .successHandler(oAuth2SuccessHandler)
                )
                .addFilterBefore(jwtAuthenticationFilter, UsernamePasswordAuthenticationFilter.class)
                .logout(logout -> logout
                        .logoutUrl("/logout")
                        .logoutSuccessUrl(Uri.MAIN_PAGE.getDescription())
                        .deleteCookies("JSESSIONID")
                        .invalidateHttpSession(true)
                );

        return httpSecurity.build();
    }

    @Bean
    protected CorsConfigurationSource corsConfigurationSource() {

        CorsConfiguration corsConfiguration = new CorsConfiguration();
        corsConfiguration.addAllowedOrigin(Uri.MAIN_PAGE.getDescription());
        corsConfiguration.addAllowedOrigin("http://localhost:3000");
        corsConfiguration.addAllowedOrigin("http://localhost:8080");
//        corsConfiguration.addAllowedOrigin("https://accounts.kakao.com");
        corsConfiguration.setAllowCredentials(true);
        corsConfiguration.addAllowedMethod("*");
        corsConfiguration.addAllowedHeader("*");
        corsConfiguration.addExposedHeader("Authorization");
        corsConfiguration.addExposedHeader("Content-Type");
        corsConfiguration.addAllowedHeader("Authorization");
        corsConfiguration.addAllowedHeader("Content-Type");

        UrlBasedCorsConfigurationSource source = new UrlBasedCorsConfigurationSource();
        source.registerCorsConfiguration("/**", corsConfiguration);

        return source;
    }
}
위 코드에 나오는 각 내용들을 살펴 보자.
CORS
먼저 CORS 설정이 있다.
이는 Cross-Origin Resource Sharing의 약자로,
HTTP는 보안적인 이유로 기본적으로 서로 다른 오리진 간의 파일 공유를 막아 놓는다.
따라서 서버에서 자원을 공유하려면 CORS를 설정해 열어줘야 한다.
Session
세션 정책으로는 Stateless를 설정했는데,
이는 서버에서의 효율적인 자원 관리와 처리 단순화를 위함이다.
사용자 인증은 JWT를 통해 진행한다.
Authorization
authorizeHttpRequests에서 요청의 경로나 메소드에 따른 인가를 세부적으로 설정할 수 있다.
위 코드에서는 /api/** 경로에 대한 POST 요청은 사용자의 인증을 요구한다.
나머지 요청에 대해서는 모두 허용한다.
OAuth2
oauth2Login에서 OAuth 로그인을 설정할 수 있는데,
여기서 설정하는 redirectionEndpoint는 인증 제공자(Kakao)에서 설정한 redirect URI와는 약간 다르다.
인증 제공자에서 등록한 redirect URI는 실제 유저를 리디렉션 시킬 URI를 설정한 것이고,
여기서 설정하는 것은 해당 엔드포인트로 왔을 시 처리할 후속 절차들을 설정하기 위함이다.
차이를 알겠는가?
인증 제공자에 의해 사용자의 인증이 완료되면 사용자는 리디렉션 되고,
Spring Security는 userInfoEndpoint의 userService를 통해 엔드 포인트에서 사용자 정보를 가져와 사용자 객체로 만든다.
이 객체는 successHandler로 넘어간다.
oAuth2SuccessHandler에서는 OAuth2 제공자로부터 받은 코드를 이용해 JWT를 발행하고,
사용자를 특정 페이지로 리디렉션 시킨다.
Security Filter Chain
http.addFilterBefore를 통해 JWT 필터를 먼저 적용시켰다.
SecurityFilterChain에 대해 간단히 설명하자면,
Spring Security는 단계별로 필터를 거치면서 사용자의 인증을 진행한다.
각 필터가 순서대로 실행되며,
어떠한 필터에서 인증이 실패하면 더 이상 진행되지 않고 요청이 반환된다.
인증에 성공하면 doFilter를 통해 다음 필터로 요청을 넘긴다.
이전 필터에서 사용자의 인증이 완료되어 SecurityContextHolder에 인증 정보가 등록되면,
이후의 인증 관련 필터는 인증 절차를 수행하지 않고 바로 다음 단계로 넘어갈 수 있다.
JWT
사용자는 처음 인증을 통해 JWT를 발급받으면 이후 요청 헤더에 Authorization: Bearer {JWT}를 포함시켜 보낸다.
JWT 필터는 HTTP 요청을 가로채 요청헤더에서 JWT 토큰을 추출하여
토큰이 유효하면 해당 정보를 바탕으로 Authentication 객체를 생성해 SecurityContextHolder에 저장한다.
사용자의 인증이 완료되었기 때문에 이후 인증 필터는 실행되지 않는다.
사용자 정보 가져오기
프로필 이미지나 이름 같은 사용자 정보를 가져오기 위해선
다음과 같은 절차가 필요하다.
1. 애플리케이션 설정
kakao developers의 애플리케이션 동의 항목에서 필요한 항목들을 설정한다.
2. userService
사용자 정보를 가져오는 서비스 클래스를 구현한다.
  public OAuth2User loadUser(OAuth2UserRequest request) throws OAuth2AuthenticationException {

      OAuth2User oAuth2User = super.loadUser(request);
      String oauthClientName = request.getClientRegistration().getClientName();

      Set<GrantedAuthority> authorities = new HashSet<>();
      authorities.add(new SimpleGrantedAuthority(Role.USER.getDescription()));

      if (oauthClientName.equals("kakao")) {

          String userCode = "kakao_" + oAuth2User.getAttributes().get("id");
          User user = userRepository.findByCode(userCode)
                  .orElseGet(() -> new User(userCode));

          Map<String, Object> attributes = oAuth2User.getAttributes();

          String nickname = Optional.ofNullable(attributes)
                  .map(attrs -> attrs.get("kakao_account"))
                  .filter(kakaoAccount -> kakaoAccount instanceof Map)
                  .map(kakaoAccount -> ((Map<?, ?>) kakaoAccount).get("profile"))
                  .filter(profile -> profile instanceof Map)
                  .map(profile -> ((Map<?, ?>) profile).get("nickname"))
                  .filter(nicknameObj -> nicknameObj instanceof String)
                  .map(nicknameObj -> (String) nicknameObj)
                  .orElse("보드픽");

          String profileImage = Optional.ofNullable(attributes)
                  .map(attrs -> attrs.get("kakao_account"))
                  .filter(kakaoAccount -> kakaoAccount instanceof Map)
                  .map(kakaoAccount -> ((Map<?, ?>) kakaoAccount).get("profile"))
                  .filter(profile -> profile instanceof Map)
                  .map(profile -> ((Map<?, ?>) profile).get("profile_image_url"))
                  .filter(profileImageUrl -> profileImageUrl instanceof String)
                  .map(profileImageUrl -> (String) profileImageUrl)
                  .orElse("http://t1.kakaocdn.net/account_images/default_profile.jpeg.twg.thumb.R640x640");

          user.setNickname(nickname);
          user.setProfileImage(profileImage);
          userRepository.save(user);

          return new CustomOAuth2User(userCode, authorities);
      }

      return null;
  }
위 코드에선 유저 정보를 가져와 attributes를 파싱해 사용자의 nickname과 profileImage를 가져왔다.
더 깔끔한 방법이 있을 것 같은데 내가 찾아봤을 땐 저렇게 일일이 파싱하는 방법밖에 찾지 못했다.
또 카카오의 정책이 변경되어 유저의 이메일을 가져오는건
사업자 등록 후 비즈니스 앱 인증을 받아야 가능했다.
Error 발생::authorization_request_not_found
잘 작동하던 OAuth2 로그인이 로드밸런서를 통해 HTTPS를 적용하고 난 뒤
authorization_request_not_found 에러가 발생하며 동작하지 않는 문제가 발생했다.
찾아보니 HttpSessionOAuth2AuthorizationRequestRepository가 세션을 사용하여 OAuth2 요청 정보를 저장하는데,
로드 밸런서가 여러 서버로 요청을 분산하면서 세션 정보가 공유되지 않아 발생한 문제였다.
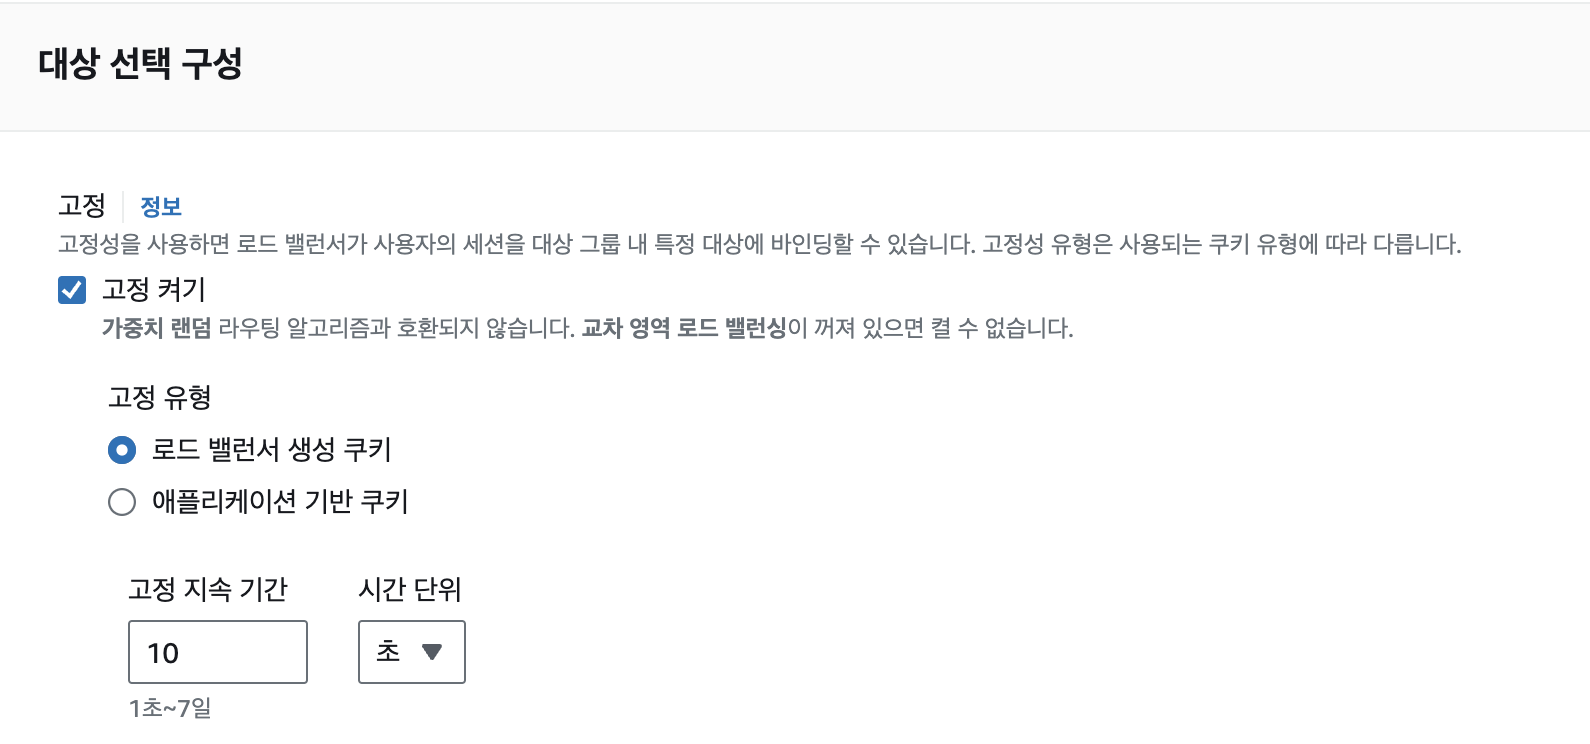
이를 해결하기 위해 AWS에서 로드 밸런서 설정을 통해 세션을 고정화 하였다.
이렇게 하면 동일한 사용자의 요청이 항상 동일한 서버로 전달되어
세션 정보가 일관되게 유지될 수 있다.
로드밸런서 > 대상그룹 > 속성 편집 > 고정 켜기
여기까지가 대략적인 카카오 로그인 구현 과정이었다.
필요한 모든 코드를 다 옮겨 적진 않았기에
나머지 부분은 여러분들이 직접 찾아보며 구현해보길 바란다.
나는 생각보다 어려웠어서 거의 일주일동안 했던 거 같다.
