🤔 라이브러리를 사용하면서 하고 싶었던 것
- 레코딩이 가능한 패키지 컴포넌트의 디자인과 기능을 커스터마이징 하고 싶다
- npm을 통해 패키지를 다운하고 README.md 에있는 사용방법을 따라 적었는데 마음대로 작동하지 않았다. 원인을 알고 제대로 동작시키고 싶었다.
사용한 라이브러리는 vue-audio-recorder 라는 레코딩과 플레이어가 결합한 라이브러리이다.
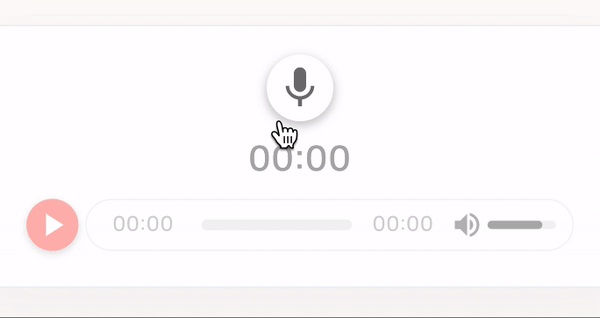
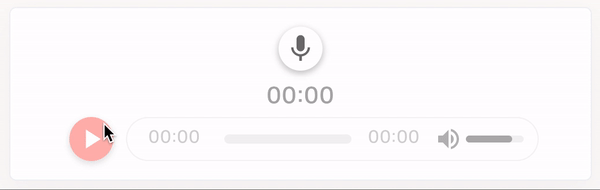
🧚 todo - 이렇게 생긴 컴포넌트를
플레이어 컴포넌트를 분리해서 재탕하고 (
html audio tag는 브라우저 차이 때문에 디자인을 커스터마이징 하는 것은 매우 헬게이트...)
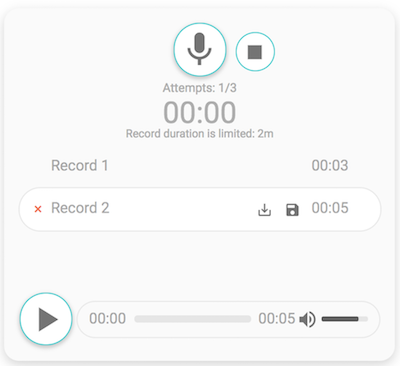
레코드 컴포넌트는
이런 모양으로 만들고 싶었고, 녹음을 여러번 하고 파일을 삭제하는 것이 아니라 마지막으로 녹음된 파일로 덮어 씌우게 기능을 바꿔야 했다.
또, 좀 더 나은 사용자 경험을 위해 녹음이 한번도 진행되지 않았거나 녹음 파일이 업데이트 되어 플레이 할 수 있게 되기 전에는 플레이 부분의 opacity를 죽여 disabled화 시키게끔 만들어 보았다.
또 일시정지 버튼을 없애고 중지버튼과 녹음 시작버튼을 하나로 합치고 싶었다.
🧚 작업 시작
순탄하게 되기를 바랬지만 포스팅 하는 이유는 마음대로 되지 않아 꽤 오랜시간을 삽질했다는... 뜻이죠..
일단 Usage에 있는대로 따라해보았습니다.
// npm i vue-audio-recorder --save
$ yarn add vue-audio-recorder
📃 .vue
<template>
  ...
  <audio-player src="/demo/example.mp3"/>
  <audio-recorder ref="recorder" :after-recording="setRecorded" :before-recording="startRecord" />
</template>
import AudioRecorder from 'vue-audio-recorder'
Vue.use(AudioRecorder)
export default {
...
components: {
AudioRecorder,
AudioPlayer,
},
...
methods:{
startRecord() {
console.log('start recording')
},
setRecorded() {
console.log('finish recording')
},
...
}
}두둥..! 👀 서버를 돌렸더니
❗️흰화면이 뜨고 (렌더링 중지) 에러는 안뿜어주는.. 그런상황.. Vue를 알 수없다고 알려주었으면 고생 안했을텐데.. 😂ㅜㅜㅜ
❌ part1 이슈 해결
일단 이 현상은
Vue.use(AudioRecorder)코드 때문이었다. 코드를 지웠더니 렌더링은 되었지만
Uncaught (in promise) TypeError: Cannot read property 'loading' of undefined
라는 에러가 나온다.
index.js의 아래부분에서 에러가 난 것을 보니
// Start the loading bar.
  if (components[components.length - 1].loading !== false) {
    router.app.$nextTick(() => router.app.$loading.start());
  }
컴포넌트가 임포트가 잘 안된것 같아 일단 콘솔에 찍어 보았다.
import AudioRecorder from 'vue-audio-recorder';
console.log(AudioRecorder);
{AudioPlayer: {…}, AudioRecorder: {…}, install: ƒ}🤔 보통 이러한 형태로 import한 컴포넌트를 찍어보면 객체에 mounted 등의 훅이 보여야 하는데.. (👇 아래와 같이 )
// ex
{props: {…}, computed: {…}, data: ƒ, mounted: ƒ, beforeDestroy: ƒ, …}
보이지 않는 것을 보니 export 하는 부분을 살펴 보아야겠다.
👀 package 안의 index 파일
export default components

export { AudioPlayer, AudioRecorder }
이렇게 되어있는 부분을 보고 코드를 수정해 보았다.
📃 .vue
//before
import AudioRecorder from 'vue-audio-recorder'

//after
import { AudioPlayer, AudioRecorder } from 'vue-audio-recorder';
👀 오 이제 뜨긴 뜨고 기능도 어느 정도 돌아가긴 하는데
[Vue warn]: Error in mounted hook: "TypeError: Cannot read property '$on' of undefined"
이런 에러가 7개가 뜬다..😂
🤔 $on이면 이벤트 버스에 관한 것같은데.. 일단 목표는 패키지 코드를 건드리지 않고 이슈를 해결하는 것이기 때문에 github 이슈에 질문을 올렸다.
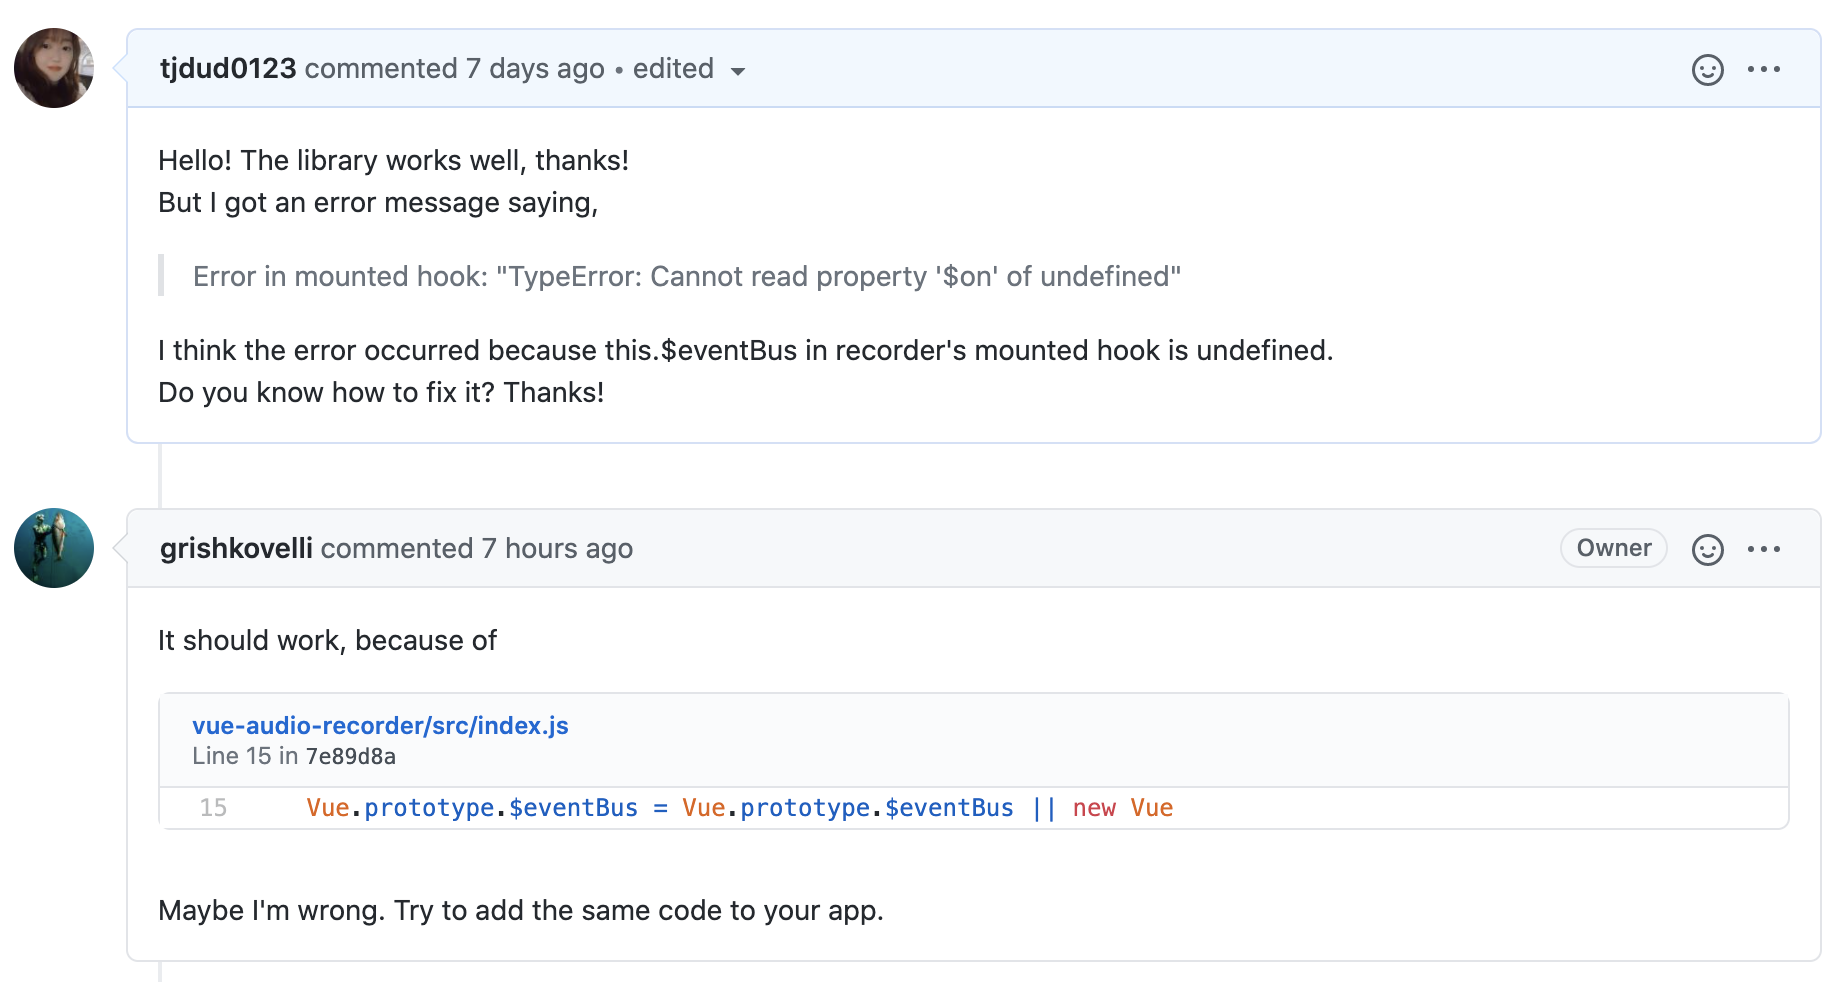
답변이 와서 살펴보던 중
지워 버렸던 Vue.use(AudioRecorder) 때문인 것 같았다
🤔 Vue가 vm으로 바뀐건가 별 생각을 다하다가 vs code 프로젝트 검색창에 Vue를 검색해보았는데
오...
import Vue from 'vue';
이런게 나오네... 추가해 줍시다.
📃 .vue
import Vue from 'vue';
import { AudioPlayer, AudioRecorder } from 'vue-audio-recorder';
Vue.use(AudioRecorder)

  ...
}
🤔 근데도 안 되어서 디스트럭쳐로 컴포넌트를 분리하기전에 AudioRecorder 자체를 사용해야한다고 생각했다.
그렇다면 컴포넌트를 정의하는 부분을 바꿔보자
📃 .vue
import Vue from 'vue';
// 다시 원상복구
import AudioPlayer from 'vue-audio-recorder';
Vue.use(AudioRecorder)
  ...
export default {
  ...
/* before
  components: {
    AudioRecorder,
    AudioPlayer,
  }, */

// after
  components: {
    AudioRecorder:AudioRecorder.AudioRecorder,
    AudioPlayer:AudioRecorder.AudioPlayer,
  },
  ...

}
🧚 이렇게 이슈 해결 완료 !! 👍
+ 에필로그

👀 이슈에 답글로 사용법 업데이트 해달라고 했는데 내가 생각하지 못한 부분이나 더 나은 방법이 있는 것인지 궁금하다
답장을 기다려봐야지
👩🎨 part2 컴포넌트 디자인 변경
일단 자식 컴포넌트 안에 있는 element에 class를 먹여 css를 조작하는 것은 패키지 파일을 직접 복붙해서 쓰는 경우 아니고는 힘들다고 생각한다. 이럴 때 v::deep 셀렉터를 사용하여 패키지를 import한 자식 컴포넌트의 css를 조작해보자
👀 deep selector
렌더링된 화면에서 개발자 도구를 보고 element들을 살펴본 뒤
css를 입혀주자
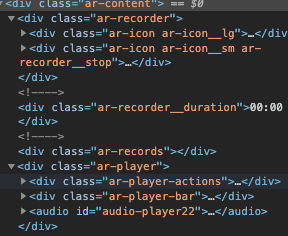
📃 .scss
/* Player, Recorder 관련 css 조정 */

::v-deep .ar-player__play {
  fill: white !important;
  background-color: #171003 !important;

  &.ar-player__play--active {
    background-color: #171003 !important;
  }
}

::v-deep .ar-player__play {
  fill: white !important;
  background-color: #ff6b64 !important;
  cursor: inherit;

  &.ar-player__play--active {
    background-color: #ff6b64 !important;
  }
}

::v-deep .ar-icon {
  border: none;
  box-shadow: 0 2px 5px 1px rgba(158, 158, 158, 0.5);
}

::v-deep .ar-icon__lg {
  width: 38px;
  height: 38px;
}

::v-deep svg {
  vertical-align: baseline;
}

::v-deep div.ar {
  margin: auto;
  width: 100%;
  max-width: 510px;
  box-shadow: 0 0.75rem 1.5rem rgba(18, 38, 63, 0.03);
  background-color: #fff;
  border: 1px solid #eff2f7;
  border-radius: 0.375rem;
}

::v-deep .ar-player {
  width: 100%;
}

/* disalbed 처리 */
::v-deep .ar-player {
  opacity: 0.5;
  cursor: default;
  &.abled {
    opacity: 1;
    cursor: pointer;
  }
}

::v-deep .ar-player__time {
  width: 3.2rem;
  margin: 0 0.4rem;
}

::v-deep .ar-records {
  display: none;
}

::v-deep .ar-records__record {
  min-width: 250px;
}

::v-deep .ar-recorder__duration {
  font-size: 1.3rem;
  margin: 0.3rem 0 0 0;
}

::v-deep .ar-player-actions {
  width: 50px;
  justify-content: center;
}

::v-deep .ar-player > .ar-player-bar > .ar-player__progress {
  max-width: 110px;
}

/* 중지 버튼 레코딩 버튼과 겹치기 */

::v-deep .ar-recorder__stop {
  fill: white !important;
  background-color: #ff6b64 !important;
  top: 0;
  right: 0;
  width: 38px;
  height: 38px;
  display: none;
}👩🔧 part3 컴포넌트 기능 변경
이제 위에서 만든 모양에 기능을 입혀보자
- 레코드 상태에 따라 버튼을 switch
- 플레이어에 담기는 녹음파일을 자동으로 셋팅해주고 최근 녹음본으로 덮어씌우는 기능
( 원본은 여러개의 파일을 녹음하고 선택한 후 재생 👀 원본 데모 )
내가 원하는 것에 대한 기능이나 설명이 README에 나와있지 않다면 직접 컴포넌트의 구조를 보고 추측해보면 된다.
devtools를 통해 property를 조회해 보았다. (아니면 console로 찍어봐도 된다)
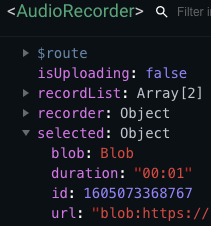
🤔 현재 플레이어에 담기는 녹음파일은 selected에 담기고, 녹음된 파일들은 recordList에 차례로 담기는 것 같다. 이를 이용해보자
📃 .vue
...
export default {
  	...
    methods:{
      setPlayerDisabled() {
        const $player = this.$refs.recorder.$el.querySelector('.ar-player');
        $player.classList.remove('abled');
      },
      setPlayerAbled() {
        const $player = this.$refs.recorder.$el.querySelector('.ar-player');
        $player.classList.add('abled');
      },
      hideStopBtn() {
        const $stopBtn = this.$refs.recorder.$el.querySelector('.ar-recorder__stop');
        $stopBtn.style.display = 'none';
      },
      showStopBtn() {
        const $stopBtn = this.$refs.recorder.$el.querySelector('.ar-recorder__stop');
        $stopBtn.style.display = 'block';
      },
      setRecentRecord() {
      const recorder = this.$refs.recorder;
      if (recorder) {
        const top = recorder.recordList.length - 1;
        recorder.selected = recorder.recordList[top];
      }
    },

      // 녹음 끝 <audio-recorder ... :after-recording="setRecorded" ... />
	setRecorded() {
       	// 중지 버튼 hide
        this.hideStopBtn();

        // 녹음본 저장 및 교체
        this.setPlayerDisabled();
        setTimeout(() => {
          // 마지막 List요소를 selected 오브젝트로 설정해 준다.
            this.setRecentRecord();
            this.setPlayerAbled();
          }, 800);
        },

      // 녹음 시작 <audio-recorder ... :before-recording="startRecord" ... />
        startRecord() {
          // 중지 버튼 show
          this.showStopBtn();
    }
}
  ...
❗️selected를 설정해 줄때 setTimeout을 사용하는 이유는 녹음이 끝나고 나서 저장될 때까지 시간차를 두어야 하기 때문이다.