📌 Semantic Segmentation
🔅 segmentation: image를 여러 영역으로 나누는 것. 일반적으로 object의 boundary를 경계로 해 영역을 나눔
1. Pixel classification: following the object (e.g., road, car, pedestrian, building, etc.)
🔅 image는 pixel로 이루어져있으므로 해당 pixel이 어느 영역에 속하는가를 의미, 즉 pixel classification은 pixel이 속해있는 object(ex. 길, 차, 행인, 건물 등)를 따라감
🔅 아래 그림은 image(왼쪽)에 semantic segmentation 진행한 것(오른쪽)
1) different objects of the same class are not distinguished
🔅 동일한 object일 경우 구별하지 않음 => semantic segmentation (<-> instance segmentation: 동일한 object여도 하나하나 다른 segment로 구분)
ex. 자동차가 여러 개지만 하나의 segmentation으로 표현
2) Difficulty: regular CNN => gradually lose spatial resolution (S>1: downsampling);
🔅 regular CNN을 진행하면서 점점 잃는 공간이 생기며 stride가 1보다 큰 경우 downsampling이 발생
🔸 Prediction: there's a person somewhere in the bottom left
🔸 No more precise than that
🔅 사람이 왼쪽 아래에 존재하는 것까지만 예측할 수 있고 더 정확히 예측할 수 없음

2. Simple approach (2015)
🔅 정확한 pixel의 위치를 알아야 정확한 semantic segmentation 진행 가능
1) taking a pretrained CNN and turning it into an FCN
🔅 미리 학습된 CNN을 FCN으로 바꿈
2) The CNN with an overall stride of 32 => outputs feature map with 32 times smaller => clearly too coarse
🔅 CNN의 전반적인 stride가 32일 경우 output feature map의 가로와 세로는 input feature map의 가로와 세로의 1/32배가 됨(pixel은 만큼 작아짐) => 이는 output pixel 하나가 input image의 32x32 정사각형 모양의 pixel을 모두 대표하게 되므로 정확하게 segmentation할 수 없음
3) add a single upsampling layer by 32: transposed convolutional layer
🔅 32배로 upsampling 진행하는 layer 추가: transposed convolutional layer
🔸 (방식1)first stretching the image by inserting empty rows and columns (full of zeros) => regular convolution
🔅 image의 pixel 간격을 늘린 후 빈 공간(pixel)을 0으로 채워주고 이를 이용해 regular convolution 진행
🔅 아래 그림은 stride=2로 transposed convolution 진행한 것: 2x3으로 5x7을 만들 수 있음. 단 이때의 stride는 기존의 pixel을 얼마나 멀리 떨어트릴것인지에 대한 값으로, regular convolution에서 사용했던 stride와 다름
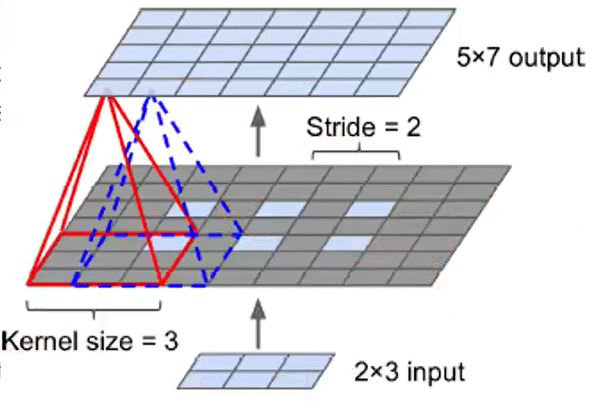
🔸 (방식2)Or regular convolutional layer that uses fractional strides (e.g., 1/2)
🔸 TF: tf.keras.Conv2DTranspose layer
🔸 stride defines how much the input will be stretched (not the size of the filter steps) => the larger the stride, the larger the output
🔅 위에서 진행한 stride는 기존의 stride와 다름. 기존의 pixel을 얼마나 멀리 떨어트릴것인지에 대한 값
4) Maybe ok, but too imprecise
🔅 정확도가 낮음
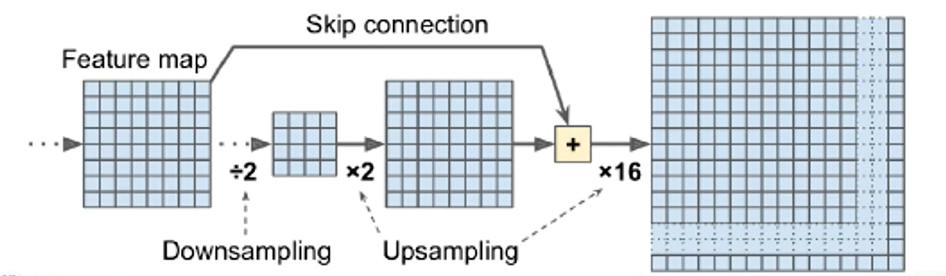
3. Better solution: add skip connections from lower layers
🔅 skip connection을 추가해 lower layer의 정보 활용
1) Ex. upsample the output image by a factor of 2 (instead of 32);
🔅 Ex. image를 32배 upsampling. But 한 번에 하는 것이 아님
1. 아래 그림은 stride=2를 하여 입력 feature map(8x8)을 downsampling => 4x4 feature map
2. 이후 2배로 upsampling 진행 => 8x8
3. 값의 정확도가 떨어지므로 downsampling 전의 feature map을 skip connection하여 가져와 더함 => 잃어버린 정보 어느정도 복원
4. 이후 16배 단순 upsampling 진행 (skip connection을 가져온 것이 아니라 크기만 증가)
5. 결과적으로 2배 upsampling 후 16배 upsampling 했으므로 총 32배 upsampling 진행
🔸 add the output of a lower layer with the same resolution
🔸 upsample the result by a factor of 16
🔸 total upsampling factor of 32
2) Recovers some of the spatial resolution
🔅 위와 같은 방식으로 진행할 경우 spatial resolution 복원(해결) 가능
3) Super-resolution: a second similar skip connection to recover even finer details
🔅 detail 정보를 더 살리기 위해 skip connection 더 추가 => super-resolution
🔸 Upscale x2, add the output of a lower layer (of the appropriate scale)
🔸 Upscale x2 again, add the output of an even lower layer
🔸 and finally upscale x8
🔅 skip connection한 8x8 feature map에서 위에서 진행한 순서와 동일하게 2배 upsampling한 후 그림의 feature map 이전에 존재한 16x16 feature map의 정보를 가져와(skip connection) 더하고, 이를 반복하면 그림에서 skip connection 한 번 한 후 단순 upscaling한 것보다 더 정확한 pixel 정보를 얻을 수 있음