LinearLayout
Linear layout 을 이용하면 view 계층 구조를 이용해서 화면을 구성할 수 있다. 이러한 방법을 컴포지트 패턴 또는 문서 객체 모델이라고 부른다. 이런 화면 구성 방법은 웹 레이아웃에서 흔한 방법이다.
layout_weight(여백처리)
<?xml version="1.0" encoding="utf-8"?>
<LinearLayout xmlns:android="http://schemas.android.com/apk/res/android"
    xmlns:app="http://schemas.android.com/apk/res-auto"
    xmlns:tools="http://schemas.android.com/tools"
    android:layout_width="match_parent"
    android:layout_height="match_parent"
    tools:context=".MainActivity">

    <Button
        android:layout_width="wrap_content"
        android:layout_height="wrap_content"
        android:layout_weight="1"
        android:text="Button1"/>

    <Button
        android:layout_width="wrap_content"
        android:layout_height="wrap_content"
        android:layout_weight="2"
        android:text="Button2"/>
</LinearLayout>
layout 에서 중점적으로 살펴볼 사항은android:layout_weight 이다. 이 속성은 주어진 라인(이 경우 horizontal 로 정렬된 LinearLayout) 에서 화면을 차지하는 비율을 나타낸다. Button1 이 1, Butoon2 가 2를 부여 받았으므로, 별다른 마진을 부여받지 않은 상태에서는 해당 라인의 1/3 을 Button1 이, 2/3을 Button2 가 차지하며 여백을 모두 채운다.
gravity, layout_gravity(View 정렬)
gravity 속성은 해당 view가 가지고 있는 content 를, layout_gravity 는 해당 view 자체를 정렬한다.
<?xml version="1.0" encoding="utf-8"?>
<LinearLayout xmlns:android="http://schemas.android.com/apk/res/android"
    xmlns:app="http://schemas.android.com/apk/res-auto"
    xmlns:tools="http://schemas.android.com/tools"
    android:layout_width="match_parent"
    android:layout_height="match_parent"
    android:orientation="horizontal"
    tools:context=".MainActivity">

    <Button
        android:layout_width="150dp"
        android:layout_height="150dp"
        android:text="Hello"
        android:textColor="@color/white" />
</LinearLayout>
이렇게 만들어진 button 은 기본적으로 왼쪽 위로 정렬된다.

여기에 gravity, layout_gravity 속성을 추가해보면
    <Button
        android:layout_width="150dp"
        android:layout_height="150dp"
        android:text="Hello"
        android:textColor="@color/white"
        android:gravity="right|bottom"
        android:layout_gravity="center_vertical" />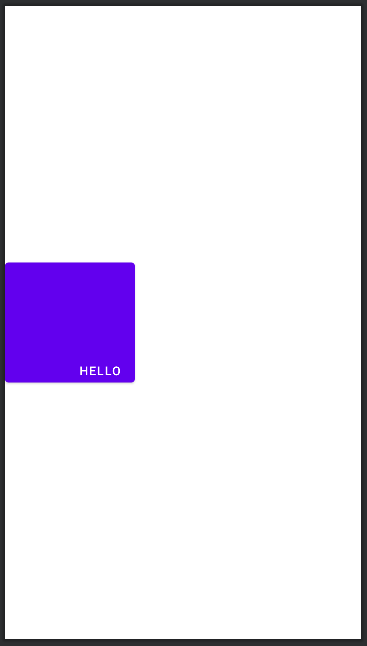
주어진 조건대로 view 와 content 가 변하는 것을 알 수 있다.
만약 주어진 button 을 화면의 가운데로 정렬하고 싶다면 어떻게 해야할까? button 의 layout_gravity=center 를 해야할것 같지만, 이는 적용되지 않는다. LinearLayout 의 콘텐츠가 button 이기 때문에 gravity=center 속성을 줘야한다.
자세한 하위 속성은 문서(layout_gravity), 문서(gravity)를 참고하자.
RelativeLayout
RelativeLayout 은 그 이름에서도 알 수 있듯이, 상대 view 의 위치를 기준으로 정렬하는 레이아웃 클래스이다.
<?xml version="1.0" encoding="utf-8"?>
<RelativeLayout
    android:id="@+id/relative_container"
    xmlns:android="http://schemas.android.com/apk/res/android"
    xmlns:app="http://schemas.android.com/apk/res-auto"
    xmlns:tools="http://schemas.android.com/tools"
    android:layout_width="match_parent"
    android:layout_height="match_parent"
    tools:context=".MainActivity">

    <ImageView
        android:id="@+id/image"
        android:layout_width="300dp"
        android:layout_height="300dp"
        android:src="@drawable/ic_launcher_background"
        tools:srcCompat="@tools:sample/avatars" />

    <Button
        android:id="@+id/button"
        android:layout_width="150dp"
        android:layout_height="150dp"
        android:text="Hello2"
        android:textColor="@color/white" />
</RelativeLayout>
LinearLayout 은 View 들이 모두 정렬된 상태로 나온것과 달리 RelativeLayout 은 View 가 모두 왼쪽 위에 겹쳐서 생성된다. 이러한 view 들을 배치하기 위해서
- android:layout_above : 기준 뷰의 위쪽에 배치
- android:layout_below : 기준 뷰의 아래쪽에 배치
- android:layout_toLeftOf : 기준 뷰의 왼쪽에 배치
- android:layout_toRightOf : 기준 뷰의 오른쪽에 배치
이 속성들이 사용된다.
button 에 layout_toRightOf 속성을 추가함으로써 위치를 변경할 수 있다.
    <Button
        android:id="@+id/button"
        android:layout_width="150dp"
        android:layout_height="150dp"
        android:text="Hello2"
        android:textColor="@color/white"
        android:layout_toRightOf="@id/image"/>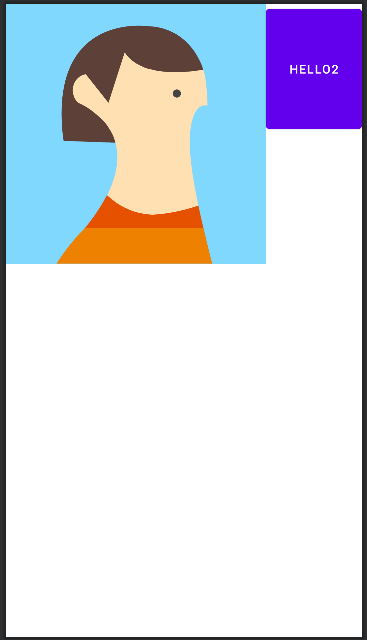
align (맞춤정렬)
버튼이 이미지의 오른쪽에 갔지만, 이미지가 버튼보다 커서 버튼이 이미지의 위쪽에 정렬되었다. 이 정렬 방식을 바꿔주는 속성이 align 이다.
align 속성은 기준 view 가 있는 상태에서, 혹은 parent 를 기준으로 정렬할 수 있다.
- android:layout_alignTop: 기준View 위쪽
- android:layout_alignBottom: 기준View 아래쪽
- android:layout_alignBaseline: 기준 View 의 텍스트 라인
- android:layout_alignStart: 기준 View startline (우리나라는 왼쪽 끝, 위쪽 끝)
- android:layout_alignEnd : 기준 View endline (우리나라는 오른쪽 끝, 아래쪽 끝)
- android:layout_alignLeft : 기준 View 왼쪽 끝
- android:layout_alignRight : 기준 View 오른쪽 끝
이 속성들 중 start ~ right 는 상대적으로 설정된 view 의 위치를 무시하고 적용된다.
parent 관련 정렬은 문서 참조
GridLayout
LinearLayout 처럼 orientation 속성으로 방향을 지정하지만, rowCount, columnCount 로 가로 세로로 나열할 view 의 갯수를 지정하고 이를 넘어가면 자동으로 줄바꿈을 시행하는 layout 이다.
<?xml version="1.0" encoding="utf-8"?>
<GridLayout
    android:id="@+id/relative_container"
    xmlns:android="http://schemas.android.com/apk/res/android"
    xmlns:app="http://schemas.android.com/apk/res-auto"
    xmlns:tools="http://schemas.android.com/tools"
    android:layout_width="match_parent"
    android:layout_height="match_parent"
    android:orientation="horizontal"
    android:rowCount="3"
    android:columnCount="3"
    tools:context=".MainActivity">

    <Button android:text="A"/>
    <Button android:text="B"/>
    <Button android:text="C"/>
    <Button android:text="D"/>
    <Button android:text="E"/>
</GridLayout>
GridLayout 에 추가된 View는 그 크기가 자동으로 wrap_content 로 설정되므로 따로 설정하지 않아도 오류가 발생하지 않는다.
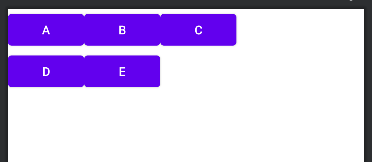
grid 를 3x3 으로 설정했으므로 4번째 버튼부터는 아랫줄에 표시된다.
grid 내부에서 위치 조정하기
layout_row , layout_column 속성을 이용해서 특정 인덱스에 view 를 위치시킬 수 있다. 일반적인 프로그래밍이 그렇듯, 인덱스는 0부터 시작한다.
    <Button android:text="A"/>
    <Button android:text="B"/>
    <Button android:text="C"/>
    <Button android:text="D"
        android:layout_row="1"
        android:layout_column="1"/>
    <Button android:text="E"/>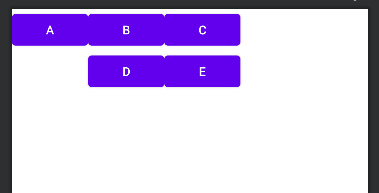
위치 조정 결과 2행 2열부터 D 버튼이 나왔고, 그 뒤의 view 가 자연스럽게 따라온다.
하지만 만약 row = 0, column = 0 속성을 주면 A 버튼은 사라지고 그 뒤에 B 버튼이 따라온다. 자신의 원래 위치보다 앞으로 갈 경우는 이전 view 가 표시되지 않는 것 같다.

특정 view 의 크기 조정하기
아래와 같이 버튼을 배치할 경우 E 에서 F로 넘어가는 사이에 여백이 생기게 된다.
    <Button android:text="A"/>
    <Button android:text="Hello World"/>
    <Button android:text="C"/>
    <Button android:text="D"/>
    <Button android:text="E"/>
    <Button android:text="F"/>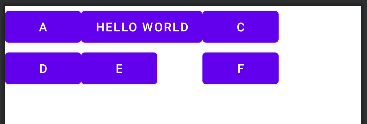
gravity 속성에서 fill_horizontal, fill_vertical 의 속성을 이용해서 grid 를 채우거나,
    <Button android:text="A"/>
    <Button android:text="Hello World"/>
    <Button android:text="C"/>
    <Button android:text="D"/>
    <Button android:text="E"/>
    <Button android:text="F"
        android:layout_row="1"
        android:layout_column="1"
        android:layout_gravity="right"/>
하나의 grid 에 view 를 하나 더 추가하여 채우는 방법도 있다.

열이나 행 병합
layout_columnSpan, layout_rowSpan 속성을 이용하면 하나의 View 가 여러 칸을 차지하게 설정할 수 있다.
    <Button android:text="A"
        android:layout_columnSpan="2"
        android:layout_rowSpan="2"
        android:layout_gravity="fill"/>
    <Button android:text="B"/>
    <Button android:text="C"/>
    <Button android:text="D"/>
    <Button android:text="E"/>
    <Button android:text="F"/>
FrameLayout
FrameLayout 은 RelativeLayout 처럼 view 가 겹처서 생성되지만 view들의 상대적인 위치를 설정할 수 도 없는 레이아웃이다. 여러 view 를 겹처놓고 어떤 순간에 하나의 view 만 출력할 때 사용된다. 따라서 visibility 속성과 함께 사용한다.
탭해서 화면이 바뀌는 것을 구현할때 이용할 수 있다.
Constratinat layout
이 레이아웃은 안드로이드 플랫폼이 아니라 androidx 에서 제공하는 라이브러리이다. 레이아웃 편집기를 이용해서 구성하는게 훨씬 좋다.
