
❓ 연결 리스트란?
- 각 노드가 데이터와 포인터를 가지며, 한 줄로 연결되어 있는 방식으로 데이터를 저장하는 자료 구조
- 연속된 Node의 연결체 (즉, 체인처럼 연결된 데이터 상자)
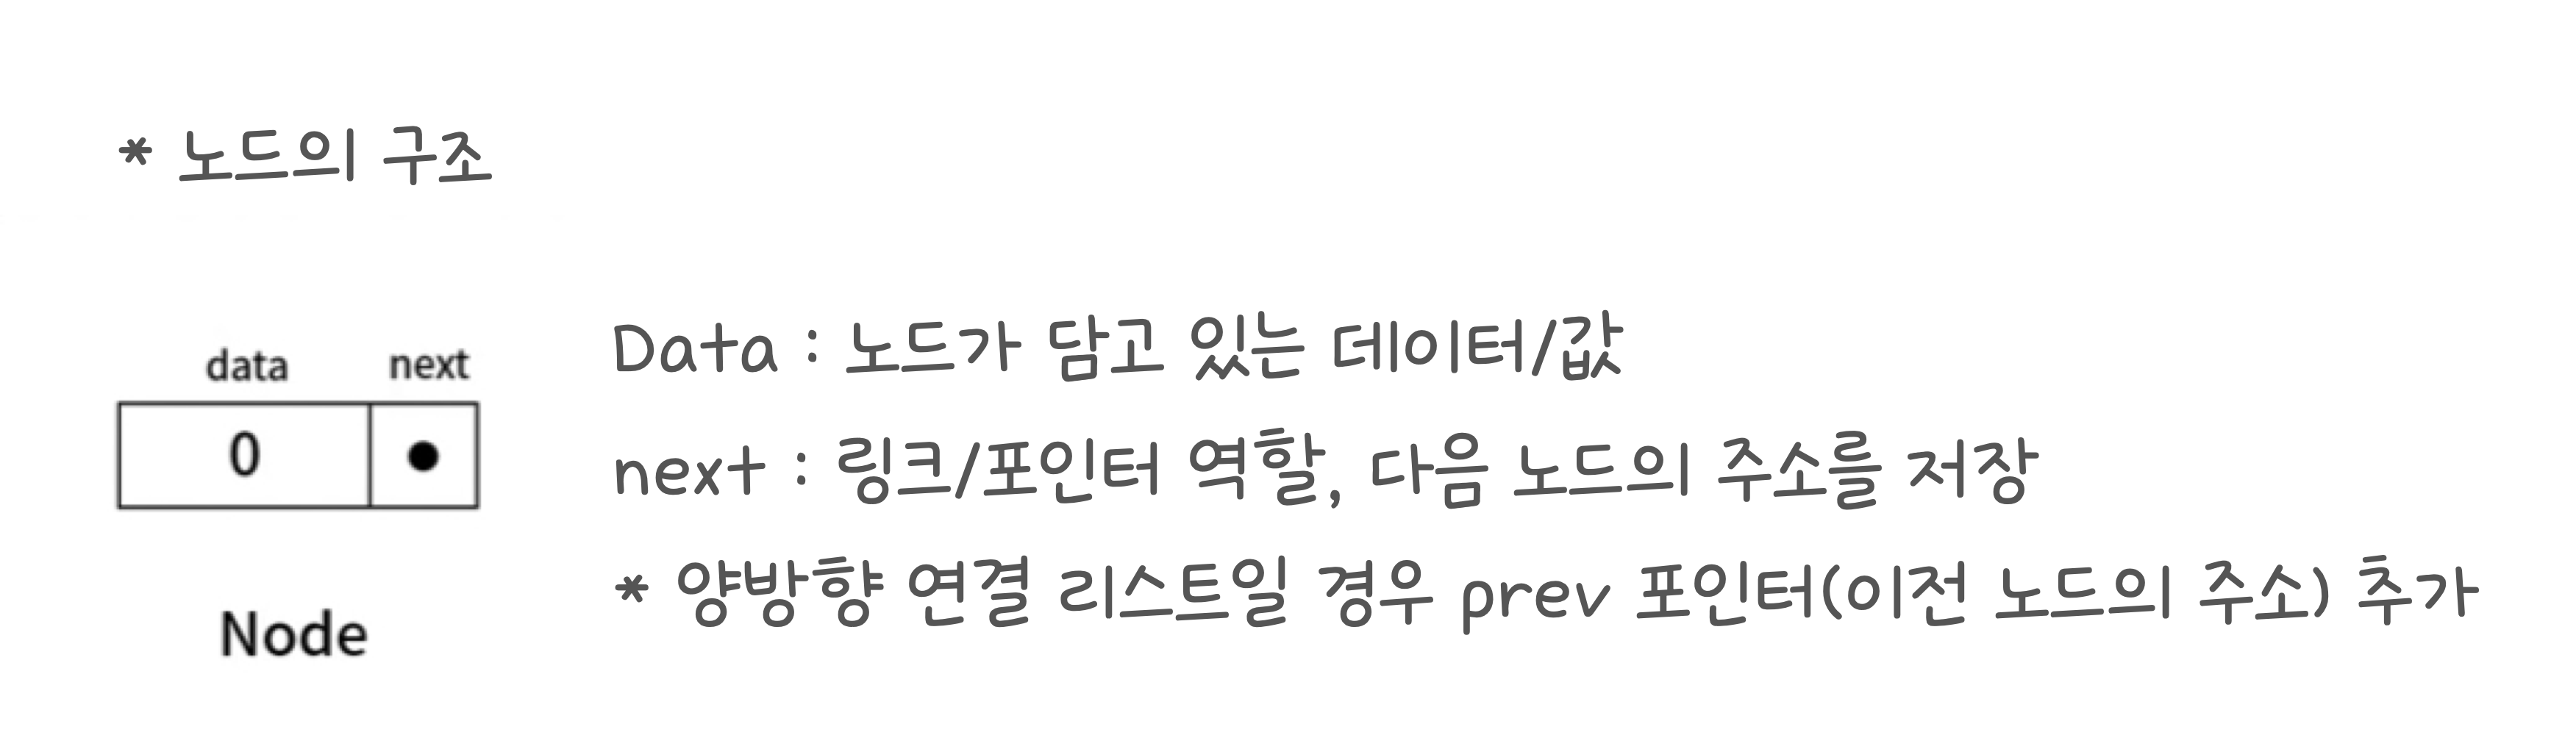
🤔 연결 리스트에서 노드란?
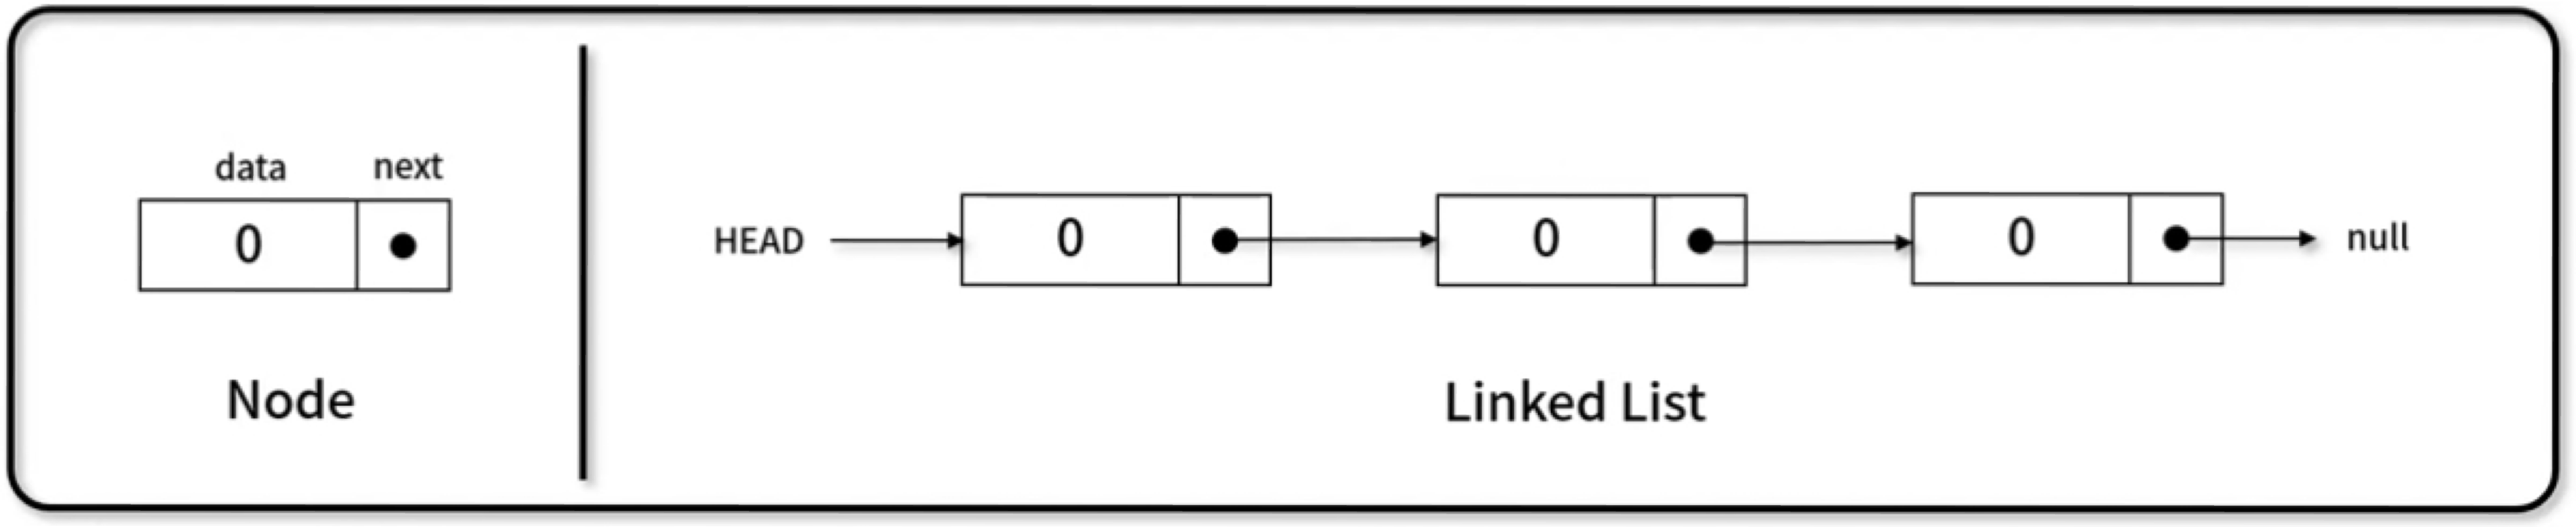
- 연결 리스트에서 사용되는 하나의 데이터 덩어리이며, 데이터 & 링크 2가지의 필드를 담고 있는 구조이다.
✅ 연결 리스트의 구조
- 첫번째 node next에 다음 node 주소를 지정해 주고, 두번째 node next에 다음 node 주소를 지정해 준다.
- 마지막 node는 존재하지 않기 때문에 Null로 처리한다.
- 시작 지점의 node는 head라고 부르고 마지막 node는 tail(꼬리)라고 부름
✅ 배열과 연결리스트의 특징 비교
배열- random access가 가능하다. 즉, 바로 접근이 가능하다. (ex: arr[1])
- 원소 삽입 및 삭제가 일반적으로 시간이 소요된다.
연결 리스트- random access가 불가능 하다. 만약, n번째 노드에 접근하려면 head노드부터 n번째까지 순회해야하기 때문이다.(시간이 걸림)
- 상황에 따라 노드 삽입 및 삭제가 배열보다 빠르게 처리할 수 있다.
✅ 연결 리스트의 종류
단일 연결 리스트(singly Linked List)- 위 노드의 구조 예제와 동일하게 하나의 포인터를 가지고 있는 연결 리스트(한쪽 방향으로만 흐름)
이중 연결 리스트(Doubly Linked List)- 다음으로 넘어갈 수 있는 포인터만 가지고 있을 뿐만이 아니라, 이전으로 갈 수 있는 포인터도 가지고 있다. (즉, next와 prev)
- 앞뒤로 탐색하는게 빠르다는 장점이 있지만, 노드 별로 2개의 포인터를 관리해야 하기 때문에 데이터의 구조와 흐름이 복잡해 질 수 있다.
원형 연결 리스트(Circular Linked List)- 마지막 tail 노드가 head 노드로 연결 되어 있음 (순환 구조라고 생각하면 쉬움)
✅ 연결 리스트 구현 메서드
1️⃣ 연결 리스트 만들기

2️⃣ LinkedList(): head와 length를 가지고 있는 객체 만들기
function LinkedList() {
  this.head = null;
  this.length = 0;
}
3️⃣ size(): 연결 리스트 내 노드 개수 확인 하기
LinkedList.prototype.size = function () {
  return this.length;
};
4️⃣ isEmpty(): 객체 내 노드 존재 여부 파악 하기
LinkedList.prototype.isEmpty = function () {
  return this.length === 0;
};
5️⃣ printNode(): 노드 출력 하기
LinkedList.prototype.printNode = function () {
  for (let node = this.head; node != null; node = node.next) {
    process.stdout.write(`${node.data} -> `);
  }
  console.log("null");
};
6️⃣ append(): 연결 리스트 가장 끝에 노드 추가 하기
LinkedList.prototype.append = function (value) {
  let node = new Node(value),
    current = this.head;

  if (this.head === null) {
    this.head = node;
  } else {
    while (current.next != null) {
      current = current.next;
    }
    current.next = node;
  }

  this.length++;
};
7️⃣ insert(): position 위치에 노드 추가 하기
LinkedList.prototype.insert = function (value, position = 0) {
  if (position < 0 || position > this.length) {
    return false;
  }

  let node = new Node(value),
    current = this.head,
    index = 0,
    prev;

  if (position === 0) {
    node.next = current;
    this.head = node;
  } else {
    while (index++ < position) {
      prev = current;
      current = current.next;
    }

    node.next = current;
    prev.next = node;
  }

  this.length++;

  return true;
};
8️⃣ remove(): value 데이터를 찾아 노드 삭제 하기
LinkedList.prototype.remove = function (value) {
  let current = this.head,
    prev = current;

  while (current.data != value && current.next != null) {
    prev = current;
    current = current.next;
  }

  if (current.data != value) {
    return null;
  }

  if (current === this.head) {
    this.head = current.next;
  } else {
    prev.next = current.next;
  }

  this.length--;

  return current.data;
};
9️⃣ removeAt(): position 위치 노드 삭제 하기
LinkedList.prototype.removeAt = function (position = 0) {
  if (position < 0 || position >= this.length) {
    return null;
  }

  let current = this.head,
    index = 0,
    prev;

  if (position === 0) {
    this.head = current.next;
  } else {
    while (index++ < position) {
      prev = current;
      current = current.next;
    }

    prev.next = current.next;
  }

  this.length--;

  return current.data;
};
1️⃣0️⃣ indexOf(): value 값을 갖는 노드 위치 반환 하기
// indexOf(): value 값을 갖는 노드 위치 반환
LinkedList.prototype.indexOf = function (value) {
  let current = this.head,
    index = 0;

  while (current != null) {
    if (current.data === value) {
      return index;
    }

    index++;
    current = current.next;
  }

  return -1;
};
1️⃣1️⃣ remove2(): indexOf + remoteAt = remove
LinkedList.prototype.remove2 = function (value) {
  let index = this.indexOf(value);
  return this.removeAt(index);
};
#UXUI #코린이