
React-Query V4로 업데이트 하기
npm install @tanstack/react-query리액트쿼리가 버전 업그레이드 되면서 @tanstack/react-query로 이름이 바뀌었다.
지금까지 사용하면서 느낀 기존 버전과 차이점은 devtools를 사용하려면 @tanstack/react-query-devtools 를 따로 설치해야 한다는 점과 QueryKey를 배열로 사용해야 한다는 정도이다.
devtools를 사용하기 위해 해당 라이브러리를 설치하자
npm install @tanstack/react-query-devtools리액트 18 이전버전은 적용이 안되는 듯 하다...
적용법은 기존과 동일하므로 스킵!
Pagination
지난번에 useQuery훅을 이용해서 comment를 불러온 것에 이어서 post의 pagination을 구현해보자
src/Posts.tsx
import { useState } from "react";
import { useQuery } from "@tanstack/react-query";

import { PostDetail } from "./PostDetail";
export interface IPost {
  userId: number;
  id: number;
  title: string;
  body: string;
}
const maxPostPage = 10; // 최대 페이지 수 10으로 설정

// pageNum을 인자로 받아서 해당 페이지의 포스트를 fetch함
async function fetchPosts(pageNum: number) {
  const response = await fetch(
    `https://jsonplaceholder.typicode.com/posts?_limit=10&_page=${pageNum}`
  );
  return response.json();
}

function Posts() {
  const [currentPage, setCurrentPage] = useState(0); // 현재페이지를 0으로 초기설정
  const [selectedPost, setSelectedPost] = useState<IPost | null>(null);

  // replace with useQuery
  const { data, isLoading, isError } = useQuery<IPost[]>(
    ["posts", currentPage], // 쿼리키를 페이지마다 지정
    () => fetchPosts(currentPage),
    {
      staleTime: 2000, // staleTime을 2초로 설정하여 fetch된 데이터는 2초간 fresh 상태
    }
  );

  if (isError) return <h3>ERROR!</h3>;
  if (isLoading) return <h3>Loading...</h3>;
  return (
    <>
      <ul>
        {data?.map((post) => (
          <li
            key={post.id}
            className="post-title"
            onClick={() => setSelectedPost(post)}
          >
            {post.title}
          </li>
        ))}
      </ul>
      <div className="pages">
        <button
          disabled={currentPage <= 0} // 현재페이지가 0 이하면 previous 버튼 비활성화
          onClick={() => setCurrentPage((prev) => prev - 1)}
        >
          Previous page
        </button>
        <span>Page {currentPage + 1}</span>
        <button
          disabled={currentPage >= maxPostPage - 1} // 현재페이지가 9 이상이면 next 버튼 비활성화
          onClick={() => setCurrentPage((prev) => prev + 1)}
        >
          Next page
        </button>
      </div>
      <hr />
      {selectedPost && <PostDetail post={selectedPost} />}
    </>
  );
}

export default Posts;
Next Page버튼과 Previous Page버튼을 누르면 currentPage값이 변한다.
useQuery 훅에 의해서 fetchPosts 함수가 실행되고, 각 페이지마다 쿼리키로 데이터가 캐시에 저장된다.
하지만 문제는 다음페이지 또는 이전페이지로 이동할 때 마다 캐시에 데이터가 없으면 로딩이 발생한다.
이를 해결하기 위해 prefetching을 사용하여 데이터를 미리 fetching 하면 된다.
useQueryClient와 prefetcing
앞서 말한 prefetching을 하기 위해서 useQueryClient훅을 사용해야 한다
useQueryClient는 우리가 index.tsx에서 QueryClientProvider에 등록한 queryClient에 접근할 수 있도록 해주는 훅이다
const queryClient = useQueryClient();데이터 prefetching을 언제할 것이냐면 현재페이지 상태가 변경될 때 다음페이지를 prefetching할 것이다
useEffect 훅을 사용해서 currentPage가 변경될 때 queryClient의 prefetchQuery 메소드를 사용하여 다음페이지의 post들을 미리 캐시에 저장할 것이다
useEffect(() => {
    if (currentPage <= maxPostPage - 2) { // 마지막 페이지가 10이므로 9페이지까지만 다음페이지 데이터를 받음
      const nextPage = currentPage + 1;
      queryClient.prefetchQuery(["posts", nextPage], () =>
        fetchPosts(nextPage)
      );
    }
  }, [currentPage, queryClient]);
src/Posts.tsx
import { useEffect, useState } from "react";
import { useQuery, useQueryClient } from "@tanstack/react-query";

import { PostDetail } from "./PostDetail";
export interface IPost {
  userId: number;
  id: number;
  title: string;
  body: string;
}
const maxPostPage = 10; // 최대 페이지 수 10으로 설정

// pageNum을 인자로 받아서 해당 페이지의 포스트를 fetch함
async function fetchPosts(pageNum: number) {
  const response = await fetch(
    `https://jsonplaceholder.typicode.com/posts?_limit=10&_page=${pageNum}`
  );
  return response.json();
}

function Posts() {
  const [currentPage, setCurrentPage] = useState(0); // 현재페이지를 0으로 초기설정
  const [selectedPost, setSelectedPost] = useState<IPost | null>(null);

  const queryClient = useQueryClient();

  // replace with useQuery
  const { data, isLoading, isError } = useQuery<IPost[]>(
    ["posts", currentPage], // 쿼리키를 페이지마다 지정
    () => fetchPosts(currentPage),
    {
      staleTime: 2000, // staleTime을 2초로 설정하여 fetch된 데이터는 2초간 fresh 상태
      keepPreviousData: true // 쿼리키가 바뀌어도 지난 데이터를 유지해서 혹시나 이전페이지로 이동했을때 캐시에 해당 데이터가 있도록
    }
  );

  useEffect(() => {
    if (currentPage <= maxPostPage - 2) { // 마지막 페이지가 10이므로 9페이지까지만 다음페이지 데이터를 받음
      const nextPage = currentPage + 1;
      queryClient.prefetchQuery(["posts", nextPage], () =>
        fetchPosts(nextPage)
      );
    }
  }, [currentPage, queryClient]);

  if (isError) return <h3>ERROR!</h3>;
  if (isLoading) return <h3>Loading...</h3>;
  return (
    <>
      <ul>
        {data?.map((post) => (
          <li
            key={post.id}
            className="post-title"
            onClick={() => setSelectedPost(post)}
          >
            {post.title}
          </li>
        ))}
      </ul>
      <div className="pages">
        <button
          disabled={currentPage <= 0} // 현재페이지가 0 이하면 previous 버튼 비활성화
          onClick={() => setCurrentPage((prev) => prev - 1)}
        >
          Previous page
        </button>
        <span>Page {currentPage + 1}</span>
        <button
          disabled={currentPage >= maxPostPage - 1} // 현재페이지가 9 이상이면 next 버튼 비활성화
          onClick={() => setCurrentPage((prev) => prev + 1)}
        >
          Next page
        </button>
      </div>
      <hr />
      {selectedPost && <PostDetail post={selectedPost} />}
    </>
  );
}

export default Posts;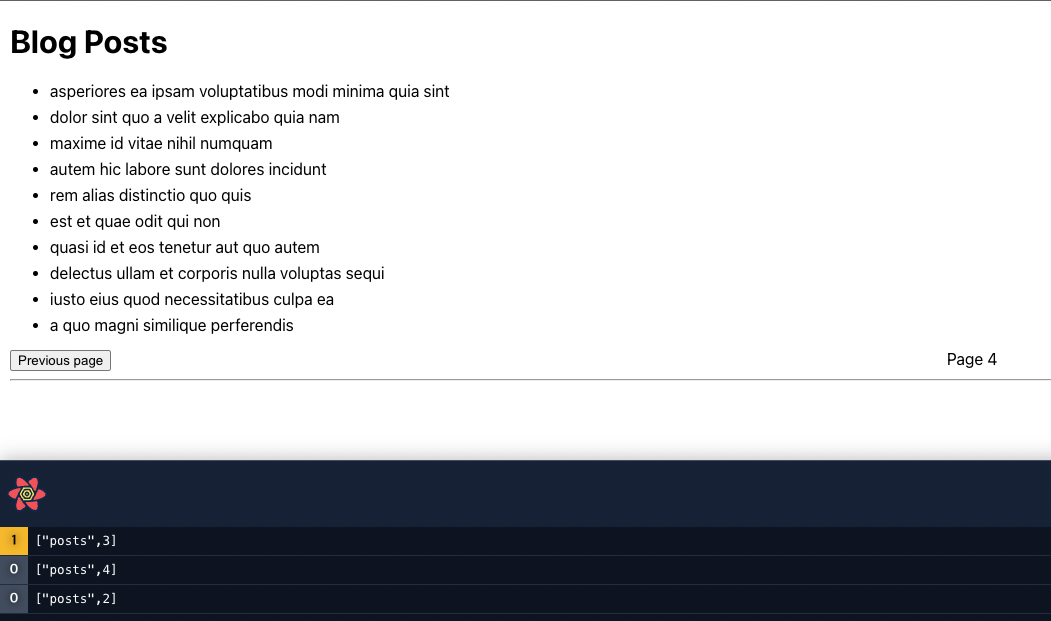
devtools를 사용해서 확인해보면 현재 4페이지(['posts', 3]) 쿼리키가 활성 상태이고 나머지 쿼리들은 비활성 상태이다
다음 페이지인 5페이지(['posts', 4])도 미리 받아와서 캐시에 저장되어 있는것을 확인할 수 있다
다음 페이지의 데이터가 캐시에 있기 때문에 로딩없이 바로 보여질 수 있다
isFetching vs isLoading
지난 포스트에서도 다뤘던 내용인데 다시 한번 정리를 해보자
isFetching: async 쿼리 함수가 해결되지 않았을 때 true. 아직 데이터를 가져오는 중
isLoading: isFetching이 true이면서 쿼리에 대해 캐시된 데이터가 없는 상태
isLoading이 true면 isFetching도 true이다
위의 Posts.tsx 코드에서 isLoading 대신에 isFethcing을 사용해보자
...
if(isFetching) return <h3>Fetching...</h3>;
...
Next Page 버튼을 눌러도 로딩메세지가 나오는 것을 볼 수 있다
prefetching을 하면 다음 페이지에 대한 쿼리가 캐시에 저장되기 때문에 isLoading으로 한다면 로딩메세지가 출력되지 않는다
하지만 isFetching은 데이터가 캐시에 있든 없든 데이터를 받아오고 있는 상태라면 true이기 때문에 캐시에 있는 값을 가져오지 않고 로딩메세지가 출력되는 것이다
