
FSD
FSD(Feature-Sliced Design) 아키텍처는 대규모 프론트엔드 애플리케이션을 위한 아키텍처 방법론입니다.
기존의 모듈식 설계(Component, Service, Style 등)에서 발생하는 복잡한 종속성을 해결하기 위해 고안되었습니다.
FDA(Feature Driven Architecture)로 부터 파생하였으며, v2.1에 도달한 현재는 다양한 예제와 Linter 또한 제공됩니다.
이 글에서는 React에 실제로 적용하면서 얻은 경험들을 기준으로 FSD 구성 방법과 예시를 설명합니다.
핵심 철학
모듈과 컴포넌트들을 유추하기 쉬운 위치에 배치하여 결합도를 줄이고 응집성을 높입니다.
이 때 위치란, 약속된 규칙에 따라 논리적이고 타당하게 배치되는 목적지를 말합니다.
프로젝트의 구성원 누구나 원칙을 이해한다면, 특정 기능의 코드를 찾는 과정에서 설계자와 일관되고 합리적인 사고를 할 수 있습니다.
따라서 개발자는 원칙과 합의된 규칙에 의존하여 레이어와 슬라이스를 꾸려나가야 합니다.
구성
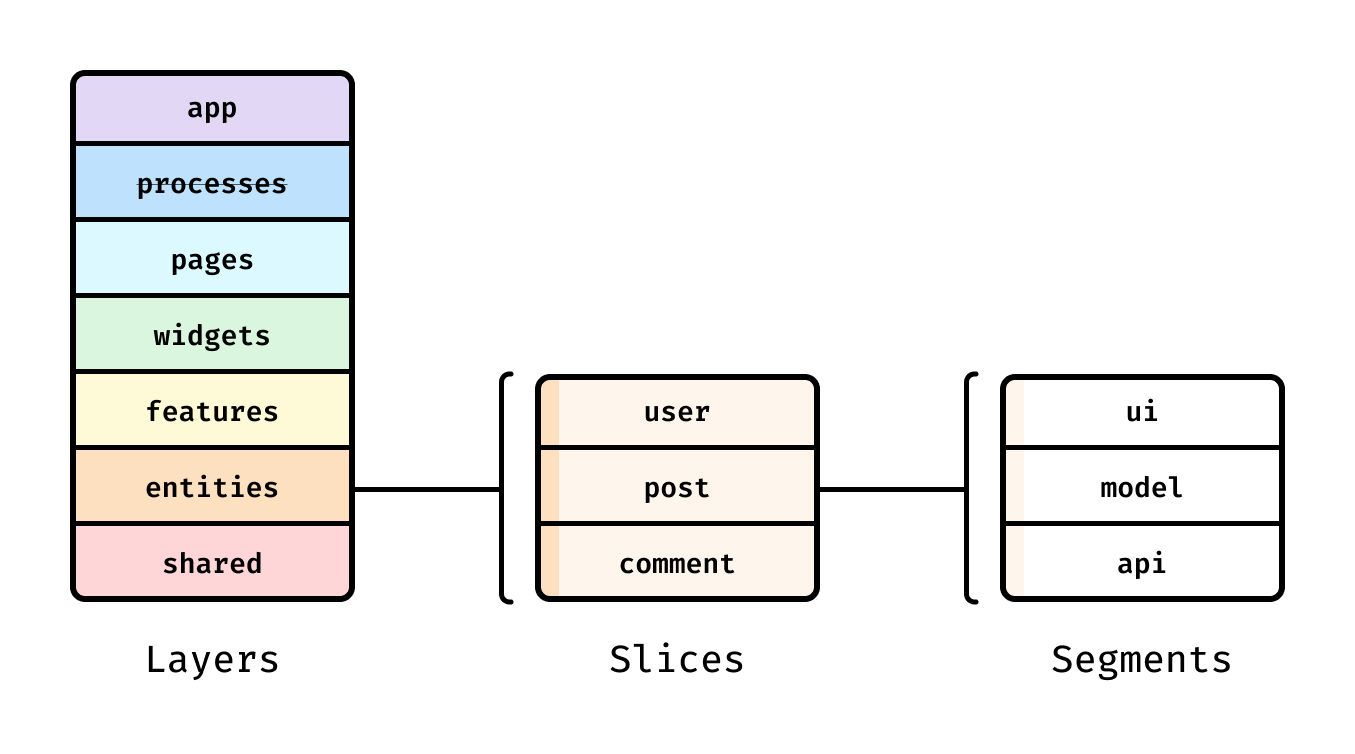
FSD 아키텍처는 레이어, 슬라이스, 세그먼트로 구성됩니다.
각 레이어는 그룹의 성격을 나타내고, 도메인으로 구성된 슬라이스로 나누어집니다.
최종적으로 슬라이스에서 다시 기능 단위 세그먼트로 구성됩니다.
규칙
Cross-Import
동일 레이어의 슬라이스 간 import는 금지됩니다. 이러한 행위는 모듈의 결합도를 높이고 유지보수를 까다롭게 만듭니다.
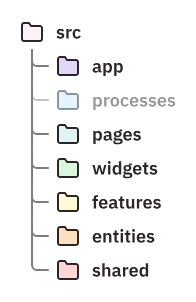
예외적으로 app, shared 레이어는 슬라이스 없이 세그먼트로만 구성되기 때문에 레이어 내에서 자유롭게 import가 가능합니다.
Public API
슬라이스 내의 코드를 외부에서 import 할 때 반드시 Public API를 거쳐야 합니다. 캡슐화를 통해 다른 기능과의 통합과 유지보수를 안정적으로 할 수 있습니다.
구현 조건
- 슬라이스 내 폴더 구조를 변경하여도 외부에서는 잘 동작해야 합니다.
- 주요 기능에 큰 변화가 있을 경우, Public API 또한 수정해야 합니다.
- 꼭 필요한 부분만 export하고, 와일드카드는 지양합니다.
Public API 예시
📂features
┗ 📂user-auth
  ┣ 📂ui
  ┃ ┣ 📜LoginForm.tsx
  ┃ ┗ 📜SignupForm.tsx
  ┣ 📂api
  ┃ ┣ 📜auth.api.ts
  ┃ ┗ 📜auth.types.ts
  ┣ 📂model
  ┃ ┗ 📜auth.store.ts
  ┗ 📜index.ts  # Public API
// features/user-auth/index.ts
// ✅ 좋은 예시: 필요한 부분만 export
export { LoginForm } from "./ui/LoginForm";
export { SignupForm } from "./ui/SignupForm";
export { useAuth } from "./model/auth.store";
export type { User, AuthState } from "./api/auth.types";
// ❌ 나쁜 예시: 와일드카드 export
export * from "./ui";
export * from "./api";Layers
각 레이어는 방향성을 가지며, 자신보다 상위의 레이어는 참조할 수 없습니다.
예를 들어 features 레이어 내부의 그 어떤 파일이든 widgets 레이어의 코드를 참조해서는 안됩니다.
processes레이어는 deprecate 되어 더이상 사용되지 않습니다.
App
라우터, 엔트리포인트(App.tsx 나 main.tsx 등 진입점), 글로벌 스타일, Provider 등 앱을 실행하는 최상위 로직을 포함합니다. 이와 같은 요소들은 도메인에 종속되지 않으므로 슬라이스 없이 세그먼트로만 구성됩니다.
Next.js와 통합하는 경우
src바깥에app디렉토리를 생성하거나_app으로 이름을 바꾸어 사용할 수 있습니다.
App 레이어 예시
📂app
┣ 📂entrypoint
┃ ┣ 📜main.tsx       # 앱 진입점
┃ ┗ 📜App.tsx        # 최상위 컴포넌트
┣ 📂providers
┃ ┣ 📜index.ts
┃ ┣ 📜ThemeProvider.tsx
┃ ┣ 📜QueryProvider.tsx
┃ ┗ 📜AuthProvider.tsx
┣ 📂routes
┃ ┣ 📜index.ts
┃ ┗ 📜Router.tsx     # 라우팅 설정
┗ 📂styles
  ┣ 📜global.css     # 전역 스타일
  ┗ 📜reset.css      # Reset CSS
// app/entrypoint/App.tsx
import { ThemeProvider, QueryProvider, AuthProvider } from "../providers";
import { Router } from "../routes";
export const App = () => (
<ThemeProvider>
<QueryProvider>
<AuthProvider>
<Router />
</AuthProvider>
</QueryProvider>
</ThemeProvider>
);Pages
하위 레이어들을 조합하여 만든 최종 페이지 컴포넌트와 이에 속하는 라이브러리, 로직을 포함합니다. 이름 그대로 개별 페이지를 표현하는 독립적인 구현체가 이 레이어에 속합니다.
페이지 단위로 슬라이스를 구성하는 것이 일반적이지만 필요하다면 유사한 여러 페이지를 하나의 슬라이스로, 또는 여러 슬라이스를 하나의 그룹으로 묶을 수 있습니다.
Next.js와 통합하는 경우
src바깥에pages디렉토리를 생성하거나_pages로 이름을 바꾸어 사용할 수 있습니다.
Pages 레이어 예시
📂pages
┣ 📂home
┃ ┣ 📂ui
┃ ┃ ┣ 📜HomePage.tsx
┃ ┃ ┗ 📜HeroSection.tsx
┃ ┗ 📜index.ts
┣ 📂products
┃ ┣ 📂ui            # 여러 페이지를 하나의 슬라이스로 묶음
┃ ┃ ┣ 📜ProductListPage.tsx
┃ ┃ ┗ 📜ProductDetailPage.tsx
┃ ┣ 📂model
┃ ┃ ┗ 📜products.store.ts
┃ ┗ 📜index.ts
┗ 📂auth            # 여러 슬라이스를 하나의 그룹으로 묶음
  ┣ 📂login
  ┃ ┣ 📂ui
  ┃ ┃ ┗ 📜LoginPage.tsx
  ┃ ┗ 📜index.ts
  ┗ 📂signup
    ┣ 📂ui
    ┃ ┗ 📜SignupPage.tsx
    ┗ 📜index.ts
// pages/products/ui/ProductListPage.tsx
import { ProductCard } from "@/widgets/product-card";
import { ProductFilter } from "@/features/product-filter";
import { useProducts } from "@/entities/product";
export const ProductListPage = () => {
const products = useProducts();
return (
<div>
<ProductFilter />
<div className="grid">
{products.map((product) => (
<ProductCard key={product.id} product={product} />
))}
</div>
</div>
);
};Widgets
페이지에 포함 될 독립적인 UI 블록을 작성합니다. 경우에 따라 features 레이어와 혼동될 여지가 있는데, 엄밀한 구분을 위해 다음 우선순위를 고려할 수 있습니다.
우선순위
features레이어의 모듈을 import 하고 있는가?
동일 레이어 간 cross-import를 피하기 위해widgets에 배치합니다.- UI 컴포넌트가 페이지의 한 블록인가?
그리드, 수직, 수평과 같은 페이지 구성 혹은 JSX 내에서 다른 블록과 확연히 구분되고 고립되어 있다면widgets에 배치합니다. - 특정 페이지에 종속되는가?
특정 페이지에만 사용된다면pages레이어에 배치합니다.
Widgets 레이어 예시
📂widgets
┣ 📂header
┃ ┣ 📂ui
┃ ┃ ┣ 📜Header.tsx
┃ ┃ ┣ 📜Navigation.tsx
┃ ┃ ┗ 📜UserMenu.tsx
┃ ┣ 📂model
┃ ┃ ┗ 📜header.store.ts
┃ ┗ 📜index.ts
┣ 📂sidebar
┃ ┣ 📂ui
┃ ┃ ┣ 📜Sidebar.tsx
┃ ┃ ┗ 📜MenuItem.tsx
┃ ┗ 📜index.ts
┗ 📂product-card     # 여러 features 조합
  ┣ 📂ui
  ┃ ┗ 📜ProductCard.tsx
  ┗ 📜index.ts
// widgets/product-card/ui/ProductCard.tsx
import { AddToCart } from "@/features/cart";
import { ToggleFavorite } from "@/features/favorites";
import { ProductPrice } from "@/entities/product";
import type { Product } from "@/entities/product";
interface ProductCardProps {
product: Product;
}
export const ProductCard = ({ product }: ProductCardProps) => (
<div className="card">
<img src={product.image} alt={product.name} />
<h3>{product.name}</h3>
<ProductPrice value={product.price} />
<div className="actions">
<AddToCart productId={product.id} />
<ToggleFavorite productId={product.id} />
</div>
</div>
);Features
비즈니스 로직을 포함하는 주요 기능을 포함합니다. 하위 Entity를 import 하는 경우가 일반적이며, 여러 페이지에서 재사용됩니다.
특정 페이지에서만 사용된다면, 굳이
features로 분리할 필요가 없습니다. 오히려 상위 슬라이스에 포함할 때 응집성이 좋습니다.
Features 레이어 예시
📂features
┣ 📂cart
┃ ┣ 📂ui
┃ ┃ ┣ 📜AddToCart.tsx
┃ ┃ ┗ 📜CartDrawer.tsx
┃ ┣ 📂api
┃ ┃ ┗ 📜cart.api.ts
┃ ┣ 📂model
┃ ┃ ┣ 📜cart.store.ts
┃ ┃ ┗ 📜cart.hooks.ts
┃ ┗ 📜index.ts
┣ 📂product-filter
┃ ┣ 📂ui
┃ ┃ ┣ 📜FilterPanel.tsx
┃ ┃ ┣ 📜PriceRange.tsx
┃ ┃ ┗ 📜CategoryFilter.tsx
┃ ┣ 📂model
┃ ┃ ┗ 📜filter.store.ts
┃ ┗ 📜index.ts
┗ 📂auth
  ┣ 📂ui
  ┃ ┣ 📜LoginForm.tsx
  ┃ ┗ 📜LogoutButton.tsx
  ┣ 📂api
  ┃ ┗ 📜auth.api.ts
  ┣ 📂model
  ┃ ┣ 📜auth.store.ts
  ┃ ┗ 📜auth.hooks.ts
  ┗ 📜index.ts
// features/cart/ui/AddToCart.tsx
import { useCart } from "../model/cart.hooks";
import { Button } from "@/shared/ui";
interface AddToCartProps {
productId: string;
quantity?: number;
}
export const AddToCart = ({ productId, quantity = 1 }: AddToCartProps) => {
const { addItem, isLoading } = useCart();
const handleClick = () => {
addItem(productId, quantity);
};
return (
<Button onClick={handleClick} disabled={isLoading}>
Add to Cart
</Button>
);
};Entities
API 요청이나 작은 UI 블록, 검증 로직과 같은 도메인을 이루는 핵심 데이터 조각들을 담습니다. 데이터에 대한 개념만 담고, 이를 활용하는 비즈니스 로직은 포함하지 않습니다.
불가피하게 비즈니스 로직을 포함해야 하는 경우, props로 받아서 사용할 수 있습니다.
Cross-Import 피하기
도메인의 특성에 따라 하나의 Entity가 다른 Entity를 포함해야 하는 경우가 있습니다. 이 때 다음과 같은 방법으로 Cross-Import 문제를 회피합니다.
- 상위 레이어로 승격
데이터가 아닌 로직에서 Cross-Import가 발생한다면features나widgets에서 대신 구현할 수 있습니다. - 교차 Public API
복잡한 도메인을 표현하기 위해 다른 Entity를 import 해야 하는 경우, 교차점을 만들어 전용 Public API를 통해 대신 import 할 수 있습니다.
교차 Public API
다른 Entity에서 import 할 수 있도록 현재 슬라이스에 @x 폴더를 추가하고, 그 안에 특정 Entity를 위한 교차 Public API를 작성하는 방법입니다.
예를 들어, 다음과 같이 song Entity에 artist Entity의 데이터가 필요한 경우가 있습니다.
// entities/song/model/song.ts
import type { Artist } from "entities/artist"; // Cross-Import 위반

export interface Song {
  name: string;
  artist: Artist;
}
이 때 아래와 같이 교차 Public API를 만듭니다.
📂entities
┗ 📂artist
  ┣ 📂model
  ┃ ┗ 📜artist.ts   # 'song' Entity 에 필요한 데이터
  ┣ 📂@x            # 'artist' Entity와 'song' Entity의 교차점
  ┃ ┗ 📜song.ts     # 'song' Entity 전용 Public API
  ┗ 📜index.ts      # 기본 Public API
song Entity에서는 다음과 같이 import 할 수 있습니다.
// entities/song/model/song.ts
import type { Artist } from "entities/artist/@x/song"; // 교차 Public API 사용

export interface Song {
  name: string;
  artist: Artist;
}
Cross-Import 위반을 완전히 해소할 수는 없지만, Entity 간 관계를 명시함으로써 도메인의 성질을 유지하고 데이터를 표현할 수 있게 됩니다.
Entities 레이어 예시
📂entities
┣ 📂product
┃ ┣ 📂ui
┃ ┃ ┣ 📜ProductPrice.tsx
┃ ┃ ┗ 📜ProductBadge.tsx
┃ ┣ 📂api
┃ ┃ ┣ 📜product.api.ts
┃ ┃ ┗ 📜product.types.ts
┃ ┣ 📂model
┃ ┃ ┣ 📜product.schema.ts
┃ ┃ ┗ 📜product.hooks.ts
┃ ┗ 📜index.ts
┣ 📂user
┃ ┣ 📂ui
┃ ┃ ┗ 📜UserAvatar.tsx
┃ ┣ 📂api
┃ ┃ ┣ 📜user.api.ts
┃ ┃ ┗ 📜user.types.ts
┃ ┣ 📂model
┃ ┃ ┗ 📜user.schema.ts
┃ ┗ 📜index.ts
┗ 📂category
  ┣ 📂api
  ┃ ┣ 📜category.api.ts
  ┃ ┗ 📜category.types.ts
  ┣ 📂model
  ┃ ┗ 📜category.schema.ts
  ┗ 📜index.ts
// entities/product/api/product.types.ts
export interface Product {
id: string;
name: string;
description: string;
price: number;
categoryId: string;
image: string;
stock: number;
}
// entities/product/api/product.api.ts
import { api } from "@/shared/api";
import type { Product } from "./product.types";
export const productApi = {
getAll: () => api.get<Product[]>("/products"),
getById: (id: string) => api.get<Product>(`/products/${id}`),
search: (query: string) => api.get<Product[]>(`/products/search?q=${query}`),
};Shared
모든 레이어에서 사용 가능한 공용 코드를 포함합니다. UI가 될 수도 있고, 유틸리티나 서드파티 라이브러리를 포함할 수 있습니다. app 레이어와 마찬가지로 세그먼트로만 구성되고, Cross-Import 규칙에 구애받지 않습니다.
배치 조건
shared 레이어에 배치하기 위해서는 다음 조건을 만족해야 합니다.
- 특정 도메인에 종속되지 않는다.
- 다른 프로젝트에서도 사용할 수 있을 만큼 범용적이다.
- 비즈니스 로직을 포함하지 않는다.
Shared 레이어 예시
📂shared
┣ 📂ui
┃ ┣ 📂button
┃ ┃ ┣ 📜Button.tsx
┃ ┃ ┗ 📜Button.styles.ts
┃ ┣ 📂input
┃ ┃ ┣ 📜Input.tsx
┃ ┃ ┗ 📜Input.styles.ts
┃ ┣ 📂modal
┃ ┃ ┗ 📜Modal.tsx
┃ ┗ 📜index.ts
┣ 📂api
┃ ┣ 📜client.ts      # axios 인스턴스
┃ ┣ 📜interceptors.ts
┃ ┗ 📜index.ts
┣ 📂lib
┃ ┣ 📂formatters
┃ ┃ ┣ 📜date.ts
┃ ┃ ┣ 📜currency.ts
┃ ┃ ┗ 📜index.ts
┃ ┣ 📂validators
┃ ┃ ┣ 📜email.ts
┃ ┃ ┣ 📜phone.ts
┃ ┃ ┗ 📜index.ts
┃ ┗ 📜index.ts
┗ 📂config
  ┣ 📜constants.ts
  ┣ 📜env.ts
  ┗ 📜index.ts
// shared/lib/formatters/currency.ts
export const formatCurrency = (amount: number, currency = "USD"): string => {
return new Intl.NumberFormat("en-US", {
style: "currency",
currency,
}).format(amount);
};
// shared/ui/button/Button.tsx
import { ButtonHTMLAttributes } from "react";
import { cn } from "@/shared/lib";
interface ButtonProps extends ButtonHTMLAttributes<HTMLButtonElement> {
variant?: "primary" | "secondary" | "danger";
size?: "sm" | "md" | "lg";
}
export const Button = ({
variant = "primary",
size = "md",
className,
children,
...props
}: ButtonProps) => (
<button
className={cn("btn", `btn-${variant}`, `btn-${size}`, className)}
{...props}
>
{children}
</button>
);Slices
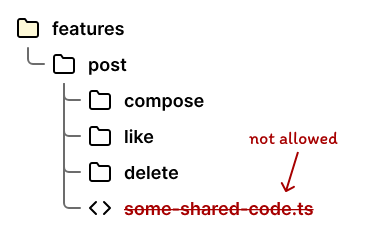
각 레이어에 배치할 요소들을 도메인과 기능에 따라 분류합니다. 네이밍에는 제약이 없으나, 종속되는 비즈니스 도메인과 핵심 기능이 명확하게 나타나야 합니다.
슬라이스 내부는 자유롭게 구현할 수 있으나, 반드시 Public API를 제공해야 합니다.
결합도와 응집도
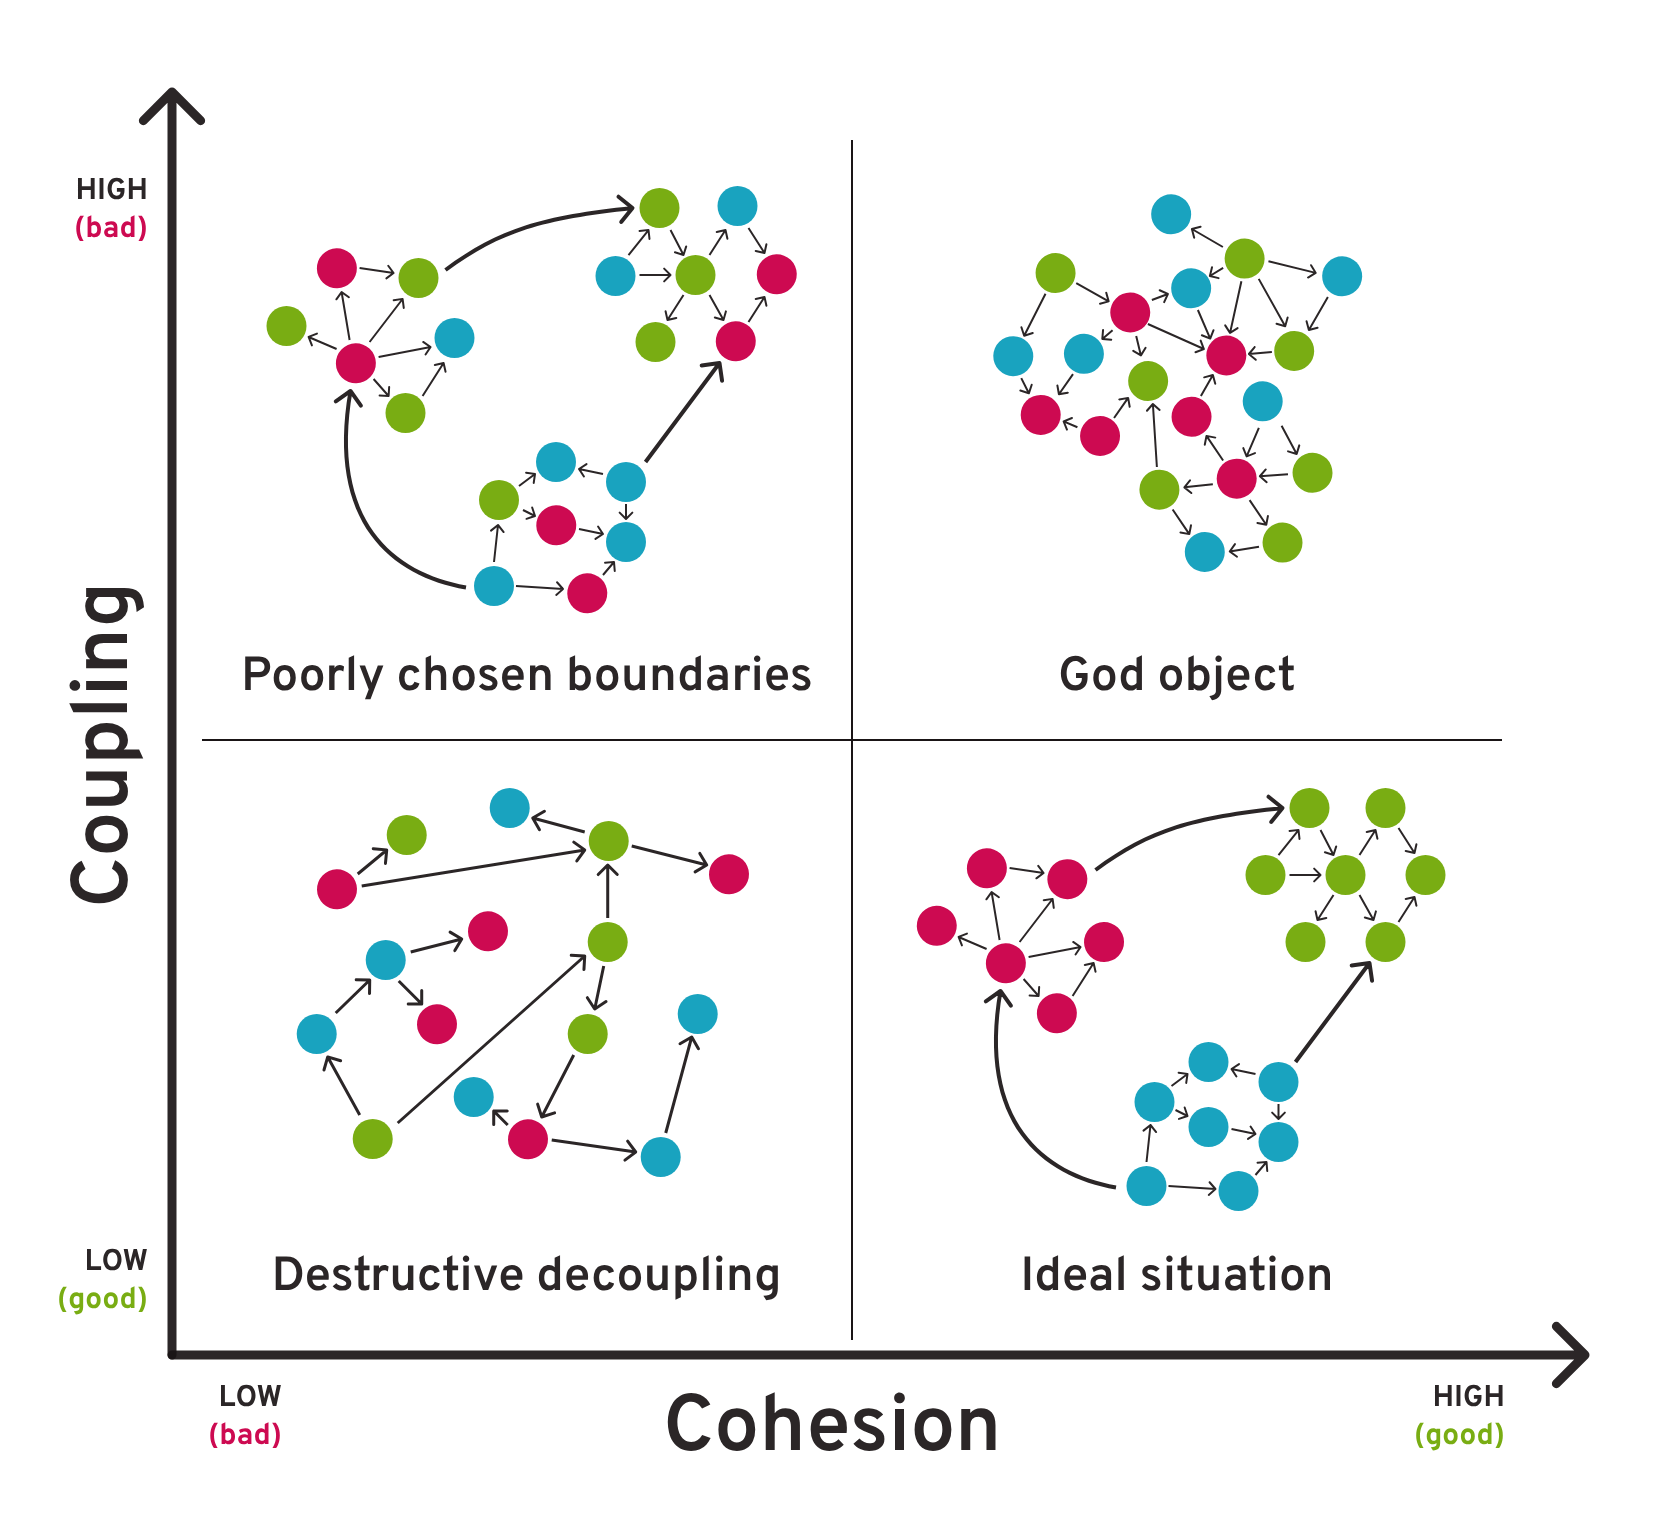
낮은 결합도와 높은 응집도를 위해 슬라이스는 다음 규칙을 준수해야 합니다.
- 낮은 결합도: 같은 레이어에서 서로 다른 슬라이스 간 import는 금지됩니다.
- 높은 응집도: 슬라이스 내부에는 슬라이스와 관련된 대부분의 코드를 포함하여야 합니다.
이를 통해 슬라이스의 독립성을 확보할 수 있습니다.
Slice Group
서로 관련된 도메인, 혹은 기능에 대하여 개별 슬라이스로 나열하지 않고 그룹화할 수 있습니다. 단, 같은 그룹 내에서도 여전히 서로 import하거나 공용 코드를 작성할 수 없습니다. 따라서 그룹화를 해도 실제 코드에는 영향이 없어야 합니다.
Public API는 그룹화를 하지 않았을 때와 마찬가지로 슬라이스 내에서만 작성합니다. 그룹 자체에 대한 Public API는 작성하지 않습니다.
Slice Group 예시
📂features
┣ 📂auth            # 인증 관련 기능 그룹
┃ ┣ 📂login
┃ ┃ ┣ 📂ui
┃ ┃ ┣ 📂api
┃ ┃ ┣ 📂model
┃ ┃ ┗ 📜index.ts
┃ ┣ 📂signup
┃ ┃ ┣ 📂ui
┃ ┃ ┣ 📂api
┃ ┃ ┣ 📂model
┃ ┃ ┗ 📜index.ts
┃ ┗ 📂password-reset
┃   ┣ 📂ui
┃   ┣ 📂api
┃   ┣ 📂model
┃   ┗ 📜index.ts
┣ 📂payment         # 결제 관련 기능 그룹
┃ ┣ 📂checkout
┃ ┃ ┗ ...
┃ ┣ 📂invoice
┃ ┃ ┗ ...
┃ ┗ 📂refund
┃   ┗ ...
┗ 📂product-management  # 상품 관리 기능 그룹
  ┣ 📂product-create
  ┃ ┗ ...
  ┣ 📂product-edit
  ┃ ┗ ...
  ┗ 📂inventory
    ┗ ...
// ❌ 나쁜 예시: 같은 그룹 내 cross-import
// features/auth/signup/model/signup.store.ts
import { LoginForm } from '@/features/auth/login';
// ✅ 좋은 예시: 공용 코드는 shared로 이동
// shared/lib/auth/validation.ts
export const validateEmail = (email: string) => { ... };
// features/auth/signup/model/signup.store.ts
import { validateEmail } from '@/shared/lib';Segments
FSD의 최하위 계층으로, 코드를 기술적 성격에 따라 분류하여 슬라이스 내부에 배치합니다. 따라서 실제 코드는 모두 특정 세그먼트 하위에 위치하게 됩니다.
표준
세그먼트는 다음과 같은 표준으로 나누어질 수 있습니다.
ui: Component, Style 등 UI 관련 요소api: API Request, Response Type, Mapper 등 외부 API 관련 코드model: Schema, Interface, Store 등 내부 비즈니스 로직lib: Hook, Formatter, Converter 등 유틸리티config: 환경 변수나 설정 파일
표준 세그먼트 예시
📂features/cart
┣ 📂ui          # UI 컴포넌트와 스타일
┃ ┣ 📜CartDrawer.tsx
┃ ┣ 📜CartItem.tsx
┃ ┗ 📜CartSummary.tsx
┣ 📂api         # 외부 API 통신
┃ ┣ 📜cart.api.ts
┃ ┣ 📜cart.types.ts
┃ ┗ 📜cart.mapper.ts
┣ 📂model       # 비즈니스 로직과 상태 관리
┃ ┣ 📜cart.store.ts
┃ ┣ 📜cart.hooks.ts
┃ ┗ 📜cart.selectors.ts
┣ 📂lib         # 유틸리티 함수
┃ ┣ 📜calculateTotal.ts
┃ ┗ 📜validateQuantity.ts
┣ 📂config      # 설정 파일
┃ ┗ 📜cart.config.ts
┗ 📜index.ts    # Public API
// features/cart/api/cart.types.ts
export interface CartItem {
id: string;
productId: string;
quantity: number;
price: number;
}
// features/cart/model/cart.store.ts
import { create } from "zustand";
import { cartApi } from "../api/cart.api";
import type { CartItem } from "../api/cart.types";
export const useCartStore = create<CartState>((set) => ({
items: [],
addItem: async (productId: string, quantity: number) => {
const item = await cartApi.addItem(productId, quantity);
set((state) => ({
items: [...state.items, item],
}));
},
}));커스텀
표준 세그먼트 외에도 필요에 따라 적절히 커스텀 세그먼트를 만들어 사용할 수 있습니다. 단, 파일의 내용이나 형식에 의한 분류(components, hooks, types 등)는 세그먼트로 만들 수 없습니다. 세그먼트는 다음 예시와 같이 파일의 목적을 설명할 수 있어야 합니다.
routes: 라우팅 관련 상수 혹은 패턴entrypoint: 엔트리포인트나 프레임워크 설정providers: 전역 프로바이더i18n: 다국어 설정 관련 코드
커스텀 세그먼트 예시
📂app
┣ 📂entrypoint     # 애플리케이션 진입점
┃ ┣ 📜main.tsx
┃ ┗ 📜App.tsx
┣ 📂routes         # 라우팅 설정
┃ ┣ 📜Router.tsx
┃ ┣ 📜routes.ts
┃ ┗ 📜guards.ts
┣ 📂i18n           # 다국어 설정
┃ ┣ 📜i18n.ts
┃ ┣ 📂locales
┃ ┃ ┣ 📜en.json
┃ ┃ ┣ 📜ko.json
┃ ┃ ┗ 📜ja.json
┃ ┗ 📜index.ts
┗ 📂seo            # SEO 관련 설정
  ┣ 📜meta.ts
  ┣ 📜sitemap.ts
  ┗ 📜robots.ts
// app/routes/routes.ts
import { lazy } from "react";
export const routes = [
{
path: "/",
component: lazy(() => import("@/pages/home")),
},
{
path: "/products",
component: lazy(() => import("@/pages/products")),
},
{
path: "/cart",
component: lazy(() => import("@/pages/cart")),
guard: "auth", // 커스텀 가드
},
];
// app/i18n/i18n.ts
import i18n from "i18next";
import { initReactI18next } from "react-i18next";
import en from "./locales/en.json";
import ko from "./locales/ko.json";
i18n.use(initReactI18next).init({
resources: {
en: { translation: en },
ko: { translation: ko },
},
lng: "en",
fallbackLng: "en",
});
export default i18n;Linter
Steiger는 FSD 팀에서 제공하는 Linter입니다. 스크립트를 통해 규칙 위반을 자동으로 검출하여 아키텍처 품질 개선을 기대할 수 있습니다.
다만 Steiger 프로젝트가 아직 베타 단계인 점, 빌트인 룰들 또한 구현 단계에서 어느 정도 타협이 필요한 점을 고려하여 린트가 필요한 규칙만 선택적으로 활용하는 것이 권장됩니다.
사용법
설치
프로젝트 루트에서 Steiger와 FSD 플러그인을 설치합니다.
npm install -D steiger

npm install -D @feature-sliced/steiger-plugin
사용
다음과 같이 스크립트를 실행하면 린팅이 수행됩니다.
npx steiger ./src실행 결과:
┌ src\features\submission\ui\field-item\FileFieldInput.tsx
✘ Forbidden cross-import from slice "file-uploader".
│
└ fsd/forbidden-imports: https://github.com/feature-sliced/steiger/tree/master/packages/steiger-plugin-fsd/src/forbidden-imports

──────────────────────────────────────────────────────────────────
 Found 1 error (none can be fixed automatically)
--fix옵션으로 자동 정정을 수행할 수 있으나, 베타 버전이라 정확성이 그리 좋지 않기 때문에 사용하지 않는 것을 권장합니다.npx steiger ./src --fix
환경 설정
ESLint와 유사하게 steiger.config.ts 파일을 루트에 작성하여 린트 경로와 규칙을 설정할 수 있습니다.
import fsd from "@feature-sliced/steiger-plugin";
import { defineConfig } from "steiger";

export default defineConfig([
  ...fsd.configs.recommended,
  {
    files: ["./src/**"],
    rules: {
      "fsd/typo-in-layer-name": "off",
      "fsd/segments-by-purpose": "off",
      "fsd/inconsistent-naming": "off",
      "fsd/insignificant-slice": "warn",
    },
  },
]);
빌트인 규칙
아래는 간략한 설명이며, 자세한 내용은 각 규칙의 README에 상세하게 설명되어 있습니다.
| 규칙 | 설명 |
|---|---|
fsd/ambiguous-slice-names | shared 레이어에 이미 존재하는 세그먼트를 다른 레이어에 배치할 수 없음 |
fsd/excessive-slicing | 하나의 레이어 또는 슬라이스 그룹 내에 20개를 초과하여 슬라이스를 배치할 수 없음 |
fsd/forbidden-imports | 역방향 import 및 동일 레이어 내 슬라이스 간 cross-import 금지 |
fsd/inconsistent-naming | entities 레이어 내 슬라이스의 이름은 복수형이어야 함 |
fsd/insignificant-slice | 참조가 1개이거나 전혀 없는 슬라이스 금지 |
fsd/no-layer-public-api | 레이어 내에서 슬라이스 없이 직접 index 파일 생성 금지 |
fsd/no-public-api-sidestep | Public API를 우회하여 다른 슬라이스 내부의 모듈을 직접 import 할 수 없음 |
fsd/no-reserved-folder-names | 세그먼트 하위에 추가적인 표준 세그먼트 생성 금지 |
fsd/no-segmentless-slices | 세그먼트를 갖지 않는 슬라이스 생성 금지 |
fsd/no-segments-on-sliced-layers | app, shared 를 제외한 레이어는 하위에 슬라이스 없이 직접 세그먼트를 배치할 수 없음 |
fsd/no-ui-in-app | app 레이어에 ui 세그먼트를 배치할 수 없음 |
fsd/public-api | 슬라이스 혹은 app, shared 하위 세그먼트에 Public API를 반드시 작성해야 함 |
fsd/repetitive-naming | 유사 패턴으로 반복되는 슬라이스 이름 규칙 금지(homePage, aboutPage 등) |
fsd/segments-by-purpose | 파일의 내용이나 형식에 따른 세그먼트 이름 금지(components, hooks 등) |
fsd/shared-lib-grouping | shared/lib 하위에 15개를 초과하여 파일 배치 금지(그룹화 권장) |
fsd/typo-in-layer-name | 레이어 이름에 오타가 있음(featrues 등) |
fsd/no-processes | 더 이상 사용되지 않는 processes 레이어 사용 금지 |
다음 규칙은 비활성화하는 것을 권장합니다.
fsd/typo-in-layer-name,fsd/insignificant-slice: Next.js App Router에서_pages레이어를 사용하는 경우 인식되지 않습니다.fsd/inconsistent-naming: 기준이 모호하며 정확하게 동작하지 않습니다.
주관적인 팁
깔끔함에 너무 매몰되기 보다는 도메인의 특성에 맞게 구성하는 것이 좋습니다. 예를 들어 대형 폼과 같은 거대하고 복잡한 기능에 불가피하게 많은 슬라이스와 세그먼트를 작성해야 할 수 있고, cross-import를 피하려다 보면 shared 레이어가 비대해질 수 있습니다.
이러한 상황에서는 최소한의 조치로써 cross-import 금지 규칙만 준수하고, 슬라이스나 세그먼트를 복잡하게 커스터마이징하는 것도 나쁘지 않다고 생각합니다.
FSD 팀은
pages와features를 보고 앱 전체의 기능과 구조를 파악할 수 있도록 구성할 것을 권장합니다. 특정 슬라이스나 세그먼트가 다소 지저분하게 작성되어 있을 지라도 다른 기능들이 잘 구성되어 있다면, FSD의 철학에 크게 위배되지 않을 것입니다.
맺음말
FSD 아키텍처를 잘 적용하면 체계화된 폴더 구조 뿐만 아니라 일관된 컨벤션까지 챙길 수 있습니다. 규칙적인 배치와 논리적인 결정이 만족감을 주기도 합니다.
다만 새로운 기능이 추가될수록 필연적으로 모호함을 마주치게 됩니다. 이 때 나름의 근거로 자신만의 규칙을 세우는 과정에서 개발자의 역량이 잘 드러날 것입니다.
커뮤니티에서도 FSD에 대한 많은 이슈와 토론이 제기되듯이, FSD가 항상 정답인 것은 아니며 맹신할 필요도 없습니다. 기술 스택을 선정할 때 늘 고민하는 것과 같이, 현재 프로젝트에 가장 적합한 아키텍처를 찾는 노력과 통찰력이 필요합니다.
참고 자료
https://feature-sliced.design/
https://github.com/feature-sliced/steiger
