
환경 설정
build.gradle
implementation 'org.springframework.cloud:spring-cloud-starter-aws:2.2.6.RELEASE'application.properties
cloud.aws.credentials.access-key=[IAM 사용자 Access Key Id]
cloud.aws.credentials.secret-key=[IAM 사용자 Secret Access Key]
cloud.aws.s3.bucket=[접근할 버킷 아이디]
cloud.aws.region.static=ap-northeast-2
cloud.aws.stack.auto=false
위 application.properties를 환경 변수로 빼지 않고 사용할 수도 있지만, AWS에서는 저런 키들을 Github에 직접적으로 올렸을 때, 문제가 될 수 있다고 한다. 즉, 환경변수로 AWS 관련된 변수를 빼고 Github에 위 application.properties는 push 하면 안된다.
코드
Config
import com.amazonaws.auth.AWSCredentials;
import com.amazonaws.auth.AWSStaticCredentialsProvider;
import com.amazonaws.auth.BasicAWSCredentials;
import com.amazonaws.services.s3.AmazonS3;
import com.amazonaws.services.s3.AmazonS3ClientBuilder;
import org.springframework.beans.factory.annotation.Value;
import org.springframework.context.annotation.Bean;
import org.springframework.context.annotation.Configuration;

@Configuration
public class AwsConfig {

    @Value("${cloud.aws.credentials.access-key}")
    private String accessKey;

    @Value("${cloud.aws.credentials.secret-key}")
    private String secretKey;

    @Value("${cloud.aws.region.static}")
    private String region;

    @Bean
    public AmazonS3 amazonS3() {
        AWSCredentials awsCredentials = new BasicAWSCredentials(accessKey, secretKey);
        return AmazonS3ClientBuilder.standard()
                .withRegion(region)
                .withCredentials(new AWSStaticCredentialsProvider(awsCredentials))
                .build();
    }
}
Spring Boot와 AWS S3를 연동하기 위해서 꼭 해주어야 하는 설정 클래스이다. 위에서 AmazonS3를 반환하는 Bean을 설정해야 위 인증을 통해 AWS Bucket에 접근할 수 있다.
Controller
import lombok.RequiredArgsConstructor;
import org.springframework.http.ResponseEntity;
import org.springframework.web.bind.annotation.*;
import org.springframework.web.multipart.MultipartFile;

import java.io.IOException;

@RestController
@RequiredArgsConstructor
@RequestMapping("/v1/aws")
public class AwsController {

    private final FileStore fileStore;

    @PostMapping("/create")
    public ResponseEntity<?> uploadFile(MultipartFile multipartFile) throws IOException {
        return ResponseEntity.ok().body(fileStore.create(multipartFile));
    }

    @GetMapping("/read/{fileName}")
    public ResponseEntity<?> findFile(@PathVariable String fileName) throws IOException {
        return fileStore.read(fileName);
    }

    @PostMapping("/update")
    public ResponseEntity<?> updateFile(FileDeleteDto fileDeleteDto) throws IOException {
        return ResponseEntity.ok().body(fileStore.update(fileDeleteDto));
    }

    @PostMapping("/delete")
    public ResponseEntity<?> deleteFile(@RequestBody FileNameDto fileName) {
        fileStore.delete(fileName.getFileName());
        return ResponseEntity.ok().body(null);
    }
}- 웹 뷰를 사용하지 않고, Postman을 사용하여 테스트 할 것이기 때문에, RestController를 사용한다.
- 기본적인 CRUD Controller 구현
- 실제 비지니스 로직은 FileStore에 존재한다.
Repository
- Interface
import org.springframework.http.ResponseEntity;
import org.springframework.web.multipart.MultipartFile;

import java.io.IOException;

public interface FileStore {

    /**
     * create - FileStore
     * 파일을 AWS S3에 업로드합니다.
     * @param multipartFile MultipartFile 형식의 파일을 받아옵니다.
     * @return 자원에 접근할 수 있는 URI를 받아옵니다.
     * @throws IOException 입출력 에러를 던질 수 있습니다.
     */
    String create(MultipartFile multipartFile) throws IOException;

    /**
     * read - FileStore
     * 파일을 AWS S3에서 읽습니다.
     * @param fileName 파일 이름을 받아옵니다.
     * @return ResponseEntity를 만들어 반환합니다.
     * @throws IOException 입출력 에러를 던질 수 있습니다.
     */
    ResponseEntity<?> read(String fileName) throws IOException;

    /**
     * delete - FileStore
     * AWS S3에 저장되어 있는 파일을 삭제합니다.
     * @param fileName 파일 이름을 받아옵니다.
     */
    void delete(String fileName);

    /**
     * update - FileStore
     * @param fileDeleteDto 파일 수정을 위해 파일 이름과 파일이 담긴 객체를 받아옵니다.
     * @return 새롭게 수정된 자원에 접근할 수 있는 URI를 반환합니다.
     * @throws IOException 입출력 에러를 던질 수 있습니다.
     */
    String update(FileDeleteDto fileDeleteDto) throws IOException;
}
파일 CRUE 기능을 정의해놓은 메서드이다. 테스트 단계이기 때문에, Optinal 과 try, catch 처리는 하지 않은 상황이다.
- implementation
import com.amazonaws.services.s3.AmazonS3;
import com.amazonaws.services.s3.model.*;
import com.amazonaws.util.IOUtils;
import lombok.RequiredArgsConstructor;
import org.springframework.beans.factory.annotation.Value;
import org.springframework.http.HttpHeaders;
import org.springframework.http.HttpStatus;
import org.springframework.http.MediaType;
import org.springframework.http.ResponseEntity;
import org.springframework.stereotype.Component;
import org.springframework.web.multipart.MultipartFile;

import java.io.IOException;
import java.util.ArrayList;
import java.util.List;
import java.util.UUID;

@Component
@RequiredArgsConstructor
public class FileStoreImpl implements FileStore {

    @Value("${cloud.aws.s3.bucket}")
    private String bucket;
    private final AmazonS3 amazonS3;

    @Override
    public String create(MultipartFile multipartFile) throws IOException {
        String fileName = UUID.randomUUID() + "-" + multipartFile.getOriginalFilename();

        ObjectMetadata objectMetadata = new ObjectMetadata();
        objectMetadata.setContentLength(multipartFile.getInputStream().available());

        amazonS3.putObject(bucket, fileName, multipartFile.getInputStream(), objectMetadata);
        return amazonS3.getUrl(bucket, fileName).toString();
    }

    @Override
    public ResponseEntity<?> read(String fileName) throws IOException {
        S3Object s3Object = amazonS3.getObject(new GetObjectRequest(bucket, fileName));
        S3ObjectInputStream s3ObjectInputStream = s3Object.getObjectContent();

        byte[] bytes = IOUtils.toByteArray(s3ObjectInputStream);
        int byteLength = bytes.length;

        List<MediaType> mediaTypeList = new ArrayList<>();

        mediaTypeList.add(MediaType.APPLICATION_OCTET_STREAM);
        mediaTypeList.add(new MediaType("image", getExt(fileName)));

        return new ResponseEntity<>(bytes, createHttpHeaders(byteLength, mediaTypeList), HttpStatus.OK);
    }

    @Override
    public void delete(String fileName) {
        amazonS3.deleteObject(new DeleteObjectRequest(bucket, fileName));
    }

    @Override
    public String update(FileDeleteDto fileDeleteDto) throws IOException {
        delete(fileDeleteDto.getFileName());
        return create(fileDeleteDto.getMultipartFile());
    }

    private HttpHeaders createHttpHeaders(Integer byteLength, List<MediaType> mediaTypeList) {
        HttpHeaders httpHeaders = new HttpHeaders();
        for (MediaType mediaType : mediaTypeList) {
            httpHeaders.setContentType(mediaType);
        }
        httpHeaders.setContentLength(byteLength);
        return httpHeaders;
    }

    private String getExt(String fileName) {
        int dotIndex = fileName.trim().lastIndexOf(".");
        if (dotIndex >= 0) {
            return fileName.substring(dotIndex + 1);
        }
        return null;
    }
}- create - AmazonS3의 putObjcet를 통해 Cloud 저장소에 파일을 넣는다.
- read - AmazonS3의 getObject를 통해 Cloud 저장소에 있는 파일을 가져온다.
- delete - AmazonS3의 deleteObjcet를 통해 Cloud 저장소에 있는 파일을 삭제한다.
- update - 위에서 정의한 delete, create 메서드를 통해 Clood 저장소에 있는 파일을 변경한다.
DTO
FileDeleteDto
import lombok.Builder;
import lombok.Getter;
import lombok.NoArgsConstructor;
import lombok.Setter;
import org.springframework.web.multipart.MultipartFile;

@Getter
@Setter
@NoArgsConstructor
public class FileDeleteDto {
    private String fileName;
    private MultipartFile multipartFile;

    @Builder
    public FileDeleteDto(String fileName, MultipartFile multipartFile) {
        this.fileName = fileName;
        this.multipartFile = multipartFile;
    }
}
Delete 기능을 사용할 때 필요한 파일 이름과, 파일 정보를 객체로 받아오기 위한 클래스이다.
FileNameDto
import lombok.Builder;
import lombok.Getter;
import lombok.NoArgsConstructor;
import lombok.Setter;

@Getter
@Setter
@NoArgsConstructor
public class FileNameDto {
    private String fileName;

    @Builder
    public FileNameDto(String fileName) {
        this.fileName = fileName;
    }
}
파일 이름을 객체로 불러오기 위해 필요한 클래스이다. (나중에 값이 추가될 것을 예상해 Dto로 만들었다.)
Postman
Test를 위해 총 4개의 API 요청이 필요. 인증 관련해서 추가한 코드가 없으므로, Header는 따로 추가할 필요가 없다.
Create
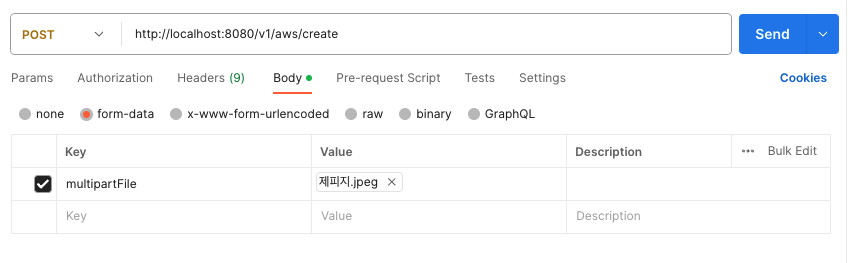
POST : /v1/aws/create
Body : form-data
| Key | Value | |
|---|---|---|
| File | multipartFile | 이미지파일 |
Read
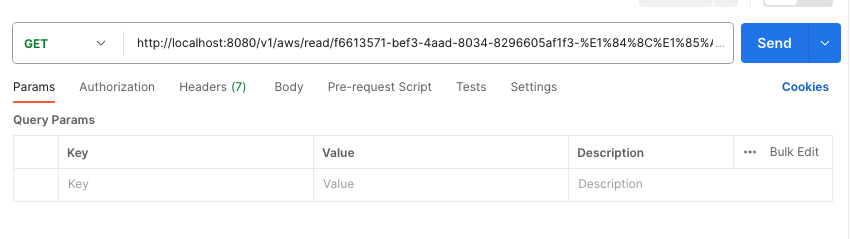
GET : /v1/aws/read/파일명(확장자포함)
Body : 없음
Update
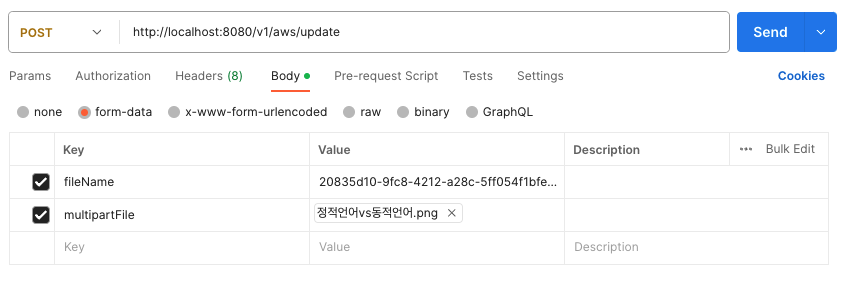
POST : /v1/aws/update
Body : form-data
| Key | Value | |
|---|---|---|
| Text | fileName | 파일명 |
| File | multipartFile | 이미지파일 |
Delete
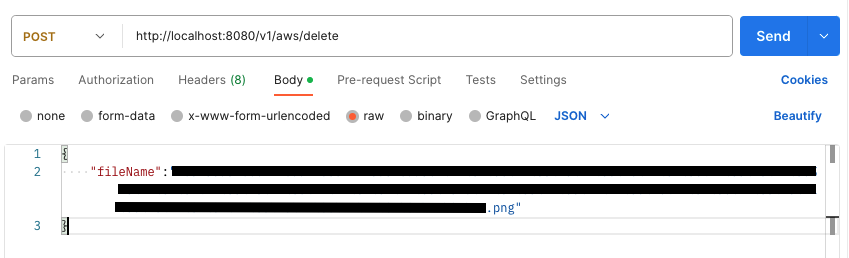
POST : /v1/aws/delete
Body : raw → JSON
{
	"fileName": 파일명
}
결론
기존에 진행했던 학교 어플리케이션에서 백엔드를 맡았다. 같은 환경에 Rest API를 제공하는 역할을 했는데, 이때는 Image 관련 처리가 학교 서버 loacl 파일에 저장이 됐었다. Cloud 관련 처리를 하려면 매우 힘들 것만 같았지만, 하고 보니 결국 다 비슷비슷 한 것 같다는 생각이 들었다. 물론 에러처리, null 처리 관련해서 미숙한 부분이 많지만 이 부분까지도 보완해보면 더 좋을 것 같다는 생각이 들었고, 현재는 cloud에만 저장하고 개인 DB에는 저장하는 로직이 없어 이것까지 추가해보면 많은 도움이 될 것 같다.
[참고]
[Spring boot] AWS S3 를 이용한 파일 업로드
SpringBoot로 AWS S3 사용 (이미지 CRUD)
https://woooow.tistory.com/118
[Spring] Spring Boot AWS S3 사진 업로드 하는 법
https://devlog-wjdrbs96.tistory.com/323
Github