[Spring] Spring Security OAuth2 구현중 Google Login OAuth2UserCustomService 로직 동작하지 않는 문제
Spring

🔑 문제
OAuth2.0 + JWT에 관한 책으로 학습중 Google 로그인을 구현했는데 인증 요청을 받아 사용자 정보(email)을 DB에서 사용자에 대한 정보가 없을 경우 가입되는 구조이다.
하지만 500에러를 나는 문제가 있었다.
🔍 분석
책에서는 이미 시큐리티를 사용해서 소셜 로그인을 구현한 상태이다.
그러면 같은 email을 가입한 상태로 Google 로그인을 해보았다.
결과는 로그인 되었다! 그러면 OAuth2UserCustomService에 있는 saveOrUpdate 코드가 실행이 되지않은거 같다. 다음은 OAuth2UserCustomService 클래스안에 saveOrUpdate메서드 로직이다.
// ...

// 유저가 있으면 업데이트, 없으면 유저 생성
private User saveOrUpdate(OAuth2User oAuth2User) {
// ...

User user = userRepository.findByEmail(email)
			.map(entity -> entity.update(name))
			.orElse(User.builder()
			.email(email)
			.nickname(name)
			.build());

return userRepository.save(user);
orElse() 코드를 보면 사용자 정보(email)을 찾지 못한 경우에 회원가입을 하는 로직이다.
🛠 디버그
그래서 이 코드와 OAuth2UserCustomService에 브레이크 포인트를 찍고 디버그를 돌려보았다. 하지만 OAuth2UserCustomService 로직 자체를 타지 않았다.
찾아본 결과 OAuth2.0 같은 경우는 OAuth2LoginAuthenticationFilter 타게 되는데 이 필터를 타고 attemptAuthentication을 거치게 된다.
 public Authentication attemptAuthentication(HttpServletRequest request, HttpServletResponse response) throws AuthenticationException {

	MultiValueMap<String, String> params = OAuth2AuthorizationResponseUtils.toMultiMap(request.getParameterMap());	authenticationRequest.setDetails(authenticationDetails);
	OAuth2LoginAuthenticationToken authenticationResult = (OAuth2LoginAuthenticationToken)this.getAuthenticationManager().authenticate(authenticationRequest);
	// ...
}
authenticationResult에는 많은 정보들이 담긴다.
그리고 우리가 application.yml에 설정한 내용들도 들어가 있다.
그리고 아까 전 코드에서 authenticationResult을 구현한 코드를 보자.
OAuth2LoginAuthenticationToken authenticationResult = (OAuth2LoginAuthenticationToken)this.getAuthenticationManager().authenticate(authenticationRequest);이 코드에서 authenticate()메서드는 AuthenticationManager라는 인터페이스로 구현을 했다.
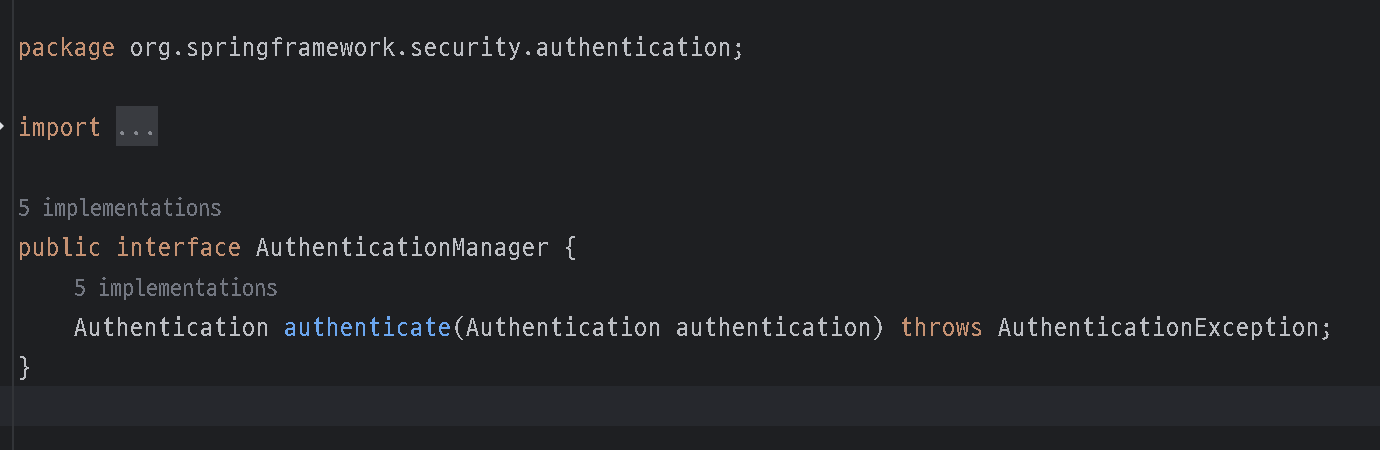
AuthenticationManager을 구현한 구현체 중에 현재 authenticate()은 ProviderManager 구현체를 쓴다.
이 구현체 안에 authenticate()에는
try {
	result = provider.authenticate(authentication);
    // ...
}
가 있는데 이 authenticate()은 AuthenticationProvider 라는 인터페이스를 쓰고 있다.
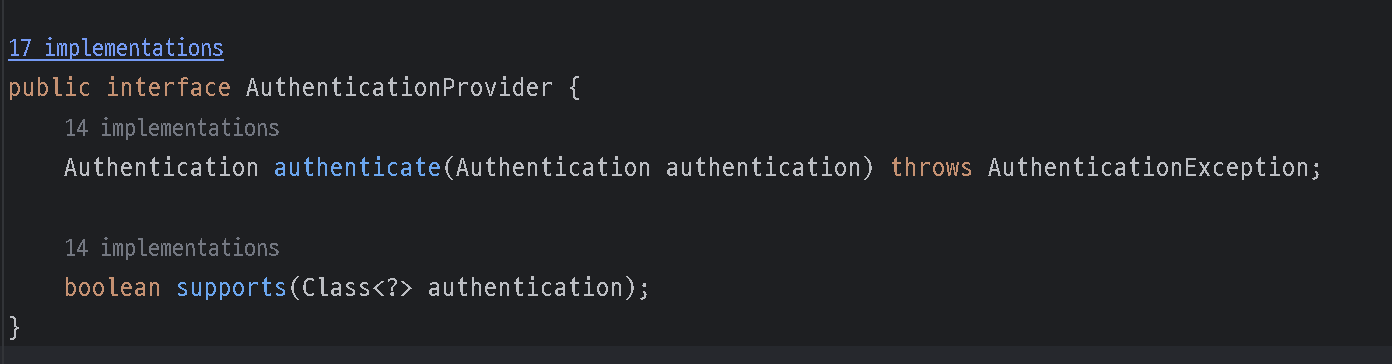
그리고 이 인터페이스를 구현한 구현체인 OAuth2LoginAuthenticationProvider을 쓰고 있다.
OAuth2LoginAuthenticationProvider의 authenticate 메소드를 살펴보면
public Authentication authenticate(Authentication authentication) throws AuthenticationException {
OAuth2LoginAuthenticationToken loginAuthenticationToken = (OAuth2LoginAuthenticationToken)authentication;
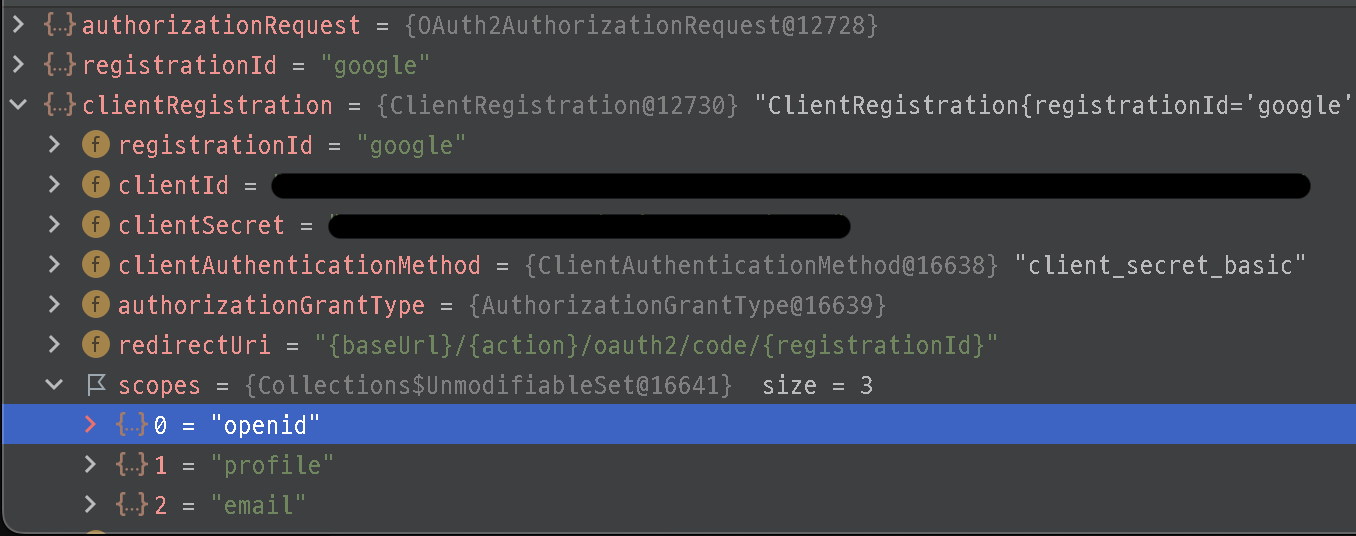
if (loginAuthenticationToken.getAuthorizationExchange().getAuthorizationRequest().getScopes().contains("openid")) {
return null;
}
// ...
OAuth2AccessToken accessToken = authorizationCodeAuthenticationToken.getAccessToken();
Map<String, Object> additionalParameters = authorizationCodeAuthenticationToken.getAdditionalParameters();
OAuth2User oauth2User = this.userService.loadUser(new OAuth2UserRequest(loginAuthenticationToken.getClientRegistration(), accessToken, additionalParameters));을 살펴보면 openid가 포함되어 있는것이 보인다. 이 코드는 scopes에 openid가 포함되어 있을 경우 null을 리턴하고OidcAuthorizationCodeAuthenticationProvider 가 대신 처리 한다.
만약에 openid가 없을 경우는 loadUser()가 실행이 된다. 그리고 이 loadUser() 커스텀한 OAuth2UserCustomService이다.
결론은 scopes에 openid가 포함되어 사용자가 정의한 OAuth2UserCustomService로 정상적으로 진행되지 않았던 것이다.
💡 해결
저 같은 경우는 application.yml에 파일을 설정해줘서 해결 했습니다!
처음 프로젝트를 설정해 줬을때 openid를 빼고 설정해 뒀는데 뭔가 싶었더니
나중에 다 알아본뒤 다시 확인 해보니
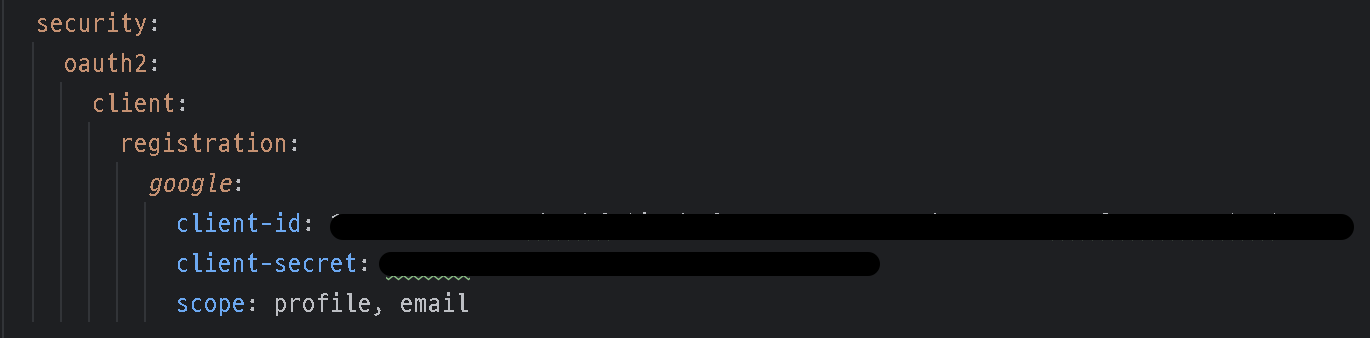
해결 전
  security:
    oauth2:
      client:
        registration:
          google:
            client-id:
            client-secret:
           scope: profile, email
해결 후
  security:
    oauth2:
      client:
        registration:
          google:
            client-id:
            client-secret:
            scope: profile, email
그렇다.. scope 뛰어쓰기가 한칸 밀려있었다. 😅
그래도 이번에 시큐리티 Oauth2.0 필터에 관해 더욱 깊숙히 알아보는 시간이어서 뜻 깊은 시간이었다.
📌 궁금증
그럼 Google 로그인의 scopes 요소에 openid는 어디서 왔을까?
Spring Security OAuth2에는 Google, FaceBook, GitHub 같은 것들은 미리 제공을 해준다.(카카오, 네이버 직접 설정해줘야 됨)
그 기본값들을 설정해 둔 곳이 있는데 바로 enum 타입의 CommonOAuth2Provider가 있다.
public enum CommonOAuth2Provider {
    GOOGLE {
        public ClientRegistration.Builder getBuilder(String registrationId) {
            ClientRegistration.Builder builder = this.getBuilder(registrationId, ClientAuthenticationMethod.CLIENT_SECRET_BASIC, "{baseUrl}/{action}/oauth2/code/{registrationId}");
            builder.scope(new String[]{"openid", "profile", "email"});
            builder.authorizationUri("https://accounts.google.com/o/oauth2/v2/auth");
            builder.tokenUri("https://www.googleapis.com/oauth2/v4/token");
            builder.jwkSetUri("https://www.googleapis.com/oauth2/v3/certs");
            builder.issuerUri("https://accounts.google.com");
            builder.userInfoUri("https://www.googleapis.com/oauth2/v3/userinfo");
            builder.userNameAttributeName("sub");
            builder.clientName("Google");
            return builder;
        }
    },
    GITHUB {
        public ClientRegistration.Builder getBuilder(String registrationId) {
            ClientRegistration.Builder builder = this.getBuilder(registrationId, ClientAuthenticationMethod.CLIENT_SECRET_BASIC, "{baseUrl}/{action}/oauth2/code/{registrationId}");
            builder.scope(new String[]{"read:user"});
            builder.authorizationUri("https://github.com/login/oauth/authorize");
            builder.tokenUri("https://github.com/login/oauth/access_token");
            builder.userInfoUri("https://api.github.com/user");
            builder.userNameAttributeName("id");
            builder.clientName("GitHub");
            return builder;
        }
    },
// ....
코드를 보면 builder.scope("openid", "profile", "email") openid, profile, email이 기본적으로 있다.
⌨️ 요약
OAuth2LoginAuthenticationFilter은attemptAuthentication을 거치게 된다.authenticationResult을 구현한 코드 문장에authenticate()메서드는AuthenticationManager라는 인터페이스로 구현을 했다.- 그리고
OAuth2LoginAuthenticationProvider라는 구현체를 사용중이다. OAuth2LoginAuthenticationProvider의authenticate을 보면openid가 없을 시loadUser()실행하는데 이loadUser()우리가 커스텀한OAuth2UserCustomService에 사용자 정보(email)를 찾고 없으면 회원가입을 하는 로직 부분이다.
참고로 application.yml을 건드리지 않고
CommonOAuth2Provider를 재정의 해서openid을 없애는 방식도 쓸 수 있다. 그리고 재정의한 enum을 다시 시큐리티에 재설정하면 된다.