Spring Security 란?
스프링 시큐리티는 보안, 인증과 인가를 담당하는 프레임워크로 스프링부트에서는 필터나 인터셉터를 이용해 해당 기능을 구현하기보다 스프링 시큐리티를 이용해 구현하는 것을 권장한다.
Spring Security 의 동작 과정
간단히 이해한 내용을 설명하면 DelegatingFilterProxy 가 필터 흐름을 가로채고 이 필터는 SecurityFilterChain을 가지는 FilterChainProxy 에 동작을 위임한다.
이런 세부 동작 과정은 이해하기 힘드나 결국 SecurityFilterChain 을 통해 스프링 시큐리티의 세부 필터가 작동하는 것이다.
Spring Security 의 인증(Authentication)
스프링 시큐리티의 인증은 두가지로 나뉜다.
- 로그인 인증
- 권한 인가를 위한 사용자 인증
먼저 로그인 인증을 알아보고 권한 인가를 위한 사용자 인증을 알아보자
SecurityFilterChain
SecurityFilterChain 은 수많은 필터로 이루어져 있고 순서는 위의 공식문서 9.5. SecurityFilters 를 참조하자.
여기서 로컬 로그인의 인증을 위해 알아볼 필터는 UsernamePasswordAuthenticationFilter 이다.
UsernamePasswordAuthenticationFilter
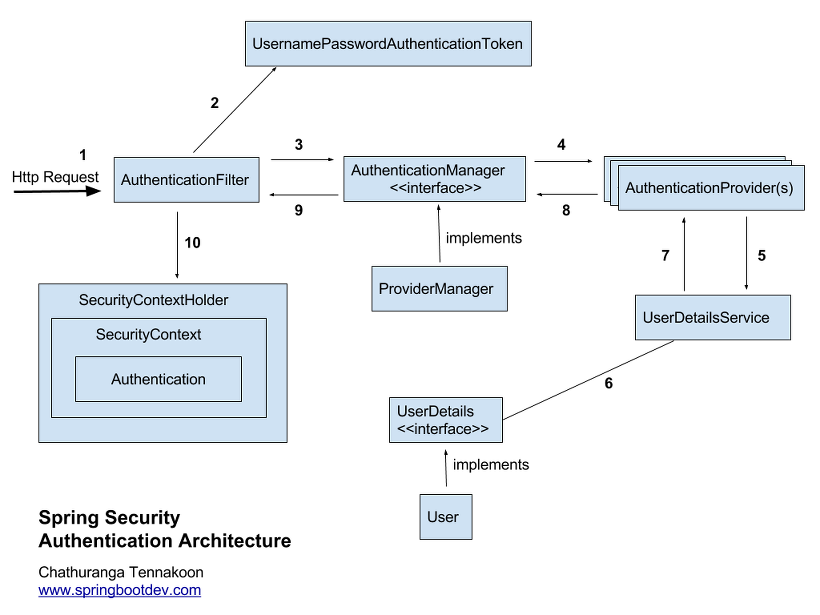
위의 그림은 스프링 시큐리티의 사용자이름과 비밀번호를 통한 로그인 인증 과정을 도식화한 그림이다.
- http로 로그인 요청
- 로그인 인증 요청이라면
UsernamePasswordAuthenticationFilter(이하AuthenticationFilter) 가 요청을 가로채 전달된username,password파라미터를 이용해UsernamePasswordAuthenticationToken인증 객체를 만든다. - 인증 객체를 인증을 위한
AuthenticationManager에 넘기고 인증을 위임한다. AuthenticationManager를 구현한ProviderManger는 스프링 시큐리티 기본적으로 제공하는AuthenticationProviders에 인증 객체를 전달한다.- 인증에 사용되기 적합한
AuthenticationProvider가 존재하면(여기서는DaoAuthenticationProvider)UserDatailsService에 인증 객체를 전달한다. UserDatailsService에서 인증 객체의 정보를 통해 DB에서 일치하는 사용자 정보를 찾고UserDetails객체를 만든다.AuthenticationProvider는UserDetails와UsernamePasswordAuthenticationToken를 비교해 인증에 성공하면ProviderManger에 권한을 담은 새UsernamePasswordAuthenticationToken만들어 전달한다.ProviderManager는 검증된 인증 객체를AuthenticationFilter에게 전달합다.AuthenticationFilter는 검증된 인증 객체를SecurityContextHolder의SecurityContext에 저장하고 나머지SecurityFilterChain은 무시하고SecurityFilterChain을 종료한다.
자세한 설명과 구현 예제
로그인 인증에 필요한 클래스
CustomAuthenticationSuccessHandlerCustomAuthenticationFailureHandlerCustomAuthenticationProviderCustomUserDetailsServiceUserPrinciple: UserDetails 구현 클래스JwtTokenProviderRestAuthenticationEntryPointRoleType: 권한 종류 Enum 클래스
WebSecurityConfig
@Configuration
@EnableWebSecurity
class WebSecurityConfig(
    private val customAuthenticationSuccessHandler: CustomAuthenticationSuccessHandler,
    private val customAuthenticationFailureHandler: CustomAuthenticationFailureHandler,
    private val passwordEncoder: BCryptPasswordEncoder,
    private val customUserDetailsService: CustomUserDetailsService,
    private val jwtAuthenticationFilter: JwtAuthenticationFilter
) : WebSecurityConfigurerAdapter() {

	// authenticationManager 빈 등록
    @Bean
    override fun authenticationManagerBean(): AuthenticationManager {
        return super.authenticationManagerBean()
    }

    // h2-console을 사용하기 위한 설정
    override fun configure(web: WebSecurity) {
        web.ignoring().antMatchers("/h2-console/**");
        super.configure(web)
    }

    override fun configure(http: HttpSecurity) {
        http.httpBasic().disable()
            .csrf().ignoringAntMatchers("/h2-console/**").disable()
            .sessionManagement().sessionCreationPolicy(SessionCreationPolicy.STATELESS)	// 세션 비활성화

        http.formLogin()
            .loginProcessingUrl("/login")
            .usernameParameter("emailAddress")
            .passwordParameter("password")
            .successHandler(customAuthenticationSuccessHandler)
            .failureHandler(customAuthenticationFailureHandler)

        http.exceptionHandling()
            .authenticationEntryPoint(RestAuthenticationEntryPoint())

        http.addFilterAfter(jwtAuthenticationFilter, UsernamePasswordAuthenticationFilter::class.java)

        http.authorizeRequests()
            .antMatchers(
                "/h2-console/**"    // 여기!
            ).permitAll()
            .antMatchers("/api/login/test").hasRole("MEMBER")
            .anyRequest().permitAll()

    }

    override fun configure(auth: AuthenticationManagerBuilder) {
        auth.userDetailsService(customUserDetailsService)
            .passwordEncoder(passwordEncoder)
    }
}
위의 코드는 스프링 시큐리티 설정 클래스이다. 기본적으로 WebSecurityConfigurerAdapter를 상속받아 configure 메소드를 오버라이딩하여 설정한다.
로그인 인증을 위한 설정
기본 폼 로그인은 세션을 디폴트로 사용하기 때문에과 JWT를 사용하는 REST API 방식으로 로그인하는데는 추가 설정이 필요하다. 스프링 시큐리티가 제공하는 로그인 폼(httpBasic), 세션 사용 등을 비활성화한다.
http.loginForm()
로그인 요청 경로, 로그인 인증에 쓰일 파라미터 매핑, 로그인 인증 성공, 실패에 따른 처리 핸들러 추가와 같은 설정을 추가한다.
디폴트시 /login 경로로 로그인 요청이 전달되고 폼 데이터의 username, password 는 Authentication 객체의 principle, credential 로 매핑된다.
- loginProcessingUrl( 경로 ) : 로그인 요청을 받은 경로를 지정한다.
- usernameParameter(), passwordParameter() : 전달받은 폼 데이터 파라미터를 로그인 인증에 사용되는 username, password 에 매핑한다.
- successHandler(), failureHandler() : 로그인 인증 성공, 실패시 수행할 핸들러를 부착한다.
주의사항
JSON의 로그인 데이터 본문 담아 로그인 요청을 할 시 에러가 발생한다. 따라서 프론트엔드에서 폼 방식 로그인을 사용하지 않는다면 JSON 형식 요청 본문을 폼 방식으로 변환하고
Content-Type = x-www-form-urlencoded로 설정해야 한다.
AuthentciationProvider를 위한 설정
configure(auth: AuthenticationManagerBuilder) 메소드에 DaoAuthenticationProvider 가 필요로하는 UserDetailsService의 구현체와 passwordEncoder 를 설정한다.
내부적으로 암호화된 패스워드를 전제로 검증하기 때문에 회원가입시 패스워드를 암호화하여 DB에 저장해야 된다.
passwordEncoder 빈 등록
@Configuration
class PasswordEncoderConfig {

    @Bean
    fun passwordEncoder() = BCryptPasswordEncoder()
}
패스워드 암호화를 위한 PasswordEncoder 를 빈으로 등록해야 된다. 스프링부트 2.6 이상부터 WebSecurityConfig 에 빈을 등록할 경우 커스터마이징한 AuthenticationProvider 와 순환 참조 에러가 발생하므로 가급적 다른 Config 클래스에 빈을 추가하는 것이 좋다.
UserPrinciple, CustomUserDetailsService
class UserPrinciple(member: Member) : UserDetails {
    private val email = member.emailAddress
    private val password = member.password
    private val authorities = listOf<GrantedAuthority>(SimpleGrantedAuthority(RoleType.ROLE_MEMBER.name))

    override fun getAuthorities() = authorities

    override fun getPassword() = this.password

    override fun getUsername() = this.email

    override fun isAccountNonExpired() = true

    override fun isAccountNonLocked() = true

    override fun isCredentialsNonExpired() = true

    override fun isEnabled() = true
}
@Service
class CustomUserDetailsService(
private val memberRepository: MemberRepository
) : UserDetailsService {
override fun loadUserByUsername(username: String): UserDetails {
val member = memberRepository.findByEmailAddress(username) ?: throw UsernameNotFoundException("Cannot found username.")
return UserPrinciple(member)
}
}여러 AuthenticationProvider 중 DB를 사용하는 인증방식인 DaoAuthenticationProvider에서 로그인 인증을 수행할 때UserDetailsService 를 구현한 객체를 필요로 한다. CustomUserDetailsService 의 loadUserByUsername 메소드를 오버라이드해 실제로 사용하는 데이터베이스에 접근해 유저 정보를 얻어 그 정보를 UserDetails를 구현한 객체에 담아 넘겨주어야 한다.
UserDetails 구현체
Entity를 UserDetails를 구현해 사용할 수도 있지만 코틀린의 자동 게터, 세터 생성과 충돌하기 때문에 분리해 사용하였다.
authorities 란?
결국
UserDetails를 구현한 객체를 활용해 인증 객체Authentication객체를 생성하고 이를 기반으로 자원에 대한 접근을 인가하기 때문에 유저의 권한을 리스트에 담는 것이다. 유저의 권한은 하나만 있지 않고 여러개를 가질 수 있기 때문에 리스트에 권한 객체GrantedAuthority의 구현체SimpleGrantedAuthority를 담는다.
CustomAuthenticationProvider
@Component
class CustomAuthenticationProvider(
    private val userDetailsService: CustomUserDetailsService,
    private val passwordEncoder: BCryptPasswordEncoder
) : AuthenticationProvider {

    override fun authenticate(authentication: Authentication): Authentication {
        val userPrinciple = userDetailsService.loadUserByUsername(authentication.principal as String)

        return when(passwordEncoder.matches(authentication.credentials as String , userPrinciple.password)){
            true -> UsernamePasswordAuthenticationToken(userPrinciple, null, userPrinciple.authorities);
            false -> throw BadCredentialsException("Bad Credential")
        }
    }

    override fun supports(authentication: Class<*>?): Boolean {
        return true
    }
}
DaoAuthenticationProvider 의 동작 방식대로 만든 AuthenticationProvider 객체이다. 커스터마이징한 Provider 객체를 사용하려면 configure(auth: AuthenticationManagerBuilder) 메소드에 auth.authenticationProvider() 메소드를 통해 추가하면 된다. DaoAuthenticationProvider 가 어떻게 동작하는지 참조하면 된다.
JwtTokenProvider
@Component
class JwtTokenProvider(
    private val userDetailsService: CustomUserDetailsService
) {
    companion object{
        private const val TOKEN_TTL = 30 * 60 * 1000   // ms
    }
    var secretKey = "testing-secret-key"

    // 비밀키 암호화 - Base64
    @PostConstruct
    fun init(){
        secretKey = Base64.getEncoder().encodeToString(secretKey.toByteArray())
    }

    fun createToken(authentication: Authentication): String {
        val now = Date()
        val principle = authentication.principal as UserPrinciple
        val claims = Jwts.claims().setSubject(principle.username)
        claims["roles"] = principle.authorities.first()

        return Jwts.builder()
            .setClaims(claims)	// claim 설정
            .setIssuedAt(now)	// 생성 시간
            .setExpiration(Date(now.time + TOKEN_TTL))	// 만료 시간
            .signWith(SignatureAlgorithm.HS256, secretKey)	// 알고리즘 설정
            .compact()
    }

    fun getAuthentication(token: String) =
        userDetailsService.loadUserByUsername(getEmailAddress(token)).let {
            UsernamePasswordAuthenticationToken(it, it.password, it.authorities)
        }

    fun getEmailAddress(token: String): String =
        Jwts.parser()
            .setSigningKey(secretKey)
            .parseClaimsJws(token)
            .body
            .subject

    fun resolveToken(req: HttpServletRequest): String?{
        val token = req.getHeader("X-AUTH-TOKEN") ?: ""
        val prefix = "bearer "
        return when(token.startsWith(prefix)){
            true -> token.substring(prefix.length, token.length);
            false -> null;
        }
    }

    fun validateToken(jwtToken: String): Boolean {
        return try {
            Jwts.parser()
                .setSigningKey(secretKey)
                .parseClaimsJws(jwtToken)
                .let { !it.body.expiration.before(Date())}
        } catch (e: Exception){
            false
        }
    }
}
JWT 토큰을 생성, 검증, 추출 등의 동작을 하는 JwtTokenProvider 이다.
Bearer 는 무엇이지?
jwt, oauth 토큰을 통한 인증임 의미한다. 클라이언트에서 넘겨줄때 Bearer를 붙임으로서 일단 jwt, ouath 토큰임을 알리는 것이다.
SuccessHandler, FailureHandler
@Component
class CustomAuthenticationSuccessHandler(
    private val jwtTokenProvider: JwtTokenProvider
) : AuthenticationSuccessHandler {
    override fun onAuthenticationSuccess(
        request: HttpServletRequest?,
        response: HttpServletResponse?,
        authentication: Authentication
    ) {
        val jwt = jwtTokenProvider.createToken(authentication)
        response?.sendRedirect("http://localhost:8080/api/login/success/$jwt")
    }
}

@Component
class CustomAuthenticationFailureHandler : AuthenticationFailureHandler{
    override fun onAuthenticationFailure(
        request: HttpServletRequest?,
        response: HttpServletResponse?,
        exception: AuthenticationException?
    ) {
        println(exception?.message)
        response?.sendRedirect("http://localhost:8080/api/login/fail")
    }
}
로그인에 대한 인증(AuthFilter, AuthProvider) 이 성공하거나 실패했을 때 수행되는 핸들러이다.
유의점
UsernamePasswordAuthFilter는 인증 과정을 모두 마치면 뒤에 남아 있는 필터 체인을 무시하고 종료한다. 하지만 위와 같이 핸들러를 설정하면 뒤의 필터들이 수행되는 것을 볼 수 있다. 이는 핸들러 내에서 리다이렉션을 했기 때문이다. 즉 겉으로는 AuthFilter 이후에도 필터들이 동작하는 것처럼 보이지만 사실 수행되는 필터들은 리다이렉션 된 요청에 의해 동작하는 것이다.
인가를 위한 인증에 대한 내용은 길어저 다른 포스팅으로 분리한다.
참조
- https://webfirewood.tistory.com/115
- https://deeplify.dev/back-end/spring/configure-spring-security-rest-api
- https://tech.junhabaek.net/spring-security-usernamepasswordauthenticationfilter%EC%9D%98-%EB%8D%94-%EA%B9%8A%EC%9D%80-%EC%9D%B4%ED%95%B4-8b5927dbc037#bd84
- https://ziponia.github.io/2019/05/26/spring-security-authenticationmanager.html
- https://velog.io/@cada/%ED%86%A0%EA%B7%BC-%EA%B8%B0%EB%B0%98-%EC%9D%B8%EC%A6%9D%EC%97%90%EC%84%9C-bearer%EB%8A%94-%EB%AC%B4%EC%97%87%EC%9D%BC%EA%B9%8C
- https://pygmalion0220.tistory.com/entry/Spring-Boot-Rest-API-%EC%97%90-Spring-Security-Form-%EB%A1%9C%EA%B7%B8%EC%9D%B8-%EC%A0%81%EC%9A%A9%ED%95%98%EA%B8%B0#controllerhomecontroller
- https://godekdls.github.io/Spring%20Security/contents/
- https://velog.io/@yaho1024/spring-security-delegatingFilterProxy
- https://gregor77.github.io/2021/05/18/spring-security-03/