stack
firebase cloud messaging
notification
* XML
- margin start , margin left
세계의 다양한 언어들은 왼쪽에서 오른쪽으로 진행하거나 오른쪽에서 왼쪽으로 진행된다.
이들을 지원하기 위해서 언어별로 진행되는 방향에 맞춰 마진을 줄 수 있는 속성이 margin start
조건들의 경우 api, support 등의 속성이 요구된다
- 빌더 패턴?
* FCM
-
개념
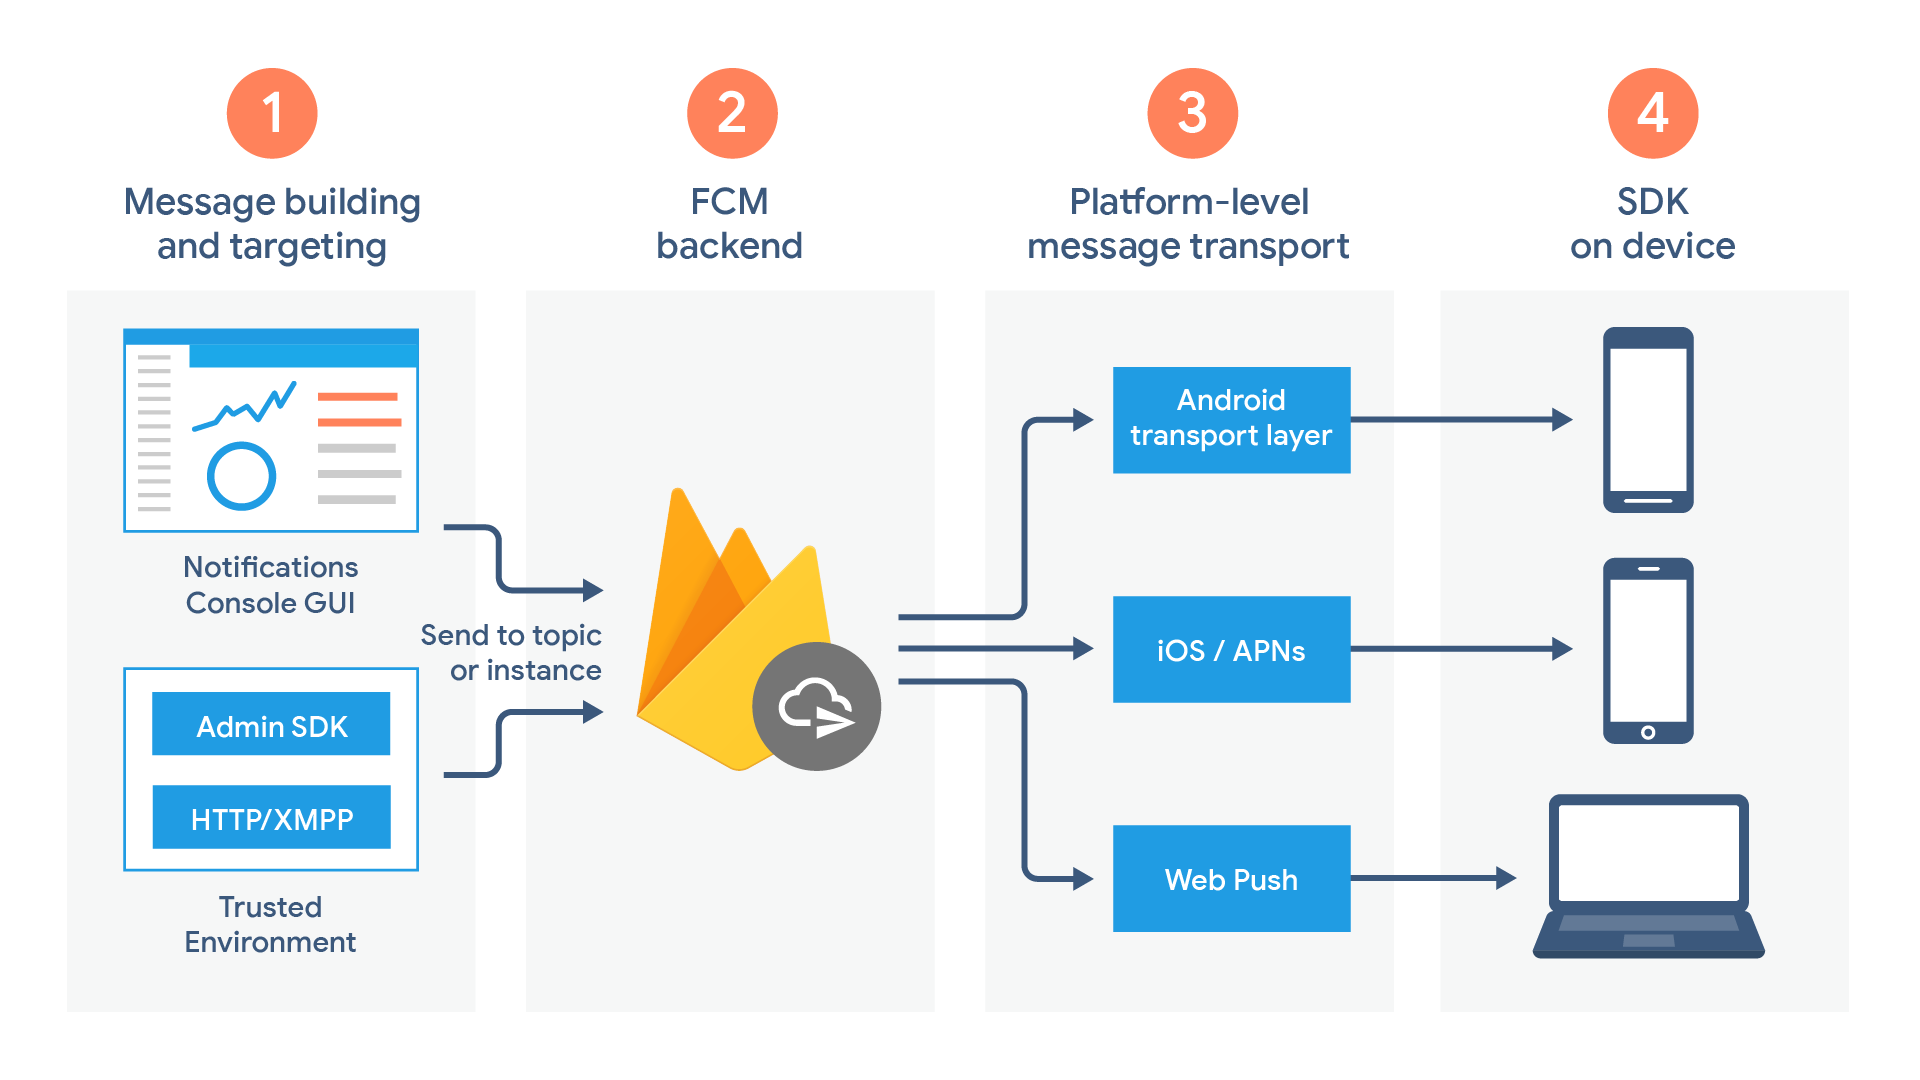
파이어베이스 클라우드 메시징(FCM)
https://firebase.google.com/docs/cloud-messaging?authuser=0 -
FCM 아키텍쳐 이미지
-
특징
[1] 호환성
알림의 경우 호환성 및 제약사항이 수시로 바뀜. 따라서 문서를 보고 파악을 자주 해줘야 한다
[2] 채널 -
메시지 유형
[1] 알림 메시지
구현이 쉬움, 고정적, 백그라운드에 있을 경우 처리할 수 없음
- Firebase Console은 애널리틱스 기반의 A/B 테스팅을 제공하여 마케팅 메시지를 수정하고 개선하는 데 도움이 됩니다.
마케팅적으로 좀더 효과적인 알림 메시지 전송을 확인할 때 사용하기도 한다
[2] 데이터 메시지
구현이 비교적 어려움, 표현할 수 있는것이 다양해짐, 포그라운드 백그라운드 구분없이 동작 지정 가능
- 설정하기
https://firebase.google.com/docs/android/setup?authuser=0
[1] 다운받은 파일(json)을 위치에 추가
[2] 그래들에 설정 추가
  dependencies {
    // ...

    // Add the following line:
    classpath 'com.google.gms:google-services:4.3.5'  // Google Services plugin
  }

apply plugin: 'com.android.application'
// Add the following line:
apply plugin: 'com.google.gms.google-services'  // Google Services plugin

android {
  // ...
}

dependencies {
  // ...

  // Import the Firebase BoM
  implementation platform('com.google.firebase:firebase-bom:26.8.0')

  // When using the BoM, you don't specify versions in Firebase library dependencies

  // Declare the dependency for the Firebase SDK for Google Analytics
  implementation 'com.google.firebase:firebase-analytics-ktx'

  // Declare the dependencies for any other desired Firebase products
  // For example, declare the dependencies for Firebase Authentication and Cloud Firestore
  implementation 'com.google.firebase:firebase-auth-ktx'
  implementation 'com.google.firebase:firebase-firestore-ktx'
> 우리거는 https://firebase.google.com/docs/android/setup?authuser=0
}
[3] 파이어베이스 토큰 확인
oncreate
        FirebaseMessaging.getInstance().token.addOnCompleteListener {
            task ->
                if (task.isSuccessful){
                    firebaseToken.text = task.result
                }
        }
[4] 파이어베이스 gui 툴을 통해 메시지 전송 확인
https://console.firebase.google.com/u/0/project/push-alarm-45db6/notification/compose?hl=ko
(이때 알림메시지로 가기에, 백그라운드에서만 확인 가능)
- Firebase 알림의 동작은 수신하는 앱의 포그라운드/백그라운드 상태에 따라 달라짐
- 모든 메시지는 수신된 지 20초(Android Marshmallow의 경우 10초) 이내에 처리되어야 함. 이는 네트워크 상태에 따라 제약이 발생할 수 있음을 의미
코딩
1. 서비스 클래스 작성
[1] FirebaseMessagingService()를 상속
[2] onNewToken 오버라이딩토큰이라는 것은 굉장히 자주 변경이 가능함(삭제 및 재설치, 데이터 삭제, 클리어 등등)
실제 라이브 서비스에선 토큰의 갱신을 확인하고 서버로 토큰 갱신을 알려줘야 한다
[3] onMessageReceived 오버라이딩
실제 메시지를 받을 때 동작을 작성
[4] 매니페스트 등록
어플리케이션 안에다가 추가
인텐트 필터란 앱에서 해당 필터에 해당하는 이벤트를 서비스로 수신하겠다는 것을 의미함
서비스는 외부 앱들과 공유할 수 있는데, 이를 막기 위한 속성이 exported = false임
-
테스트
[1] 클라우드 서비스중 API를 통해 메시지를 전송할 수 있는 서비스 이용
https://firebase.google.com/docs/reference/fcm/rest/v1/projects.messages/send?authuser=0&apix=true
[2] parent에 gson 파일에 있는 "projects/"project id 입력
[3] 리퀘스트 바디에 정보를 넣어 전송메시지 구조는 다음을 확인
https://firebase.google.com/docs/reference/fcm/rest/v1/projects.messages?authuser=0#Message
토큰에 파이어베이스 토큰 입력 -
디버깅
[1] 특정 케이스에 대한 상황이 왔는지 확인하기 위해 사용
(상세 동작을 구현하기 전)
[2] 브레이크 포인트를 건다
[3] attach 디버거 to 를 선택앱실행중에 디버깅에 걸림
- Notification 구현
-
주의
[1] Notification은 업데이트가 자주 일어남. 호환성을 신경 써줘야 함 > 공식 문서 참고
[2] 안드로이드 8.0부터 채널에 속해야 한다는 것을 주의 -
채널
https://developer.android.com/training/notify-user/channels?hl=ko
[1] 8.0이상부터 모든 알림을 채널에 할당해줘야 한다.( 그 이하에선 채널에 속하면 오히려 에러가 남)
[2] 다양한 중요도(우선순위)가 존재한다. 알림은 자신이 속하는 채널의 중요도와 같은 값을 갖는다.
[3] 알림이 발송되기 전에 만들어져 있어야 한다.
[4] 앱 정보의 Notification을 들어가보면 채널에 대한 정보를 볼 수 있음
[5] 코딩(서비스 클래스에서 진행)
private fun createNotificationChannelIfNeeded() {
if (Build.VERSION.SDK_INT >= Build.VERSION_CODES.O) {
val channel = NotificationChannel(
CHANNEL_ID,
CHANNEL_NAME,
NotificationManager.IMPORTANCE_DEFAULT
)
channel.description = CHANNEL_DESCRIPTION(getSystemService(Context.NOTIFICATION_SERVICE) as NotificationManager) .createNotificationChannel(channel) } } -
Notification 생성
[1] Notification 기본 틀 코딩코딩 (createNotification)
private fun createNotification(
type: NotificationType,
title: String?,
message: String?
): Notification {val notificationBuilder = NotificationCompat.Builder(this, CHANNEL_ID) .setSmallIcon(R.drawable.ic_baseline_circle_notifications_24) .setContentTitle(title) .setContentText(message) .setPriority(NotificationCompat.PRIORITY_DEFAULT) // 8.0이하의 경우 할당하지 않으면 에러 .setAutoCancel(true) // 알림을 눌렀을 때, 사라지도록 } return notificationBuilder.build() }
코딩 onMessageReceived
NotificationManagerCompat.from(this)
.notify(type.id, createNotification(type, title, message))
[2] Notification(normal, expand, custom) 별로 구분하여 동작 구현
코딩 (enum class)
enum class NotificationType(val title: String, val id: Int) {
NORMAL("일반 알림", 0),
EXPANDABLE("확장형 알림", 1),
CUSTOM("커스텀 알림", 3)
}
코딩 (service in onMessageReceived)
val type = remoteMessage.data["type"]
?.let { NotificationType.valueOf(it) }
type ?: return
코딩 (service in createNotification)
when (type) {
NotificationType.NORMAL -> Unit
NotificationType.EXPANDABLE -> {
notificationBuilder.setStyle(
NotificationCompat.BigTextStyle()
.bigText(
"?? ?? ?? ?? ?? ?? ?? ?? ?? ?? ?? ?? " +
"?? ?? ?? ?? ?? ?? ?? ?? ?? ?? ?? ?? " +
"?? ?? ?? ?? ?? ?? ?? ?? ?? ?? ?? ?? " +
"?? ?? ?? ?? ?? ?? ?? ?? ?? ?? ?? ?? " +
"?? ?? ?? ?? ?? ?? ?? ?? ?? ?? ?? ?? " +
"?? ?? ?? ?? ?? ?? ?? ?? ?? ?? ?? ?? " +
"?? ?? ?? ?? ?? ?? ?? ?? ?? ?? ?? ?? " +
"?? ?? ?? ?? ?? ??"
)
)
}
NotificationType.CUSTOM -> {
notificationBuilder
.setStyle(NotificationCompat.DecoratedCustomViewStyle())
.setCustomContentView(
RemoteViews(
packageName,
R.layout.view_custom_notification
).apply {
setTextViewText(R.id.title, title)
setTextViewText(R.id.message, message)
}
)
}
}https://developer.android.com/training/notify-user/expanded?hl=ko
https://developer.android.com/training/notify-user/custom-notification?hl=ko
큰 텍스트 블록 추가
.setStyle(NotificationCompat.BigTextStyle()
.bigText(emailObject.getSubjectAndSnippet()))
커스텀 알림
val notificationLayout = RemoteViews(packageName, R.layout.notification_small)
val notificationLayoutExpanded = RemoteViews(packageName, R.layout.notification_large)
// Apply the layouts to the notification
val customNotification = NotificationCompat.Builder(context, CHANNEL_ID)
        .setSmallIcon(R.drawable.notification_icon)
        .setStyle(NotificationCompat.DecoratedCustomViewStyle())
        .setCustomContentView(notificationLayout)
        .setCustomBigContentView(notificationLayoutExpanded)
        .build()
커스텀 알림에서 텍스트 조작은 위에처럼 별도의 메서드 이용
코딩(커스텀 레이아웃)
<TextView
    android:id="@+id/title"
    style="@style/TextAppearance.Compat.Notification.Title"
    android:layout_width="wrap_content"
    android:layout_height="wrap_content"
    android:textSize="25sp"
    tools:text="Title" />

<TextView
    android:id="@+id/message"
    style="@style/TextAppearance.Compat.Notification"
    android:layout_width="wrap_content"
    android:layout_height="wrap_content"
    android:layout_marginTop="10dp"
tools:text="Message" />- Notificatoin 눌렀을 때 동작 구현
https://developer.android.com/training/notify-user/build-notification?hl=ko#click
- 모든 알림은 일반적으로 앱에서 알림에 상응하는 활동을 열려면 탭에 응답해야 합니다. 이 작업을 하려면 PendingIntent 객체로 정의된 콘텐츠 인텐트를 지정하여 setContentIntent()에 전달해야 합니다.
[1] 코딩 in createNotification
val intent = Intent(this, MainActivity::class.java).apply {
putExtra("notificationType", "${type.title} 타입")
addFlags(Intent.FLAG_ACTIVITY_SINGLE_TOP)
}
val pendingIntent = PendingIntent.getActivity(this, type.id, intent, FLAG_UPDATE_CURRENT)
-
팬딩 인펜트
https://developer.android.com/reference/android/app/PendingIntent?hl=ko
"If the creating application later re-retrieves the same kind of PendingIntent (same operation, same Intent action, data, categories, and components, and same flags), it will receive a PendingIntent representing the same token if that is still valid, and can thus call cancel() to remove it."알림이 반복해서 들어와도, 아이디가 같으면 팬딩 인텐트가 중복해서 생성되지 않는다.
아이디로 구분해야 알림별로 새로운 팬딩 인텐트를 생성할 수 있다.
different request code integers supplied to getActivity(Context, int, Intent, int), getActivities(Context, int, Intent[], int), getBroadcast(Context, int, Intent, int), or getService(Context, int, Intent, int). -
플래그와 액티비티 스택
https://developer.android.com/guide/components/activities/tasks-and-back-stack?hl=ko
[2] 코딩 in Main
override fun onCreate(savedInstanceState: Bundle?) {
super.onCreate(savedInstanceState)
setContentView(R.layout.activity_main)
    initFirebase()
    updateResult()
}

override fun onNewIntent(intent: Intent?) {
    super.onNewIntent(intent)

    setIntent(intent)
    updateResult(true)
}

@SuppressLint("SetTextI18n")
private fun updateResult(isNewIntent: Boolean = false) {
    resultTextView.text = (intent.getStringExtra("notificationType") ?: "앱 런처") +
            if (isNewIntent) {
                "(으)로 갱신했습니다."
            } else {
                "(으)로 실행했습니다."
            }
}
인텐트를 통해 새로 만들어졌는지, 아님 갱신된 건지 확인
-
테스트
테스트가능
-
sha-1
인증에서 동적 링크, Google 로그인, 전화번호를 지원하는 데 필요 -
firebase-bom
의존성을 갖는 도구들이 무척 많은데, 각각의 도구들이 서로 호환하는 버전들이 다 다르다. 이를 일괄적으로 호환되는 버전을 매칭해주는 도구가 bom이다 -
메시지 수신하기
20초 이내에 처리해야 한다. (네트워크 상태 점검 필요)
알림이냐 데이터냐 에따라 처리가 다르다
데이터의 경우 백, 포 그라운드 모드 둘 다 onMessageReceived가 호출됨
firebase messaging service 상속해야 함
onNewToken 오버라이드 해야함
실제 서비스에서는 토큰이 갱신되는 경우가 많음. 이를 서버에 반영해주기 위한 메서드임
-
매니페스트 추가
service + intent filter -
메세지 보내기
보통 서버에서 하거나 다른 경로를 통해 하는게 대다수
firebase에서 api로 메시지 보내기를 서비스를 제공중임
- 알림 만들기
빌더 패턴을 따라 만들어줘야함
- 서비스
- 다른 외부 앱과 공유할지 않할지 선택 속성
export
-
디버그
실제 동작을 구현하기 전에, 해당 경우가 제대로 발생하는지 확인할 떄 사용하면 좋다
실제 디버깅 모드로 어플을 실행하기보다, attach를 사용하면 실행 도중 디버깅을 일부 붙여 보여주는 기능을 제공함 -
pending intent
.jpg)