Implementing a Container View Controller
Implementing a Container View Controller
- Designing a Custom Container View Controller
- Configuring a Container in Interface Builder
- Implementing a Custom Container View Controller
- Suggestions for Building a Container View Controller
- Delegating Control to a Child View Controller
1. Designing a Custom Container View Controller
- Container - Child VC 간의 명확한 역할 분담이 핵심
- Container ViewController: Embedded 된 Child ViewController 의 View를 자체 View 계층 구조에 포함하여 크기와 위치를 설정
- Child ViewController: 해당 View 의 컨텐츠를 담당
예시)
1-1. Navigation Controller
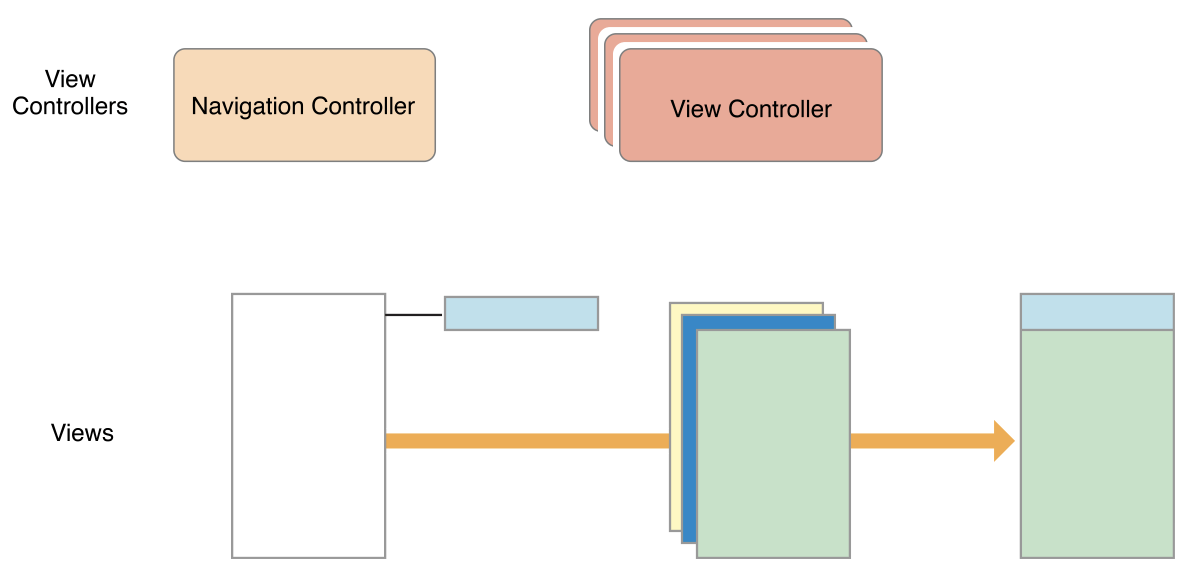
Navigation Controller 는 navigation stack을 통해 navigation 을 지원한다.
- NavigationController 는 transition animations, navigation bar 을 담당하고 compact 든, regular 든 한 번에 오직 하나의 Child VC만을 보여준다.
- Child ViewController는 컨텐츠 구성을 관리한다
1-2. Split View Controller

Split ViewController는 2개의 ViewController 를 Master - Detail 배치로 보여준다.
이 배치에서 Master VC 의 content 는 다른 Detail VC의 정보를 결정한다.
두 VC 가 보여지는 것은 현재 환경에 따라 달라진다.
-
Size class
-
레귤러-가로 (regular-horizontal): Master - Detail 두 VC를 모두 보여주거나 Master는 필요할 때만 보여줄 수 있다
-
컴팩트 (compact): 한 번에 하나의 VC만 보여줄 수 있다
-
2. Configuring a Container in Interface Builder
- 스토리보드에서 Container View 를 사용하는 방법
: Container VC 가 로드될 때 Child VC도 로드된다.

3. Implementing a Custom Container View Controller
Child VC 의 View를 관리하기 전에 Parent - Child 관계를 설정해야 UIKit에서 Parent VC가 Child VC의 view의 크기와 위치를 관리하고 있음을 알 수 있다.
이러한 관계는 (위의 경우 처럼) 스토리보드로 구현할 수도 있고 코드로 구현할 수 있다.
코드로 구현하는 경우 Child VC 를 명시적으로 추가하고 제거해야 한다.
3-1 추가 할 때
- addChild(child) // willMove 호출
- child.view.frame 설정
- view.addSubview(child.view)
- child.didMove

- didmove 의 위치는 addChild 직후 vs addSubview ?

: 어느 위치든 addChild 이후 다른 로직이 실행되기 전에, 즉 사이드 이펙트가 나타날 여지만 없으면 상관 없다.
3-2. 제거 할 때
- willMove
- view.removeFromSuperview()
- removeFromParent () // didMove 호출
3-3. addChild, addSubview
- addChild O, addSubview X: Child VC는 메모리에 올라가지만 Child VC 의 view 는 view 계층에 올라가지 않기 때문에 화면에 보이지 않음
- addChild X, addSubview O: Child VC는 메모리에서 deinit 돼서 인터렉션이 불가능하지만 Child VC 의 view 는 view 계층에 올라가기 때문에 deinit 되지 않고 화면에 표시된다.
📌보충설명: (ChildVC 를 지역변수로 선언하는 경우) Child VC를 초기화한 메서드가 끝나면 ChildVC 는 레퍼런스 카운트가 0이 되서 deinit 된다. 하지만 ChildVC 의 view 는 addSubView 에 의해 레퍼런스 카운트가 늘어난 상태이기 때문에 Child VC가 종료되도 View 는 deinit 되지 않는다.
3-4 ChildVC 의 Appearance Method 관리
override var shouldAutomaticallyForwardAppearanceMethods: Bool {
        false
}-
false 인 경우 자식 VC의 appearance methods 를 호출하는 책임을 프로그래머가 가지게 된다
(apperance methods: viewWillAppear, viewDidAppear, viewWillDisappear, viewDidDisappear) -
직접 호출 대신 아래와 같이 호출 가능
- beginAppearanceTransition(_isAppearing: Bool, animated Bool)
- endAppearanceTransition()
override func viewWillAppear(_ animated: Bool) {
    super.viewWillAppear(animated)

    childVC.beginAppearanceTransition(true, animated: animated)
}

override func viewDidAppear(_ animated: Bool) {
    super.viewDidAppear(animated)

    childVC.endAppearanceTransition()
}

override func viewWillDisappear(_ animated: Bool) {
    super.viewWillDisappear(animated)

    childVC.beginAppearanceTransition(false, animated: animated)
}

override func viewDidDisappear(_ animated: Bool) {
    super.viewDidDisappear(animated)

    childVC.endAppearanceTransition()
}- 어떠한 상황에서 쓰이는지 알아보기 위해 많이 찾아봤지만 적절한 예제가 없고
- 기본적으로 작동하는 Apperance Method 의 호출 타이밍이 특정 시점에 작동되길 원하는 로직과 맞지 않는 경우 사용하여 호출 시점을 수동으로 조절하는 것 같음
참고링크
4. Suggestions for Building a Container View Controller
Container VC 를 구현할 때 참고할 것들
- Container VC 는 Child VC 의 root view에만 접근해야 한다. 즉, child VC 의 다른 view 에 접근하면 안된다.
- Child VC 는 Container VC 에 대한 최소한의 정보만을 가져야 한다. 만약 Container VC 가 Child VC 에 의해 영향을 받아야 하는 경우에는, delegate 패턴을 사용해야 한다.
- Container 를 사용하기 전 일반 View 를 사용하여 예상대로 작동 하는지 테스트해보고 적용
(더 단순화된 조건에서 레이아웃 제약조건, 애니메이션 전환 테스트)
5. Delegating Control to a Child View Controller
: Child VC 에게 제어 권한 위임하기
5-1. childForStatusBarStyle
class ContainerVC: UINavigationController {
    override var childForStatusBarStyle: UIViewController? {
        return self.topViewController
    }
}

class ChildVC: UIViewController {
    override var preferredStatusBarStyle: UIStatusBarStyle {
        return .lightContent
    }
}
: StatusBar 는 ContainerVC 에서 관리하기 때문에 ChildVC 에서 Status Bar 를 설정하게 하고 싶은 경우 ContainerVC 에서 childForStatusBarStyle 을 override 해서 topViewController 를 반환해야 ChildVC에서 preferredStatusBarStyle 이 호출됨
5-2. preferredContentSize
ContainerVC 에서 ChildVC 의 preferredContentSize 를 이용하여 ChildVC 의 view 의 크기를 조정할 수 있다.


class LibraryContainerViewController: UIViewController { // Container VC

    private let library = [
        Book(title: "Alice's Adventures in Wonderland", author: "Lewis Caroll", firstLine: "Alice was beginning to get very tired of sitting by her sister on the bank, and of having nothing to do: once or twice she had peeped into the book her sister was reading, but it had no pictures or conversations in it, ‘and what is the use of a book,’ thought Alice ‘without pictures or conversations?’"),
        Book(title: "Emma", author: "Jane Austen", firstLine: "Emma Woodhouse, handsome, clever, and rich, with a comfortable home and happy disposition, seemed to unite some of the best blessings of existence; and had lived nearly twenty-one years in the world with very little to distress or vex her."),
        Book(title: "Great Expectations", author: "Charles Dickens", firstLine: "My father's family name being Pirrip, and my Christian name Philip, my infant tongue could make of both names nothing longer or more explicit than Pip."),
        Book(title: "Metamorphosis", author: "Franz Kafka", firstLine: "One morning, when Gregor Samsa woke from troubled dreams, he found himself transformed in his bed into a horrible vermin."),
        Book(title: "Peter Pan", author: "James M. Barrie", firstLine: "All children, except one, grow up.")
    ]

    @IBOutlet private var messageHeightConstraint: NSLayoutConstraint?

    private var previewController: MessageViewController?
    private var listTableViewController: BookListTableViewController?

    override func preferredContentSizeDidChange(forChildContentContainer container: UIContentContainer) {
        super.preferredContentSizeDidChange(forChildContentContainer: container)
        if (container as? MessageViewController) != nil {
            messageHeightConstraint?.constant = container.preferredContentSize.height
        }
    }
}
class MessageViewController: UIViewController { // Child ViewController
@IBOutlet private var messageLabel: UILabel!
var message: String? {
didSet {
updateMessage()
}
}
override func viewDidLoad() {
super.viewDidLoad()
updateMessage()
}
override func viewDidLayoutSubviews() {
super.viewDidLayoutSubviews()
calculatePreferredSize()
}
private func calculatePreferredSize() {
preferredContentSize = messageLabel.intrinsicContentSize
}
private func updateMessage() {
messageLabel?.text = message
}
}-
ContainerVC → ChildVC 로 text 전달
-
ChildVC
- 전달 받은 text 를 이용하여 ChildVC 의 messageLabel의 text 업데이트
- 갱신된 messageLabel 의 intrinsicContentSize 이용하여 preferredContentSize 업데이트
-
ContainerVC
: 호출된 preferredContentSizeDidChange 를 통해 ChildVC의 preferredContentSize 받고 ChildVC.view 의 height Constraint 를 업데이트
Supporting Accessibility
Accessibility 의 핵심
: 장애인과 비장애인이든 상관없이 모든 사람들에게 최대한 동일한 UX를 제공하는 것
accessibilityLabel
: 간단하지만 가장 핵심적인 메서드
backButton.accessibilityLabel = "뒤로가기"accessibilityTraits
- : button, header, image 등 설정 가능
- button 으로 설정 시 accessibilityLabel 에 적은 문구를 다 읽고 나서 '버튼'이라고 읽어준다.
- 예를 들어 UIImageView 로 버튼을 만드는 경우 필요.
- accessibilityLabel 맨 뒤에 그냥 버튼이라고 넣으면 되지 않나 싶을 수도 있지만 trait 의 경우 살짝 텀을 주고 읽기 때문에 좀 더 의미 구별을 쉽게 할 수 있음

UIAccessibility.post
- ex) argument 에 화면이 바뀔 때 Foucs 하고 싶은 view 를 적으면 됨
- NavigationController 의 경우 다음 화면으로 가면 맨 처음 Foucs 가 가는 view 가 back button 인데 이 때 이를 다른 걸로 바꿔 주고 싶을 경우 용이함
UIAccessibility.post(
            notification: UIAccessibility.Notification.screenChanged,
            argument: view
)
accessibilityElements
: Focus 순서 제어
cell.accessibilityElements = [cell.nameLabel, cell.ageLabel, cell.homeLabel]UIAccessibility.isVoiceOverRunning
: 보이스오버 일 때, 아닐 때 분기처리해서 로직을 나눌 수 있음

- 늘리려면 터치하라는 accessibilityLabel 존재
- 뿐만 아니라 VoiceOver 작동 시 터치 시 하나씩 늘어나고 5개에서 한 번 더 누르면 다시 0.5개부터 시작
참고하면 좋은 링크
HIG
https://developer.apple.com/design/human-interface-guidelines/accessibility/overview/introduction/