안드로이드에서 Retrofit2를 이용하여 서버와 데이터를 주고 받는 방법에 대해 알아보고자 한다.
그러면 Retrofit2가 무엇인지 어떠한 역할을 하는지 정리해보겠다.
1. Retrofit2이란?
- 안드로이드에서 클라이언트(Request)와 서버(Response)간에 HTTP 통신을 위한 라이브러리.
- Square에서 만들어진 라이브러리이며 , Okhttp 라이브러리를 간편히 사용할 수 있다.
HTTP란?
- HTTP(Hypertext Transfer Protocol의 약자)는 인터넷에서 데이터를 주고받는 데 사용되는 프로토콜.
- HTTP는 웹 브라우저와 웹 서버 간에 데이터를 전송하는 데 사용되는 통신규약.
- HTTP는 클라이언트-서버 모델로, 클라이언트가 요청(Request)을 보내고 서버가 응답(Response)을 반환하는 방식으로 동작함.
- 요청(Request)-응답(Response) 방식 중 가장 많이 사용되는 것이 HTTP. (FTP , SMTP , DNS 등)
모듈(Gradle) 추가
build.gradle (:app)
dependencies {
    implementation 'com.squareup.retrofit2:retrofit:2.7.1'
    implementation 'com.squareup.retrofit2:converter-gson:2.7.1'
    implementation 'com.squareup.okhttp3:okhttp:4.9.1'
}
매니페스트 권한 설정 추가
AndroidManifests.xml
<uses-permission android:name="android.permission.INTERNET" /> // 인터넷 연결

<application
	android:usesCleartextTraffic="true"> // 서버 Url이 http라면 추가
Retrofit 기본 설정
interface
- GET/POST 등의 함수가 정의된 인터페이스를 선언.
public interface ApiService {

    String BaseUrl="https://jsonplaceholder.typicode.com";

    @POST("/b-api/~임의의 주소값")
    Call<JsonElement OR Data class> register(@Body JsonObject jsonObject);

    @FormUrlEncoded // key-value 형식
    @POST("/posts")
    Call<Post> getPostList(@FieldMap HashMap<String, Object> param);

    @FormUrlEncoded // key-value 형식
    @POST("/posts")
    Call<Post> getPostList(@Field("userId") int userId ,
                    @Field("id") int id ,
                    @Field("title") String title ,
                    @Field("body") String body );

    @GET("/posts")
    Call<List<Post>> getData(@Query("userId") String id);
}
Data Class
- GET, POST 등의 응답값을 받기위한 Post 데이터 클래스 정의.
- JSON 형태는 userId, id, title, body로 구성된 형태이기 때문에 그대로 Post의 프로퍼티로 생성.
- @SerializedName이라는 어노테이션은, JSON에 있는 key값과 동일한 값으로 매칭시켜준다는 의미.
- @SerializedName을 사용하지 않으면 Gson은 데이터 클래스의 필드 이름과 JSON 키 이름들이 동일해야 함.
- 정리하면 , @SerializedName을 사용함으로써 Java 객체와 JSON 데이터 간의 매핑을 명시적으로 지정할 수 있다.
public class Post {
	@SerializedName("userId")
    private int userIds; // @SerializedName 사용하니 필드 이름이 달라도 됨.
    @SerializedName("id")
    private int id;
    //@SerializedName("title")
    private String title; // @SerializedName 사용안하니 JSON 키값과 필드 이름이 동일해야됨.
    @SerializedName("body")
    private String body;
}
MainActivity 전체코드
private void Retrofit(){

    // 데이터 통신의 로그를 확인.
    HttpLoggingInterceptor httpLoggingInterceptor = new HttpLoggingInterceptor();
    httpLoggingInterceptor.setLevel(HttpLoggingInterceptor.Level.BASIC);

	// 네트워크 통신에 대한 설정(타임아웃 , 인터셉터 등)을 추가
    OkHttpClient.Builder httpClient = new OkHttpClient.Builder()
              .readTimeout(60, TimeUnit.SECONDS)
              .writeTimeout(60, TimeUnit.SECONDS)
              .addInterceptor(httpLoggingInterceptor);

	// Retrofit 객체 생성
    Retrofit retrofitRequest = new Retrofit.Builder()
            .baseUrl(ApiService.BaseUrl)
            .addConverterFactory(GsonConverterFactory.create())
            .addInterceptor(httpLoggingInterceptor)
            .build();

	// API 요청 메소드 객체 생성
	ApiService apiService = retrofitRequest.create(ApiService.class);

	// Api 요청 - Get 통신
	apiService.getData("1").enqueue(new Callback<List<Post>>() {
                @Override
                public void onResponse(Call<List<Post>> call, Response<List<Post>> response) {
                    List<Post> data = response.body();
                    LogUtil.d("Retrofit getData userId : " + data.get(2).userIds);
                    LogUtil.d("Retrofit getData id : " + data.get(2).id);
                    LogUtil.d("Retrofit getData title : " + data.get(2).title);

                    for (Post item : data) LogUtil.d("Retrofit getData data : " + item.title);

                }

                @Override
                public void onFailure(Call<List<Post>> call, Throwable t) {

                }
            });

            /*
            HashMap<String,Object> PostData = new HashMap<>();
            PostData.put("userId",1);
            PostData.put("title","PostData Title");
            PostData.put("body","PostData Body");

			// Post 통신 - FieldMap
            apiService.getPostList(PostData).enqueue(new Callback<Post>() {
                @Override
                public void onResponse(Call<Post> call, Response<Post> response) {
                    Post post = response.body();
                    LogUtil.d("Retrofit getData userId : " + post.userIds);
                    LogUtil.d("Retrofit getData id : " + post.title);
                    LogUtil.d("Retrofit getData title : " + post.body);
                }

                @Override
                public void onFailure(Call<Post> call, Throwable t) {

                }
            });*/

            /*
            // Post 통신 - Field
            apiService.getPostList(
                    2,
                    13,
                    "nostrum quis quasi placeat",
                    "eos et molestiae\\nnesciunt ut a\\ndolores perspiciatis repellendus repellat aliquid\\nmagnam sint rem ipsum est")
                    .enqueue(new Callback<Post>() {
                @Override
                public void onResponse(Call<Post> call, Response<Post> response) {
                    Post post = response.body();
                    LogUtil.d("Retrofit getData userId : " + post.userIds);
                    LogUtil.d("Retrofit getData id : " + post.title);
                    LogUtil.d("Retrofit getData title : " + post.body);
                }

                @Override
                public void onFailure(Call<Post> call, Throwable t) {

                }
            });*/

}
결과값
- onResponse() [ 222] >> Retrofit getData userId : 1
- onResponse() [ 223] >> Retrofit getData id : 3
- onResponse() [ 224] >> Retrofit getData title : ea molestias quasi exercitationem repellat qui ipsa sit aut
2. API 서버와 통신하는 방법
기본적으로 서버와 통신하려면 서버측에서 요구하는 키값과 파라미터 값들을 맞춰서 세팅해주면 된다.
Retrofit 객체 생성
- API 서버를 설정
    // 데이터 통신의 로그를 확인.
    HttpLoggingInterceptor httpLoggingInterceptor = new HttpLoggingInterceptor();
    httpLoggingInterceptor.setLevel(HttpLoggingInterceptor.Level.BASIC);

	// 네트워크 통신에 대한 설정(타임아웃 , 인터셉터 등)을 추가
    OkHttpClient.Builder httpClient = new OkHttpClient.Builder()
              .readTimeout(60, TimeUnit.SECONDS)
              .writeTimeout(60, TimeUnit.SECONDS)
              .addInterceptor(httpLoggingInterceptor);

	// Retrofit 객체 생성
    Retrofit retrofitRequest = new Retrofit.Builder()
            .baseUrl(ApiService.BaseUrl) // API 요청할 베이스 URL
            .addConverterFactory(GsonConverterFactory.create())
            .addInterceptor(httpLoggingInterceptor)
            .build();

	ApiService apiService = retrofitRequest.create(ApiService.class);
API 요청 명령어 정리 - (GET , POST , PUT , DELETE)
- @메소드("경로") 형식으로 사용.
- 예시 : @GET("api/v1/app") , @POST("api/v1/login").
- 메소드 : GET / POST / PUT / DELETE 로 구성.
1. GET
- @GET 메소드는 보통 서버에서 데이터 조회용도로 자주 쓰인다.
- 파라미터로는 주로 @Query 와 @Path를 사용한다.
- @Query 와 @Path 차이는 예시로 간단히 설명하고자 한다.
- 예시 : www.jsonplaceholder.typicode.com/posts/{Path}/comments?id={Query}
- @Query는 경로 뒤에 ? 로 붙는것이고 , @Path는 경로뒤에 하위경로{Path}를 설정하는 것이다.
interface
    @GET("/posts") // ex) https://jsonplaceholder.typicode.com/posts?userId=2
    Call<List<Post>> getData(@Query("userId") String id);

    @GET("/posts/{id}") // ex) https://jsonplaceholder.typicode.com/posts/2
    Call<List<Post>> getDataId(@Path("id") String id);
메인
            apiService.getData("2").enqueue(new Callback<List<Post>>() {
                @Override
                public void onResponse(Call<List<Post>> call, Response<List<Post>> response) {
                    List<Post> data = response.body();
                    LogUtil.d("Retrofit getData userId : " + data.get(2).userIds);
                    LogUtil.d("Retrofit getData id : " + data.get(2).id);
                    LogUtil.d("Retrofit getData title : " + data.get(2).title);

                    for (Post item : data) LogUtil.d("Retrofit getData data : " + item.title);

                }

                @Override
                public void onFailure(Call<List<Post>> call, Throwable t) {

                }
            });
결과값
- Retrofit getData userId : 2
- Retrofit getData id : 13
- Retrofit getData title : dolorum ut in voluptas mollitia et saepe quo animi
userId를 @Query로 전달하면, 해당하는 파라미터에 맞춰서 데이터를 가져온다.
(예를 들어 , 파라미터로 userId 2면, userId가 2인 JSON 데이터를 가져온다.)
그리고 GET을 통해 전달받고 싶은 데이터의 형식을 Call<>안에 써준다.
JSON 데이터를 Post 객체 데이터(id , title 등)로 가져오고 싶기 때문에 반환값을 Call<List>로 설정한다.
2. POST
- @POST 메소드는 보통 서버에서 데이터를 생성하거나 정보를 입력할때 사용한다. (로그인 , 회원가입 등)
- 파라미터로는 보통 @Body를 사용하며 , @Field나 @FieldMap를 사용하기도 한다.
- @Body는 데이터를 Java Object 통째로 직렬화해서 보낸다.
- @Field나 @FieldMap는 @FormUrlEncoded : 키-값 방식으로 데이터를 보낸다.
interface
    @FormUrlEncoded // key-value 형식
    @POST("/posts")
    Call<Post> getPostList(@FieldMap HashMap<String, Object> param);

    @FormUrlEncoded // key-value 형식
    @POST("/posts")
    Call<Post> getPostList(@Field("userId") int userId ,
                           @Field("id") int id ,
                           @Field("title") String title ,
                           @Field("body") String body );

    @Headers("Content-Type: application/json")
    @POST("api/t1/login")
    Call<LoginData> login(@Body RequestData body);
메인
            HashMap<String,Object> PostData = new HashMap<>();
            PostData.put("userId",1);
            PostData.put("title","PostData Title");
            PostData.put("body","PostData Body");

            apiService.getPostList(PostData).enqueue(new Callback<Post>() {
                @Override
                public void onResponse(Call<Post> call, Response<Post> response) {
                    Post post = response.body();
                    LogUtil.d("Retrofit getData userId : " + post.userIds);
                    LogUtil.d("Retrofit getData id : " + post.title);
                    LogUtil.d("Retrofit getData title : " + post.body);
                }

                @Override
                public void onFailure(Call<Post> call, Throwable t) {

                }
            });
결과값
- Retrofit getData userId : 1
- Retrofit getData title : PostData Title
- Retrofit getData body : PostData Body
@FieldMap은 @Field 형식을 통해 여러개의 데이터를 맵처럼 한번에 전송한다.
다만 Retrofit에서 Map보다 HashMap을 사용하길 권장한다.
3. PUT
- @PUT은 보통 서버내의 데이터를 수정하는 용도로 많이 이용한다.
- UPDATE 역할이라고 보면 된다.
4. DELETE
- @DELETE는 보통 서버내에서 데이터를 삭제할때 사용한다.
@Body 와 @Field 차이
- @Field 형식을 사용할때는 @FormUrlEncoded도 같이 사용하는데 Encoded를 한다는건 통신간에 보안을 신경쓴다는걸 의미한다.
- 그러면 인코딩 과정에서 특수문자(+,=,&)에 대해서는 에러가 발생한다.
- 따라서 이러한 특수문자를 사용해야할 경우에는 @Body를 사용한다고 이해하자.
JSON Data란?
- JSON Data는 기본적으로 키-값이 쌍으로 이루어진 데이터를 말한다.
- JSON Object라는 것을 지원하기 때문에 사용 방법만 알면 쉽게 접근이 가능하다.
  {
    "userId": 1,
    "id": 1,
  	"body": "Test"
  }
JSON 데이터 송신
JSON 데이터를 송신하기 위해서는 JSON Object를 통해 데이터를 가공해야 한다.
private void SetJSON(){
	JSONObject object = new JSONObject();
	try{
    	object.put("JsonName","오라클");
        object.put("JsonAddress","시카고");
        object.put("JsonAge","11");
    }catch(JSONException e){
    	e.printStackTrace();
    }
}
결과 : { "JsonName" : "오라클" , "JsonAddress" : "시카고" , "JsonAge" : "11" }
JSON Array 데이터 송신
JSON에 배열을 넣기 위해서는 JSONArray를 사용.
private void SetJSON(){
	ArrayList<String>() larray = new ArrayList<String>();
    JSONObject object = new JSONObject();
    JSONArray json_array = new JSONArray();
	try{
    	object.put("JsonName","제이슨");
        object.put("JsonAddress","서울");
        object.put("JsonAge","22");
        for(int i=0; i<larray.size; i++){
            JSONObject array_object = new JSONObject();
            array_object.put("array_data1",larray[i]);
            json_array.put(array_object);
        }
        object.put("list",json_array);
    }catch(JSONException e){
    	e.printStackTrace();
    }
}

larray.add("json1");
larray.add("json2");
larray.add("json3");
결과 : { "JsonName" : "제이슨" , "JsonAddress" : "서울" , "JsonAge" : "22", "list" : [ { "array_data1" : "json1" }, { "array_data2" : "json2" }, { "array_data3" : "json3" } ] }
사이트를 이용해서 실습해보기
사이트 : https://jsonplaceholder.typicode.com/
사이트를 확인해보면 Postman 툴 같은걸로 API 요청 테스트를 해볼 수 있다.
- GET /posts
- GET /posts/1
- GET /posts/1/comments
- GET /comments?postId=1
- POST /posts
- PUT /posts/1
- PATCH /posts/1
- DELETE /posts/1
3. 크롬 개발자모드(F12)에서 통신 데이터 확인하는 방법
웹에서 빠르게 확인해야 되는 경우 크롬 개발자 모드(F12)를 사용한다.
F12 > Network > Name > Preview > 원하는 통신 데이터 확인
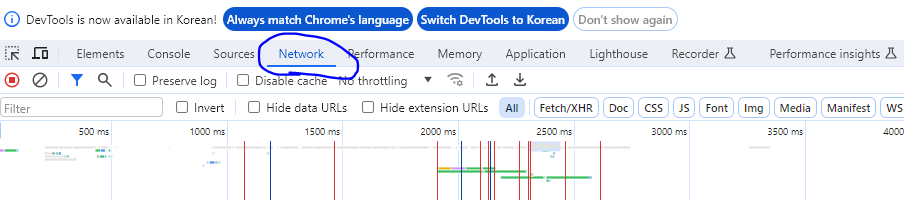
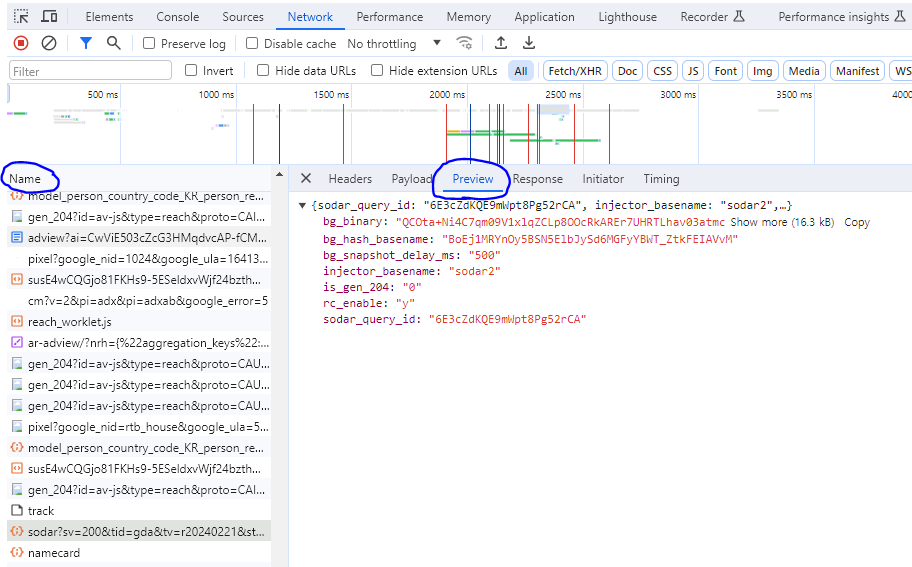
이런식으로 확인이 가능하다.