
앞서 진행한 build에 이어, 테스트를 위해 활용할 프로젝트의 repository에서 생성된 결과물을 활용하는 방식에 대해 알아봅시다~.~
#4, #5 중 하나의 방식을 택하여 활용하면 됩니당
#4. curl로 build된 결과물 다운로드하는 방식
- 다음의 내용은 테스트를 위해 활용할 프로젝트의 repository에서 진행합니다.
- 러너의 등록 방식은 위와 동일하며, 같은 방식으로 러너를 등록해줍니다.
- yml 파일 작성 방식 역시 동일하며, 앞서 build 된 결과물을 이용하는 방식은 다음과 같습니다. (curl로 다운로드 하는 방식)
stages:
    - download
    - build


download:
    stage: download
    script:
        - echo "for test gitlab ci build"
        - mkdir appsuit
        - curl --location --output sample.jar
					"생성된 파일의 경로 입력?private_token={개인 토큰 값 입력}"
        - echo $(ls)
        - mv sample.jar etc/

    artifacts:
        paths:
            - etc/sample.jar

    tags:
        - sample

build:
    stage: build

    dependencies:
        - download

    script:
        - ./gradlew assembleRelease

    artifacts:
        paths:
            - Sample.apk

    tags:
- sample- 다음은 예시일 뿐이며, 해당 내용을 참고해 필요한 단계 추가하여 작성하시면 됩니다.
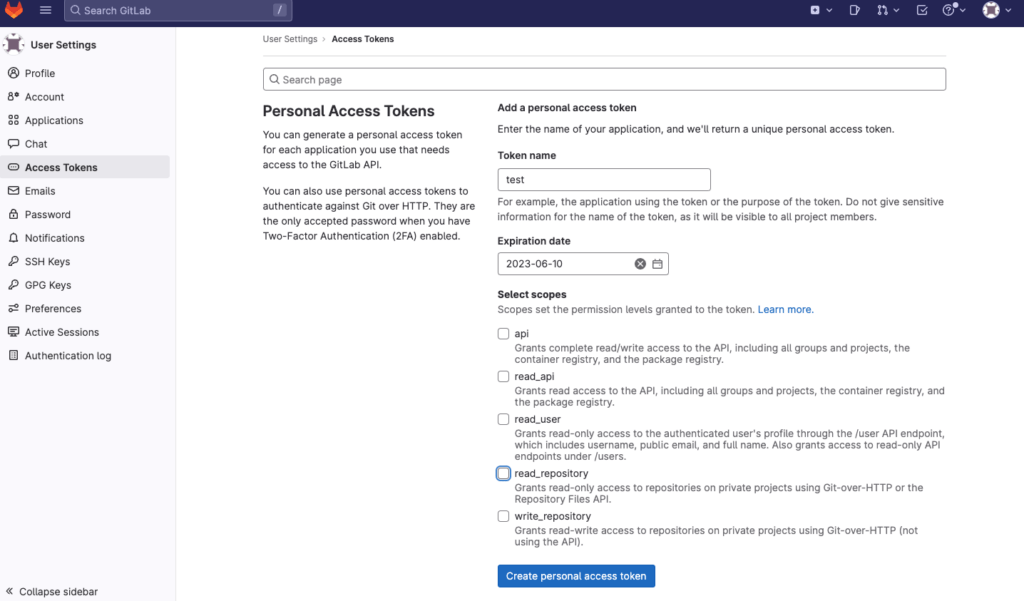
위의 입력이 필요한 개인 토큰 값을 생성하는 방법은 아래와 같습니다.
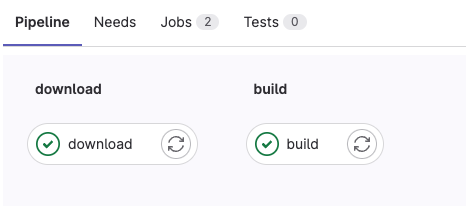
정상적으로 pipeline이 작동하는 것을 확인할 수 있습니다.
#5. Trigger 활용하여 자동화
#4. TestCase에 적용하기 보다 자동화 된 방법으로 trigger을 이용하여 앞서 활용한 repository(특정 branch 설정 가능)에서 commit 발생 시, 자동으로 test case의 pipeline이 run 되도록 하였습니다.
- 다음의 내용은 테스트를 위해 활용할 프로젝트의 repository에서 진행합니다.
- 러너의 등록 방식은 위와 동일하며, 같은 방식으로 러너를 등록해줍니다.
- yml 파일 작성 방식 역시 동일하며, 앞서 build 된 결과물을 이용하는 방식은 다음과 같습니다. (trigger 활용)
stages:
    - trigger
    - build

trigger:
    stage: trigger
    trigger:
        project: etc/sample //적용할 프로젝트 name
        branch: gitlab-ci
        strategy: depend

    # only: // 넣어주지 않아도 무방함
    #     changes:
    #         - .gitlab-ci.yml


build:
    stage: build

    script:
        - ./gradlew assembleRelease

    artifacts:
        paths:
            - Sample.apk // 경로는 각자의 경로에 맞게 설정해주세요.
												// 토큰 값이 포함 된 경로로 설정해야 정상 작동합니다.

    tags: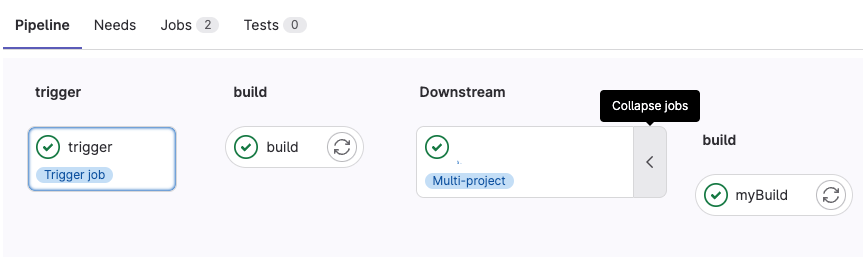
- sample- trigger를 걸어둔 repository에서 commit 발생시 자동으로 pipeline이 작동하는 것을 확인할 수 있습니다.
여기까지 진행했다면, 기본적인 build 및 trigger 단계는 구현이 가능할것입니다.
GitLab Runner는 현대 개발 환경에서 필수적인 빌드 도구로, 생산성 향상과 안정성을 보장한다. 효율적인 CI/CD 환경 구축에 도움이 되었기를 바라며, 더 많은 개발자들이 GitLab Runner의 강력함을 경험하길 기대합니다. 자세한 활용 방법과 팁은 공식 문서를 통해 더 자세히 알아보도록 합시다!

Android Developer