[Xcode] Tuist
협업할 때 Xcode 프로젝트 파일의 충돌로 받는 스트레스가 이만 저만이 아니다.
따라서 Xcode 프로젝트 파일을 생성하고 관리하는 도구를 사용하게 되는데, XcodeGen은 프로젝트 설정을 yml 또는 json으로 관리하는 반면, Tuist는 Project.swift라는 파일로 관리할 수 있고, 기능도 더 많다.
Tuist 설치
curl -Ls https://install.tuist.io | bash터미널에서 위 코드를 실행하여 설치할 수 있다.
기본 프로젝트 만들기
mkdir MyApp
cd MyApp

tuist init --platform ios
tuist init --platform ios --template swiftui	// swiftui ios 프로젝트
tuist init까지 완료하면 아래와 같이 파일들이 생성된다.
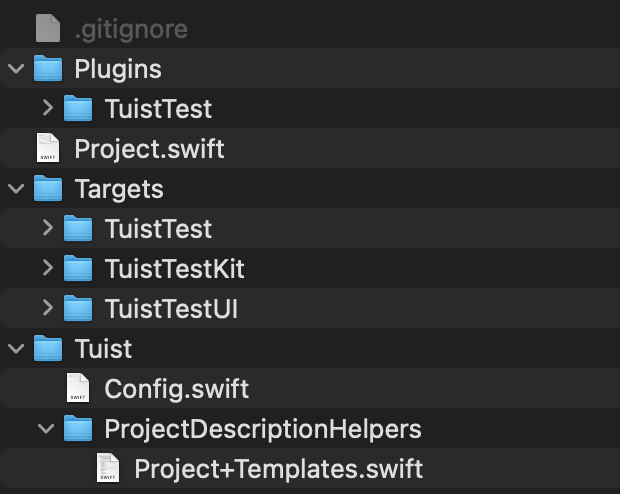
Project.swift
생성된 파일 가운데 메인 설정 파일인 Project.swift 파일을 보면 다음과 같다.
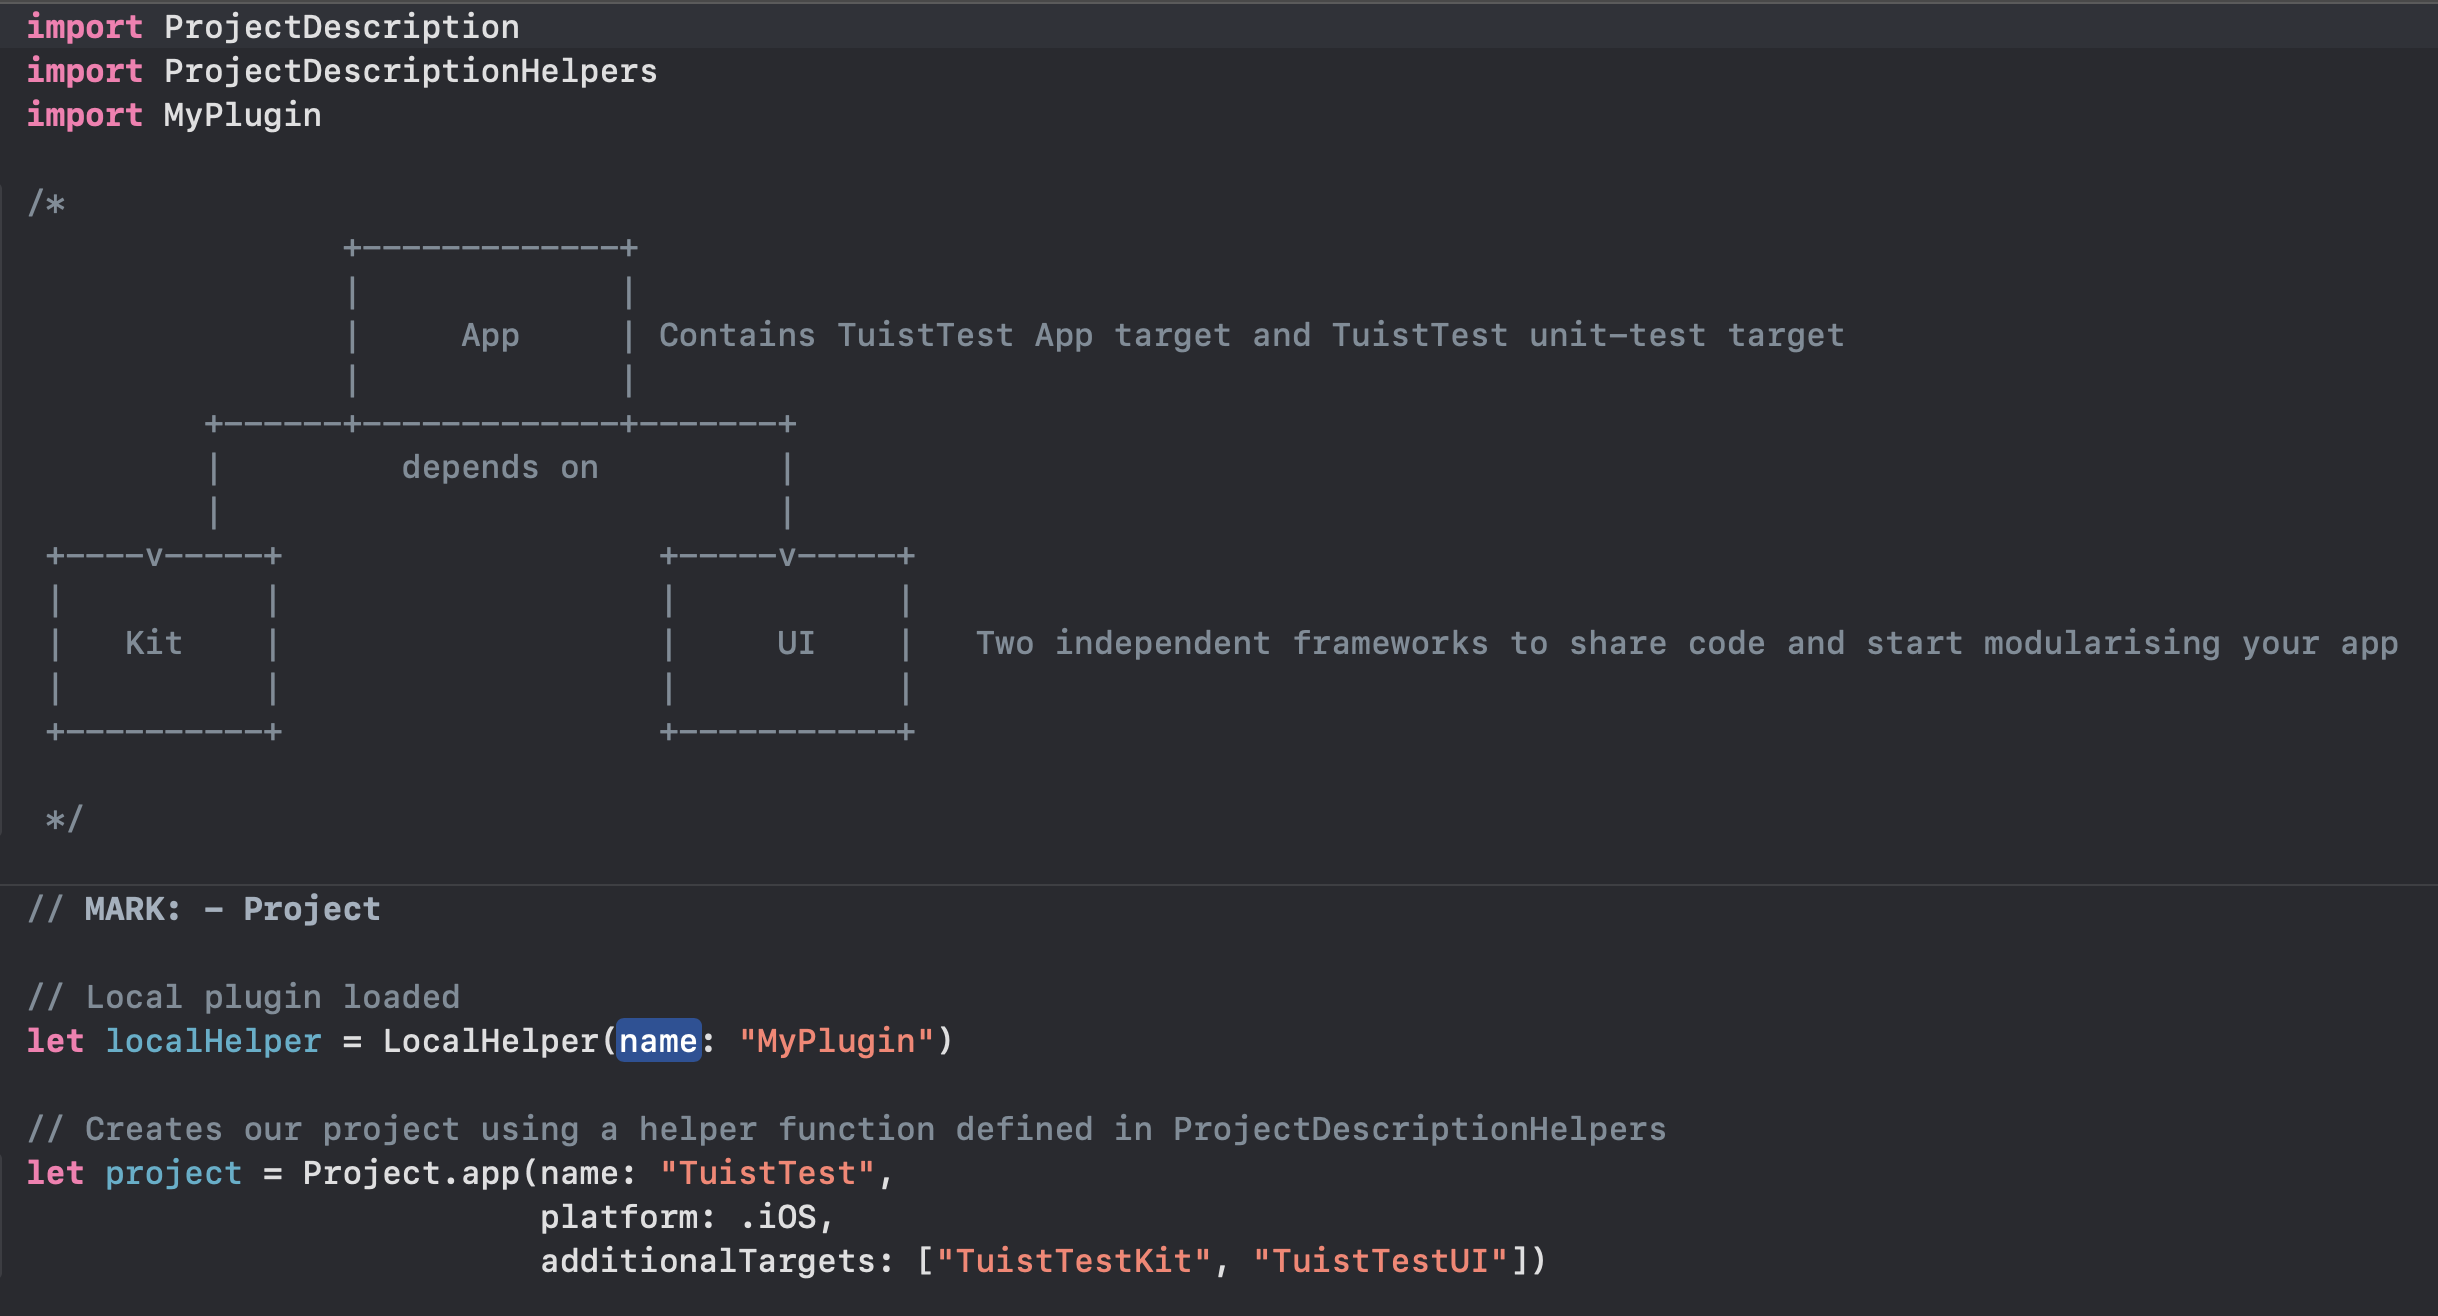
Project.app을 통해 'TuistApp'에 'TuistTestKit', 'TuistTestUI'를 타겟으로 추가하는 것을 볼 수 있다.
Project.app() 함수는 처음에 생성된 Project+Templates.swift 파일에 정의되어있는 함수이다.
프로젝트 또는 타겟이 따라야 하는 설정을 이 파일에 미리 정의해둘 수 있는데, 기본적으로 제공하는 것들을 각자의 프로젝트에 맞게 수정하여 사용하면 된다.
프로젝트 수정하기
tuist edit위 명령어를 통해 설정들을 Project.swift 파일을 Xcode로 열어 수정할 수 있다.
설정을 완료하면 ctrl + c 버튼을 눌러 완료할 수 있다.
기본 파일
기본적으로 제공하는 Project+Templates.swift 파일은 다음과 같다. 제공하는 Helper function 들을 보고 자신의 프로젝트에 맞게 수정하여 활용하자.
import ProjectDescription

/// Project helpers are functions that simplify the way you define your project.
/// Share code to create targets, settings, dependencies,
/// Create your own conventions, e.g: a func that makes sure all shared targets are "static frameworks"
/// See https://docs.tuist.io/guides/helpers/

extension Project {
    /// Helper function to create the Project for this ExampleApp
    public static func app(name: String, platform: Platform, additionalTargets: [String]) -> Project {
        var targets = makeAppTargets(name: name,
                                     platform: platform,
                                     dependencies: additionalTargets.map { TargetDependency.target(name: $0) })
        targets += additionalTargets.flatMap({ makeFrameworkTargets(name: $0, platform: platform) })
        return Project(name: name,
                       organizationName: "tuist.io",
                       targets: targets)
    }

    // MARK: - Private

    /// Helper function to create a framework target and an associated unit test target
    private static func makeFrameworkTargets(name: String, platform: Platform) -> [Target] {
        let sources = Target(name: name,
                platform: platform,
                product: .framework,
                bundleId: "io.tuist.\(name)",
                infoPlist: .default,
                sources: ["Targets/\(name)/Sources/**"],
                resources: [],
                dependencies: [])
        let tests = Target(name: "\(name)Tests",
                platform: platform,
                product: .unitTests,
                bundleId: "io.tuist.\(name)Tests",
                infoPlist: .default,
                sources: ["Targets/\(name)/Tests/**"],
                resources: [],
                dependencies: [.target(name: name)])
        return [sources, tests]
    }

    /// Helper function to create the application target and the unit test target.
    private static func makeAppTargets(name: String, platform: Platform, dependencies: [TargetDependency]) -> [Target] {
        let platform: Platform = platform
        let infoPlist: [String: InfoPlist.Value] = [
            "CFBundleShortVersionString": "1.0",
            "CFBundleVersion": "1",
            "UIMainStoryboardFile": "",
            "UILaunchStoryboardName": "LaunchScreen"
            ]

        let mainTarget = Target(
            name: name,
            platform: platform,
            product: .app,
            bundleId: "io.tuist.\(name)",
            infoPlist: .extendingDefault(with: infoPlist),
            sources: ["Targets/\(name)/Sources/**"],
            resources: ["Targets/\(name)/Resources/**"],
            dependencies: dependencies
        )

        let testTarget = Target(
            name: "\(name)Tests",
            platform: platform,
            product: .unitTests,
            bundleId: "io.tuist.\(name)Tests",
            infoPlist: .default,
            sources: ["Targets/\(name)/Tests/**"],
            dependencies: [
                .target(name: "\(name)")
        ])
        return [mainTarget, testTarget]
    }
}
예시로 TuistTestApp, TuistTestUI, TuistTestFoundation 3개의 프로젝트를 생성한다고 하고, TuistTestUI와 TuistTestFoundation은 Static Framework 타겟으로 생성한다고 해보자.
Project Description 작성
- Project+App.swift
import ProjectDescription

extension Project {
    public static func appTargets(
        name: String,
        appDependencies: [TargetDependency],
        testDependencies: [TargetDependency]
    ) -> [Target] {
        let sources = Target(
            name: name,
            platform: .iOS,
            product: .app,
            bundleId: "com.charlie/\(name)",
            infoPlist: .default,
            sources: "Sources/**",      // 소스파일 경로
            resources: "Resources/**",  // 리소스파일 경로
            dependencies: appDependencies
        )

        let testTarget = Target(
            name: "\(name)Tests",
            platform: .iOS,
            product: .app,
            bundleId: "com.charlie.\(name)Tests",
            infoPlist: .default,
            sources: "Tests/**",    // 소스파일 경로
            dependencies: [.target(name: name)] + testDependencies
        )

        return [sources, testTarget]
    }
}- Project+Framework.swift
import ProjectDescription

extension Project {
    public static func staticFrameworkTargets(
        name: String,
        frameworkDependencies: [TargetDependency],
        testDependencies: [TargetDependency]
    ) -> [Target] {
        let sources = Target(
            name: name,
            platform: .iOS,
            product: .app,
            bundleId: "com.charlie.\(name)",
            infoPlist: .default,
            sources: ["Sources/**"],   // 소스파일 경로
            resources: [],
            dependencies: frameworkDependencies
        )

        let tests = Target(
            name: "\(name)Tests",
            platform: .iOS,
            product: .app,
            bundleId: "com.charlie.\(name)Tests",
            infoPlist: .default,
            sources: ["Tests/**"],  // 소스파일 경로
            resources: [],
            dependencies: [.target(name: name)] + testDependencies
        )

        return [sources, tests]
    }
}
프로젝트 구성
Targets 폴더에 있던 것들을 Project.swift 파일을 생성하여 프로젝트로 변경한다. 이 때, 미리 작성해 둔 타겟 템플릿을 활용하고 settings, schemes 등을 신경써서 작성한다.
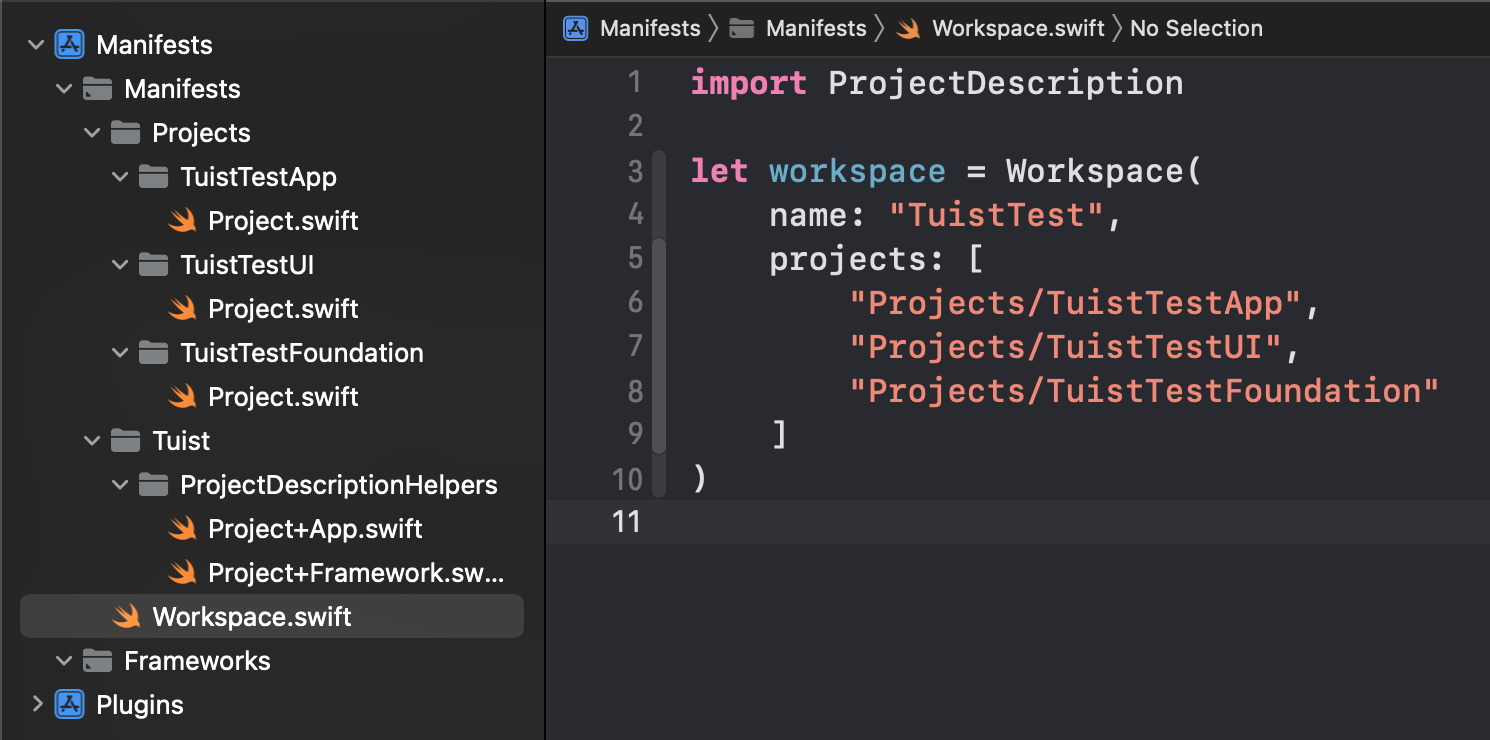
Workspace.swift 파일 작성
마지막으로 작성한 프로젝트 파일을 묶어서 workspace를 구성한다. workspace는 루트 폴더에 위치하면 된다.
프로젝트 생성하기
실제로 Xcode 프로젝트 파일이 없기 때문에 Xcode를 실행할 수 없다. 따라서 아래 명령어를 통해 설정해둔 것들을 바탕으로 Xcode 프로젝트를 생성한다.
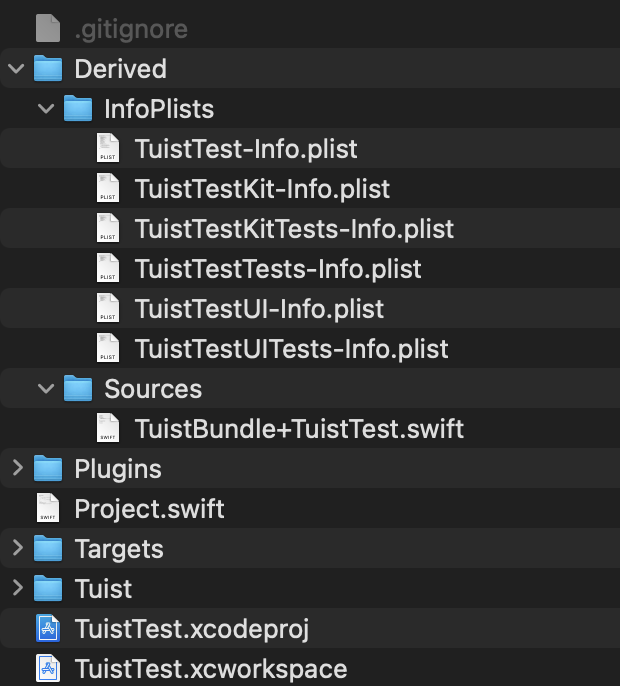
tuist generate프로젝트가 생성되면 다음과 같이 Xcodeproj, Xcworkspace 파일과 Derived폴더 안에 Info.plist 파일들 및 Bundle 관련 코드들이 생성된다.
위 명령어를 통해서 기본적으로 앱이 의존하는 모든 프로젝트들이 함께 생성된다.
그러나 가끔 workspace 내의 프로젝트들을 개별적으로 다시 생성하는 것이 필요한데, 이 때 아래와 같이 옵션을 추가한 명령어를 사용하면 된다.
tuist generate --project-onlyTuist badge 추가하기
프로젝트의 README 파일에 Tuist를 사용하여 프로젝트를 생성했다는 badge를 추가하고 싶다면 아래 Markdown snippet을 타이틀 아래에 작성하면 된다.
[](https://tuist.io)Reference
Tuist
Xcode 프로젝트 관리를 위한 Tuist 알아보기
당근마켓) XcodeGen 에서 Tuist 로 전환하기
Tuist를 활용한 하쿠나 iOS 프로젝트 모듈화 적용하기
