
🔎 조건문
01. If
📝 구조
//// 조건이 참일 때 실행됨
if (조건) {
  // ...
}

//// 조건이 거짓일 때 else 뒤에 있는 코드를 실행
if (조건) {
  // ...
} else {
  // ...
}

//// 조건1이 거짓일 때 else if 조건을 충족시키는 코드를 실행
if (조건1) {
  // ...
} else if (조건2) {
  // ...
} else if (조건3) {
  // ...
} else {
  // ...
}
✍ 예제1
const age = 20
if (age >= 18) {
  console.log('성인')
}

const number = 7
if (number % 2 === 0) {
  console.log('짝수')
} else {
  console.log('홀수')
}

const score = 85
if (score >= 90) {
  console.log('A')
} else if (score >= 80) {
  console.log('B')
} else if (score >= 70) {
  console.log('C')
} else if (score >= 60) {
  console.log('D')
} else {
  console.log('F')
}
💻 출력
성인
홀수
B
✍ 예제2
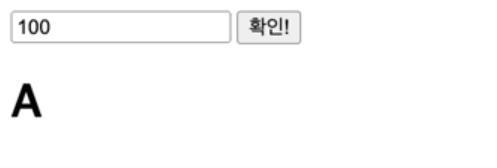
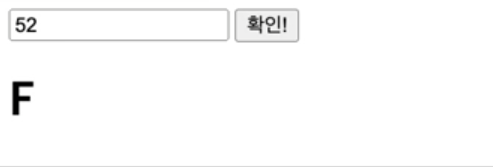
/* html */
<input type="text">
<button>확인!</button>
<h1></h1>
const inputEl = document.querySelector('input')
// input 태그를 찾아서 inputEl 라는 변수에 할당한다.
const buttonEl = document.querySelector('button')
const h1El = document.querySelector('h1')
buttonEl.addEventListener('click', function () {
const score = Number(inputEl.value)
if (score >= 90) {
h1El.textContent = 'A'
} else if (score >= 80) {
h1El.textContent = 'B'
} else if (score >= 70) {
h1El.textContent = 'C'
} else if (score >= 60) {
h1El.textContent >= 'D'
} else {
h1El.textContent = 'F'
}
})- buttonEl 에 addEventListener 라는 메소드를 호출하고있다.
- 사용자가 버튼을 클릭하면 뒤의 함수를 실행하겠다!
- input 요소에는 문자 데이터가 입력되기 때문에 숫자데이터로 바꾸기 위해서 Number()사용
💻 출력
02. Switch
📝 구조
switch (조건) {
  case 값1:
    // ...
    break
  case 값2:
    // ...
    break
  default:
    // ...
}
✍ 예제1
const prod = '노트북'
switch (prod) {
  case '노트북':
    console.log((3000000).toLocaleString() + '원')
    // console.log('3,000,000' + '원')
    break
  case '스마트폰':
    console.log((800000),toLocaleString() + '원')
    break
  case '키보드':
  case '마우스':
    console.log((120000),toLocaleString() + '원')
    break
  default:
    console.log('-')
}
💻 출력
3,000,000원
✍ 예제2
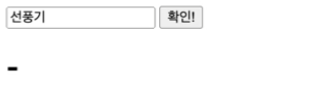
/* html */
<input type="text">
<button>확인!</button>
<h1></h1>
const inputEl = document.querySelector('input')
const buttonEl = document.querySelector('button')
const h1El = document.querySelector('h1')
buttonEl.addEventListener('click', function () {
const prod = inputEl.value
switch (prod) {
case: '노트북':
h1El.textContent = (3000000).toLocaleString() + '원'
break
case: '스마트폰':
h1El.textContent = (800000).toLocaleString() + '원'
break
case: '키보드':
case: '마우스':
h1El.textContent = (120000).toLocaleString() + '원'
break
default:
h1El.textContent = '-'
}
})
💻 출력


🔎 반복문
01. For
- 선언문, 조건문, 증감문 형태로 이루어진 반복문
- 조건문이 fail 되기 전까지 코드 블록을 계속적으로 반복 수행
- 선언문, 조건문, 증감문 자리에 공백 입력 가능
📝 구조
//// for (초기화; 조건; 증감) {}
for ( let i = 0; i < 6; i += 1) {
  console.log(i)
}

// 0
// 1
// 2
// 3
// 4
// 5
✍ 예제1
for ( let i = 0; i < 6; i += 1) {
  if (i > 3) {
    break   // 반복이 정지됨
  }
  console.log(i)
}

// 0
// 1
// 2
// 3
✍ 예제2
for ( let i = 0; i < 10; i += 1) {
  if (i % 2 === 0) {
    continue   // 조건문이 맞으면 아래쪽 코드는 무시하고 다음 반복으로 넘어감
  }
  console.log(i)
}

// 1
// 3
// 5
// 7
// 9- 변수에 새로운 값이 다시 할당될 수 있기 때문에
let이라는 키워드를 사용한다. i변수가 유효하게 동작할 수 있는 범위는 for 구문 안에서만 가능 (유효 범위)
✍ 예제3
- 2중 for문
for (let i = 0; i < 3; i++) {
  for (let j = 0; j < 3; j++) {
    console.log(`${i} + ${j} = ${i + j}`)
  }
}

// 0 + 0 = 0
// 0 + 1 = 1
// 0 + 2 = 2
// 1 + 0 = 1
// 1 + 1 = 2
// 1 + 2 = 3
// 2 + 0 = 2
// 2 + 1 = 3
// 2 + 2 = 4
02. While
- 조건문이 참일 때 코드 블록을 계속해서 반복 수행하는 반복문
- for 문에 비해 선언문과 증감문 없이 loop를 수행하며, 무한 loop 등 수행 시 많이 사용
✍ 예제1
let count = 1
while (count <= 10) {
  const divEl = document.createElement('div')
  divEl.textContent = count
  document.body.apppendChild(divEl)
  count += 1
}
💻 출력
// <div>2</div>
...
// <div>10</div>
- 정확하게 종료될 수 있는 구조를 제공해줘야함.
그렇지 않으면 무한반복이 되어 브라우저가 멈춰버릴 수 있음.
👀 For 구문과의 비교
for (let i = 1; i <= 10; i += 1) {
  const divEl = document.createElement('div')
  divEl.textContent = i
  document.body.append(divEl)
}
03. For of / For in
📝 for 구조에서 for of 구조로 바꾸기
- for 구조
const fruits = ['Apple', 'Banana', 'Cherry', 'Durian']
for (let i = 0; i < fruits.length; i += 1) {
  const fruit = fruits[i]
  console.log(fruit)
}
💻 출력
Apple
Banana
Cherry
Durian
- for of 구조
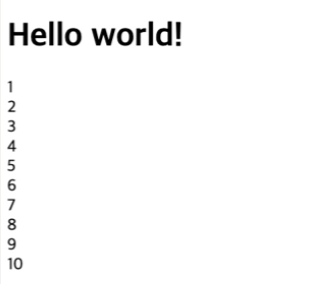
/* html */
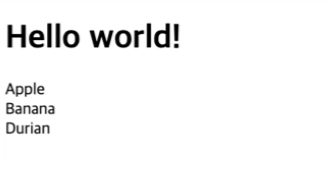
<h1>Hello world!</h1>// for (const 아이템 변수 of 배열) {}
for (const fruit of fruits) {
if (fruit === 'Cherry') {
continue
}
console.log(fruit) //콘솔 창에 나타남
const divEl = document.createElement('div') //메모리 상에 div 요소를 만든다
divEl.textContent = fruit // 메모리 상에 만들어진 div 요소의 글자 내용
document.body.appendChild(divEl) // 메모리 상의 div 요소를 실제 html 구조로 출력한다
}✔ 자바스크립트가 html을 제어할 수 있는 역할도 할 수 있다.
💻 출력
- for in 구조
/* html */
<h1>Hello world!</h1>
// for (const 키 변수 in 객체 데이터) {}
const user = {
name: 'Heropy'
age: 85
isValid: true
email: 'thesecon@gmail.com'
}
for (const key in user) {
if (key === age') {
continue
}
console.log(key, user[key]) //콘솔 창에 나타남
const divEl = document.createElement('div') //메모리 상에 div 요소를 만든다
divEl.innerHTML = `<b>${key}</b>: ${user[key]}`
document.body.appendChild(divEl) // 메모리 상의 div 요소를 실제 html 구조로 출력한다
}💻 출력
👀 여기서! 만약 divEl.innerHTML 대신 divEl.textContent를 사용하게 된다면?

프론트엔드 개발자를 꿈꾸는 코린이₊⋆ ☾⋆⁺