Flutter 앱에서 사용자 인증을 위한 로그인 화면은 매우 중요합니다. 이번 글에서는 Flutter의 LoginScreen 클래스를 분석하여 로그인 화면을 구현하는 방법에 대해 알아보겠습니다.
LoginScreen 클래스 소개 ✨
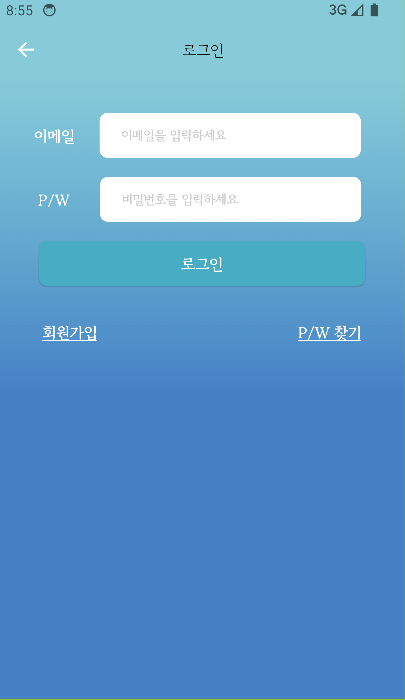
LoginScreen 클래스 사용자가 이메일과 비밀번호를 입력하여 로그인할 수 있는 화면을 구현하는 Flutter 위젯입니다. 사용자가 입력한 정보를 기반으로 Firebase 인증을 처리하고, 로그인 성공 또는 실패에 따라 적절한 처리를 수행합니다.
- Firebase Authentication 인증 방식을 사용하게 된 계기
처음에는 데이터베이스와 관련된 지식이 부족하여sqflite패키지를 사용하는 방법 밖에 알지 못했기 때문에, 다른 방식을 사용할 생각을 못하고 있었습니다. 그러나 로그인 기능을 추가하기 위해서는 자체local database에서는 구현이 힘들다는 것을 깨달았습니다. 결국엔 서버에서 아이디와 비밀번호를 확인해서 인증해주는 절차가 필요하기에 서버의 필요성을 깨닫고 방법을 모색하다가Flutter와 연동이 쉽게 되어있는Firebase를 백엔드로 두면 좋겠다고 생각했습니다. 추가적으로Firebase는 로그인 기능도Firebase Authentication을 통해 지원하고 있어서 1인 개발인 저에겐 더할 나위 없이 좋은 선택이라 생각했습니다.
주요 기능 및 코드 분석 🎭
1. 머터리얼 디자인의 Scaffold 사용
return Scaffold(
  appBar: AppBar(
    leading: IconButton(
      icon: Icon(
        Icons.arrow_back,
        color: Colors.white,
      ),
      onPressed: () {
        Navigator.pop(context); // 뒤로가기 버튼 클릭 시 이전 화면으로 이동
      },
    ),
    title: Container(
      margin: EdgeInsets.only(
        left: widthRatio * 104,
      ),
      child: Text(
        "로그인",
        style: TextStyle(
          color: Colors.black,
          fontSize: 16,
          fontFamily: 'GowunBatang',
          fontWeight: FontWeight.w400,
          height: 0,
          letterSpacing: -0.40,
        ),
      ),
    ),
    backgroundColor: Color(0xA545B0C5),
  ),
  body: Center(
    // 화면의 중앙에 배치
    child: Container(
      alignment: Alignment.center,
      ...
    ),
  ),
);LoginScreen은 Scaffold 위젯을 사용하여 화면을 구성합니다. Scaffold는 머터리얼 디자인을 구현하기 위한 기본적인 위젯으로, AppBar와 Body 등을 제공합니다.
2. 앱 바 설정
appBar: AppBar(
  leading: IconButton(
    icon: Icon(
      Icons.arrow_back,
      color: Colors.white,
    ),
    onPressed: () {
      Navigator.pop(context); // 뒤로가기 버튼 클릭 시 이전 화면으로 이동
    },
  ),
  title: Container(
    margin: EdgeInsets.only(
      left: widthRatio * 104,
    ),
    child: Text(
      "로그인",
      style: TextStyle(
        color: Colors.black,
        fontSize: 16,
        fontFamily: 'GowunBatang',
        fontWeight: FontWeight.w400,
        height: 0,
        letterSpacing: -0.40,
      ),
    ),
  ),
  backgroundColor: Color(0xA545B0C5),
),
로그인 화면의 앱 바에는 뒤로가기 버튼과 제목이 표시됩니다. 뒤로가기 버튼은 Appbar의 leading 속성으로 앱바의 좌측에 IconButton으로 구현되며, 클릭 시 이전 화면으로 이동합니다.
3. 이메일 및 비밀번호 입력 필드
		Container(
        margin: EdgeInsets.only(
                top: heightRatio * 41, left: widthRatio * 33),
              child: Row(
                children: [
                  Text(
                    '이메일',
                    style: TextStyle(
                      color: Colors.white,
                      fontSize: 16,
                      fontFamily: 'GowunBatang',
                      fontWeight: FontWeight.w700,
                      height: 0,
                      letterSpacing: -0.40,
                    ),
                  ),
                  Container(
                    padding: EdgeInsets.only(
                        left: widthRatio * 20,
                        top: heightRatio * 12,
                        bottom: heightRatio * 9),
                    decoration: ShapeDecoration(
                      color: Colors.white,
                      shape: RoundedRectangleBorder(
                          borderRadius: BorderRadius.circular(8)),
                    ),
                    margin: EdgeInsets.only(left: widthRatio * 23),
                    width: widthRatio * 240,
                    height: heightRatio * 52,
                    child: TextFormField(
                      // TextFormField의 속성들 설정
                      textInputAction: TextInputAction.next,
                      decoration: InputDecoration(
                        border: InputBorder.none,
                        hintText: '이메일을 입력하세요',
                        hintStyle: TextStyle(
                          color: Color(0xFFCCCCCC),
                          fontSize: 13,
                          fontFamily: 'GowunBatang',
                          fontWeight: FontWeight.w700,
                          height: 0,
                          letterSpacing: -0.33,
                        ),
                        // 다른 속성들 설정
                      ),
                      controller: _emailController,
                    ),
                  ),
                ],
              ),
            ),
            SizedBox(
              height: heightRatio * 22,
            ),
            Container(
              margin: EdgeInsets.only(left: widthRatio * 37),
              child: Row(children: [
                Text(
                  'P/W',
                  style: TextStyle(
                    color: Colors.white,
                    fontSize: 16,
                    fontFamily: 'GowunBatang',
                    fontWeight: FontWeight.w700,
                    height: 0,
                    letterSpacing: -0.40,
                  ),
                ),
                Container(
                  padding: EdgeInsets.only(
                      left: widthRatio * 20,
                      top: heightRatio * 12,
                      bottom: heightRatio * 9),
                  decoration: ShapeDecoration(
                    color: Colors.white,
                    shape: RoundedRectangleBorder(
                        borderRadius: BorderRadius.circular(8)),
                  ),
                  margin: EdgeInsets.only(left: widthRatio * 28),
                  width: widthRatio * 240,
                  height: heightRatio * 52,
                  child: TextFormField(
                  obscureText: true,
                  // TextFormField의 속성들 설정
                  decoration: InputDecoration(
                      border: InputBorder.none,
                      hintText: '비밀번호를 입력하세요',
                      hintStyle: TextStyle(
                      color: Color(0xFFCCCCCC),
                      fontSize: 13,
                      fontFamily: 'GowunBatang',
                      fontWeight: FontWeight.w700,
                      height: 0,
                      letterSpacing: -0.33,
                    ),
                     // 다른 속성들 설정
                  ),
                   controller: _passwordController,
                 ),
               ),
             ]),
           ),
위 코드에서는 이메일과 비밀번호를 입력하는 데 사용되는 텍스트 입력 필드를 구현합니다. 이메일 입력 필드는 TextFormField를 사용하고, controller를 활용하여 입력값을 저장해놓습니다.
4. 로그인 버튼
Container(
width: widthRatio * 300,
height: heightRatio * 52,
margin: EdgeInsets.only(
top: heightRatio * 22,
),
child: ElevatedButton(
style: ElevatedButton.styleFrom(
backgroundColor: Color(0xFF46B1C6), // 배경색 설정
shape: RoundedRectangleBorder(
borderRadius: BorderRadius.circular(8.0), // 원하는 값으로 조절
),
),
onPressed: () async {
// 로그인 버튼이 눌렸을 때의 처리
// 아이디와 비밀번호를 사용하여 로그인을 시도하고 결과에 따라 처리
String email = _emailController.text.toString();
String password = _passwordController.text.toString();
try {
UserCredential userCredential = await FirebaseAuth
.instance.signInWithEmailAndPassword(
email: email,
password: password
);
SystemChannels.textInput.invokeMethod('TextInput.hide');
Navigator.pop(context);
} on FirebaseAuthException catch (e) {
...
}
},
child: Container(
alignment: Alignment.center,
child: Text(
'로그인',
style: TextStyle(
color: Colors.white,
fontSize: 16,
fontFamily: 'GowunBatang',
fontWeight: FontWeight.w700,
height: 0,
letterSpacing: -0.40,
),
),
),
),
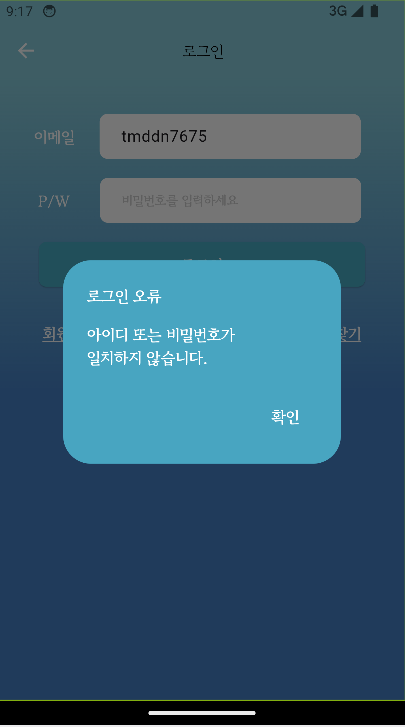
),로그인 버튼은 사용자가 입력한 이메일과 비밀번호로 Firebase 인증을 시도합니다. ElevatedButton 위젯을 사용하여 스타일을 지정하고, onPressed 콜백을 통해 로그인 시도를 수행합니다. Controller.text.toString()로 controller 값을 받아와서 FirebaseAuth.instance.signInWithEmailAndPassword(email: email, password: password)로 Firebase Authentication 인증요청을 합니다. 인증성공 시 MainScreen으로 Navigate 하고, 인증실패 시 아래와 같은 로그인 오류 Dialog를 띄웁니다. 인증성공 조건은 기본적으로 아이디가 이메일의 형식을 갖추어야하고, 입력받는 이메일과 비밀번호가 회원가입 절차를 통해 Firebase Authentication에 저장되어 있는 정보와 일치하는 계정이 있어야 합니다.
5. 회원가입 및 비밀번호 찾기 버튼
Container(
  margin: EdgeInsets.only(top: heightRatio * 26,
      left: widthRatio * 30,
      right: widthRatio * 30),
  child: Row(
    children: [
      TextButton(
        onPressed: () {
          Navigator.pushNamed(context, '/signup');
        },
        child: Text(
          "회원가입",
          style: TextStyle(
            fontSize: 16,
            fontFamily: 'GowunBatang',
            color: Colors.white,
            fontWeight: FontWeight.w700,
            decoration: TextDecoration.underline,
            decorationColor: Colors.white,
            decorationThickness: 1.5,
            height: 0,
            letterSpacing: -0.40,
          ),
        ),
      ),
      Spacer(),
      TextButton(
        onPressed: () {
          Navigator.push(context, MaterialPageRoute(builder: (
              context) => FindPasswordScreen()));
        },
        child: Text(
          "P/W 찾기",
          style: TextStyle(
            fontSize: 16,
            fontFamily: 'GowunBatang',
            color: Colors.white,
            fontWeight: FontWeight.w700,
            decoration: TextDecoration.underline,
            decorationThickness: 1.5,
            decorationColor: Colors.white,
            height: 0,
            letterSpacing: -0.40,
          ),
        ),
      ),
    ],
  ),
)
회원가입 및 비밀번호 찾기 버튼은 사용자가 회원가입하거나 비밀번호를 잊어버렸을 때 필요한 기능을 제공합니다. TextButton 위젯을 사용하여 각각의 버튼을 구현하고, 클릭 시 해당 화면으로 이동합니다.
6. 비밀번호 찾기(비밀번호 재설정)
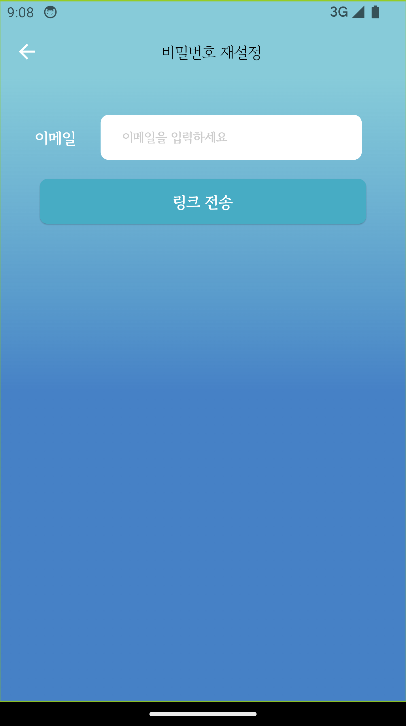
로그인 화면에서 비밀번호 찾기 버튼을 클릭 시 전환되는 화면입니다. 해당 입력폼에 이메일을 입력하고 링크 전송 버튼을 클릭하면, 입력한 이메일로 아래와 같은 비밀번호 재설정 메일이 전송됩니다.
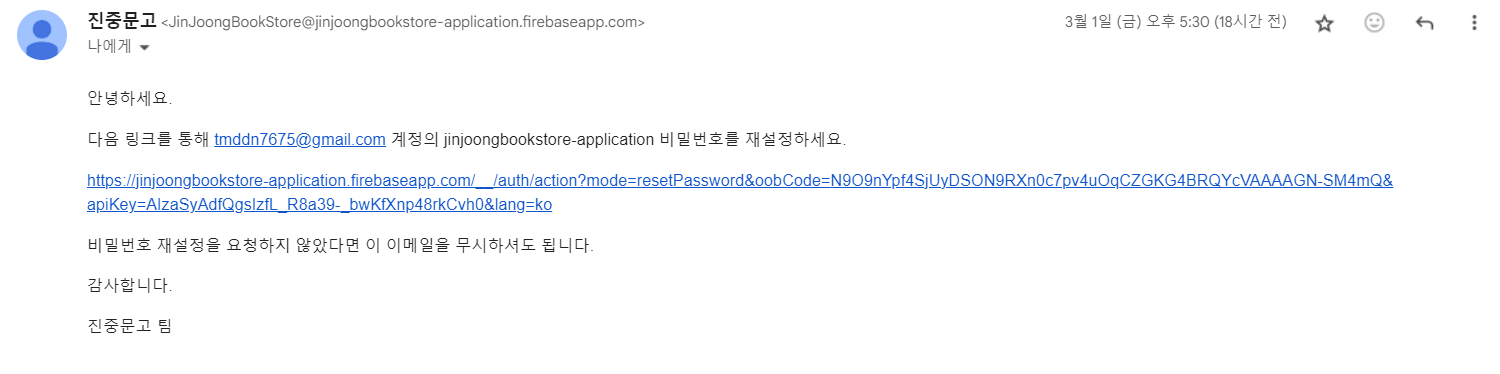
비밀번호 재설정 이메일 전송 기능은 Firebase Authentication에서 자체적으로 지원하는 기능이며, 아래 코드와 같이 FirebaseAuth.instance.sendPasswordResetEmail(email: email)를 통해 해당 기능을 사용할 수 있습니다.
import 'package:firebase_auth/firebase_auth.dart';
import 'package:flutter/material.dart';
class FindPasswordScreen extends StatelessWidget {
FindPasswordScreen({super.key});
final TextEditingController _emailController = TextEditingController();
Widget build(BuildContext context) {
double deviceWidth = MediaQuery.of(context).size.width;
double deviceHeight = MediaQuery.of(context).size.height;
double widthRatio = deviceWidth / 375;
double heightRatio = deviceHeight / 812;
return Scaffold(
appBar: AppBar(
leading: IconButton(
icon: Icon(
Icons.arrow_back,
color: Colors.white,
),
onPressed: () {
Navigator.pop(context); // 뒤로가기 버튼 클릭 시 이전 화면으로 이동
},
),
title: Container(
margin: EdgeInsets.only(
left: widthRatio * 84,
),
child: Text(
"비밀번호 재설정",
style: TextStyle(
color: Colors.black,
fontSize: 16,
fontFamily: 'GowunBatang',
fontWeight: FontWeight.w400,
height: 0,
letterSpacing: -0.40,
),
),
),
backgroundColor: Color(0xA545B0C5),
),
body: Center(
child: Container(
alignment: Alignment.center,
clipBehavior: Clip.antiAlias,
// 배경색상 설정
decoration: BoxDecoration(
gradient: LinearGradient(
begin: Alignment(-0.00, -1.00),
end: Alignment(0, 1),
colors: [Color(0xA545B0C5), Color(0xFF4681C6), Color(0xFF4681C6)],
),
),
child: Column(
mainAxisAlignment: MainAxisAlignment.start,
children: [
Container(
margin: EdgeInsets.only(
top: heightRatio * 41, left: widthRatio * 33),
child: Row(
children: [
Text(
'이메일',
style: TextStyle(
color: Colors.white,
fontSize: 16,
fontFamily: 'GowunBatang',
fontWeight: FontWeight.w700,
height: 0,
letterSpacing: -0.40,
),
),
Container(
padding: EdgeInsets.only(
left: widthRatio * 20,
top: heightRatio * 12,
bottom: heightRatio * 9),
decoration: ShapeDecoration(
color: Colors.white,
shape: RoundedRectangleBorder(
borderRadius: BorderRadius.circular(8)),
),
margin: EdgeInsets.only(left: widthRatio * 23),
width: widthRatio * 240,
height: heightRatio * 52,
child: TextFormField(
// TextFormField의 속성들 설정
textInputAction:TextInputAction.next,
decoration: InputDecoration(
border: InputBorder.none,
hintText: '이메일을 입력하세요',
hintStyle: TextStyle(
color: Color(0xFFCCCCCC),
fontSize: 13,
fontFamily: 'GowunBatang',
fontWeight: FontWeight.w700,
height: 0,
letterSpacing: -0.33,
),
// 다른 속성들 설정
),
controller: _emailController,
),
),
],
),
),
Container(
width: widthRatio * 300,
height: heightRatio * 52,
margin: EdgeInsets.only(
top: heightRatio * 22,
),
child: ElevatedButton(
style: ElevatedButton.styleFrom(
backgroundColor: Color(0xFF46B1C6), // 배경색 설정
shape: RoundedRectangleBorder(
borderRadius: BorderRadius.circular(8.0), // 원하는 값으로 조절
),
),
onPressed: () async{
// 로그인 버튼이 눌렸을 때의 처리
// 아이디와 비밀번호를 사용하여 로그인을 시도하고 결과에 따라 처리
String email = _emailController.text.toString();
await FirebaseAuth.instance.sendPasswordResetEmail(email: email);
showDialog(
context: context,
builder: (context) => AlertDialog(
backgroundColor: Color(0xFF45B0C5),
title: Text("전송완료",style: TextStyle(
color: Colors.white,
fontSize: 16,
fontFamily: 'GowunBatang',
fontWeight: FontWeight.w700,
height: 0,
letterSpacing: -0.40,
),),
content: Text("해당 이메일로 비밀번호 재설정\n링크를 전송하였습니다.", style: TextStyle(
color: Colors.white,
fontSize: 16,
fontFamily: 'GowunBatang',
fontWeight: FontWeight.w700,
height: 0,
letterSpacing: -0.40,
),),
actions: [
TextButton(
onPressed: (){
Navigator.pop(context);
},
child: Text("확인", style: TextStyle(
color: Colors.white,
fontSize: 16,
fontFamily: 'GowunBatang',
fontWeight: FontWeight.w700,
height: 0,
letterSpacing: -0.40,
),),
)
],
)
);
// Navigator.pop(context);
},
child: Container(
alignment: Alignment.center,
child: Text(
'링크 전송',
style: TextStyle(
color: Colors.white,
fontSize: 16,
fontFamily: 'GowunBatang',
fontWeight: FontWeight.w700,
height: 0,
letterSpacing: -0.40,
),
),
),
),
),
],
),
),
),
);
}
}
추가적으로 회원가입 화면에 대한 설명은 다음 포스팅에서 다루도록 하겠습니다! 감사합니다!