스프링 시큐리티 기본편 정리
Spring Security 적용 전 웹 애플리케이션 만들기
-
스프링 Initializer에서
web-start와thymeleaf라이브러리 추가 후 프로젝트를 만듭니다. -
간단한 웹 Controller와 뷰 template을 만들어서 작동 테스트를 합니다.
@Controller
public class SampleController {

    @GetMapping("/")
    public String index(Model model, Principal principal) {
        if (principal == null) {
            model.addAttribute("message", "Hello Spring Security");
        } else {
            model.addAttribute("message", "Hello " + principal.getName());
        }
        return "index";
    }

    @GetMapping("/info")
    public String info(Model model) {
        model.addAttribute("message", "Hello Info");
        return "info";
    }

    @GetMapping("/dashboard")
    public String dashboard(Model model, Principal principal) {
        model.addAttribute("message", "Hello " + principal.getName());
        return "dashboard";
    }

    @GetMapping("/admin")
    public String admin(Model model, Principal principal) {
        model.addAttribute("message", "Hello Admin, " + principal.getName());
        return "admin";
    }

}
이때
Principal은 자바의 표준 시큐리티 기술로, 로그인이 된 상태라면 계정 정보를 담고 있습니다. 현 상태에서는principal에 아무 정보가 안 담겨있기 때문에 두 가지 문제점이 있습니다.- 로그인 할 방법이 없습니다.
- 현재 사용자를 알아낼 방법이 없습니다.
스프링 시큐리티 연동
의존성 추가
<dependency>
    <groupId>org.springframework.boot</groupId>
    <artifactId>spring-boot-starter-security</artifactId>
</dependency>-
스프링 부트의 스타터(Starter)를 사용해서 추가합니다.
-
의존성을 추가하면, 기본적으로 모든 요청은 인증을 필요로 하게 됩니다.
-
더불어, 기본 유저가 생성됩니다.
Username: user
Password: 콘솔창 Log 확인
따라서 인증 없이 접근 가능한 URL을 설정하는 작업과 애플리케이션에서 사용할 수 있는 유저 정보 설정 작업을 추가로 해야 합니다.
기본적인 시큐리티 설정
@Configuration
@EnableWebSecurity
public class SecurityConfig extends WebSecurityConfigurerAdapter {
    @Override
    protected void configure(HttpSecurity http) throws Exception {
        http.authorizeRequests()
                .mvcMatchers("/", "/info").permitAll()
                .mvcMatchers("/admin").hasRole("ADMIN")
                .anyRequest().authenticated();
        http.formLogin();
        http.httpBasic();
    }
}- 스프링 웹 시큐리티 설정 정보
authorizeRequests()의mvcMatchers()메서드로 요청 URL별 인증 및 Role을 설정할 수 있습니다.http.formLogin()으로 Form 로그인을 합니다.http.httpBasic()으로 HTTP 기본 인증을 활성화 합니다.
하지만 여전히 계정은 기본 유저 하나뿐이고, 계정에 Role을 부여할 수 없으며, 비밀번호도 여전히 콘솔 Log에 남는 문제가 있습니다.
In-Memory 상태의 유저 추가
이전까지 스프링 부트가 알아서 만들어 주던 유저 정보는 UserDetailsServiceAutoConfiguration가 SecurityProperties로 부터 정보를 가져와 생성되는 것 입니다. 따라서 아래처럼 application.properties에 값을 설정해서 기본 유저 정보를 변경할 수도 있습니다.
spring.security.user.name=admin
spring.security.user.password=123
spring.security.user.roles=ADMIN
하지만 위 방법보다는, 스프링 웹 시큐리티 설정 정보에 유저 정보를 추가하도록 하겠습니다.
@Configuration
@EnableWebSecurity
public class SecurityConfig extends WebSecurityConfigurerAdapter {
    /* ... */

    @Override
    protected void configure(AuthenticationManagerBuilder auth) throws Exception {
        // 입력받은 비밀번호를 {algorithm} 방식으로 암호화해서 마치 DB에 보관되는 것과 유사 (현재는 NoOp이므로 암호화를 하지 않음)
        auth.inMemoryAuthentication()
                .withUser("seungho").password("{noop}123").roles("USER").and()
                .withUser("admin").password("{noop}!@#").roles("ADMIN");
    }
}- In-Memory 상에 유저를 추가합니다.
password()에{noop}에는 비밀번호를 암호화할 알고리즘을 명시합니다.
이로써 계정을 여러개, 그리고 계정별 Role을 설정할 수 있게 되었습니다. 그러나 비밀번호가 코드 상에서 보이지 않도록, 그리고 외부의 DB에 보관되어 있는 정보를 사용할 수 있도록 수정해야 합니다.
JPA 연동 및 부가 기능 설정
<dependency>
    <groupId>org.springframework.boot</groupId>
    <artifactId>spring-boot-starter-data-jpa</artifactId>
</dependency>
<dependency>
    <groupId>com.h2database</groupId>
    <artifactId>h2</artifactId>
    <scope>runtime</scope>
</dependency>
JPA와 H2 DB를 사용하기 위해 의존성을 추가합니다. 그리고 Account 엔티티, 관련 Repository, Service를 만들어줍니다.
@Entity
public class Account {

    @Id @GeneratedValue
    private Integer id;

    @Column(unique = true)
    private String username;

    private String password;

    private String role;

    public void encodePassword(PasswordEncoder passwordEncoder) {
        this.password = passwordEncoder.encode(this.password);
    }

}- 비밀번호가 그대로 DB에 보관되지 않도록 암호화하는
encodePassword()메서드를 만들어 놓습니다.
@Bean
public PasswordEncoder passwordEncoder() {
//    return NoOpPasswordEncoder.getInstance();
    return PasswordEncoderFactories.createDelegatingPasswordEncoder();
}PasswordEncoder는 비밀번호를 단방향 암호화 하는 기능을 포함한 인터페이스입니다.NoOpPasswordEncoder.getInstance()을 반환하면 암호화 알고리즘이 No Operation으로써 비밀번호가 그대로 반환됩니다.PasswordEncoderFactories에 있는createDelegatingPasswordEncoder()메서드로 암호화 방법을 정해서 암호화된 비밀번호를 반환합니다. (기본값은 bcrypt 방식)
public interface AccountRepository extends JpaRepository<Account, Integer> {
    Account findByUsername(String username);
}
@Service
public class AccountService implements UserDetailsService {
// DAO(Data Access Object) 인터페이스를 통해서 외부로 부터 유저 정보를 가져옴 (in-memory 형식이 아님)
@Autowired
AccountRepository accountRepository;
@Override
public UserDetails loadUserByUsername(String username) throws UsernameNotFoundException {
Account account = accountRepository.findByUsername(username);
if (account == null) {
throw new UsernameNotFoundException(username);
}
return User.builder()
.username(account.getUsername())
.password(account.getPassword())
.roles(account.getRole())
.build();
}
public Account createNew(Account account) {
account.encodePassword(passwordEncoder);
return accountRepository.save(account);
}
}AccountService는UserDetailsService인터페이스를 구현한 클래스로,loadUserByUsername()메서드를 오버라이딩합니다.loadUserByUsername()메서드는UserDetails를 반환하므로,User의 빌더를 이용해서Account를 알맞게 맞춰 줍니다.
@RestController
public class AccountController {

    @Autowired
    AccountRepository accountRepository;

    @GetMapping("/account/{role}/{username}/{password}")
    public Account createAccount(@ModelAttribute Account account) {
        return accountService.createNew(account);
    }

}
@Configuration
@EnableWebSecurity
public class SecurityConfig extends WebSecurityConfigurerAdapter {
@Override
protected void configure(HttpSecurity http) throws Exception {
http.authorizeRequests()
.mvcMatchers("/", "/info", "/account/**").permitAll()
.mvcMatchers("/admin").hasRole("ADMIN")
.anyRequest().authenticated();
http.formLogin();
http.httpBasic();
}
}- 지금은 간단한 테스트 용도이므로, 회원 가입을 위한 유저 정보를 URL로 받아오게끔 구현합니다.
/accountURL로 요청할 때는 유저 정보가 필요없도록 설정 정보를 수정합니다.
이로써 비밀번호가 코드 상에 보이지 않고, DB에 보관되어 있는 유저 정보를 가져와 사용할 수 있게 되었습니다.
테스트 코드
작성한 코드를 테스트 하기 위해서 매번 웹 애플리케이션을 재실행해서 일일이 URL 접속하는 식으로 확인할 수 없기 때문에 테스트 코드를 작성해서 검증해보겠습니다.
<dependency>
    <groupId>org.springframework.security</groupId>
    <artifactId>spring-security-test</artifactId>
    <scope>test</scope>
    <version>${spring-security.version}</version>
</dependency>
우선 스프링 시큐리티가 지원하는 테스트 의존성을 추가하고, 스코프는 테스트 코드 실행 시에만 동작하도록 정합니다.
@RunWith(SpringRunner.class)
@SpringBootTest
@AutoConfigureMockMvc
public class AccountControllerTest {

    @Autowired
    MockMvc mockMvc;

}-
@RunWith(SpringRunner.class)기본적으로
@RunWith는 이 애노테이션이 붙은 클래스를 테스트 Runner를 이용해 JUnit 프레임워크를 호출합니다. 여기서 Runner 클래스는 JUnit이 지원하는 메서드들을 호출해야하는 책임을 가지며, 테스트 클래스들을 실행하는 역할을 합니다.SpringRunner클래스는 테스트를 실행하기 전에 스프링 컨테이너를 시작하는 작업을 포함합니다. 따라서 스프링 관련 기능을 띄우기 위한 오베헤드가 큽니다. 해당 클래스는TestContextManager를 갖는SpringJUnit4ClassRunner를 상속받는데,TestContextManager를 살펴보면 스프링의 핵심적인 부분인 ApplicationContext를 로딩합니다. -
@SpringBootTestSpringRunner클래스보다 포괄적인 스프링 관련 기능들을 모두 로딩하여 테스트를 실행합니다. -
@AutoConfigureMockMvc우선 Mock이라는 단어는 '테스트를 위해 만든 모형'을 의미합니다. 테스트를 위해 실제 객체와 비슷한 모의 객체를 만드는 것을 Mocking이라고 하며, 모킹한 객체를 메모리에서 얻어내느 과정을 Mock-up이라고 합니다.
웹 애플리케이션에서의 컨트롤러를 테스트할 때는 서블릿 컨테이너를 모킹해야 하는데, 실제로 모킹하는 것은
@SpringBootTest의WebEnvironment속성입니다. 이 설정에 의해서 모킹된 서블릿 컨테이너를 의존성 주입받기 위해서@AutoConfigureMockMvc를 사용합니다.해당 애노테이션은
@WebMvcTest와는 달리 컨트롤러 뿐만이 아니라@Service,@Repository가 붙은 객체들도 모두 메모리에 올려서 테스트를 실행합니다.
@RunWith(SpringRunner.class)
@SpringBootTest
@AutoConfigureMockMvc
public class AccountControllerTest {

    @Autowired
    MockMvc mockMvc;

    @Test
    public void index_anonymous() throws Exception {
        mockMvc.perform(get("/").with(anonymous()))
                .andDo(print())
                .andExpect(status().isOk());
    }

    @Test
    public void index_user() throws Exception {
        mockMvc.perform(get("/").with(user("seungho").password("123").roles("USER")))   // 유저가 로그인을 한 상태라고 가정을 함 (DB에 있음을 의미하지 않음)
                .andDo(print())
                .andExpect(status().isOk());
    }

    @Test
    public void admin_user() throws Exception {
        mockMvc.perform(get("/admin").with(user("seungho").password("123").roles("USER")))
                .andDo(print())
                .andExpect(status().isForbidden());
    }

    @Test
    public void admin_admin() throws Exception {
        mockMvc.perform(get("/admin").with(user("admin").password("123").roles("ADMIN")))
                .andDo(print())
                .andExpect(status().isOk());
    }

}@RunWith(SpringRunner.class)
@SpringBootTest
@AutoConfigureMockMvc
public class AccountControllerTest {
@Autowired
MockMvc mockMvc;
@Test
@WithAnonymousUser
public void index_anonymous() throws Exception {
mockMvc.perform(get("/"))
.andDo(print())
.andExpect(status().isOk());
}
@Test
@WithMockUser(username = "seungho", roles = "USER")
public void index_user() throws Exception {
mockMvc.perform(get("/"))
.andDo(print())
.andExpect(status().isOk());
}
@Test
@WithMockUser(username = "seungho", roles = "USER")
public void admin_user() throws Exception {
mockMvc.perform(get("/admin"))
.andDo(print())
.andExpect(status().isForbidden());
}
@Test
@WithMockUser(username = "admin", roles = "ADMIN")
public void admin_admin() throws Exception {
mockMvc.perform(get("/admin").with(user("admin").password("123").roles("ADMIN")))
.andDo(print())
.andExpect(status().isOk());
}
}- 유저 정보가 필요 없는 URL과 필요한 URL에 따라 테스트를 실행합니다.
- 위의 코드처럼 유저 정보를 넘겨줄 수도 있고, 혹은 아래의 코드처럼
@WithMockUser(username = "seungho", roles = "USER")애노테이션을 활용할 수도 있습니다.
@RunWith(SpringRunner.class)
@SpringBootTest
@AutoConfigureMockMvc
public class AccountControllerTest {

    @Autowired
    MockMvc mockMvc;

    @Autowired
    AccountService accountService;

    /* ... */

    private void createUser(String username, String password) {
        Account account = new Account();
        account.setUsername(username);
        account.setPassword(password);
        account.setRole("USER");
        accountService.createNew(account);
    }

    @Test
    @Transactional  // 테스트 코드 실행 후 DB가 롤백됨
    public void login_success() throws Exception {
        String username = "seungho";
        String password = "123";
        createUser(username, password);
        mockMvc.perform(formLogin().user(username).password(password))
                .andExpect(authenticated());	// 응답 가능
    }

    @Test
    @Transactional
    public void login_fail() throws Exception {
        String username = "seungho";
        String password = "123";
        createUser(username, password);
        mockMvc.perform(formLogin().user(username).password("321"))
                .andExpect(unauthenticated());	// 응답 불가
    }

}- Form 로그인 테스트 코드입니다.
@Transactional으로 해당 테스트 코드 실행이 끝나면 DB를 이전 상태로 롤백 해줍니다.
스프링 시큐리티 아키텍처
전반적인 구조와 Authentication
-
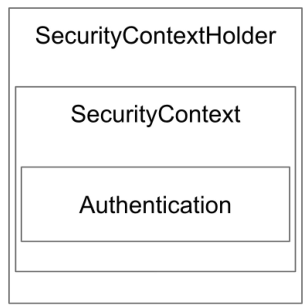
SecurityContextHolder-
SecurityContext를 제공하며, 기본적으로 ThreadLocal 방식을 사용합니다. -
ThreadLocal이란 하나의 쓰레드 수준의 데이터 저장소입니다.ThreadLocal방식을 사용하는AccountContext를 만들어서 예제를 만들어 보겠습니다.public class AccountContext { private static final ThreadLocal<Account> ACCOUNT_THREAD_LOCAL = new ThreadLocal<>(); public static void setAccount(Account account) { ACCOUNT_THREAD_LOCAL.set(account); } public static Account getAccount() { return ACCOUNT_THREAD_LOCAL.get(); } }@Controller public class SampleController { @Autowired SampleService sampleService; @Autowired AccountRepository accountRepository; /* ... */ @GetMapping("/dashboard") public String dashboard(Model model, Principal principal) { model.addAttribute("message", "Hello " + principal.getName()); AccountContext.setAccount(accountRepository.findByUsername(principal.getName())); sampleService.dashboard(); return "dashboard"; } }@Controller에서ThreadLocal방식을 사용하는AccountContext에 유저 정보를 보관합니다.
@Service public class SampleService { public void dashboard() { Account account = AccountContext.getAccount(); System.out.println("account = " + account); } }@Service의dashboard()메서드는 유저 정보를 파라미터로 받지 않고서도AccountContext에서 가져올 수 있습니다.
-
-
SecurityContextAuthentication정보를 제공합니다. -
AuthenticationPrincipal과GrantAuthority를 제공합니다. -
Principal'누구'에 해당하는 정보로,
UserDetailsService를 구현한AccountService의loadUserByUsername()메서드에서 반환한 객체를 가리킵니다. 반환된 객체는UserDeatils타입입니다.@Service public class AccountService implements UserDetailsService { @Autowired AccountRepository accountRepository; @Override public UserDetails loadUserByUsername(String username) throws UsernameNotFoundException { Account account = accountRepository.findByUsername(username); if (account == null) { throw new UsernameNotFoundException(username); } return User.builder() .username(account.getUsername()) .password(account.getPassword()) .roles(account.getRole()) .build(); } /* ... */ }-
UserDetails애플리케이션이 가지고 있는 유저 정보와 스프링 시큐리티가 사용하는
Authentication객체 사이의 어댑터 역할을 수행합니다. -
UserDetailsService유저 정보를
UserDetails타입으로 가져오는 DAO (Data Access Obejct`) 인터페이스 입니다. (지금의 경우 스프링 데이터 JPA를 사용해서 구현한 상태)
-
-
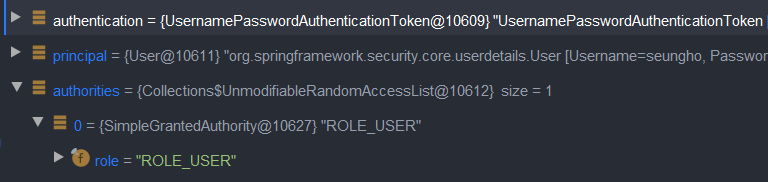
GrantAuthorityROLE_USER,ROLE_ADMIN등Prinicpal이 가지고 있는 권한을 나타냅니다. 정상적인 인증 이후, 인가 및 권한 확인할 때 이 정보를 참조합니다.
이처럼 Authentiaction은 인증된 정보를 담고 있는 객체 혹은 객체를 제공하는 컨테이너라고 할 수 있습니다. 그러면 이어서, Authentication을 얻기 위해 실제로 인증하는 부분을 살펴보겠습니다.
AuthenticationManager와 Authentication
스프링 시큐리티에서 인증(Authentication)은 AuthenticationManager가 수행합니다.
public interface AuthenticationManager {
    Authentication authenticate(Authentication var1) throws AuthenticationException;
}
해당 인터페이스는 authenticate() 메서드만을 갖고 있는데, 인자로 받은 Authentication이 유효한 인증인지 확인하고, 문제가 없다면 Authentication 객체를 반환하거나 문제가 있으면 에러를 던집니다.
public class ProviderManager implements AuthenticationManager, MessageSourceAware, InitializingBean {

    private List<AuthenticationProvider> providers;

    public Authentication authenticate(Authentication authentication) throws AuthenticationException {
        /* ... */
    }

    /* ... */
}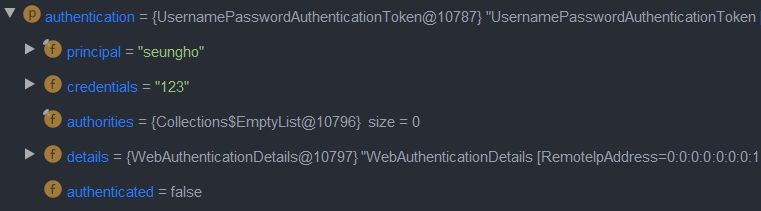
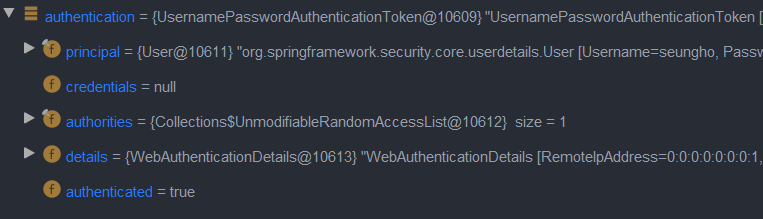
AuthenticationManger의 구현체인 ProvideManager의 authenticate() 메서드가 실행됩니다. 파라미터로 넘어온 authentication은 UsernamePasswordAuthenticationToken 타입으로 클라이언트가 입력한 ID(principal)와 PW(credentials) 정보만이 담겨 있는 상태입니다.
이제 ProvideManager 내의 AuthenticationProvider 리스트에 속한 각 Provider에 위임해서 인증을 진행합니다. 만약 맞는 Provider가 없다면 부모 클래스의 Provider에 접근해서 진행합니다.
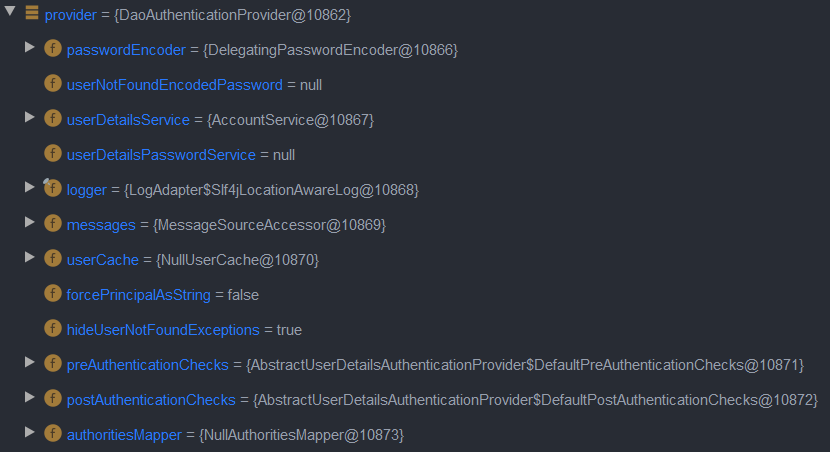
DaoAuthenticationProvider은 UsernamePasswordAuthenticationToken 타입을 검증할 수 있으므로 실질적인 인증 과정이 진행됩니다.

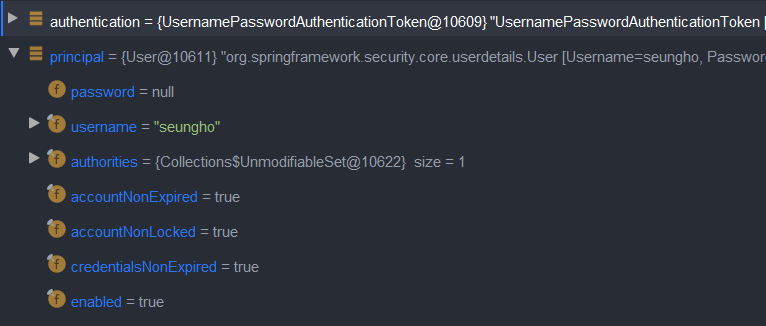
정상적인 인증 후 result의 principal에는 UserDetails의 User타입이 담겨 있습니다. 해당 User타입은 UserDetailsService를 구현한 AccountService의 loadUserByUsername() 메서드에서 반환한 그 객체입니다.
Authenticate와 SecurityContextHolder
애플리케이션을 실행시킨 후 처음 유저 로그인을 시도하면 기존에 로그인 되어있지 않았기 때문에, authenticate() 메서드로 Authentication 객체를 만들어 내고 이를 SecurityContextHolder에 넣어 주게 됩니다. 여기서 authenticate() 메서드를 호출하게 되는 부분이 UsernamePasswordAuthenticationFilter 입니다.
- Form 인증을 처리하는 시큐리티 필터 입니다.
attemptAuthentication()메서드로authenticate()를 호출해서 인증을 진행하고, 인증된Authentication객체를SecurityContextHolder에 넣어줍니다.
이후 로그인을 완료한 상태로, 리다이렉션을 하면 이전에 로그인이 되어 있는 상태이기 때문에, authenticate() 메서드를 실행하지 않고 HTTP 세션으로 부터 Authentication 객체를 가져와서 진행합니다. 이 부분을 SecurityContextPersisenceFilter가 수행합니다.
SecurityContext를 HTTP 세션에 캐시하여Authentication을 공유하는 필터 입니다.- 매번
loadContext()메서드로 세션 상에Authentication객체를 갖고 있는SecurityContext가 있는지 확인하고, 없다면UsernamePasswordAuthenticationFilter로 인증을 진행, 있다면 가져온SecurityContext를 이용합니다.
스프링 시큐리티 필터와 FilterChainProxy
그러면 authenticate() 메서드를 호출하고 SecurityContextHolder에 Authentication 객체를 넣어주거나, 세션 상의 Authentication 객체를 가져오는 여러 필터들을 어디서 호출하는지 알아보겠습니다.
우선 스프링의 기본 설정 상, 동작하는 웹 애플리케이션은 Tomcat 서블릿 컨테이너에 의해 구동됩니다. 여기서 Servlet은 자바 언어가 클라이언트의 요청을 처리하고, 결과를 반환할 수 있도록 구현된 것입니다. URL 주소를 맵핑하여 자바의 클래스 파일을 호출할 수 있도록 만들어, 웹 화면으로 보여주는 것처럼 서블릿은 웹에서 사용할 수 있게 만든 자바 프로그래밍입니다.
서블릿은 웹에서 실행되는 프로그램이기 때문에 네트워크 통신의 사이 사이에서 여러 동작을 만들어 낼 수 있습니다. 이런 동작에 있어서 사이 사이에 끼워져서 실행되는 서블릿의 클래스를 Filter라 부릅니다. 일종의 Intercepter와 느낌이 유사합니다.
이러한 서블릿 필터 중에 DelegatingFilterProxy라는 것이 있습니다. 이 클래스는 서블릿 필터 처리를 스프링에 들어있는 빈으로 위임하고 싶을 때 사용하는 서블릿 필터입니다. 위임할 타겟 빈을 이름으로 설정하는데, 스프링 부트를 사용할 때는 SecurityFilterAutoConfiguration에 의해 자동으로 등록됩니다. 기본 타겟 빈 이름은 보통 springSecurityFilterChain으로 빈 등록이 됩니다.
위 과정은 FilterChainProxy에 위임해서 시큐리티 필터 동작을 수행합니다. FilterChainProxy는 시큐리티 설정 정보로 부터 필요한 필터들을 가져와 SecurityFilterChain에 보관합니다. 해당 체인에 포함된 시큐리티 필터는 아래와 같습니다.

- WebAsyncManagerIntergrationFilter
- SecurityContextPersistenceFilter
- HeaderWriterFilter
- CsrfFilter
- LogoutFilter
- UsernamePasswordAuthenticationFilter
- DefaultLoginPageGeneratingFilter
- DefaultLogoutPageGeneratingFilter
- BasicAuthenticationFilter
- RequestCacheAwareFtiler
- SecurityContextHolderAwareReqeustFilter
- AnonymouseAuthenticationFilter
- SessionManagementFilter
- ExeptionTranslationFilter
- FilterSecurityInterceptor
결국, 서블릿 필터 중 하나인 DelegatingFilterProxy가 FilterChainProxy에 필터 호출을 위임하고, 자바로 명시해놓은 SecurityConfig 설정 정보에 의해 SecurityFilterChain이 만들어 지며, 각 시큐리티 필터가 웹 동작 사이 사이에 끼어들어 동작합니다.

AccessDecisionManager
이전까지 유저 Authentication 인증 과정을 살펴봤다면, AccessDecisionManager으로 유저 Authorities에 대한 인증 과정을 살펴보겠습니다. AccessDecisionManager는 Access(Authority) Control 결정을 내리는 인터페이스로, 구현체 3가지를 기본으로 제공합니다.
AffirmativeBased: 여러 Voter 중에 한 명이라도 허용하면 허용하는 기본 전략ConsensusBased: 각 Voter가 판단하여 다수결로 결정하는 전략UnanimousBased: 모든 Voter가 만장일치하면 허용하는 전략
AccessDecisionVoter는 Authority 판단을 심사하는 인터페이스로, 해당 Authentication이 특정한 Object에 접근할 때 필요한 ConfigAttributes를 만족하는지 확인합니다.(permitAll, authnticated 등) 웹 시큐리티에서 사용하는 기본 구현체는 WebExpressionVoter 입니다.
ROLE_USER 권한을 필요로 하는 URL /user 예제를 만들어서 확인해보겠습니다.
@Controller
public class SampleController {

    /* ... */

    @GetMapping("/user")
    public String user(Model model, Principal principal) {
        model.addAttribute("message", "Hello User, " + principal.getName());
        return "user";
    }

}@Controller에 맵핑을 해서 애플리케이션을 구동시켜 보면,ROLE_USER권한을 가진 유저는 접근 가능하지만,ROLE_ADMIN권한을 가진 유저는 접근 불가 합니다. 일반적으로는ROLE_ADMIN권한이ROLE_USER권한의 상위 Hierarchy이지만 스프링에서 단어 문맥만 보고 자동 설정하기에는 무리가 있으므로, 설정을 해주어야 합니다.
@Configuration
@EnableWebSecurity
public class SecurityConfig extends WebSecurityConfigurerAdapter {

    public AccessDecisionManager accessDecisionManager() {
        RoleHierarchyImpl roleHierarchy = new RoleHierarchyImpl();
        roleHierarchy.setHierarchy("ROLE_ADMIN > ROLE_USER");

        DefaultWebSecurityExpressionHandler handler = new DefaultWebSecurityExpressionHandler();
        handler.setRoleHierarchy(roleHierarchy);

        WebExpressionVoter webExpressionVoter = new WebExpressionVoter();
        webExpressionVoter.setExpressionHandler(handler);

        List<AccessDecisionVoter<? extends Object>> voters = Arrays.asList(webExpressionVoter);
        return new AffirmativeBased(voters);
    }

    @Override
    protected void configure(HttpSecurity http) throws Exception {
        http.authorizeRequests()
                .mvcMatchers("/", "/info", "/account/**").permitAll()
                .mvcMatchers("/admin").hasRole("ADMIN")
                .mvcMatchers("/user").hasRole("USER")
                .anyRequest().authenticated()
                .accessDecisionManager(accessDecisionManager());
        http.formLogin();
        http.httpBasic();
    }

}- 새로 추가한
accessDecisionManager()메서드는 주 목적은RoleHierachy를 등록하는 과정으로, 추가한 Role의 Hierachy를 차례차례DefaultWebSecurityExpressionHandler,WebExpressionVoter,List<AccessDecisionVoter<? extends Object>>에 반영해서AccessDecisionManager를 설정합니다.
FilterSecurityInterceptor
그렇다면 AccessDecisionManager를 어디서 호출하는지 살펴보겠습니다. 앞서 살펴본 FilterChainProxy가 가져온 필터 목록 중, FilterSecurityInterceptor의 부모 클래스인 AbstractSecurityInterceptor에서 accessDecisionManger의 decide() 메서드를 호출합니다.
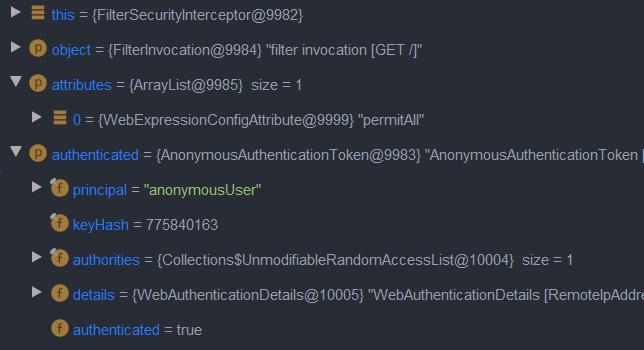
/URL은 유저 정보가 없는 경우에도 접근 가능하기 때문에,ConfigAttribute는permitAll이며AnonymousAuthenticationToken으로 인증 및 인가 처리 됩니다.
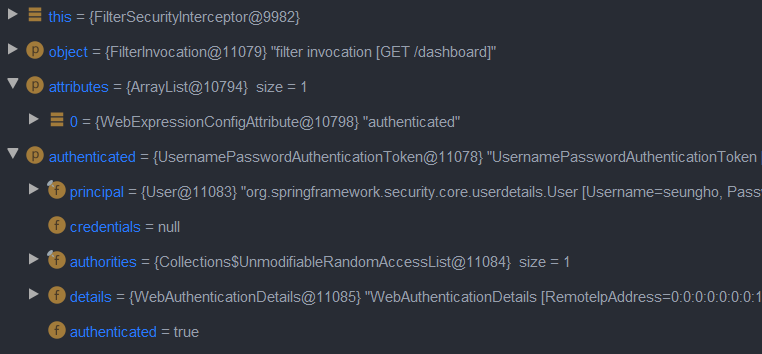
/dashboard는 유저 정보가 있는 경우에만 접근 가능하므로,ConfigAttribute는authenticated이며UsernamePasswordAuthenticationToken으로 인증 및 인가 처리됩니다.
웹 애플리케이션 시큐리티
스프링 시큐리티 ignoring()
@Configuration
@EnableWebSecurity
public class SecurityConfig extends WebSecurityConfigurerAdapter {

    public SecurityExpressionHandler expressionHandler() {
        RoleHierarchyImpl roleHierarchy = new RoleHierarchyImpl();
        roleHierarchy.setHierarchy("ROLE_ADMIN > ROLE_USER");

        DefaultWebSecurityExpressionHandler handler = new DefaultWebSecurityExpressionHandler();
        handler.setRoleHierarchy(roleHierarchy);

        return handler;
    }

    @Override
    protected void configure(HttpSecurity http) throws Exception {
        http.authorizeRequests()
                .mvcMatchers("/", "/info", "/account/**").permitAll()
                .mvcMatchers("/admin").hasRole("ADMIN")
                .mvcMatchers("/user").hasRole("USER")
                .anyRequest().authenticated()
                .expressionHandler(expressionHandler());
        http.formLogin();
        http.httpBasic();
    }

}
위 상태의 시큐리티 설정 상태에서 웹 애플리케이션을 구동하여 루트 URL로 요청을 보내면, 실제로는 "/", "/favicon.ico", "/login" 세 요청을 처리합니다. "/" 요청 외에도 "/favicon.ico" 요청을 보내는데, 정적 리소스를 가져오기 위함입니다. 여기서 시큐리티 설정에 의해 (anyRequest().authenticated()) "/login" 요청을 보내게 됩니다. "/login" 요청은 불필요한 리소스와 지연 시간을 차지하므로 무시하도록 설정하는 것이 좋습니다.
@Configuration
@EnableWebSecurity
public class SecurityConfig extends WebSecurityConfigurerAdapter {

    /* ... */

    @Override
    public void configure(WebSecurity web) throws Exception {
//        web.ignoring().mvcMatchers("/favicon.ico");
        web.ignoring().requestMatchers(PathRequest.toStaticResources().atCommonLocations());
    }

    @Override
    protected void configure(HttpSecurity http) throws Exception {
        http.authorizeRequests()
                .mvcMatchers("/", "/info", "/account/**").permitAll()
                .mvcMatchers("/admin").hasRole("ADMIN")
                .mvcMatchers("/user").hasRole("USER")
                .anyRequest().authenticated()
                .expressionHandler(expressionHandler());
        http.formLogin();
        http.httpBasic();
    }

}-
WebSecurityConfigureerAdapter의configure(WebSecurity web)메서드를 오버라이딩해서 무시할 요청을 설정할 수 있습니다.-
ignoring().mvcMatchers()로 특정 요청을 무시하도록 설정할 수 있으나, 모든 정적 리소스에 대해 처리하기에는 역부족입니다. -
ignoring().requestMatchers(PathRequest.toStaticResources().atCommonLocations())로 스프링 부트에서 제공하는 정적 리소스 무시 기능을 사용할 수 있습니다. 이 경우 일반적인 정적 리소소 요청들을 모두 무시하도록 설정합니다.
-
-
위의 시큐리티 설정으로 웹 애플리케이션을 구동하여 루트 요청을 보내면,
"/"와"/favicon.ico"두 요청만이 처리되고, 요청 결과도 200으로 정상 처리됩니다."/"요청은FilterChainProxy에서 필요한 스프링 시큐리티 필터들을 순서대로 호출하며 인증 및 인가를 수행합니다."/favicon.ico"요청은web.ignoring()설정에 의해 스프링 시큐리티 필터들이 호출되지 않고 처리됩니다.
위 방법 대신, 정적 리소스 요청은 모두 허용하도록 설정할 수도 있습니다.
@Configuration
@EnableWebSecurity
public class SecurityConfig extends WebSecurityConfigurerAdapter {

    /* ... */

    @Override
    protected void configure(HttpSecurity http) throws Exception {
        http.authorizeRequests()
                .mvcMatchers("/", "/info", "/account/**").permitAll()
                .mvcMatchers("/admin").hasRole("ADMIN")
                .mvcMatchers("/user").hasRole("USER")
                .requestMatchers(PathRequest.toStaticResources().atCommonLocations()).permitAll()
                .anyRequest().authenticated()
                .expressionHandler(expressionHandler());
        http.formLogin();
        http.httpBasic();
    }

}requestMatchers(PathRequest.toStaticResources().atCommonLocations()).permitAll()로 정적 리소스로 요청이 들어오면 인증을 허가하도록 설정합니다.- 다만, 이 경우 Anonymous상태로 요청이 들어오고,
FilterChainProxy에서AnonymousAuthenticationFilter에 의해 처리되기 때문에 스프링 시큐리티 필터가 호출되어 리소스와 시간을 조금 더 잡아 먹습니다.
따라서 정적 리소스 요청의 경우 configure(WebSecurity web) 메서드를 오버라이딩해서 처리하는 것이 좋고, http.authorizeRequests() 메서드로는 동적 리소스를 처리하는 것이 좋습니다. 만약 인증이 필요한 정적 리소스가 있는 경우에는 http.authorizeRequests()를 사용하는 것이 좋습니다.
Async 웹 MVC 지원 필터 WebAsyncManagerIntegrationFilter
기본적으로 SecurityContextHolder는 ThreadLocal 방식을 사용해서 하나의 쓰레드에서는 Authentication을 공유할 수 있도록 지원합니다. 만약 비동기 처리 기능을 사용하면, 다른 쓰레드를 생성하여 작업을 처리하기 때문에 ThreadLocal 방식을 취하는 SecurityContextHolder는 Authentication을 타 쓰레드에 공유하지 못합니다. 하지만 스프링 MVC의 Async 기능을 사용할 때에도 동일한 Authentication이 필요할 경우를 위해 WebAsyncManagerIntegrationFilter가 제 역할을 합니다.
public class SecurityLogger {

    public static void log(String message) {
        System.out.println(message);
        Thread thread = Thread.currentThread();
        System.out.println("Thread: " + thread.getName());
        Object principal = SecurityContextHolder.getContext().getAuthentication().getPrincipal();
        System.out.println("Principal: " + principal);
    }

}
@Controller
public class SampleController {
/* ... */
@GetMapping("/async-handler")
@ResponseBody
public Callable<String> asyncHandler() {
SecurityLogger.log("MVC");
return new Callable<String>() {
@Override
public String call() throws Exception {
SecurityLogger.log("Callable");
return "Async Handler";
}
};
}
}스프링 MVC의 Async 기능을 수행하는 핸들러를 맵핑하고, 실제로 잘 동작하는 지 SecurityLogger로 기록을 살펴보겠습니다.
MVC
Thread: http-nio-8080-exec-4
Principal: org.springframework.security.core.userdetails.User [Username=seungho, Password=[PROTECTED], Enabled=true, AccountNonExpired=true, credentialsNonExpired=true, AccountNonLocked=true, Granted Authorities=[ROLE_User]]
Callable
Thread: task-1
Principal: org.springframework.security.core.userdetails.User [Username=seungho, Password=[PROTECTED], Enabled=true, AccountNonExpired=true, credentialsNonExpired=true, AccountNonLocked=true, Granted Authorities=[ROLE_User]]
콘솔창에 찍힌 로그를 보면, MVC가 로깅된 쓰레드와 Callable이 로깅된 쓰레드는 서로 다르지만, Principal은 공유되어 같은 정보를 로깅하고 있음을 알 수 있습니다.
@Async와 스프링 시큐리티
Callable을 사용하여 동작하는 스프링 MVC의 Async 기능은 별도의 필터가 있어서 SecurityContext를 공유할 수 있었지만, @Async를 사용한 서비스를 호출하는 경우에는 이를 위한 별도의 필터가 존재하지 않습니다. 따라서 SecurityContextHolder의 기본 전략인 ThreadLocal방식 대신에 InheritableThreadLocal 방식을 선택하도록 설정해주어야 합니다.
@Configuration
@EnableWebSecurity
public class SecurityConfig extends WebSecurityConfigurerAdapter {

    /* ... */

    @Override
    protected void configure(HttpSecurity http) throws Exception {
        http.authorizeRequests()
                .mvcMatchers("/", "/info", "/account/**").permitAll()
                .mvcMatchers("/admin").hasRole("ADMIN")
                .mvcMatchers("/user").hasRole("USER")
                .anyRequest().authenticated()
                .expressionHandler(expressionHandler());
        http.formLogin();
        http.httpBasic();

        SecurityContextHolder.setStrategyName(SecurityContextHolder.MODE_INHERITABLETHREADLOCAL);
    }

}- 기본 전략을
InheritableThreadLocal로 설정해서 쓰레드가 생성되면 하위 쓰레드에서도SecurityContext를 공유하도록 설정합니다.
@SpringBootApplication
@EnableAsync
public class DemoSpringSecurityFormApplication {

    /* ... */

    public static void main(String[] args) {
        SpringApplication.run(DemoSpringSecurityFormApplication.class, args);
    }

}
@Service
public class SampleService {
/* ... */
@Async
public void asyncService() {
SecurityLogger.log("Async Service");
System.out.println("Async service is called");
}
}@Controller
public class SampleController {
/* ... */
@GetMapping("/async-service")
@ResponseBody
public String asyncService() {
SecurityLogger.log("MVC, before async service");
sampleService.asyncService();
SecurityLogger.log("MVC, after async service");
return "Async Service";
}
}- 웹 애플리케이션이 실행되는 클래스에
@EnableAsync를 붙이고, 비동기 처리할 메서드에@Async를 붙여서 비동기적으로 동작하도록 만듭니다.
MVC, before async service
Thread: http-nio-8080-exec-5
Principal: org.springframework.security.core.userdetails.User [Username=seungho, Password=[PROTECTED], Enabled=true, AccountNonExpired=true, credentialsNonExpired=true, AccountNonLocked=true, Granted Authorities=[ROLE_User]]
MVC, after async service
Thread: http-nio-8080-exec-5
Principal: org.springframework.security.core.userdetails.User [Username=seungho, Password=[PROTECTED], Enabled=true, AccountNonExpired=true, credentialsNonExpired=true, AccountNonLocked=true, Granted Authorities=[ROLE_User]]
Async Service
Thread: task-1
Principal: org.springframework.security.core.userdetails.User [Username=seungho, Password=[PROTECTED], Enabled=true, AccountNonExpired=true, credentialsNonExpired=true, AccountNonLocked=true, Granted Authorities=[ROLE_User]]
Async service is called- 콘솔 로그를 보면,
asyncService()는 비동기적으로 처리되기 때문에 뒷부분에 로깅되었으며 이전의 쓰레드와 다른 것을 확인할 수 있습니다. - 서로 다른 쓰레드임에도 불구하고,
InheritableThreadLocal전략으로 설정했으므로SecurityContext를 정상적으로 공유하고 있습니다.
SecurityContext 영속화 필터 SecurityContextPersistenceFilter
SecurityContextRepository를 사용해서 기존의 SecurityContext를 읽어오거나 초기화를 수행합니다. 기본 구현체는 HttpSessionSecurityContextRepository로, HTTP 세션을 이용해서 SecurityContext를 가져옵니다.
시큐리티 관련 헤더 추가 필터 HeaderWriterFilter
응답 헤더에 시큐리티 관련 헤더를 추가해주는 필터입니다.
XContentTypeOptionsHeaderWriter: 마임 타입 스니핑 방어 적용 - 참고XXSSProtectionHeaderWriter: 브라우저에 내장된 XSS 필터 적용 - 참고CacheControlHeadersWriter: 캐시 히스토리 취약점 방어 적용 - 참고HstsHeaderWriter: HTTPS로만 소통하도록 강제 - 참고XFrameOptionsHeaderWriter: Click Jacking 방어 - 참고
Cache-Control: no-cache, no-store, max-age=0, must-revalidate
Connection: keep-alive
Content-Language: ko-KR
Content-Type: text/html;charset=UTF-8
Date: Mon, 01 Mar 2021 06:09:28 GMT
Expires: 0
Keep-Alive: timeout=60
Pragma: no-cache
Transfer-Encoding: chunked
X-Content-Type-Options: nosniff
X-Frame-Options: DENY
X-XSS-Protection: 1; mode=block- 스프링 시큐리티를 이용하여 로딩된 사이트의 응답 헤더입니다.
CSRF 어택 방지 필터 CsrfFilter
CSRF(Cross Site Request Forgery) 어택은 인증된 유저의 계정을 사용해 악의적인 변경 요청을 만들어 보내는 기법입니다. 이를 방지하기 위해 의도한 유저만 리소스를 변경할 수 있도록 CsrfFilter 필터가 CSRF 토큰을 사용해서 막습니다. 로그인 Form을 만들 때 CSRF 토큰을 부여하고, Form을 보낼 때 CSRF 토큰을 전달받아서 기존의 토큰과 같은지 비교하는 방식입니다.
CORS(Cross-Origin Resource Sharing)를 사용하면 타 도메인에서 보내오는 요청을 허용하기 때문에 CSRF 어택에 취약할 수 있습니다.
CSRF 토큰을 사용해서 회원가입하는 예제를 만들어보겠습니다.
@Controller
@RequestMapping("/signUp")
public class SingUpController {

    @Autowired
    AccountService accountService;

    @GetMapping
    public String signUpForm(Model model) {
        model.addAttribute("account", new Account());
        return "signUp";
    }

    @PostMapping
    public String processSignUp(@ModelAttribute Account account) {
        account.setRole("USER");
        accountService.createNew(account);
        return "redirect:/";
    }

}- 회원가입 뷰 요청을 처리하는 메서드와 회원가입 Form 처리 요청을 처리하는 메서드입니다.
@RunWith(SpringRunner.class)
@SpringBootTest
@AutoConfigureMockMvc
public class SingUpControllerTest {

    @Autowired
    MockMvc mockMvc;

    @Test
    public void signUpForm() throws Exception {
        mockMvc.perform(get("/signUp"))
                .andExpect(status().isOk())
                .andExpect(content().string(containsString("_csrf")));
    }

    @Test
    public void processSignUp() throws Exception {
        mockMvc.perform(post("/signUp")
                .param("username", "seungho")
                .param("password", "123")
                .with(csrf()))
                .andExpect(status().is3xxRedirection());
    }

}- 테스트 코드로 정상 작동하는지 확인합니다.
signUpForm()테스트는 GET 요청을 잘 처리하는지 확인하고, 요청 결과에 CSRF 토큰이 존재하는지 확인합니다.processSignUp()테스트는 CSRF 토큰값을 포함하여 보낸 POST 요청을 잘 처리하는지 확인합니다.
로그아웃 처리 필터 LogoutFilter
LogoutFilter 필터 내에서 여러 LogoutHandler를 사용하여 로그아웃시 필요한 처리를 하며, 이후에는 LogoutSuccessHandler를 사용하여 로그아웃 후처리를 합니다.
LogoutHandler에는 CsrfLogoutHandler와 SecurityContextLogoutHandler가 있고, LogoutSuccessHandler에는 SimplUrlLogoutSuccessHandler가 있습니다.
@Configuration
@EnableWebSecurity
public class SecurityConfig extends WebSecurityConfigurerAdapter {

    /* ... */

    @Override
    protected void configure(HttpSecurity http) throws Exception {
        http.authorizeRequests()
                .mvcMatchers("/", "/info", "/account/**", "/signUp").permitAll()
                .mvcMatchers("/admin").hasRole("ADMIN")
                .mvcMatchers("/user").hasRole("USER")
                .anyRequest().authenticated()
                .expressionHandler(expressionHandler());
        http.formLogin();
        http.httpBasic();

        http.logout()
                .logoutUrl("/logout")
                .logoutSuccessUrl("/")
                .invalidateHttpSession(true);

        SecurityContextHolder.setStrategyName(SecurityContextHolder.MODE_INHERITABLETHREADLOCAL);
    }

}- 더불어 시큐리티 설정에
http.logout()으로 로그아웃시 어떻게 동작할지 정할 수 있습니다.
Form 인증 처리 필터 UsernamePasswordAuthenticationFilter
Form 로그인을 처리하는 인증 필터 입니다. 사용자가 Form에 입력한 username과 password로 Authentication을 만들고, AuthenticationManager를 사용하여 인증을 시도합니다.
AuthenticationManager의 구현체로 ProviderManager를 호출하여, 내부에서 여러 AuthenticationProvider를 사용해 인증을 시도하는데, 그 중에 DaoAuthenticationProvider는 UserDetailsService를 사용하여 UserDetails 정보를 가져와 사용자가 입력한 password와 비교합니다.
로그인/로그아웃 페이지 생성 필터 DefaultLoginPageGeneratingFilter, DefaultLogoutPageGeneratingFilter
기본 로그인 / 로그아웃 Form 페이지를 생성해주는 필터입니다. 즉, GET 요청의 /login, /logout을 처리합니다. 해당 페이지를 커스터마이징해서 동작하도록 설정할 수도 있습니다.
@Controller
public class LogInOutController {

    @GetMapping("/login")
    public String loginForm() {
        return "login";
    }

    @GetMapping("/logout")
    public String logoutForm() {
        return "logout";
    }

}
@Configuration
@EnableWebSecurity
public class SecurityConfig extends WebSecurityConfigurerAdapter {
/* ... */
@Override
protected void configure(HttpSecurity http) throws Exception {
http.authorizeRequests()
.mvcMatchers("/", "/info", "/account/**", "/signUp").permitAll()
.mvcMatchers("/admin").hasRole("ADMIN")
.mvcMatchers("/user").hasRole("USER")
.anyRequest().authenticated()
.expressionHandler(expressionHandler());
http.formLogin()
.loginPage("/login")
.permitAll();
http.httpBasic();
http.logout()
.logoutUrl("/logout")
.logoutSuccessUrl("/")
.invalidateHttpSession(true);
SecurityContextHolder.setStrategyName(SecurityContextHolder.MODE_INHERITABLETHREADLOCAL);
}
}http.formLogin()에서 커스텀한 로그인 페이지 URL을 모든 유저가 접근할 수 있도록 설정합니다.http.logout()에서 커스텀한 로그아웃 페이지 URL과 로그아웃시 보낼 URL 등을 설정합니다.
HTTP Basic 인증 처리 필터 BasicAuthenticationFilter
Basic 인증이란, 요청 헤더에 username과 password를 실어 보내면 브라우저 또는 서버가 그 값을 읽어서 인증하는 방식입니다. 예를 들어, Authorization: Basic c2V1bmdobzoxMjM=처럼 seungho:123을 BASE 64 방식으로 인코딩해서 요청 헤더에 실어 보냅니다.
보통 브라우저 기반 요청이 클라이언트의 요청을 처리할 때 자주 사용합니다. 다만 유저 정보가 단순 인코딩되어서 전달되어 보안에 취약하기 때문에 반드시 HTTPS를 사용하는 걸 권장합니다.
요청 캐시 필터 RequestCacheAwareFilter
현재 요청과 관련 있는 캐시된 요청이 있는지 찾아서 적용하는 필터입니다. 캐시된 요청이 없다면 현재 요청을 처리하고, 캐시된 요청이 있다면 해당 캐시된 요청을 처리합니다. 예를 들어 /dashboard 요청을 보내면, 먼저 /login으로 가서 처리 후 정상적으로 로그인을 했으면 다시 /dashboard 요청을 처리합니다.
시큐리티 관련 서블릿 스펙 구현 필터 SecurityContextHolderAwareRequestFilter
아래와 같은 시큐리티 관련 서블릿 API를 구현해주는 필터입니다.
HttpServletRequest#authenticate(HttpServletResponse)HttpServletRequest#login(String, String)HttpServletRequest#logout()AsyncContext#start(Runnable)
익명 인증 필터 AnonymousAuthenticationFilter
현재 SecurityContext에 Authentication이 null이면 익명의 Authentication을 만들어 넣어주고, 그렇지 않으면 넘어가는 방식으로 동작합니다.
세션 관리 필터 SessionManagementFilter
여러 세션을 관리할 수 있는 설정을 제공합니다.
-
세션 변조 방지 전략 설정
http.sessionManagement().sessionFixation()세션 변조란 공격자가 세션 ID를 쿠키로부터 가져와서 희생자에게 세션 정보를 넘겨주고, 희생자가 해당 세션 정보로 특정 사이트에 로그인을 하게 되면, 공격자도 희생자와 동일한 세션 정보이므로 유저 정보에 접근할 수 있게 됩니다.
이를 방지하기 위해 여러 전략이 제공됩니다.
none: 아무런 전략을 설정하지 않습니다.newSession: 로그인을 하면 새로운 세션을 만들어서 진행합니다.migrateSession: 로그인을 하면 세션을 이동시켜 진행합니다.changeSessionId: 로그인을 하면 기존 세션의 ID만 변경하여 진행합니다. (서블릿 3.1+ 컨테이너 사용시 기본값)
-
유효하지 않은 세션을 리다이렉트 시킬 URL 설정
http.sessionManagement().invalidSessionUrl() -
동시성 제어
http.sessionManagement().maximumSessions()추가 로그인을 막을지 여부를 설정합니다. 기본값은
false로 되어 있습니다. -
세션 생성 전략
http.sessionManagement().sessionCreationPolicy()시큐리티 관련 작업을 할 때, 세션을 어떻게 만들어 관리할지 정합니다.
IF_REQUIRED(기본값),NEVER,STATELESS,ALWAYS등의 전략이 있습니다.
@Configuration
@EnableWebSecurity
public class SecurityConfig extends WebSecurityConfigurerAdapter {

    /* ... */

    @Override
    protected void configure(HttpSecurity http) throws Exception {
        http.authorizeRequests()
                .mvcMatchers("/", "/info", "/account/**", "/signUp").permitAll()
                .mvcMatchers("/admin").hasRole("ADMIN")
                .mvcMatchers("/user").hasRole("USER")
                .anyRequest().authenticated()
                .expressionHandler(expressionHandler());

        http.formLogin()
                .loginPage("/login")
                .permitAll();

        http.httpBasic();

        http.logout()
                .logoutUrl("/logout")
                .logoutSuccessUrl("/")
                .invalidateHttpSession(true);

        http.sessionManagement()
//                .sessionCreationPolicy(SessionCreationPolicy.STATELESS)
                .sessionFixation()
                    .changeSessionId()
                .invalidSessionUrl("/")
                .maximumSessions(1)
//                    .expiredUrl("/")
                    .maxSessionsPreventsLogin(true);

        SecurityContextHolder.setStrategyName(SecurityContextHolder.MODE_INHERITABLETHREADLOCAL);
    }

}
인증/인가 예외 처리 필터: ExceptionTranslationFilter
인증과 인가 과정의 에러 처리를 담당하는 필터입니다. 주로 두 가지 예외가 발생합니다.
-
AuthentiactionException온전한 인증 정보가 없는 경우 발생하는 예외로, 예외가 발생하면
AuthenticationEntryPoint로 이동하여 에러를 처리합니다. 로그인 하지 않고/dashboard로 요청을 보내면/login으로 이동한 경우가 이에 해당합니다. -
AccessDeniedExceptionAccessDeniedHandler가 발생한 예외를 처리합니다. 기본적으로는 에러 페이지를 띄웁니다. 이를 조금 나은 방향으로 커스텀 해보겠습니다.@Configuration @EnableWebSecurity public class SecurityConfig extends WebSecurityConfigurerAdapter { /* ... */ @Override protected void configure(HttpSecurity http) throws Exception { /* ... */ http.exceptionHandling() // .accessDeniedPage("/access-denied"); .accessDeniedHandler(new AccessDeniedHandler() { @Override public void handle(HttpServletRequest request, HttpServletResponse response, AccessDeniedException accessDeniedException) throws IOException, ServletException { UserDetails principal = (UserDetails) SecurityContextHolder.getContext().getAuthentication().getPrincipal(); String username = principal.getUsername(); System.out.println(username + " is denied to access " + request.getRequestURI()); response.sendRedirect("/access-denied"); } }); } }AccessDeniedHandler를 오버라이딩하여 세팅합니다.- 서버 상에 로깅하는 기능과 사용자가 접근하려는 페이지를 커스텀 에러 페이지로 리다이렉팅하는 기능을 수행합니다.
인가 처리 필터: FilterSecurityInterceptor
HTTP 리소스 시큐리티 처리를 담당하는 필터입니다. AccessDecisionManager를 사용하여 인가를 처리합니다. HTTP 리소스 시큐리티 설정은 지금껏 해오던 http.authorizeRequests()에 세팅값입니다.

토큰 기반 인증 필터: RememberMeAuthenticationFilter
세션이 사라지거나 만료가 되더라도 쿠키 또는 DB를 사용하여 저장된 토큰 기반으로 인증을 지원하는 필터입니다. 로그인 유지 기능 등이 RememberMe를 사용해서 구현됩니다.
@Configuration
@EnableWebSecurity
public class SecurityConfig extends WebSecurityConfigurerAdapter {

    /* ... */

    @Override
    protected void configure(HttpSecurity http) throws Exception {

        /* ... */

        http.rememberMe()
//                .rememberMeParameter("remember")
//                .alwaysRemember(true)
                .userDetailsService(accountService)
                .key("remember-me-sample");
    }

}
위처럼 세션 정보 뿐만 아니라 RememberMe 토큰 정보도 쿠키에 담겨 있습니다. 이후 세션 정보가 지워지더라도 RememberMe로 부터 사용자 정보를 가져오므로 토큰이 만료되기 전까지는 별도의 로그인 없이 동작 가능합니다.
커스텀 필터 추가하기
시큐리티 필터들을 통과하는데 걸리는 시간을 측정하는 로깅 필터를 하나 추가해보겠습니다.
public class LoggingFilter extends GenericFilterBean {

    private Logger logger = LoggerFactory.getLogger(this.getClass());

    @Override
    public void doFilter(ServletRequest request, ServletResponse response, FilterChain chain) throws IOException, ServletException {
        StopWatch stopWatch = new StopWatch();
        stopWatch.start(((HttpServletRequest)request).getRequestURI());

        chain.doFilter(request, response);

        stopWatch.stop();
        logger.info(stopWatch.prettyPrint());
    }

}
@Configuration
@EnableWebSecurity
public class SecurityConfig extends WebSecurityConfigurerAdapter {
/* ... */
@Override
protected void configure(HttpSecurity http) throws Exception {
/* ... */
http.addFilterBefore(new LoggingFilter(), WebAsyncManagerIntegrationFilter.class);
}
}LoggingFilter는 모든 시큐리티 필터가 통과하는 데 소요되는 시간을 측정하는 목적임을 고려해서 필터 맨 앞에 위치해야 하므로,addFilterBefore()로 필터 추가 위치를 지정합니다.
스프링 시큐리티 그 밖에
이 파트는 부록의 느낌으로, 나중에 참고할 만한 수준으로만 언급하고 넘어가겠습니다.
타임리프 스프링 시큐리티 확장팩
타임리프로 시프링 시큐리티를 보다 편하게 사용하기 위해서는 별도 의존성을 추가해야 합니다.
<dependency>
    <groupId>org.thymeleaf.extras</groupId>
    <artifactId>thymeleaf-extras-springsecurity5</artifactId>
</dependency>
이를 이용해 /index 요청에서 인증 정보가 있으면 로그아웃 버튼을, 인증 정보가 없으면 로그인 버튼을 보여주도록 설정하겠습니다.
<!DOCTYPE html>
<html lang="en" xmlns:th="http://www.thymeleaf.org" xmlns:sec="http://www.thymeleaf.org/extras/spring-security">
<head>
    <meta charset="UTF-8">
    <title>Title</title>
</head>
<body>
    <h1 th:text="${message}">Hello</h1>
    <div th:if="${#authorization.expr('isAuthenticated()')}">
        <h2 th:text="${#authentication.name}"></h2>
        <a href="/logout" th:href="@{/logout}">Logout</a>
    </div>
    <div th:unless="${#authorization.expr('isAuthenticated()')}">
        <a href="/login" th:href="@{/login}">Login</a>
    </div>
</body>
</html>
보다 깔끔한 코드를 위한 sec 네임스페이스
sec 네임스페이스를 사용하면 표현식을 간단히 표현할 수 있습니다.
<!DOCTYPE html>
<html lang="en" xmlns:th="http://www.thymeleaf.org" xmlns:sec="http://www.thymeleaf.org/extras/spring-security">
<head>
    <meta charset="UTF-8">
    <title>Title</title>
</head>
<body>
    <h1 th:text="${message}">Hello</h1>
    <div sec:authorize="isAuthenticated()">
        <h2 sec:authentication="name">Name</h2>
        <a href="/logout" th:href="@{/logout}">Logout</a>
    </div>
    <div sec:authorize="!isAuthenticated()">
        <a href="/login" th:href="@{/login}">Login</a>
    </div>
</body>
</html>
@AuthenticationPrincipal
기본적으로 컨트롤러에서 핸들러 파라미터로 Principal 객체를 받을 수 있습니다. 하지만 이는 서비스에서 정의한 Account 엔티티가 아닌 자바 시큐리티에서 사용하는 객체를 기반으로 합니다.
@Controller
public class SampleController {

    /* ... */

    @GetMapping("/")
    public String index(Model model, Principal principal) {
        if (principal == null) {
            model.addAttribute("message", "Hello Spring Security");
        } else {
            model.addAttribute("message", "Hello " + principal.getName());
        }

        return "index";
    }
}
이를 도메인 Account로 변경해보겠습니다. 먼저 커스텀 유저 클래스를 구현해야 합니다.
public class UserAccount extends User {

    private Account account;

    public UserAccount(Account account) {
        super(account.getUsername(), account.getPassword(), List.of(new SimpleGrantedAuthority("ROLE_" + account.getRole())));
        this.account = account;
    }

    public Account getAccount() {
        return account;
    }

}loadUserByUsername()에서 반환하는 UserDetails 객체가 곧 Principal이 되므로 이 부분을 UserAccount로 수정해줍니다.
@Service
public class AccountService implements UserDetailsService {

    /* ... */

    @Override
    public UserDetails loadUserByUsername(String username) throws UsernameNotFoundException {
        Account account = accountRepository.findByUsername(username);
        if (account == null) {
            throw new UsernameNotFoundException(username);
        }

        return new UserAccount(account);
    }

}
그리고 복잡한 애노테이션 표현식 중복 방지를 위해 커스텀 애노테이션을 선언합니다.
@Retention(RetentionPolicy.RUNTIME)
@Target(ElementType.PARAMETER)
@AuthenticationPrincipal(expression = "#this == 'anonymousUser' ? null : account")
public @interface CurrentUser {
}
@Controller
public class SampleController {
/* ... */
@GetMapping("/")
public String index(Model model, @CurrentUser Account account) {
if (account == null) {
model.addAttribute("message", "Hello Spring Security");
} else {
model.addAttribute("message", "Hello " + account.getUsername());
}
return "index";
}
}스프링 데이터 연동
@Query 애노테이션에서 Spring Expression Language로 Principal을 참조할 수 있는 기능을 제공합니다. 먼저 필요한 의존성을 추가합니다.
<dependency>
    <groupId>org.springframework.security</groupId>
    <artifactId>spring-security-data</artifactId>
    <version>${spring-security.version}</version>
</dependency>
Account 객체를 author 필드로 갖는 Book 객체가 있다면 아래처럼 @Query 설정을 할 수 있습니다.
public interface BookRepository extends JpaRepository<Book, Integer> {

    @Query("select b from Book b where b.author.id = ?#{principal.account.id}")
    List<Book> findCurrentUserBooks();

}
복습하려고 찾다가 들어오게 되었는데 좋은 글 감사합니다. 스프링 부트와 JPA 활용 2- API 개발과 성능 최적화는 수강 안 하신 건가요 ?? 그리고 혹시 Spring 카테고리 안의 스프링 시큐리티 기본편 정리는 어떤 분 강의인가요?? Spring Security와 OAuth 2.0 글은 강의를 듣고 쓰신게 정리하신게 아니라 공부하신 내용을 적으신건가요 ?? 복습할 겸 보는데 글이 알짜배기가 다 있어서 편하네요 !