✅ 대각선 Border를 만들어보자.
🤨 어...?
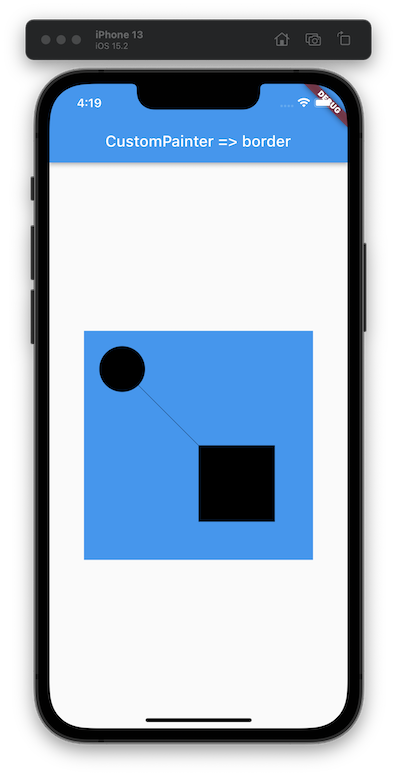
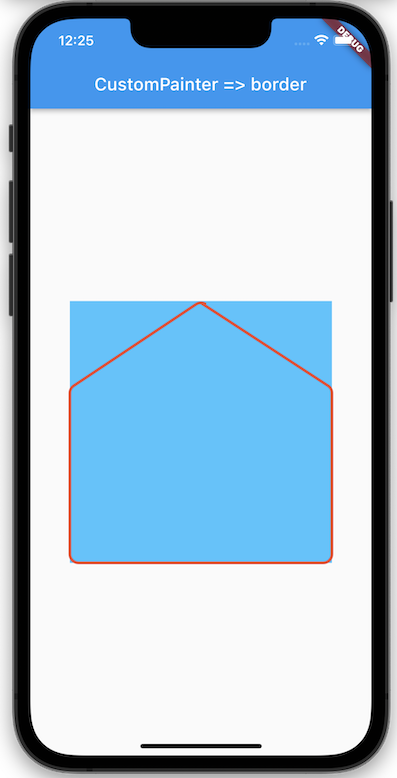
Flutter를 사용하여 어플을 만드는 도중, 아래와 같은 위젯을 만들어야 했다.
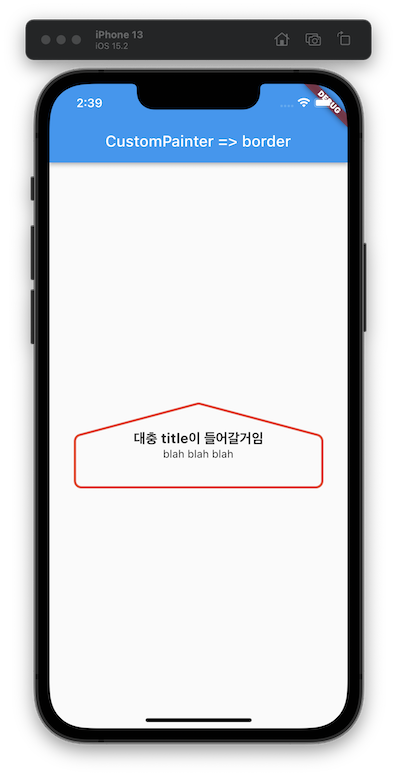
border에 해당하는 부분을 SVG이미지로 받아, Stack을 사용하여 border처럼 보이게 추가해주었다.
Center(
        child: Container(
          width: double.infinity,
          height: 400,
          margin: EdgeInsets.all(20),
          color: Colors.lightBlueAccent,
          child: Stack(
            alignment: Alignment.center,
            children: [
              Container(
                child: SvgPicture.asset(
                  "assets/custom_border.svg",
                  color: Colors.red,
                ),
              ),
              Column(
                mainAxisAlignment: MainAxisAlignment.center,
                children: const [
                  Text(
                    "대충 title이 들어갈거임",
                    style: TextStyle(fontWeight: FontWeight.bold, fontSize: 18),
                  ),
                  Text("blah blah blah"),
                ],
              ),
            ],
          ),
        ),
그런데 사이즈를 아래와 같이 맞춰야 했다.
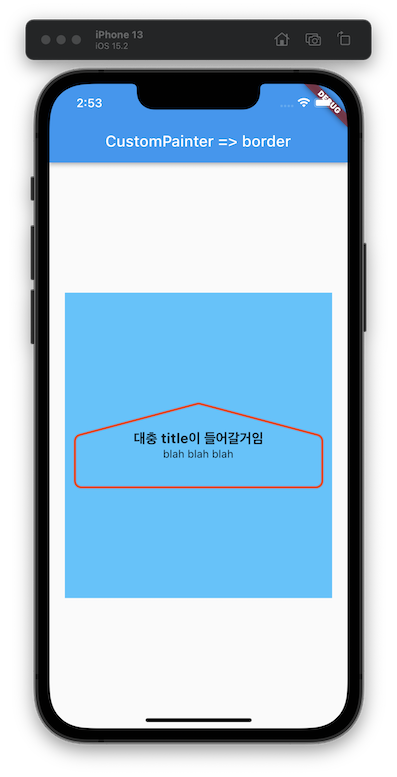
컨테이너 크기를 설정하고, fit: BoxFit.fill을 해주자.

🎨 Border 직접 그리기
✔ 어떤 위젯으로 해야하지...?
BoxDecoration?
- Custom없이 구현된 코드를 이용하여 Border를 관리할 수 있다.
- Border뿐 아니라 Shape, color, image, radius, shadow 등 다양하게 설정할 수 있다.
- 그런데 대각선 border를 구현할 수 없었다.
삼각형 위젯?
- 없었다.
CustomPaint!
- 없으면 그려야지.....
✔ 클래스 만들기
우선 CustomPainter를 상속받는 클래스 PentagonPainter를 하나 만들자.
override가 필요한 함수를 추가하면 아래와 같을 것이다.
import 'package:flutter/material.dart';
class PentagonPainter extends CustomPainter
{
const PentagonPainter();
void paint(Canvas canvas, Size size) {
// TODO: implement paint
}
bool shouldRepaint(covariant CustomPainter oldDelegate) {
return false;
}
}✔ 클래스 뜯어보기
shouldRepaint method
shouldRepaint메서드에서는 우리가 만든 CustomPainter가 다시 호출될때 불려오는 메서드이다.
true일 경우 새로 그리며, false일 경우 다시 그리지 않는다.
파라미터의 변경된 값을 확인하여 true, false를 확인하곤 한다.
bool shouldRepaint(covariant CustomPainter oldDelegate) {
	return old.myParameter != this.myParameter;
}
paint method
paint메서드에서는 canvas, size를 활용하여 실제로 그림을 그리는 로직을 실행할 수 있다.
void paint(Canvas canvas, Size size) {
    canvas.drawRect(); //사각형 그리기
    canvas.drawLine();  // 선
    canvas.drawCircle();  // 원
    canvas.drawArc();  // 원호(곡선)
    canvas.drawPath(); // 경로에 따라 그리기
    canvas.drawImage(); // 이미지
    canvas.drawImageNine(); //나인패쓰 이미지
    canvas.drawParagraph(); //텍스트 문단
  }
아래처럼 코드를 통해 쉽게 그릴 수 있다.
void paint(Canvas canvas, Size size) {
//offset => 원점으로부터의 한 점 or 좌표에 적용할 벡터
//Paint Class => 캔버스에 그릴때 필요한 스타일 설정
canvas.drawCircle(Offset(50, 50), 30, Paint());
canvas.drawRect(
Rect.fromCenter(center: Offset(200, 200), width: 100, height: 100),
Paint(),
);
canvas.drawLine(Offset(50, 50), Offset(250, 250), Paint());
}
Paint Class
canvas.drawCircle(Offset(50, 50), 30, Paint());Paint클래스를 커스터마이징하여 그려지는 도형의 속성을 변경할 수 있다.
아래에서 자주 쓰이는 세가지 속성을 적용해보았다.
void paint(Canvas canvas, Size size) {
Paint paint = Paint()
..color = Colors.red
..strokeWidth = 5
..style = PaintingStyle.stroke;
canvas.drawCircle(
Offset(size.width.toInt() / 2, size.width.toInt() / 2), 50, paint);
}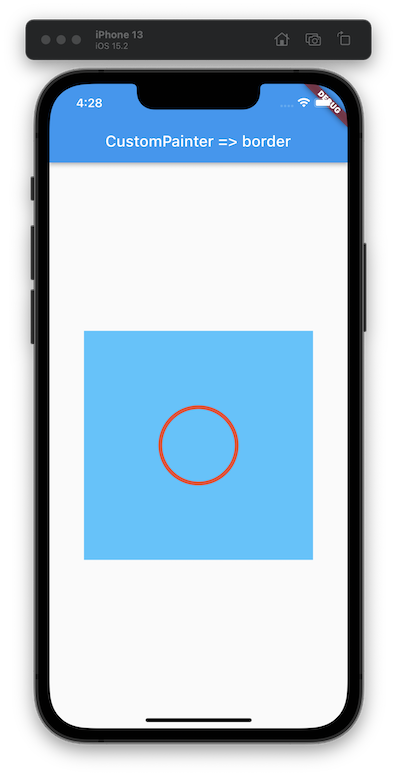
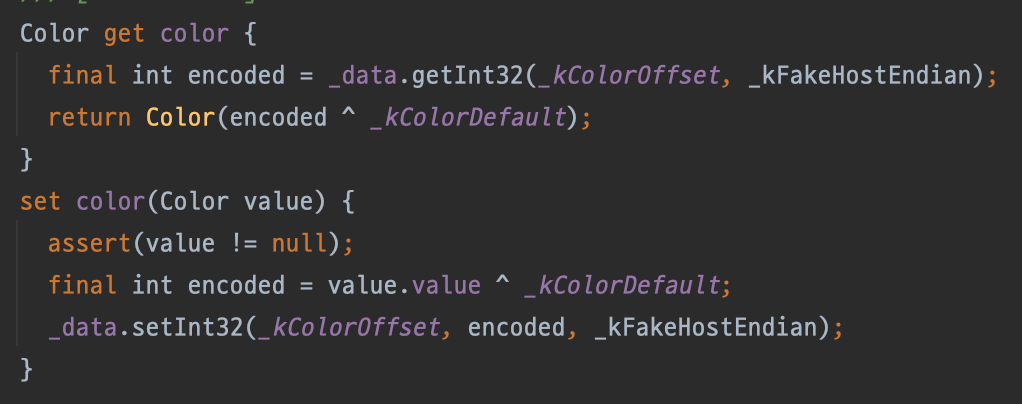
Paint클래스 내부에선 속성들을 getter, setter를 통해 적용한다.
✔ 오각형(pentagon) 그리기
해당 오각형의 제원은 아래와 같다.
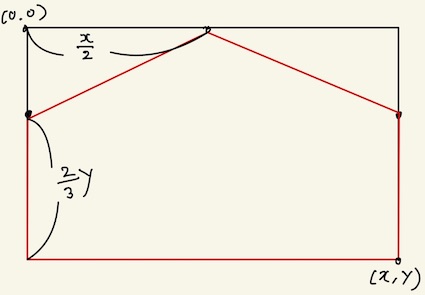
canvas.drawPentagon은 없으니 drawPath를 통해 그려보자.
void paint(Canvas canvas, Size size) {
Paint paint = Paint()
..color = Colors.red
..strokeWidth = 3
..style = PaintingStyle.stroke;
canvas.drawPath(getPath(size.width, size.height), paint);
}
Path getPath(double x, double y) {
Path path = Path()
..moveTo(x / 2, 0)
..lineTo(x, y / 3)
..lineTo(x, y)
..lineTo(0, y)
..lineTo(0, y / 3)
..close();
return path;
}
moveTo
해당 위치로 path가 이동한다.
그리지 않고 이동한다.lineTo
해당 위치에서 메소드 내 위치까지 선을 그리며 이동한다.
close
현재위치에서 시작위치로 선을 그으며 이동한다.
✔ 모서리 Radius는 뭘로 그릴까..?
곡선을 표현하기 위한 메소드는 매우 많으나, 우리가 아는 정보는
- 곡선을 그리는 원의 반지름
- 오각형을 외접하는 사각형의 길이 (이미지 상 파란 container)
뿐이다.
그래서,
사각형의 x, y값을 사용하여 필요한 위치의 각도를 구하고,
원의 중점을 구하여 원호를 구하거나,
그리고픈 곡선의 시작과 끝점을 구하여 그리는 방법이 있다.
제길 삼각함수

arcToPoint method
void arcToPoint(
	Offset arcEnd,
    {
    	Radius radius = Radius.zero,
        double rotation = 0.0,
        bool largeArc = false,
        bool clockwise = true,
    }
)
현재 위치에서 메소드 내 arcEnd 위치까지 원을 그린다.
곡선은 360도 미만이 되는 곳을 시계방향으로 그린다.
반지름이 0이 될 경우 직선으로 표시된다.
arcTo method
void arcTo(
    Rect rect,
    double startAngle,
    double sweepAngle,
    bool forceMoveTo,
)
rect 내 내접한 원으로,
startAngle -> sweepAngle 까지의 원호를 그린다.
forceMoveTo를 false로 지정하면, 함수 실행 전의 현재위치에서 이 메소드의 시작지점까지 선을 추가한다.
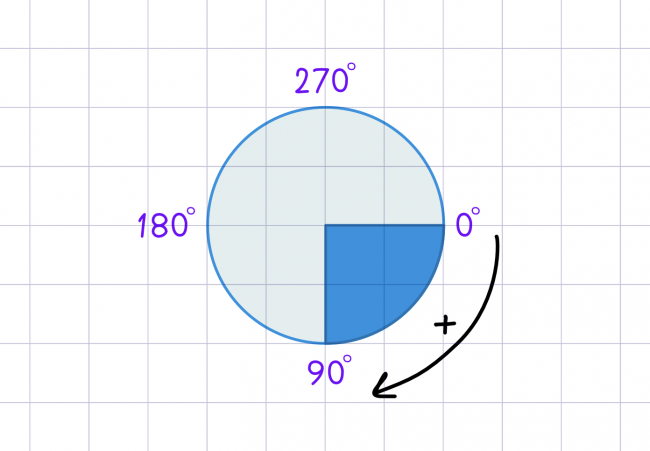
각도는 Radian을 사용한다.
각도의 순서는 아래와 같으며, 라디안 기준이다.
<출처 https://www.raywenderlich.com/7560981-drawing-custom-shapes-with-custompainter-in-flutter>
✔ 이제 그려보자?
크게 세가지 적용점이 있다.
- 하단
- 중단
- 상단 center
회전시킨 점의 좌표는 아래의 링크처럼 쉽게 구할 수 있지만,
(https://silverstonec.tistory.com/94)
원초적으로 구해본 뒤 적용시켜보자.
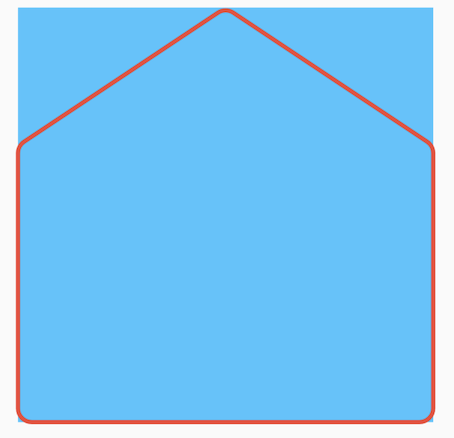
1. 하단
하단의 경우 원의 중심, 원과 접하는 접선의 위치, 길이 등을 쉽게 알 수 있다.
arcToPoint메소드를 통해 쉽게 곡선을 그릴 수 있었다.
Path getPath(double x, double y) {
    const radius = 10.0;

    Path path = Path()
      ..moveTo(x / 2, 02)
      ..lineTo(x, y / 3)
      ..lineTo(x, y - radius)
      ..arcToPoint(Offset(x - radius, y), radius: Radius.circular(radius))
      ..lineTo(0 + radius, y)
      ..arcToPoint(Offset(0, y - radius), radius: Radius.circular(radius))
      ..lineTo(0, y / 3)
      ..close();

    return path;
  }
오른쪽 하단의 곡선 시작점까지 현재 위치를 이동하고, arcToPoint함수를 이용하여 곡선의 마지막 위치까지 원을 그린다.
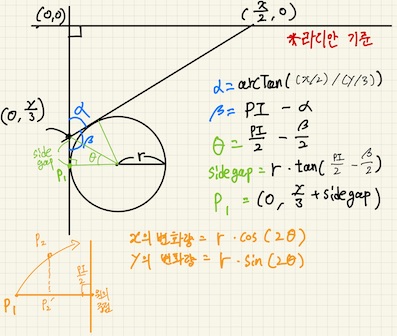
2. 중단
중단의 경우 삼각함수를 사용하여, x의 증가량과 y의 증가량을 구하고 이를 좌표에 대입시켰다.
- 우선 y축과 접하는 점의 위치부터 알아야 한다. (시계방향으로 선을 그리고 있기에)
Container 좌측 중단의 점과 상단의 가운데 점의 위치를 알고 있으므로,
각도 베타를 구할 수 있다.
- 각도 베타를 이용하여 x=0축과 원의 접점을 알 수 있다.

원과 x=0축의 좌표 = (0, y/3 + side_gap)
-
여기서 회전하는 점의 위치를 구하는 행렬(혹은 삼각함수 공식)보다는 x와 y의 움직임 차이를 통해 곡선의 마지막 위치를 알아보고자 했다.
-
우리는 삼각함수에서
0 ~ PI/2까지 범위에 있어, cos은 값이 1=>0, sin은 값이 0=>1로 변하는 것을 알고 있다. -
우리는 각도
Theta를 알고 있으니 이를 활용하여,x의 변화량과y의 변화량을 알 수 있다,
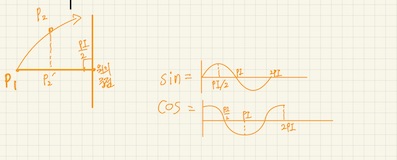
- x의 변화량은
r * cos(2Theta), y의 변화량은r * sin(2Theta)가 되겠다.
    final yGap = (radius * math.sin(((math.pi / 2) - (topSideRadian / 2)) * 2));
    final xGap =
        radius - (radius * math.cos(((math.pi / 2) - (topSideRadian / 2)) * 2));

   final topLeftStart = Offset(0, y / 3 + side_gap);
   final topLeftEnd = Offset(0 + xGap, y / 3 + side_gap - yGap);
   final topRightStart = Offset(x - xGap, y / 3 + side_gap - yGap);
   final topRightEnd = Offset(x, y / 3 + side_gap);


    Path path = Path()
      ..moveTo(x / 2, 02)
      ..lineTo(topRightStart.dx, topRightStart.dy)
      ..arcToPoint(topRightEnd, radius: Radius.circular(radius))
      ..lineTo(x, y - radius)
      ..arcToPoint(Offset(x - radius, y), radius: Radius.circular(radius))
      ..lineTo(0 + radius, y)
      ..arcToPoint(Offset(0, y - radius), radius: Radius.circular(radius))
      ..lineTo(topLeftStart.dx, topLeftStart.dy)
      ..arcToPoint(topLeftEnd, radius: Radius.circular(radius))
      ..close();
따라서 P1이 2
Theta만큼 회전한 P2의 좌표는,(0 + r * cos(2Theta), y - sin(2Theta)이다.
이것으로 우측 모서리도 같은 방식으로 좌표를 구할 수 있다.

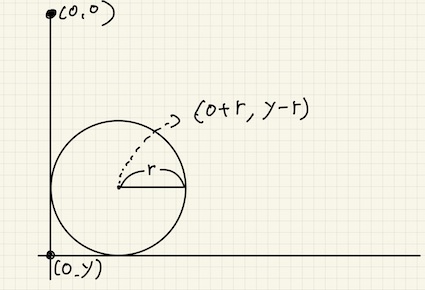
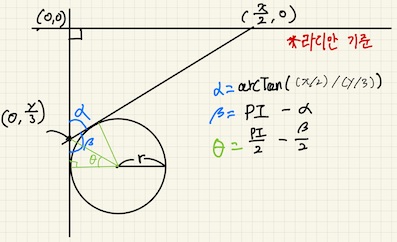
3. 상단
중단처럼 접점과 원의 중점이 같은 축에 위치하지 않지만, 하단처럼 좌표를 쉽게 구할 수 있다.
또한, 중단처럼 원호에 해당하는 각도를 구할 수 있고 h를 구할 필요 없이, 원의 중점을 알기 쉬우니 arcTo함수를 사용해보기로 했다.
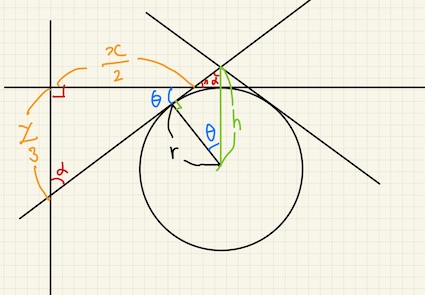
final theta = math.atan((y / 3) / (x / 2));
따라서 원의 중점은 (x / 2, r)이다.
이제 어느 각도(startAngle)에서 몇도(sweepAngle)만큼 돌릴지 구해야 한다.
시작각도는 PI * 3 / 2 + theta이며, 그로부터 2 * theta만큼 회전시킨 원호를 출력해보자.
<출처 https://www.raywenderlich.com/7560981-drawing-custom-shapes-with-custompainter-in-flutter>
final theta = math.atan((y / 3) / (x / 2));
final topCenterOffset = Offset(x / 2, r);

arcTo(Rect.fromCircle(center: topCenterOffset, radius: radius), math.pi * (3 / 2) - theta, theta * 2, false)
따라서 결과는 다음과 같다.
// 설명의 코드와 아래의 코드가 다를 수 있습니다.

    const radius = 10.0;

    final topSideRadian = (math.pi - math.atan((x / 2) / (y / 3)));
    final topSideLengthGap =
        radius * math.tan((math.pi / 2) - (topSideRadian / 2));
    final yGap = (radius * math.sin(((math.pi / 2) - (topSideRadian / 2)) * 2));
    final xGap =
        radius - (radius * math.cos(((math.pi / 2) - (topSideRadian / 2)) * 2));
    final topCenterTheta = math.atan((y / 3) / (x / 2));

    final topLeftStart = Offset(0, y / 3 + topSideLengthGap);
    final topLeftEnd = Offset(0 + xGap, y / 3 + topSideLengthGap - yGap);
    final topRightStart = Offset(x - xGap, y / 3 + topSideLengthGap - yGap);
    final topRightEnd = Offset(x, y / 3 + topSideLengthGap);
    final topCenterOffset = Offset(x / 2, radius);

    Path path = Path()
      ..moveTo(x / 2, 0)
      ..lineTo(topRightStart.dx, topRightStart.dy)
      ..arcToPoint(topRightEnd, radius: Radius.circular(radius))
      ..lineTo(x, y - radius)
      ..arcToPoint(Offset(x - radius, y), radius: Radius.circular(radius))
      ..lineTo(0 + radius, y)
      ..arcToPoint(Offset(0, y - radius), radius: Radius.circular(radius))
      ..lineTo(topLeftStart.dx, topLeftStart.dy)
      ..arcToPoint(topLeftEnd, radius: Radius.circular(radius))
      ..arcTo(Rect.fromCircle(center: topCenterOffset, radius: radius),
          math.pi * 1.5 - topCenterTheta, topCenterTheta * 2, false)
      ..close();

    return path;
시작점 정리
코드 상 마지막 위치는 (x / 2, 0)에서 Theta만큼 틀어져있고, close함수를 통해 현재위치에서 시작위치로 가는 줄이 그어져 있다.
시작위치를 수정하여 마무리하자.
// 설명의 코드와 아래의 코드가 다를 수 있습니다.

    const radius = 10.0;

    final topSideRadian = (math.pi - math.atan((x / 2) / (y / 3)));
    final topSideLengthGap =
        radius * math.tan((math.pi / 2) - (topSideRadian / 2));
    final yGap = (radius * math.sin(((math.pi / 2) - (topSideRadian / 2)) * 2));
    final xGap =
        radius - (radius * math.cos(((math.pi / 2) - (topSideRadian / 2)) * 2));
    final topCenterTheta = math.atan((y / 3) / (x / 2));

    final topLeftStart = Offset(0, y / 3 + topSideLengthGap);
    final topLeftEnd = Offset(0 + xGap, y / 3 + topSideLengthGap - yGap);
    final topRightStart = Offset(x - xGap, y / 3 + topSideLengthGap - yGap);
    final topRightEnd = Offset(x, y / 3 + topSideLengthGap);
    final topCenterOffset = Offset(x / 2, radius);

    Path path = Path()
      ..moveTo(topRightStart.dx, topRightStart.dy)
      ..arcToPoint(topRightEnd, radius: Radius.circular(radius))
      ..lineTo(x, y - radius)
      ..arcToPoint(Offset(x - radius, y), radius: Radius.circular(radius))
      ..lineTo(0 + radius, y)
      ..arcToPoint(Offset(0, y - radius), radius: Radius.circular(radius))
      ..lineTo(topLeftStart.dx, topLeftStart.dy)
      ..arcToPoint(topLeftEnd, radius: Radius.circular(radius))
      ..arcTo(Rect.fromCircle(center: topCenterOffset, radius: radius),
          math.pi * (3/2) - topCenterTheta, topCenterTheta * 2, false)
      ..close();

    return path;
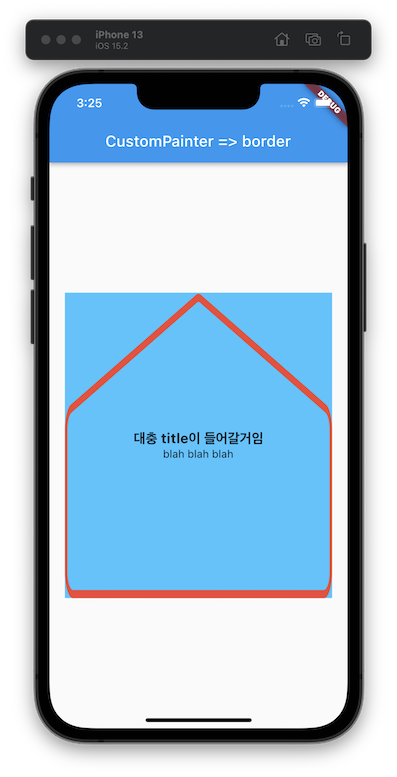
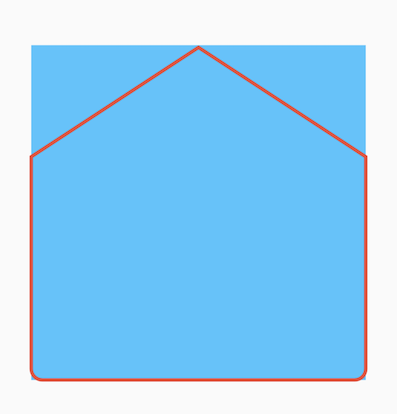
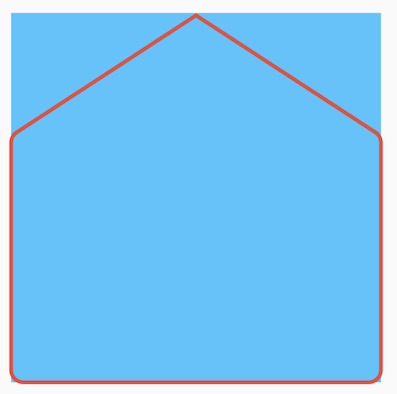
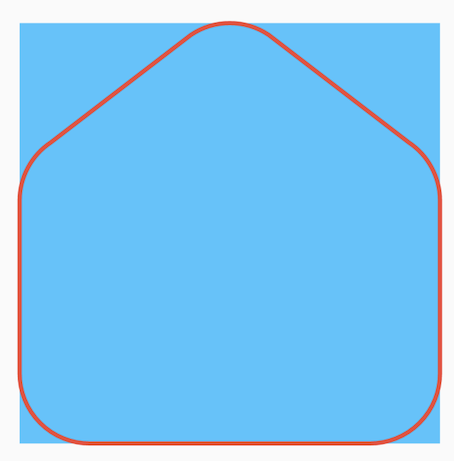
깔끔하게 그려진 오각형 Border
radius를 수정하면 더 확실히 볼 수 있다.
😅 마무리
사용한 기술도 정리할 겸 다른 사람에게 도움도 될 겸 예제파일까지 만들어가며 정리를 해보았는데, 확실히 시간도 오래 걸리고 (하루를 다 날렸다.) 의도대로 설명이 잘 되었는지도 모르겠다.
회전하는 점의 위치는 삼각함수 개념을 통해 각도만 구하면 쉽게 알 수 있으나, 여러 함수도 사용해보고 문득 러프하게 구해보고싶다는 생각도 들어서 (우린 이거를 슨팍찌리릿이라 부르기로 했다) 조금 시간이 걸린 이슈였던 것 같다.
앞으로 글도 많이 써가며 개념을 정리하고, 잘 설명하는 법도 익혀보아야겠다.
박승한
📚 참고자료
📎 https://api.flutter.dev/flutter/dart-ui/Path-class.html
📎 https://www.raywenderlich.com/7560981-drawing-custom-shapes-with-custompainter-in-flutter
📎 https://developer.mozilla.org/ko/docs/Web/API/Canvas_API/Tutorial/Drawing_shapes
📎 https://mathbang.net/159
📎 https://silverstonec.tistory.com/94
📎 https://software-creator.tistory.com/23

6개의 댓글

AI Music Generator solves the biggest AI music pain points: it creates expressive, original songs in any style, gives you full creative control, and guarantees copyright-safe music for commercial use. Just describe your idea-no music skills needed-and get professional, emotionally rich tracks in seconds. Create, edit, and share with ease, knowing your music stands out and is legally yours. https://aisonggenerator.online/

Flutter CustomPaint를 이용한 대각선 border 팁 잘 봤습니다! 저도 코딩 없이 아름다운 멜로디를 만들고 싶네요. https://musicgeneratorai.io/ 여기서 영감을 얻어보세요!
CustomPaint로 대각선 border 그리는 방법 정말 유용하게 잘 봤어요!
혹시 음악 작업에도 관심 있다면, 저도 최근에 많이 쓰는 https://vibemusicing.com/ 추천드려요. 코딩 없이도 멋진 음악을 쉽게 만들 수 있어요!
앞으로도 좋은 글 기대할게요 :)
Flutter CustomPainter를 이용한 대각선 border 튜토리얼 잘 봤습니다! 저도 비슷한 방식으로 3D 월드를 쉽게 만드는 플랫폼을 만들고 있어요. 유용한 정보 감사합니다!

Flutter’s CustomPaint and CustomBorder tutorial is gold for UI craftsmanship! Your step-by-step canvas drawing demos turn complex shapes into approachable code. That animated progress bar example with custom painters is production-ready elegance. The CustomBorder subclassing tip for asymmetric designs solves a common pain point. Your performance optimization advice for repaint boundaries is expert-level insight!
https://kawaiicoloring.org/
잘봤습니다!