
개요
- Appium 환경 세팅을 완료하고, Python 을 이용하여 자동화 스크립트를 개발한다고 가정하면, behave 프레임워크를 사용할 수 있다.
- 보통 실제 Android OS 단말기가 있다면 좋지만, 해당 글에서는 가상 디바이스(Emulator) 를 이용한다.
- 디바이스에 naver.apk 앱을 설치하고, 작성한 기본적인 스크립트를 동작하도록 설계한다.
- appium 환경 세팅 및, behave 설치부터 사용 과정은 다른 포스트에서 참조 가능
Structure
- Appium 은 Selenium 에서 파생된 자동화 프레임워크이므로, 기본적인 문법 및 POM 구조는 Selenium 과 거의 동일하다.
- 파일 구조는 아래와 같이 구성하였다.
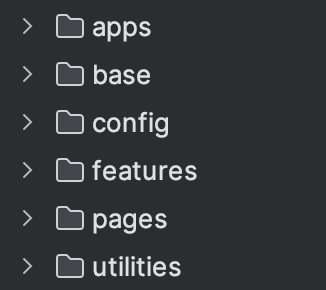
- Selenium 구조에서는 보이지 않는 apps 디렉토리에는 디바이스에 설치할 테스트용 apk 파일을 담았다.
BasePage
- Selenium 과 동일하게 App Element 를 상호작용하기 위한 BasePage 클래스 메서드를 구성한다.
- 주로 클릭, 입력 등의 액션을 아래와 같이 다양한 메서드로 정의한다.
from selenium.common.exceptions import *
from selenium.webdriver.support.ui import WebDriverWait
from selenium.webdrvier.support import expected_conditions as EC
from traceback import print_stack


class BasePage:

	def __init__(self, driver, context):
    	self.driver = driver
        self.context = context

	def app_element_wait(self, by_selector, locator):
    	"""
        엘리먼트 상호작용 전 대기
        """
		try:
    		WebDriverWait(self.driver, 10).until(
            	EC.presence_of_element_located((by_selector, locator))
            )
        except TimeoutException:
        	print_stack()
            assert False

   	def is_displayed(self, by_selector, locator):
    	"""
        엘리먼트가 표시되는 지 확인
        """
        try:
        	self.app_element_wait(by_selector, locator)
            element = self.drvier.find_element(by=by_selector, value=locator)
            element.is_displayed()
            return True
        except NoSuchElementException:
        	print_stack()
            assert False

    def touch_element(self, by_selector, locator):
    	"""
        엘리먼트 터치
        """
        try:
        	self.app_element_wait(by_selector, locator)
            element = self.driver.find_element(by=by_selector, value=locator)
            element.click()
            return True
        except NoSuchElementException:
        	print_stack()
            assert False

    def send_key_element(self, by_selector, locator, text):
    	"""
        엘리먼트에 텍스트 입력
        """
    	try:
        	self.app_element_wait(by_selector, locator)
            element = self.driver.find_element(by=by_selector, value=locator)
            element.send_keys(text)
            return True
        except NoSuchElementException:
        	print_stack()
assert False- BasePage 모듈에서 정의한 다양한 메서드(클릭, 입력, 상호작용 등) 를 가져와서 테스트 자동화 스크립트에 사용하는 구조로 설계했다.
Config
- Config 는 appium 서버 정보부터 다양한 액티비티, 필요한 capabilities 설정 값을 정의한 모듈이다.
- 최소한의 필수 값들을 위해 아래와 같이 설계했다.
APP_FILE = "naver.apk"
URL = "http://127.0.0.1:4723"
PLATFORM_NAME = "ANDROID"
PLATFORM_VERSION = "14"
AUTOMATION_NAME = "UiAutomator2"
UDID = "emulator-5554"
BUNDLE_ID = "com.nhn.android.search"
APP_ACTIVITY = "com.nhn.android.search.ui.pages.SearchHomePage"
APP_WAIT_ACTIVITY = "com.nhn.android.search.ui.pages.SearchHomePage, com.nhn.android.search.tutorial.TutorialActivity"
environment
- behave 프레임워크에서는 테스트 전/후처리를 위한 environment 모듈 기능을 제공한다. 이 모듈에서 정의한 함수는 별도로 호출할 필요가 없으며, behave 테스트 수행 도중 자동적으로 실행된다는 장점이 있다.
- appium 서버를 실행하고, 테스트 앱에 대한 사전 셋업을 이 environment 모듈을 이용하여 설계해보기로 했다.
- appium 테스트 스크립트 작성 시 capabilities 객체를 필히 선언해주어야 하는데, 이를 테스트 전처리 단계에서 설계해준다는 것이다. 이렇게 되면 자동화 테스트 실행되자마자 appium 서버 및 테스트 앱 정보에 대한 값을 설정하고 실행할 수 있게 된다.
import os
import config.config as config
import utilities.helper as helper

from appium import webdriver
from appium.webdriver.appium_service import AppiumService


# 전역 변수 목록
appium_service = AppiumService()
BASE_DIR = os.getcwd()
URL = config.URL
apps = config.APP_FILE
app = os.path.join(BASE_DIR, 'apps', apps)
start_time = None
end_time = None
scenario_test_results = []

print("Base Dir : " + BASE_DIR)
print("App Path : " + app)


def before_all(context):
    global start_time
    appium_service.start()
    print("==================== appium service started ====================")
    capabilities = {
        "app": app,
        "platformName": config.PLATFORM_NAME,
        "appium:platformVersion": config.PLATFORM_VERSION,
        "appium:automationName": config.AUTOMATION_NAME,
        "appium:appActivity": config.APP_ACTIVITY,
        "appium:appPackage": config.BUNDLE_ID,
        "appium:udid": config.UDID,
        "appWaitActivity": config.APP_WAIT_ACTIVITY,
        "autoAcceptAlerts": "true",
        "autoGrantPermissions": "true",
        "disableWindowAnimation": "true"
    }

    context.driver = webdriver.Remote(command_executor=URL, desired_capabilities=capabilities)
    helper.delete_json_file("test_result.json")
    start_time = helper.get_current_time()


def before_feature(context, feature):
    global start_time
    start_time = helper.get_current_time()
    print("===" + feature.filename + " : 테스트 시작" + "===")


def before_scenario(context, scenario):
    scenario_info = {
        "name": scenario.name,
        "status": "unknown"
    }
    scenario_test_results.append(scenario_info)


def after_scenario(context, scenario):
    for scenario_info in scenario_test_results:
        if scenario_info["name"] == scenario.name:
            scenario_info["status"] = scenario.status.name
    helper.create_json(scenario_test_results, "test_result.json")


def after_feature(context, feature):
    global start_time, end_time
    end_time = helper.get_current_time()
    time_required = end_time - start_time
    minutes, seconds = divmod(time_required.seconds, 60)
    feature_name = feature.filename
    formatted_time = f"{minutes}분 {seconds}초"
    print(f"=== {feature_name} 테스트 종료 ===")
    print(f"=== {feature_name} 테스트 소요 시간 : {formatted_time} ===")


def after_all(context):
    context.driver.quit()
    appium_service.stop()
print("==================== appium service stopped ====================")- before_all 함수에서 appium 서버를 구동하고, 실행된 에뮬레이터에서 테스트 앱 설치한 후 스크립트를 실행하는 프로세스로 구축했다. 또한 테스트 도중 앱 성능 최적화를 위해
autoAcceptAlerts,autoGrantPermissions,disableWindowAnimation키값을 추가해주었다.

QA Engineer