프로젝트를 진행하다보니, 사용자 인증/인가 관련 개발을 할 때 Spring Security를 많이 사용했다.
선제적인 이론 공부 없이 코드를 작성하다보니 오류를 수없이 맞이하고 구글링을 반복하게 되어
개념 이해를 하고자 포스팅을 진행한다.
왜 인증과 인가가 필요한가?
웹 애플리케이션에는 “인증(Authentication)”과 “인가(Authorization)”가 필수다.
- 인증(Authentication) : “이 사용자가 누구인가?”를 확인
- 인가(Authorization) : “이 사용자가 무엇을 할 수 있는가?”를 결정
HTTP는 Stateless(무상태) 하기 때문에,
한 번 로그인했다고 해서 브라우저가 계속 “나 로그인했어!”를 자동으로 알려주지 않는다.
또한, 한 번 로그인했다고 계속 인증정보가 유지되는 것이 아니다.
그래서 인증 상태를 기록하기 위해 세션/JWT 두 가지 방법 중 하나를 선택해야 한다.
| 방식 | 특징 |
|---|---|
| 세션(Session) 기반 | 서버가 로그인 상태를 메모리(또는 Redis)에 저장. 쿠키에 세션 ID를 담아 전송. |
| JWT(JSON Web Token) 기반 | 로그인 시 서버가 토큰을 발급하고, 클라이언트가 이후 요청마다 헤더에 토큰을 담아 보냄. 서버는 토큰 검증만 수행. |
Spring Security Filter Chain란?
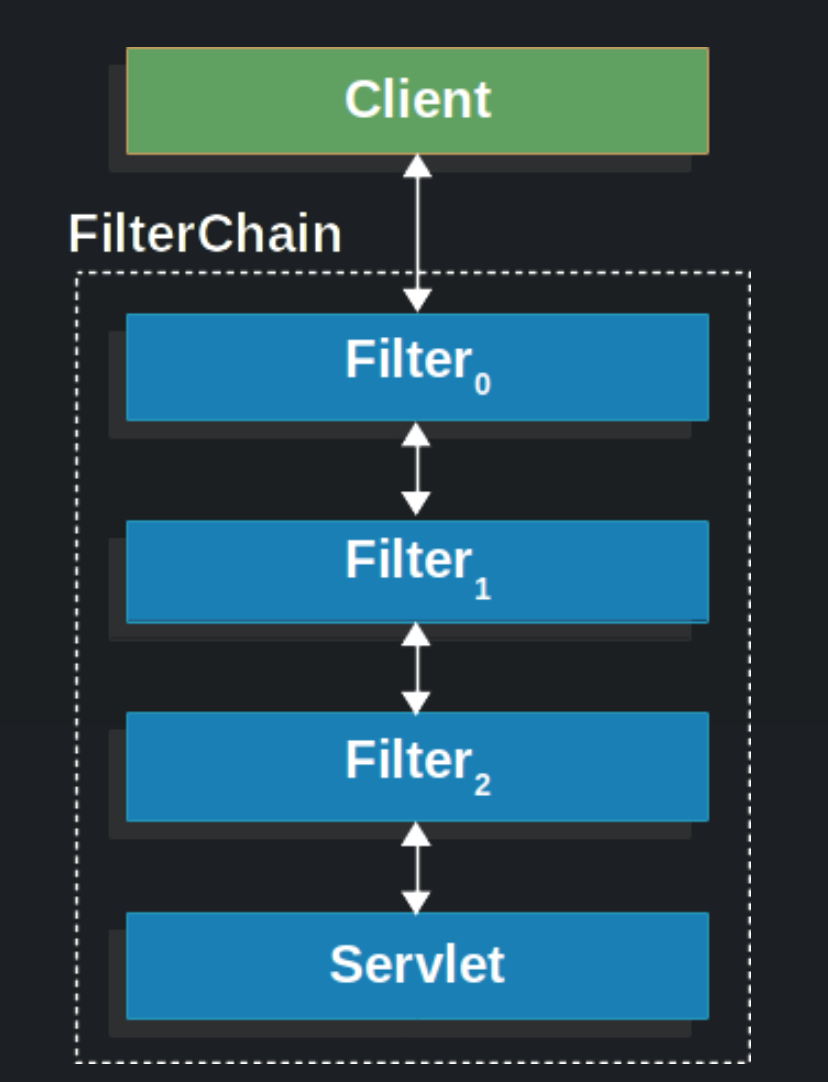
Spring Security에서 제공하는 인증,인가를 위한 필터들의 모음이다.
기본적으로 제공하는 필터들이 있으며,
사용자가 커스터마이징한 필터 또한 필터 체인으로 포함시켜 사용할 수 있다.
filterchain 사용 코드
public void doFilter(ServletRequest request, ServletResponse response, FilterChain chain) {
	// do something before the rest of the application
    chain.doFilter(request, response); // invoke the rest of the application
    // do something after the rest of the application
}
filter란?
Filter는 Servlet에서의 필터를 이야기하며, Request & Response를 처리할 때마다 실행되는 자바 클래스이다.
- 요청(request)이 DispatcherServlet(Controller)으로 가기 전에 한 번,
- 응답(response)을 클라이언트에게 보내기 전에 한 번
동작한다.
즉, 필터는 Controller보다 앞에서 실행되는 보안 전처리 단계라고 이해하면 된다.
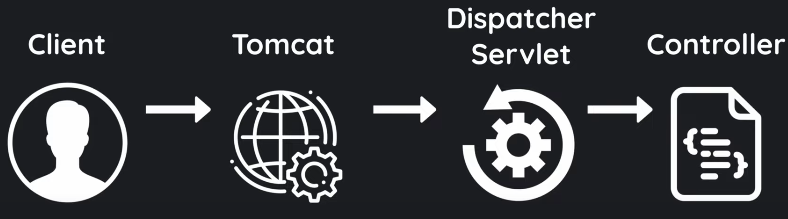
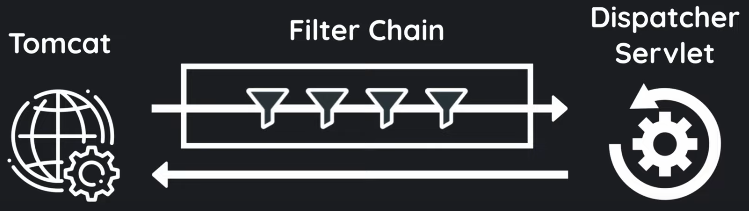
출처: https://www.youtube.com/watch?v=02PavC_ZzQA&list=PLrHjhj3I5M_ljv8s-Bejj4tbYPjOnjwQp&index=2Client가 API 요청을 하면
Web server(Java에서는 Tomcat) → Servlet(Java에서는 Dispatcher Servlet) → Controller 순서로 요청이 전달되는데,
그 중 Filter chain은 Web server와 Servlet 사이에서 작동한다.
Filter chain
필터의 묶음이라고 생각하면 된다.
서블릿 필터 체인은 요청 URI path를 기반으로 HttpServletRequest를 처리하는데 클라이언트가 서버 측 애플리케이션에 요청을 전송하면 서블릿 컨테이너는 요청 URI의 경로를 기반으로 어떤 필터와 어떤 서블릿을 매핑할지 결정한다.
참고
https://velog.io/@zini9188/Spring-Security-Filter%EC%99%80-FilterChain
https://velog.io/@choidongkuen/Spring-Security-Spring-Security-Filter-Chain-%EC%97%90-%EB%8C%80%ED%95%B4
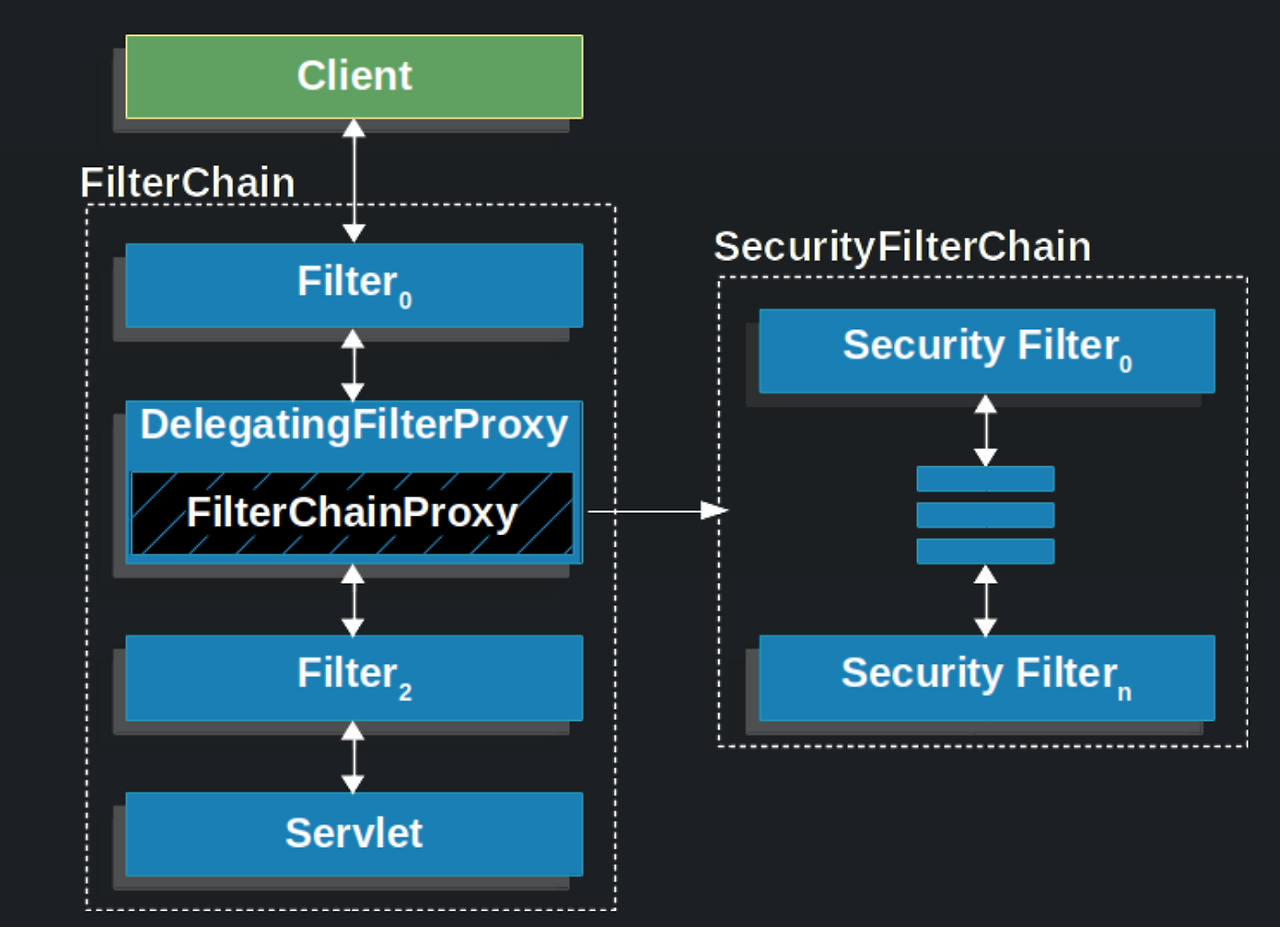
Spring Security 구조 한눈에 보기
Spring Security는 모든 요청(Request) 을 “필터(Filter)” 단계에서 가로챈다.
이 필터 체인은 아래와 같은 구조로 구성된다.
각 필터는 “요청이 들어왔을 때 해야 할 보안 작업”을 정의하고,
순서대로 통과하면서 인증을 처리한다.
Spring Security filter 종류
기본 스프링 시큐리티 필터 체인에 등록된 필터들은 아래와 같다

- DisableEncodeUrlFilter
세션 ID가 유출될 수 있으므로 URL에 포함되는 것을 막기 위해HttpServeletResponse를 사용해 URL 인코딩이 되는 것을 막는 필터 - WebAsyncManagerIntegrationFilter
비동기 처리 시에도SecurityContext접근할 수 있도록 해주는 필터
SecurityContext 통합관리 - SecurityContextPersistenceFilter
사용자 인증에 대한 정보를 담고 있는 SecurityContext 를 가져오거나 저장하는 역할의 필터 - HeaderWriterFilter
응답 Header에 spring security 관련 Header를 추가해 주는 필터 - LogoutFilter
설정된 로그아웃 URL로 오는 요청을 확인해 로그아웃 처리하는 필터 - RequestCacheAwareFilter
로그인 성공 후, 관련 캐시 요청을 확인하고 캐시 요청을 처리하는 필터
예) 로그인 하지 않고 방문했던 페이지 기억 후 로그인 후 해당 페이지로 이동 처리 - SecurityContextHolderAwareRequestFilter
HttpServletRequest정보를 감싸서 필터 체인 상의 다음 필터들에게 부가 정보 제공하기 위해 사용하는 필터 - AnonymousAuthenticationFilter
필터 호출 시점까지 인증되지 않는 경우 익명 사용자 전용 객체(AnonymousAuthentication) 만들어서 SecurityContext에 넣어주는 필터 - SessionManagementFilter
인증된 사용자와 관련된 세션 작업을 진행
유효하지 않은 세션에 대한 처리, 변조 방지 전략 등을 설정하는 작업을 처리하는 필터 - ExceptionTranslationFilter
요청을 처리하는 중에 발생할 수 있는 예외를 위임 또는 전달하는 필터 - AuthorizationFilter
AuthorizationManager를 사용하여 URL을 통해 사용자의 리소스 접근에 대한 액세스를 제한하는 인증 필터
권한 부여 필터
대표적인 필터는 아래와 같다.
| 필터 | 역할 |
|---|---|
| SecurityContextPersistenceFilter | 요청 시작 시 SecurityContext 초기화, 요청 종료 시 저장/정리 |
| LogoutFilter | 로그아웃 처리 |
| UsernamePasswordAuthenticationFilter | (폼 로그인 시) ID/PW 인증 처리 |
| AnonymousAuthenticationFilter | 인증되지 않은 요청에 AnonymousAuthentication 부여 |
| AuthorizationFilter | URL 접근 권한(인가) 체크 |
참고
REST API 기반 로그인(JWT)에서는 UsernamePasswordAuthenticationFilter는 실질적인 인증을 하지 않는다.
로그인 API를 직접 만들기 때문에 이 필터는 그냥 지나간다.
FinTrack 프로젝트에 적용
HTTP 요청이 들어올 때마다 JWT를 검증하고,
유효하면 "이 사용자는 인증된 사용자다"라는 정보를 Spring Security에 알려주기 위해 JwtAuthenticationFilter를 만들었다.
Spring Security 인증 흐름 구조 이해
Spring Security는 요청이 들어올 때 다음 순서로 필터 체인을 통과한다.
HTTP Request
   ↓
SecurityContextHolderFilter
   ↓
SecurityContextPersistenceFilter   ← SecurityContext 생성
   ↓
LogoutFilter
   ↓
UsernamePasswordAuthenticationFilter (폼 로그인일 경우)
   ↓
**JwtAuthenticationFilter (우리가 등록한 커스텀 필터)**
   ↓
AnonymousAuthenticationFilter (인증 없으면 AnonymousAuthentication 부여)
   ↓
AuthorizationFilter (인가 체크)
   ↓
Controller
JwtAuthenticationFilter가 필요한 이유
로그인 이후의 모든 요청은 JWT를 기반으로 인증이 이루어진다.
즉,
- “헤더에 JWT가 있는지”
- “JWT가 유효한지”
- “JWT에서 이메일 등을 추출해 사용자 정보가 DB에 존재하는지”
를 확인하고
인증에 성공하면 SecurityContextHolder에 인증 객체를 심어야 한다.
JwtAuthenticationFilter의 위치는?
로그인 요청(/api/auth/login)에서는 UsernamePasswordAuthenticationFilter가 처리 (ID/PW 인증)한다.
로그인 후의 요청(/api/expenses 등)에서는 JwtAuthenticationFilter가 처리(JWT 인증)한다.
즉, 이 필터는 로그인 이후 요청에서만 작동한다.
코드
@Component
@RequiredArgsConstructor
public class JwtAuthenticationFilter extends OncePerRequestFilter {
    private final JwtProvider jwtProvider;
    private final UserRepository userRepository;

    @Override
    protected void doFilterInternal(HttpServletRequest request,
                                    HttpServletResponse response,
                                    FilterChain filterChain) throws ServletException, IOException {
        String authHeader = request.getHeader("Authorization");

        if (authHeader == null || !authHeader.startsWith("Bearer ")){
            filterChain.doFilter(request, response);
            return;
        }

         String token = authHeader.substring(7);
        if (!jwtProvider.validateToken(token)){
            filterChain.doFilter(request, response);
            return;
        }

        String email = jwtProvider.getEmailFromToken(token);
        // SecurityContext에 인증정보 저장
        userRepository.findByEmail(email).ifPresent(user -> {
            UsernamePasswordAuthenticationToken authentication =
                    new UsernamePasswordAuthenticationToken(
                            user, null, null // 권한은 MVP 단계에서 생략
                    );

            authentication.setDetails(
                    new WebAuthenticationDetailsSource().buildDetails(request
                    )
            );
            SecurityContextHolder.getContext().setAuthentication(authentication);
        });

        filterChain.doFilter(request, response);
    }

}OncePerRequestFilter를 상속받는 이유
Spring Security에는 필터를 만들 수 있는 방법이 여러 가지가 있지만,
JWT 필터는 한 요청당 한 번만 실행되어야 한다.
만약 일반 Filter를 상속받으면:
한 요청이 여러 DispatcherType(FORWARD, INCLUDE 등)으로 전달될 때 필터가 여러 번 실행될 수 있다.
이를 방지하기 위해 Spring은 OncePerRequestFilter라는 추상 클래스를 제공한다.
OncePerRequestFilter는 한 HTTP 요청마다 정확히 한 번만 실행되는 보안 필터이다.
즉,
JWT 검증은 요청 한 번당 한 번이면 충분하므로, 이 클래스를 상속받아 스프링 필터 체인에서 중복 호출되지 않도록 보장한다.
필터의 역할
“이 요청이 인증된 사용자 요청인지 확인하고, 맞다면 인증 객체를 등록하는 일.”
doFilterInternal() 오버라이딩 이유
OncePerRequestFilter의 핵심 메서드가 바로 doFilterInternal()이다.
이 메서드는 모든 요청이 들어올 때마다 자동으로 호출된다. 여기서 JWT를 추출하고 검증하는 로직을 직접 작성해야 한다.
내부적으로는 다음과 같이 작동한다.
protected void doFilterInternal(HttpServletRequest request,
                                HttpServletResponse response,
                                FilterChain filterChain)
throws ServletException, IOException| 매개변수 | 역할 |
|---|---|
HttpServletRequest request | 클라이언트 요청 정보 (헤더, 바디 등) |
HttpServletResponse response | 응답 객체 (인증 실패 시 에러 반환 가능) |
FilterChain filterChain | 다음 필터로 요청을 넘기는 역할 (chain.doFilter()) |
이 메서드 안에서 “내가 JWT 검증을 수행한 뒤 다음 필터로 넘길지”를 직접 결정할 수 있다.
SecurityContextHolder란?
Spring Security는 인증된 사용자 정보를 SecurityContextHolder에 저장한다.
이 컨텍스트는 ThreadLocal 기반이라, 요청마다 독립적으로 유지된다.
즉, SecurityContextHolder에 인증 객체가 들어있으면
Spring은 “아, 이 사용자는 이미 인증된 사용자구나”라고 인식하는 것이다.
Authentication auth = SecurityContextHolder.getContext().getAuthentication();
User user = (User) auth.getPrincipal();
→ 이렇게 컨트롤러나 서비스 계층에서 현재 로그인 사용자를 조회할 수 있다.
┌───────────────────────────────┐
│        HTTP Request           │
│  Authorization: Bearer <JWT>  │
└───────────────┬───────────────┘
                ↓
     [JwtAuthenticationFilter]
        1. 헤더에서 토큰 추출
        2. 서명 & 만료 검증
        3. 사용자 이메일 추출
        4. DB에서 사용자 조회
        5. SecurityContext에 저장
                ↓
     [SecurityContextHolder]
        (현재 요청에 인증 정보 유지)
                ↓
     [Controller 접근 허용]
인증 객체 생성
UsernamePasswordAuthenticationToken authentication =
        new UsernamePasswordAuthenticationToken(user, null, null);
이 객체는 스프링 시큐리티가 인증된 사용자로 인식하는 “인증 토큰 객체”이다.
매개변수:
- 첫 번째: 인증 주체(Principal) — 여기서는 User 엔티티
- 두 번째: 자격 증명(Credentials) — JWT이므로 null
- 세 번째: 권한 리스트(Authorities) — MVP 단계에서는 null
AnonymousAuthenticationFilter가 중요한 이유
JWT가 없거나 인증에 실패한 경우, Spring은 SecurityContext를 비워두지 않는다.
대신 자동으로 AnonymousAuthenticationToken를 넣어준다.
그래서 인증되지 않아도 Authentication이 null이 아니고 getPrincipal() 등이 동작한다.
SecurityConfig 설정
@Configuration
@EnableWebSecurity
@RequiredArgsConstructor
public class SecurityConfig {
    private final JwtAuthenticationFilter jwtAuthenticationFilter;

    @Bean
    public SecurityFilterChain filterChain(HttpSecurity http) throws Exception{
        http
                // CSRF 비활성화 (JWT 기반이기 때문에 필요 없음)
                .csrf(csrf -> csrf.disable())

                // CORS 허용
                .cors(cors -> cors.configure(http))

                // 세션 사용 안함
                .sessionManagement(session -> session
                        .sessionCreationPolicy(SessionCreationPolicy.STATELESS))
                // 접근 권한 설정
                .authorizeHttpRequests(auth -> auth
                        .requestMatchers(
                                "/api/auth/**", // 로그인, 로그아웃
                                "/api/user/**" // 회원가입, 중복검사 등
                        ).permitAll()
                        .anyRequest().authenticated()
        )
                // JWT 필터 등록 (기존 UsernamePassword보다 먼저)
                .addFilterBefore(jwtAuthenticationFilter, UsernamePasswordAuthenticationFilter.class);

        return http.build();
    }


    // AuthenticationManager 등록
    @Bean
    public  AuthenticationManager authenticationManager(AuthenticationConfiguration config) throws Exception{
        return config.getAuthenticationManager();
    }
}
AuthenticationManager란?
사용자의 인증(Authentication)을 실제로 수행하는 핵심 인터페이스
즉, “아이디와 비밀번호가 올바른가?”를 최종적으로 판단하는 객체
로그인 API에서
“사용자가 입력한 이메일/비밀번호가 맞는지 확인”하는 역할이다.
AuthenticationManager는 인터페이스이고, 실제 구현체는ProviderManager이다.
실제 구현체: ProviderManager
public class ProviderManager implements AuthenticationManager {
    private List<AuthenticationProvider> providers;

    @Override
    public Authentication authenticate(Authentication authentication)
            throws AuthenticationException {

        for (AuthenticationProvider provider : providers) {
            if (provider.supports(authentication.getClass())) {
                return provider.authenticate(authentication);
            }
        }
        throw new ProviderNotFoundException("No provider found");
    }
}
-
내부적으로 여러
AuthenticationProvider를 가지는데, 각각 “내가 처리할 수 있는 인증 방식인지”를 확인한 뒤, 가능한 Provider가 실제 인증을 수행한다.- AuthenticationProvider는?
“
AuthenticationManager가 맡긴 요청을 실제로 검증하는 하위 담당자”
- AuthenticationProvider는?
-
그 중
DaoAuthenticationProvider가 DB 조회 + 비밀번호 검증 처리- 스프링에는 기본적으로
DaoAuthenticationProvider가 내장되어 있다.
이 Provider는UserDetailsService를 이용해 DB에서 사용자 정보를 가져와 입력한 비밀번호와BCryptPasswordEncoder로 저장된 비밀번호를 비교한다.
DaoAuthenticationProvider과정-
DB에서 사용자 비밀번호(암호화된 값) 조회
-
사용자가 입력한 비밀번호를 encoder.matches()로 비교
-
일치하면 인증 성공
- 스프링에는 기본적으로
-
Spring Security 6에서는
AuthenticationManager를 자동 등록하지 않기 때문에 직접 Bean 등록이 필요하다.
@Bean
public AuthenticationManager authenticationManager(AuthenticationConfiguration config)
        throws Exception {
    return config.getAuthenticationManager();
}
로그인 API에서 이걸 사용해
authenticationManager.authenticate(loginRequestToken);과 같이 실제 인증을 수행한다.
로그인 요청 시 전체 흐름
UsernamePasswordAuthenticationFilter
        ↓  (사용자가 입력한 이메일, 비밀번호)
AuthenticationManager
        ↓
AuthenticationProvider (예: DaoAuthenticationProvider)
        ↓
UserDetailsService (DB 조회)
        ↓
UserDetails (사용자 정보 반환)
        ↓
SecurityContextHolder (인증 정보 저장)
| 단계 | 객체 | 역할 |
|---|---|---|
| ① | UsernamePasswordAuthenticationFilter | 로그인 폼 데이터 수신 후 UsernamePasswordAuthenticationToken 생성 |
| ② | AuthenticationManager | 토큰을 검증 로직으로 전달 (authenticate() 메서드 호출) |
| ③ | AuthenticationProvider | 실제 인증 처리 (비밀번호 비교, DB 조회 등) |
| ④ | UserDetailsService | 사용자 정보를 DB에서 로드 (loadUserByUsername) |
| ⑤ | SecurityContextHolder | 인증 성공 시 SecurityContext에 저장 |
전체 흐름 요약
JWT 기반 인증의 핵심
HTTP 요청
    ↓
JwtAuthenticationFilter
 - Authorization 헤더 확인
 - JWT 유효성 검증
 - 사용자 정보 추출
 - SecurityContextHolder에 인증 객체 저장
    ↓
AuthorizationFilter 인가 체크
    ↓
Controller 실행
로그인 과정은 AuthenticationManager가 처리하고,
로그인 이후 요청은 JwtAuthenticationFilter가 처리한다.