
지금 우리가 공부 한 세 가지 API 후크까지, useState, useEffect, useContext. 다음으로 다음 API 후크 인 useReducer. 먼저 감속기가 무엇이며 왜 사용되는지에 대해 이야기하겠습니다. 반응 후크를 이해하는 데 도움이되는 JavaScript의 감속기가 무엇인지 연구하십시오 useReducer. 좋아요, 이제 시작하겠습니다.
useReducer 란?
useReducer상태 관리를위한 후크 API입니다. 그것은이다 useState대안.
그래서 useReducer와 useState는 어떤 차이? 대답은 built useState를 사용하는 것 useReducer입니다.
그래서 사용할 때 useReducer또는 useState무엇? 이 장을 마치면 답을 찾을 수 있습니다.
reducer
useState - state
useEffect - side effects
useContext - context API
useReducer - reducers
useReducer도 리듀서와 관련이 있음을 알 수 있습니다. 다음으로 리듀서가 무엇인지 알아 보겠습니다. 리듀서가 무엇인지 이해하는 이유는 리덕스를 마스터 할 필요가 없도록 리듀서를 사용하는 법을 배우기 위해서입니다. 물론 Redux를 알고 있다면이 장을 이해하는 것이 더 쉬울 것입니다.
이티브 자바 스크립트를 공부하는 경우, 당신은 몇 가지 내장과 같은 방법이 있다는 것을 발견 할 것이다 foreach, map, reduce. 깊이 reduce방법을 살펴 보겠습니다 . MDN은 Array.prototype.reduce(),에서 볼 수 있습니다.
reduce() 메서드는 배열의 각 요소에 대해 사용자가 제공 한 감속기 함수 (오름차순으로 실행 됨)를 실행하고 결과를 단일 반환 값으로 집계합니다.
const array1 = [1, 2, 3, 4];
const reducer = (accumulator, currentValue) => accumulator + currentValue;

// 1 + 2 + 3 + 4
console.log(array1.reduce(reducer));
// expected output: 10

// 5 + 1 + 2 + 3 + 4
console.log(array1.reduce(reducer, 5));
// expected output: 15
reduce 메소드는 2 개의 매개 변수를 받아들이고 첫 번째는 감속기 기능이고 두 번째는 초기 값 (reducer 기능에서 사용됨)입니다. reduce 메서드는 함수의 누적 처리 결과를 반환합니다.
감속기 기능에는 2 개의 필수 매개 변수가 있습니다.
accumulator누산기는 콜백의 반환 값을 누적하며, 이는 콜백이 마지막으로 호출되었을 때 반환 된 누적 값 또는 initialValue입니다.currentValue배열에서 처리중인 요소입니다.
reducer 및 useReducer
reducer 와 useReducer 사이에는 큰 유사점이 있습니다.
| reduce in JavaScript | useReducer in React |
|---|---|
array.reduce(reducer, initialValue) | useReducer(reducer, initialState) |
singleValue = reducer(accumulator, itemValue) | newState = reducer(currentState, action) |
| reduce 메서드는 단일 값을 반환합니다. | useReducer는 값 쌍을 반환합니다. [newState, dispatch] |
위의 표가 현재 이해되지 않는 경우에는 문제가되지 않으며, 추후 예를 통해 자세히 설명하도록하겠습니다.
이 섹션에서 우리는 다음을 배웠습니다.
useReducer상태 관리를위한 후크 API입니다.useReducerreducer 기능 관련useReducer(reducer, initialState)2 개의 매개 변수, 감속기 기능 및 초기 상태 허용reducer(currentState, action)또한 2 개의 매개 변수, 현재 상태 및 작업을 허용하고 새 상태를 반환합니다.
simple state & action
이 섹션에서는 간단한 상태 및 동작을 배우기위한 카운터의 예를 살펴 봅니다.
- import useReducer api
- reducer function 및 initialState선언
- 호출실행 reducer
CounterOne.js
import React, { useReducer } from 'react'

const initialState = 0
const reducer = (state: number, action: string) => {
  switch (action) {
    case 'increment':
      return state + 1
    case 'decrement':
      return state - 1
    case 'reset':
      return initialState
    default:
      return state
  }
}

function CounterOne() {
  const [count, dispatch] = useReducer(reducer, initialState)
  return (
    <div>
      <div>Count - {count}</div>
      <button
        onClick={() => dispatch('increment')}
      >Increment</button>
      <button
        onClick={() => dispatch('decrement')}
      >Decrement</button>
      <button
        onClick={() => dispatch('reset')}
      >Reset</button>
    </div>
  )
}

export default CounterOne
App.js
import React from 'react'

import './App.css'

import CounterOne from './components/19CounterOne'

const App = () => {
  return (
    <div className="App">
      <CounterOne />
    </div>
  )
}

export default App
페이지는 다음과 같이 표시됩니다.
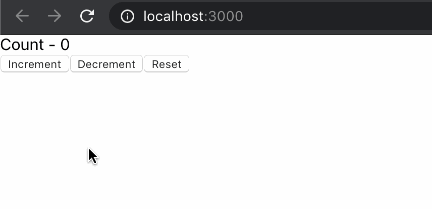
코드를 검토 한 후 먼저 useReducer를 가져옵니다.
import React, { useReducer } from 'react'그런 다음 useReducer를 호출합니다.
const [count, dispatch] = useReducer(reducer, initialState)reducer, initialState 선언
const initialState = 0
const reducer = (state: number, action: string) => {
  switch (action) {
    case 'increment':
      return state + 1
    case 'decrement':
      return state - 1
    case 'reset':
      return initialState
    default:
      return state
  }
}
reducer 함수의 두 가지 매개 변수는 현재 상태와 동작이며, 동작에 따라 다른 새로운 상태를 반환합니다.
useReducer는 상태 및 디스패치 메소드의 두 요소가있는 배열을 리턴합니다. 이 중 state는 예제에서 현재 카운트 값이며 dispatch 메소드는 매개 변수를 받아 해당 액션을 실행합니다. 디스패치가 실행 된 후 해당 상태가 변경되고 구성 요소가 렌더링되어 최신 상태를 표시합니다.
단순 상태와 단순 동작을 사용하는 예입니다.이 예에서 state는 숫자 유형이고 action도 단순 문자열 유형으로 Redux 모드와 약간 다릅니다. 다음으로 조금 더 복잡한 예를 살펴 보겠습니다.
complex state & action
아래의 두 번째 예를 살펴 보겠습니다. 객체는 Redux 모델과 더 유사한 상태 및 작업의 값으로 사용됩니다.
CounterTwo.js
import React, { useReducer } from 'react'

const initialState = {
  firstCounter: 0
}
const reducer = (
  state: {
    firstCounter: number
  },
  action: {
    type: string
  }
) => {
  switch (action.type) {
    case 'increment':
      return {
        firstCounter: state.firstCounter + 1
      }
    case 'decrement':
      return {
        firstCounter: state.firstCounter - 1
      }
    case 'reset':
      return initialState
    default:
      return state
  }
}

function CounterTwo() {
  const [count, dispatch] = useReducer(reducer, initialState)
  return (
    <div>
      <div>Count - {count.firstCounter}</div>
      <button
        onClick={() => dispatch({ type: 'increment' })}
      >Increment</button>
      <button
        onClick={() => dispatch({ type: 'decrement' })}
      >Decrement</button>
      <button
        onClick={() => dispatch({ type: 'reset' })}
      >Reset</button>
    </div>
  )
}

export default CounterTwo
App.js
import React from 'react'

import './App.css'

import CounterTwo from './components/20CountTwo'

const App = () => {
  return (
    <div className="App">
      <CounterTwo />
    </div>
  )
}

export default App
페이지는 다음과 같이 표시됩니다.
이전 섹션의 예와 동일한 효과입니다. 이제 상태와 동작을 객체로 다시 작성 했으므로 이런 방식으로 작성하면 어떤 이점이 있습니까?
이점 중 하나는 작업이 이제 개체이며 여러 속성이 작업의 효과를 결정할 수 있다는 것입니다. 예를 들어, 다른 +5 논리를 추가합니다.
CounterTwo.js
import React, { useReducer } from 'react'

const initialState = {
  firstCounter: 0
}
const reducer = (
  state: {
    firstCounter: number
  },
  action: {
    type: string
    value: number
  }
) => {
  switch (action.type) {
    case 'increment':
      return {
        firstCounter: state.firstCounter + action.value
      }
    case 'decrement':
      return {
        firstCounter: state.firstCounter - action.value
      }
    case 'reset':
      return initialState
    default:
      return state
  }
}

function CounterTwo() {
  const [count, dispatch] = useReducer(reducer, initialState)
  return (
    <div>
      <div>Count - {count.firstCounter}</div>
      <button
        onClick={() => dispatch({
          type: 'increment',
          value: 1
        })}
      >Increment</button>
      <button
        onClick={() => dispatch({
          type: 'decrement',
          value: 1
        })}
      >Decrement</button>
      <button
        onClick={() => dispatch({
          type: 'increment',
          value: 5
        })}
      >Increment 5</button>
      <button
        onClick={() => dispatch({
          type: 'decrement',
          value: 5
        })}
      >Decrement 5</button>
      <button
        onClick={() => dispatch({ type: 'reset', value: 0})}
      >Reset</button>
    </div>
  )
}

export default CounterTwo
페이지는 다음과 같이 표시됩니다.
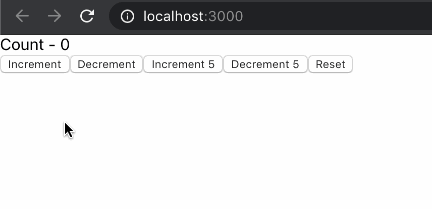
5의 덧셈과 뺄셈 논리를 구현하는 값 속성이 액션에 추가 된 것을 알 수 있습니다.
두 번째 장점은 객체로서 상태가 더 많은 상태 속성을 추가 할 수 있다는 것입니다. 예를 들어 카운터 2를 추가합니다. 코드는 다음과 같습니다.
import React, { useReducer } from 'react'

const initialState = {
  firstCounter: 0,
  secondCounter: 10,
}
const reducer = (
  state: {
    firstCounter: number
    secondCounter: number
  },
  action: {
    type: string
    value: number
  }
) => {
  switch (action.type) {
    case 'increment':
      return {
        ...state,
        firstCounter: state.firstCounter + action.value
      }
    case 'decrement':
      return {
        ...state,
        firstCounter: state.firstCounter - action.value
      }
    case 'increment2':
      return {
        ...state,
        secondCounter: state.secondCounter + action.value
      }
    case 'decrement2':
      return {
        ...state,
        secondCounter: state.secondCounter - action.value
      }
    case 'reset':
      return initialState
    default:
      return state
  }
}

function CounterTwo() {
  const [count, dispatch] = useReducer(reducer, initialState)
  return (
    <div>
      <div>First Count - {count.firstCounter}</div>
      <div>Second Count - {count.secondCounter}</div>
      <button
        onClick={() => dispatch({
          type: 'increment',
          value: 1
        })}
      >Increment</button>
      <button
        onClick={() => dispatch({
          type: 'decrement',
          value: 1
        })}
      >Decrement</button>
      <button
        onClick={() => dispatch({
          type: 'increment',
          value: 5
        })}
      >Increment 5</button>
      <button
        onClick={() => dispatch({
          type: 'decrement',
          value: 5
        })}
      >Decrement 5</button>
      <div>
        <button
          onClick={() => dispatch({
            type: 'increment2',
            value: 1
          })}
        >Increment second</button>
        <button
          onClick={() => dispatch({
            type: 'decrement2',
            value: 1
          })}
        >Decrement second</button>
      </div>
      <button
        onClick={() => dispatch({ type: 'reset', value: 0 })}
      >Reset</button>
    </div>
  )
}

export default CounterTwo
페이지 표시 효과는 다음과 같습니다.
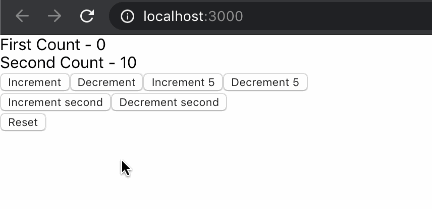
이렇게하면 동시에 2 개의 타이머를 유지할 수 있습니다.
multiple useReducers
여러 상태가 있지만 동일한 방식으로 상태가 변경되는 경우 useReducer를 여러 번 사용할 수 있습니다.
CounterThree.js
import React, { useReducer } from 'react'

const initialState = 0
const reducer = (state: number, action: string) => {
  switch (action) {
    case 'increment':
      return state + 1
    case 'decrement':
      return state - 1
    case 'reset':
      return initialState
    default:
      return state
  }
}

function CounterThree() {
  const [count, dispatch] = useReducer(reducer, initialState)
  const [countTwo, dispatchTwo] = useReducer(reducer, initialState)
  return (
    <div>
      <div>Count - {count}</div>
      <button
        onClick={() => dispatch('increment')}
      >Increment</button>
      <button
        onClick={() => dispatch('decrement')}
      >Decrement</button>
      <button
        onClick={() => dispatch('reset')}
      >Reset</button>

      <br/>

      <div>CountTwo - {countTwo}</div>
      <button
        onClick={() => dispatchTwo('increment')}
      >Increment</button>
      <button
        onClick={() => dispatchTwo('decrement')}
      >Decrement</button>
      <button
        onClick={() => dispatchTwo('reset')}
      >Reset</button>
    </div>
  )
}

export default CounterThree
페이지는 다음과 같이 표시됩니다.
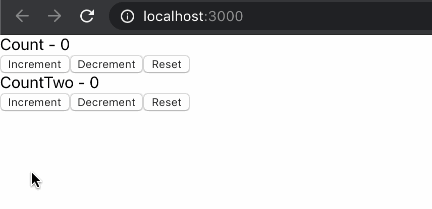
이 예에서는 여러 useReducer가 사용되지만 하나의 감속기 함수가 공유됩니다. 이는 객체 병합 문제를 효과적으로 방지합니다 (확장 알고리즘을 사용하여 상태를 병합하는 이전 섹션과 비교). 또한 코드의 재사용 성을 향상시킵니다.
useReducer with useContext
지금까지 컴포넌트에서 상태 관리를 위해 useReducer를 사용하는 방법을 배웠습니다. 특정 시나리오에서 구성 요소간에 상태를 공유하려면 전역 상태 관리를 수행 할 때 useReducer와 useContext를 사용할 수 있습니다.
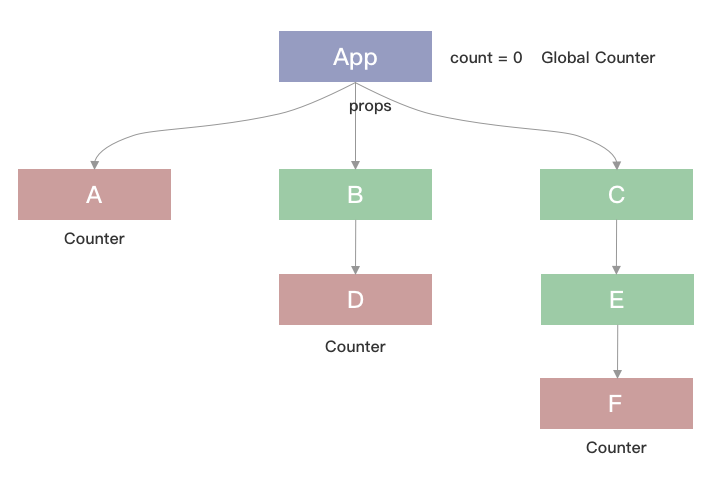
이러한 시나리오를 고려하면, 하위 컴포넌트에서 동일한 카운터를 제어하기 위해 세 개의 하위 컴포넌트 A, B, C가 있습니다. 일반적인 쓰기 방법은 카운터 메소드를 상위 컴포넌트에 작성한 다음 props를 통해 카운터 메소드 및 상태를 전달하는 것입니다. 자식 구성 요소의 경우 자식 구성 요소의 소품을 통해 전달 된 카운터 메서드를 호출하면 부모 구성 요소의 상태가 변경되고 소품으로 자식 구성 요소에 전달 된 앱의 상태도 변경됩니다. 아래 그림과 같이:
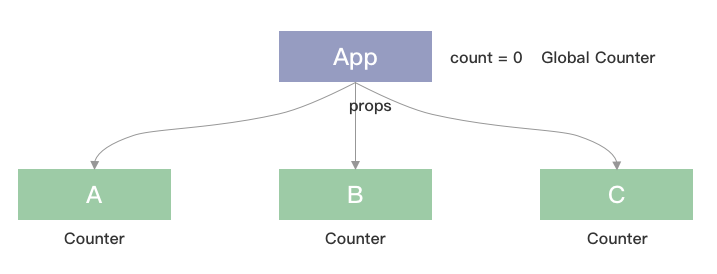
문제가되지 않는 것 같지만 컴포넌트가 깊숙이 중첩되어 있다면 매우 나빠질 것이므로 카운터 메서드를 props로 자식 컴포넌트에 레이어별로 전달해야합니다. 이때 useContext와 useReducer가 필요합니다.
이 요구 사항을 완료하려면 두 단계로 나뉩니다.
- useReducer를 사용하여 루트 노드에서 카운터 메서드를 만듭니다.
- useContext를 통해 자식 구성 요소에 대한 컨텍스트 제공 및 사용
App.js
import React, { useReducer } from 'react'
import './App.css'
import A from './components/22A'
import B from './components/22B'
import C from './components/22C'

interface CountContextType {
  countState: number
  countDispatch: (action: string) => void
}

export const CountContext = React.createContext({} as CountContextType)

const initialState = 0
const reducer = (state: number, action: string) => {
  switch (action) {
    case 'increment':
      return state + 1
    case 'decrement':
      return state - 1
    case 'reset':
      return initialState
    default:
      return state
  }
}

const App = () => {
  const [count, dispatch] = useReducer(reducer, initialState)
  return (
    <CountContext.Provider
      value={{
        countState: count,
        countDispatch: dispatch,
      }}
    >
      <div className="App">
        Count - {count}
        <A />
        <B />
        <C />
      </div>
    </CountContext.Provider>
  )
}

export default App
A.js
import React, { useContext } from 'react'
import { CountContext } from '../App'

function A() {
  const countContext = useContext(CountContext)
  return (
    <div>
      A - {countContext.countState}
      <button
        onClick={() => countContext.countDispatch('increment')}
      >Increment</button>
      <button
        onClick={() => countContext.countDispatch('decrement')}
      >Decrement</button>
      <button
        onClick={() => countContext.countDispatch('reset')}
      >Reset</button>
    </div>
  )
}

export default A
B.js
import React from 'react'
import D from './22D'

function B() {
  return (
    <div>
      <D />
    </div>
  )
}

export default B
C.js
import React from 'react'
import E from './22E'

function C() {
  return (
    <div>
      <E />
    </div>
  )
}

export default C
D.js
import React, { useContext } from 'react'
import { CountContext } from '../App'

function D() {
  const countContext = useContext(CountContext)
  return (
    <div>
      D - {countContext.countState}
      <button
        onClick={() => countContext.countDispatch('increment')}
      >Increment</button>
      <button
        onClick={() => countContext.countDispatch('decrement')}
      >Decrement</button>
      <button
        onClick={() => countContext.countDispatch('reset')}
      >Reset</button>
    </div>
  )
}

export default D
E.js
import React from 'react'

import F from './22F'

function E() {
  return (
    <div>
      <F />
    </div>
  )
}

export default E
F.js
import React, { useContext } from 'react'
import { CountContext } from '../App'

function F() {
  const countContext = useContext(CountContext)
  return (
    <div>
      F - {countContext.countState}
      <button
        onClick={() => countContext.countDispatch('increment')}
      >Increment</button>
      <button
        onClick={() => countContext.countDispatch('decrement')}
      >Decrement</button>
      <button
        onClick={() => countContext.countDispatch('reset')}
      >Reset</button>
    </div>
  )
}

export default F
페이지 효과는 다음과 같습니다.
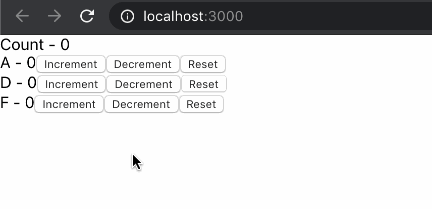
다시 한번 살펴 보자
- App.js에서는 useReducer를 사용하여 카운터를 만들고, 초기 값을 선언하고, 감속기 함수를 만들고, useReducer는 상태 카운트 및 디스패치 메서드를 반환합니다.
- 다른 컴포넌트 카운트 및 디스패치에 대한 액세스를 허용하기 위해 React.createContext CountContext 및 <CountContext.Provider>래핑 된 루트 노드를 통해 생성했습니다 . 개수를 전달하고 Provider에 값으로 전달합니다.
- 자식 노드에서 useContext를 사용하여 count 및 dispatch 메서드를 얻고 dispatch를 호출하여 개수를 변경합니다.
Fetching Data with useReducer
이전에 useEffect 장에서 데이터 요청 방법을 배웠는데 당시에는 useEffect와 useState를 사용 했었는데 이제 useReducer를 사용하여 원격 데이터를 요청하는 방법을 살펴 보겠습니다.
다음으로 우리는 작은 요구를합니다.
- 페이지가로드 될 때 데이터 요청
- 요청 데이터에 로딩 상태 표시
- 요청이 반환 된 후 요청 된 데이터를 표시하기 위해로드 스타일이 제거됩니다. 요청이 실패하면 오류 메시지를 표시하기 위해로드도 제거됩니다.
useState와 useReducer를 각각 사용하여 차이점을 달성하고 비교할 것입니다.
useState 구현 요청
App.js
import React from 'react'
import './App.css'

import DataFetchingOne from './components/23DataFetchingOne'

const App = () => {
  return (
    <div className="App">
      <DataFetchingOne />
    </div>
  )
}

export default App
DataFetchingOne.js
import React, { useState, useEffect } from 'react'
import axios from 'axios'

interface postType {
  userId: number
  id: number
  title: string
  body: string
}

function DataFetchingOne() {
  const [loading, setLoading] = useState(true)
  const [error, setError] = useState('')
  const [post, setPost] = useState({} as postType)

  useEffect(() => {
    axios.get('https://jsonplaceholder.typicode.com/posts/1').then((res) => {
      setLoading(false)
      setPost(res.data)
      setError('')
    }).catch(() => {
      setLoading(false)
      setPost({} as postType)
      setError('something went wrong')
    })
  }, [])

  return (
    <div>
      {
        loading
          ? 'Loading...'
          : post.title
      }
      {
        error
          ? error
          : null
      }
    </div>
  )
}

export default DataFetchingOne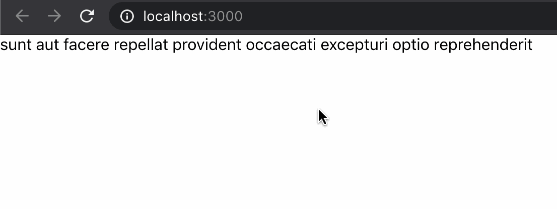
axios가 요청한 링크를 일부러 잘못 고쳤습니다. 다음과 같이 잘못된 논리로 들어가는 것을 볼 수 있습니다.

이 구현에 대해 loading, post, error를 제어하기 위해 3개의 useState를 사용했으며, useReducer를 사용하는 방법을 살펴봅니다.
useReducer
App.js
import React from 'react'
import './App.css'

import DataFetchingOne from './components/23DataFetchingOne'

const App = () => {
  return (
    <div className="App">
      <DataFetchingOne />
    </div>
  )
}

export default App
import React, { useEffect, useReducer } from 'react'
import axios from 'axios'
interface postType {
userId: number
id: number
title: string
body: string
}
type stateType = {
loading: boolean
error: string
post?: postType | {}
}
type actionType = {
type: 'FETCH_SUCCESS' | 'FETCH_ERROR'
payload?: postType | {}
}
const initialState = {
loading: true,
error: '',
post: {},
}
const reducer = (state: stateType, action: actionType) => {
switch (action.type) {
case 'FETCH_SUCCESS':
return {
loading: false,
error: '',
post: action.payload,
}
case 'FETCH_ERROR':
return {
loading: false,
error: 'something went wrong',
post: {},
}
default:
return state
}
}
function DataFetchingTwo() {
const [state, dispatch] = useReducer(reducer, initialState)
useEffect(() => {
axios.get('https://jsonplaceholder.typicode.com/posts/1').then((res) => {
dispatch({
type: 'FETCH_SUCCESS',
payload: res.data,
})
}).catch(() => {
dispatch({
type: 'FETCH_ERROR'
})
})
}, [])
return (
<div>
{
state.loading
? 'Loading...'
// @ts-ignore
: state.post.title
}
{
state.error
? state.error
: null
}
</div>
)
}
export default DataFetchingTwo이전 보기와 같이 페이지를 보여줍니다.
state를 모아서, 같은 대상에, state의 논리를 수정하는 것, 즉 reducer 함수의 switch를 보실 수 있습니다.
언제 useState를 언제, 언제, 어떻게 useReducer를 사용해야 할지 궁금하실 수도 있습니다.
useState vs useReducer
- 만약 state의 종류가 Number, String, Boolean이라면 useState를 사용할 것을 권장합니다. 만약 state의 경우 Object나 Array,
- state가 많이 변하면 useReducer를 사용하여 state 변화를 집중 관리할 것을 권장합니다.
- state 관련 변화가 있다면 useReducer를 사용하는 것이 좋습니다
- 업무 논리가 복잡할 경우 useReducer도 권장
- 구성 요소에만 state를 사용하려면 useState를 사용해야 하고 전역적인 state를 사용하려면 useReducer를 사용해야 합니다
| Scenario | useState | useReducer |
|---|---|---|
| Type of state | Number, String, Boolean | Object or Array |
| Number of state transitions | 1 or 2 | Too many |
| Related state transitions | No | Yes |
| Business logic | No business logic | Complex business logic |
| local vs global | local | global |
정리
이번 장에서는 useReducer의 사용법을 다루고 있다.자바스크립트의 reduce api에서 시작하여 useReducer가 무엇인지 비교 설명합니다.
useReducer 의 간단한 상태의 사용, 복잡한 상태의 사용, 여러 개의 useReducer 사용에 대해 배웠습니다.
패키지가 여러 겹칠 때 useContext와 useReducer를 사용하여 하위 패키지를 전체 state로 수정하는 방법을 알아냈는데, 코드가 더 우아하고 유지보수성이 높습니다.
useState를 비교하여 useEffect에 useReducer 요청 데이터를 사용하는 방법을 배웠고 loading 상태 표시 숨김을 제어했습니다.
마지막으로 useState와 useReducer를 비교하고 사용 권장 사항을 제시합니다.