
참고 문서
- Flink 1.7 Docs: https://nightlies.apache.org/flink/flink-docs-release-1.7/
- Flink 1.2 Docs: https://nightlies.apache.org/flink/flink-docs-release-1.2/dev/event_time.html
- Flink 사이드 아웃풋: https://nightlies.apache.org/flink/flink-docs-release-1.17/docs/dev/datastream/side_output/
- ProcessingTime, EventTime 설명 블로그: https://seamless.tistory.com/99
- 워터마크란? : https://jess-m.tistory.com/32
- 예제 코드: https://github.com/streaming-with-flink
- What are Timers in Apache Flink?: https://www.ververica.com/blog/4-characteristics-of-timers-in-apache-flink
- Timers management in Apache Flink: https://medium.com/@elevate.global/timers-management-in-apache-flink-ca36c0b4c39a
6장 키워드
- 시간이나 윈도우를 처리하는 시간 기반 연산자와 관련된 Datastream API 메서드(연관-2장)
- 시간 특성
- 타임스탬프
- 워터마크
- ProcessFunction
- Window API: WindowAssigner, Trigger, Evictor
- 스트림 조인
- 연착 이벤트를 처리하는 전략
1.시간 특성(Time Characteristic) 설정
< 시간 특성 >
What?
: Flink는 시간 특성을 설정해서 스트림 처리에 사용되는 시간을 정의할 수 있다.
Why, When?
: 스트림 처리 시 데이터 속성과 도출 목적에 따라 시간 특성을 별도로 정의하여 상황에 맞는 시간 정의가 필요하다.
Type?
: ProcessingTime, EventTime, IngestionTime
< ProcessingTime >
What?
: 스트림 처리 시 실행 중인 Flink 로컬 서버의 시스템 시간을 기준으로 처리한다.
Pros
- 워터마크를 기다릴 필요가 없기 때문에 시간 특성 중 성능이 가장 빠르다.
Cons
- 이벤트 도착 속도에 따라 윈도우의 연산 결과가 달라진다.(비결정적)
When?
- 애플리케이션이 이벤트 순서 및 도착 지연에 대해 고민할 필요가 없을 때.
- 이벤트 발생 시간에 대한 고민이 필요 없을 때.
- 로컬 기준 윈도우 타임 내 이벤트 카운트 모니터링이 필요할 때 등.
Example
// 스칼라
# 스트리밍 실행 환경설정
val env = StreamExecutionEnvironment.getExecutionEnvironment

# ProcessingTime 설정
env.setStreamTimeCharacteristic(TimeCharacteristic.ProcessingTime) // default
# 파이썬
from pyflink.datastream import StreamExecutionEnvironment
from pyflink.datastream import TimeCharacteristic
# 스트리밍 실행 환경설정
env = StreamExecutionEnvironment.get_execution_environment()
# ProcessingTime 설정
env.set_stream_time_characteristic(TimeCharacteristic.ProcessingTime)< EventTime >
What?
: 이벤트에서 타임스탬프를 가지고 있다. 이 때, 타임스탬프는 이벤트 발생 디바이스의 시간이거나, 애플리케이션에서 할당한 시간일 수 있다.
Pros
- 이벤트 도착 속도가 다르더라도 워터마크 지연 등을 통해 연산 결과를 (*최대한) 동일하게 보장할 수 있다.(결정적)
Cons
- 워터마크 등의 연산 과정이 증가하기 때문에, ProcessingTime에 비해 처리 비용이 높다.
- EventTime을 사용할 경우, 이벤트 내 어떤 데이터가 타임스탬프인지 모른다. 때문에, 사용자가 직접 어떤 타임스탬프 값을 워터마크로 사용할 지, Lateness 정의는 어떻게 가져갈 것인지 등을 정의 해야 하기 때문에 사용 복잡도가 올라간다.
When?
- 이벤트에서 타임스탬프를 실어올 수 있을 때.
- 애플리케이션이 이벤트 순서를 보장해야 하며, 도착, 처리 지연에 민감할 때.
Example
// 스칼라
# 스트리밍 실행 환경설정
val env = StreamExecutionEnvironment.getExecutionEnvironment

# ProcessingTime 설정
env.setStreamTimeCharacteristic(TimeCharacteristic.EventTime)
# 파이썬
from pyflink.datastream import StreamExecutionEnvironment
from pyflink.datastream import TimeCharacteristic
# 스트리밍 실행 환경설정
env = StreamExecutionEnvironment.get_execution_environment()
# ProcessingTime 설정
env.set_stream_time_characteristic(TimeCharacteristic.EventTime)📌 스트림 처리 결과에 대해 완벽히 보장이 아닌 최대한 보장인 이유?
- EventTime에서 워터 마크가 없을 때
- EventTime에서 워터 마크가 정의 되었을 때
: 워터마크 지연 범위 이후에 도착, 처리 되는 이벤트 데이터는 사용자 정의에 따라 버리거나, 차후 연산에 추가하도록 별도 로직이 필요하다.
< IngestionTime >
What?
: 이벤트가 Flink 에 입수 되는 시점의 타임스탬프를 이용하고, 자동으로 워터마크를 생성한다.
Pros
- ProcessingTime에 비해 더 결정적 결과를 보장할 수 있다.
- 워터마크 할당을 자동으로 하기 때문에, EventTime을 사용할 때보다 워터마크 정의에 대한 복잡도가 줄어든다.
Cons
- ProcessingTime에 비해 연산 비용이 더 높다.
- EventTime 보다는 결정적 결과를 보장 할 수 없는데, EventTIme과 성능이 비슷하다.
When?
- 워터마크 정의를 보다 편하게 가져가고 싶을 때...? (언제 사용하면 좋을까...? 처리 결과를 최대한 보장하고 싶은데 이벤트 데이터에 타임스탬프가 실려있지 않을 때...?)
Code
// 스칼라
# 스트리밍 실행 환경설정
val env = StreamExecutionEnvironment.getExecutionEnvironment

# ProcessingTime 설정
env.setStreamTimeCharacteristic(TimeCharacteristic.IngestionTime)
# 파이썬
from pyflink.datastream import StreamExecutionEnvironment
from pyflink.datastream import TimeCharacteristic
# 스트리밍 실행 환경설정
env = StreamExecutionEnvironment.get_execution_environment()
# ProcessingTime 설정
env.set_stream_time_characteristic(TimeCharacteristic.IngestionTime)📌 시간 특성별 타임스탬프 참고 이미지
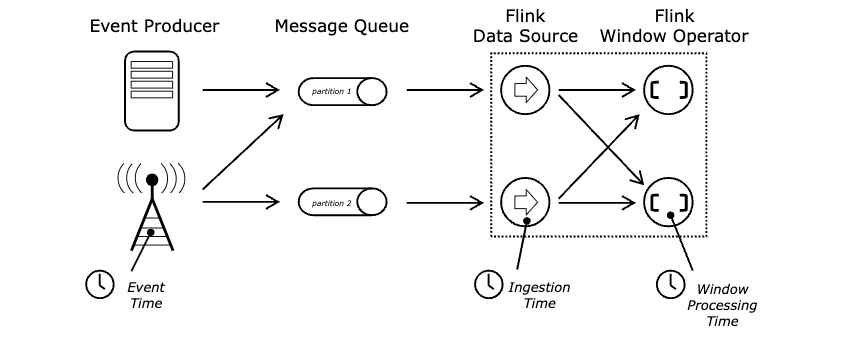
1-1. 타임스탬프 할당과 워터마크 생성
What?
- 타임스탬프: 1970-01-01T00:00:00Z 이후 유닉스 시간을 밀리초 단위로 지정한 값.
- 워터마크: 데이터 형태는 타임스탬프와 동일해야하며, 워터마크 정의에 따라 이벤트 시간을 추론할 수 있다.
How?
- SourceFunction 또는 Timestamp Assigner(사용자 정의 타임스탬프 할당자), Watermark Generator(워터마크 생성자)를 명시적으로 사용하여 타임스탬프를 할당하고 워터마크를 생성할 수 있다.
(단, SourceFunction의 타임스탬프 할당 및 워터마크 생성은 8장에서 다룬다.)
📌 참고
- TimestampAssigner를 사용하면, 기존 타임스탬프와 워터마크를 덮어쓰게 된다. (182p)
Timestamp Assigner(사용자 정의 타임스탬프 할당자)
- 이벤트가 스트리밍 처리기에 들어왔을 때 타임스탬프를 추출하고, 워터마크를 지정할 수 있도록 한다.
- 타임스탬프 할당과 워터마크 생성을 소스 근처 또는 SourceFunction 안에서 하는 것이 가장 좋다.(Q. 잘 이해 못함.)
- 이벤트 시간을 이용하는 변환 연산을 호출하기 전에 TimestampAssinger 를 호출 하는 것이 좋다.
: 아래 예제 코드에서도 화씨를 섭씨로 변환하는 연산자 보다 먼저 SensorTimeAssigner 로 TimestampAssigner를 생성한 걸 확인할 수 있다.
(예제 위치: Chapter 1 예제 코드)
    // set up the streaming execution environment
    val env = StreamExecutionEnvironment.getExecutionEnvironment

    // use event time for the application
    env.setStreamTimeCharacteristic(TimeCharacteristic.EventTime)
    // configure watermark interval
    env.getConfig.setAutoWatermarkInterval(1000L)

    // ingest sensor stream
    val sensorData: DataStream[SensorReading] = env
      // SensorSource generates random temperature readings
      .addSource(new SensorSource)
      // assign timestamps and watermarks which are required for event time
      .assignTimestampsAndWatermarks(new SensorTimeAssigner)

    val avgTemp: DataStream[SensorReading] = sensorData
      // convert Fahrenheit to Celsius using an inlined map function
      .map(r =>
        SensorReading(r.id, r.timestamp, (r.temperature - 32) * (5.0 / 9.0)))
      // organize stream by sensorId
      .keyBy(_.id)
      // group readings in 1 second windows
      .timeWindow(Time.seconds(1))
      // compute average temperature using a user-defined function
.apply(new TemperatureAverager)- 위 예제에서
SensorTimeAssigner는AssignerWithPeriodicWatermarks나AssignerWithPunctuatedWatermarks중 하나가 될 수 있다.
: 아래 코드와 같이SensorTimeAssigner를 확인해보면BoundedOutOfOrdernessTimestampExtractor를 확장하여 워터마크를 지정하고 있는 걸 확인할 수 있다. 이어서BoundedOutOfOrdernessTimestampExtractor를 확인해보면AssignerWithPeriodicWatermarks를 사용하고 있는 것도 확인할 수 있다.
// SensorTimeAssigner.scala
class SensorTimeAssigner
    extends BoundedOutOfOrdernessTimestampExtractor[SensorReading](Time.seconds(5)) {

  /** Extracts timestamp from SensorReading. */
  override def extractTimestamp(r: SensorReading): Long = r.timestamp
// BoundedOutOfOrdernessTimestampExtractor.scala
package org.apache.flink.streaming.api.functions.timestamps;
import org.apache.flink.streaming.api.functions.AssignerWithPeriodicWatermarks;
import org.apache.flink.streaming.api.watermark.Watermark;
import org.apache.flink.streaming.api.windowing.time.Time;
public abstract class BoundedOutOfOrdernessTimestampExtractor<T> implements AssignerWithPeriodicWatermarks<T> {
private static final long serialVersionUID = 1L;
private long currentMaxTimestamp;
private long lastEmittedWatermark = Long.MIN_VALUE;
private final long maxOutOfOrderness;
public BoundedOutOfOrdernessTimestampExtractor(Time maxOutOfOrderness) {
if (maxOutOfOrderness.toMilliseconds() < 0L) {
throw new RuntimeException("Tried to set the maximum allowed lateness to " + maxOutOfOrderness + ". This parameter cannot be negative.");
} else {
this.maxOutOfOrderness = maxOutOfOrderness.toMilliseconds();
this.currentMaxTimestamp = Long.MIN_VALUE + this.maxOutOfOrderness;
}
}
...AssignerWithPeriodicWatermarks
What?
- 장비 시간을 기준으로 고정 시간마다 워터마크를 내보내서 이벤트 시간이 앞으로 흐르도록 시스템에 지시하는 것을 의미한다.
Config
- 기본 시간 간격은 200밀리초이며,
ExecutionConfig.setAutoWatermarkInterval()메서드로 시간 간격을 설정할 수 있다. - 아래 코드와 같이 설정하면 5초마다 워터마크를 내보내면서, 실제로는 5초마다
getCurrentWatermark()메서드를 호출하게 된다. getCurrentWatermark()메서드가 호출 될 때 이전 워터마크의 타임스탬프보다 더 큰 타임스탬프를 반환하면 새 워터마크를 내보내게 된다.(단, Null이 아닌 값이여야 한다.)
val env = StreamExecutionEnvironment.getExecutionEnvironment

// use event time for the application
env.setStreamTimeCharacteristic(TimeCharacteristic.EventTime)
// configure watermark interval - 5초마다 워터마크 생성
env.getConfig.setAutoWatermarkInterval(5000)
Example
: 아래 코드는 타임스탬프 할당자가 새 워터마크 요청을 받으면 가장 큰 타임스탬프에서 1분의 허용 오차(tolerance interval)를 뺸 값을 타임스탬프로 반환하는 예제이다.
// WatermarkGeneration.scala
class PeriodicAssigner extends AssignerWithPeriodicWatermarks[SensorReading] {

  // 1 min in ms
  val bound: Long = 60 * 1000
  // the maximum observed timestamp // 최초 실행된다고 했을 때 MinValue로 시작해서 maxTs가 계속 갱신 되는 형태인 것 같다.
  var maxTs: Long = Long.MinValue

  override def getCurrentWatermark: Watermark = {
    new Watermark(maxTs - bound)
  }

  override def extractTimestamp(r: SensorReading, previousTS: Long): Long = {
    // update maximum timestamp
    maxTs = maxTs.max(r.timestamp)
    // return record timestamp
    r.timestamp
  }
}
일반적으로 많이 사용하는 AssignerWithPeriodicWatermarks의 구현체 2가지
1. assignAscendingTimeStamps
- 입력 이벤트가 단조 증가 타임스탬프(Monotonically Increasing timestamp)일 때 사용 가능하다.
- 아래 코드와 같이 현재 타임스탬프를 이용해 워터마크를 생성한다.
// AssignerWithPeriodicWatermarks - assignAscendingTimeStamps
val stream: DataStream[SensorReading] = ...
val withTimestampAndWatermarks = stream
	.assignAscendingTimestamps(e => e.timestamp) // 사실 이 부분이 왜 현재 타임스탬프를 사용한다는 것인지 잘 모르겠다..
BoundedOutOfOrdernessTimestampExtractor
- 입력 스트림의 최대 지연(lateness)이 얼마인지 알고 있을 때 사용 가능하다.
- 최대 지연: 이전에 인입된 이벤트 중 가장 큰 타임스탬프와 현재 이벤트의 타임스탬프 간 최대 차이.
- 아래 코드는, 이벤트가 최대 10초까지 지연되는 것을 허용하는 걸 의미한다. 워터마크를 기준으로 10초를 넘어가는 이벤트 어떻게 처리할 것인가?에 대한 전략은 6장 뒤에 '연착 데이터 처리'에서 나온다.
// AssignerWithPeriodicWatermarks - BoundedOutOfOrdernessTimestampExtractor
val stream: DataStream[SensorReading] = ...
val output = stream.assignTimestampsAndWatermarks(
	new BoundedOutOfOrdernessTimestampExtractor[SensorReading](
    Time.seconds(10))(e => .timestamp) // 최대 지연 값을 10초로 설정
AssignerWithPunctuatedWatermarks
: 입력 이벤트의 속성에 따라 워터마크를 내보낸다.
What?
- 입력 이벤트의 속성을 기반으로 워터마크를 정의할 때 사용하는 인터페이스이다.
Config
AssignerWithPunctuatedWatermarks인터페이스는 이벤트마다extractTimestamp()메서드를 호출한 직후checkAndGetNextWatermark()메서드를 호출하고, 이 메서드는 새 워터마크를 생성 할지 말지 결정할 수 있다. 이 메서드가 가장 최근에 내보낸 워터마크보다 더 큰 타임스탬프 값을 가진 워터마크를 반환하면 새 워터마크로 내보낸다.(단, 반환 되는 값이 Null 이 아니여야한다.)- 아래 코드는, 'sensor_1'에서 들어온 이벤트를 읽을 때마다 워터마크를 내보내는
AssignerWithPunctuatedWatermarks이다.
// WatermarkGeneration.scala

class PunctuatedAssigner extends AssignerWithPunctuatedWatermarks[SensorReading] {

  // 1 min in ms
  val bound: Long = 60 * 1000

  override def checkAndGetNextWatermark(r: SensorReading, extractedTS: Long): Watermark = {
    if (r.id == "sensor_1") {
      // emit watermark if reading is from sensor_1
      new Watermark(extractedTS - bound)
    } else {
      // do not emit a watermark
      null
    }
  }

  override def extractTimestamp(r: SensorReading, previousTS: Long): Long = {
    // assign record timestamp
    r.timestamp
  }
}
1-2. 워터마크가 지연과 완성도에 미치는 영향
느슨한 워터마크
- What?
: 워터마크가 앞서 처리한 레코드의 타임스탬프와 멀리 떨어져 있는 걸 의미한다. - Pros
: 느슨한 워터마크일 수록 늦게 들어오는 이벤트를 더 많이 허용하여 보다 정확한 집계가 가능하다. - Cons
: 그 만큼 더 많은 데이터를 버퍼링 하면서 상태의 크기도 커진다는 단점이 있다.
빠듯한 워터마크
- What?
: 워터마크가 앞서 처리한 레코드의 타임스탬프와 멀리 떨어져 있지 않다.(가깝다) - Pros
: 낮은 지연 시간의 결과를 생성하여 성능 이점을 가져갈 수 있다. - Cons
: 윈도우에 해당하는 데이터가 모두 도착하기 전에 시간 기반 연산이 실행되어, 늦게 도착한 이벤트에 대해 대응이 어려울 수 있다.

2. ProcessFunction
What?
- ProcessFunction은 모든 스트리밍 응용 프로그램의 기본 구성 요소에 접근할 수 있는 저수준 연산 중 하나이다.
- 기본 구성 요소?
- Events(stream elements)
- State(fault-tolerant, consistent, only on keyed stream)
- Timers(event time and processing time, only on keyed stream)
When?
- 이벤트 주도 애플리케이션을 구축하거나, 미리 정의한 윈도우나 기본 변환 연산이 사용자 로직 구현에 맞지 않을 때 주로 사용한다.
Type( Flink는 8개의 ProcessFunction을 갖고 있다. )
- ProcessFunction
- KeyedProcessFunction
- CoProcessFunction
- ProcessJoinFunction
- BroadcastProcessFunction
- KeyedBroadcastProcessFunction
- ProcessWindowFunction
- ProcessAllWindowFunction
8개의 ProcessFunction 함수들의 공통점
- KeyedStream(KeySelector를 사용하여 키별로 파티셔닝한 Datastream)에 적용할 수 있다.
- KeyedStream의 레코드마다 함수가 호출되고 여러 개의 레코드를 반환할 수 있다.(사이드 아웃풋)
- RichFunction 인터페이스를 구현하기 때문에 open(), close(), getRuntimeContext() 메서드를 제공한다.
// RichFunction.class

package org.apache.flink.api.common.functions;

import org.apache.flink.annotation.Public;
import org.apache.flink.configuration.Configuration;

@Public
public interface RichFunction extends Function {
    void open(Configuration var1) throws Exception;

    void close() throws Exception;

    RuntimeContext getRuntimeContext();

    IterationRuntimeContext getIterationRuntimeContext();

    void setRuntimeContext(RuntimeContext var1);
}
KeyedProcessFunction 함수에 확장 되는 두 가지 메서드(🔒 솔직히 잘 모르겠다)
: 8개 ProcessFunction 함수들의 공통점 이외에도 KeyedProcessFunction은 아래 두 메서드를 추가로 제공한다.
-
processElement(v: IN, ctx: Context, out: Collector[OUT])
- 호출 시점: 스트림의 레코드마다 이 메서드를 호출한다.
- 결과 반환: 보통 생성한 결과를 Collector로 내보내며
- ctx 객체: , Context 객체는 사이드 아웃풋으로 레코드를 내보낼 수 있다.
- 목적: Context 객체는 현재 레코드의 타임스탬프와 키, TimerService 에 접근할 방법을 제공한다.
-
onTimer(timestamp: Long, ctx: OnTimerContext, out: Collector[OUT])
- 호출 시점: 이 메서드는 콜백 함수(callback function)이다. 즉, 과거에 등록한 타이머가 트리거될 때 호출된다.
- 결과 반환: timestamp 인자는 타이머가 동작한 타임스탬프를 제공하고, Collector로 레코드를 내보낼 수 있다.
- ctx 객체: OnTimerContext는 processElement()의 Context객체와 같은 서비스를 제공하며, 트리거를 동작시킨 시간 도메인(처리 시간 또는 이벤트 시간)을 반환한다.
-
processElement(), onTimer() 동기화
- Flink 가 processElement() 와 onTimer() 메서드를 동기화 시켜서 두 메서드가 동시에 상태에 접근해서 조작하는 경우를 방지한다.
// KeyedProcessFunction.class
@PublicEvolving
public abstract class KeyedProcessFunction<K, I, O> extends AbstractRichFunction {
    private static final long serialVersionUID = 1L;

    public KeyedProcessFunction() {
    }

    public abstract void processElement(I var1, KeyedProcessFunction<K, I, O>.Context var2, Collector<O> var3) throws Exception;

    public void onTimer(long timestamp, KeyedProcessFunction<K, I, O>.OnTimerContext ctx, Collector<O> out) throws Exception {
    }

    public abstract class OnTimerContext extends KeyedProcessFunction<K, I, O>.Context {
        public OnTimerContext() {
            super();
        }

        public abstract TimeDomain timeDomain();

        public abstract K getCurrentKey();
    }

    public abstract class Context {
        public Context() {
        }

        public abstract Long timestamp();

        public abstract TimerService timerService();

        public abstract <X> void output(OutputTag<X> var1, X var2);

        public abstract K getCurrentKey();
    }
}
2-1. TimerService와 타이머
Timer(타이머)
- What & When?
- KeyedStream 를 전재 조건으로 한다. KeyedStream 에서 어떤 키가 일정 기간 활동이 없을 때 키 상태를 정리하거나 사용자 정의 시간 기반 윈도우 로직을 구현하기 위해 사용한다.
- 즉, 처리시간이나 이벤트시간에 반응(액세스)하여 사용자가 지정한 시간 또는 지연 후에 일부 동작을 수행할 수 있는 메커니즘이다.
- 특징
- 각 키는 여러개의 타이머를 가질 수 있다.
- 각 타임스탬프는 하나의 타이머만 가질 수 있다.
- 각 키 & 타임스탬프는 하나의 타이머만 가질 수 있다.
- Timer 호출 시점
- 처리 시간 타이머: 과거 타임스탬프 타이머를 등록하는 즉시 타이머를 호출한다.
- 이벤트 시간 타이머: 다음 워터마크가 도착하면 즉시 타이머를 호출한다.
TimerService
- What?
- 타이머를 관리하고 현재 파티션 키, 현재 타임스탬프, 타이머 서비스(?)를 추적한다.
- 키 및 타임스탬프당 타이머를 중복 제거한다. 즉, 키 및 타임스탬프당 최대 하나의 타이머가 있고, 동일한 타임스탬프에 여러 타이머가 등록된 경우 onTimer() 메서드는 한 번만 호출 된다.
Timer Types
: Context와 OntimerContext 객체의 TimerService는 아래 코드와 같은 메서드 6개를 제공한다.
// TimerService.class
package org.apache.flink.streaming.api;

import org.apache.flink.annotation.PublicEvolving;

@PublicEvolving
public interface TimerService {
    String UNSUPPORTED_REGISTER_TIMER_MSG = "Setting timers is only supported on a keyed streams.";
    String UNSUPPORTED_DELETE_TIMER_MSG = "Deleting timers is only supported on a keyed streams.";

    long currentProcessingTime(); // Long 현재 처리 시간을 반환한다.

    long currentWatermark(); // Long 현재 워터마크의 타임스탬프를 반환한다.

    void registerProcessingTimeTimer(long var1); // Unit 현재 키의 처리 시간 타이머를 등록한다. 현재 실행중인 장비의 처리 시간이 인자로 넘긴 시간에 도달하면 타이머가 동작한다.

    void registerEventTimeTimer(long var1); // Unit 현재 키의 이벤트 시간 타이머를 등록한다. 워터마크가 타이머의 시간과 같거나 큰 타임스탬프로 갱신 되면 타이머가 동작한다.

    void deleteProcessingTimeTimer(long var1); // Unit 현재 키의 타이머 중 이전에 등록한 처리 시간 타이머를 제거한다. 해당 타이머가 존재하지 않으면 이 메서드는 아무런 동작을 하지 않는다.

    void deleteEventTimeTimer(long var1); // Unit 현재 키의 타이머 중 이전에 등록한 이벤트 시간 타이머를 제거한다. 해당 타이머가 존재하지 않으면 이 메서드는 아무런 동작을 하지 않는다.
}
Timer & TimerService - 장애복구 대응
- 기본적으로 힙에 있는 우선순위 큐에 모든 타이머의 타임스탬프를 보관한다.
- RocksDB 상태 백엔드를 설정해 타이머를 등록할 수도 있따.
- 플링크는 함수 상태와 함께 타이머도 체크포인팅 한다.
- 플링크 애플리케이션을 장애에서 복구할 때에도 만료된 모든 처리 시간 타이머를 애플리케이션을 재시작할 때 모두 호출한다.(처리 시간 타이머가 세이브포인트에 저장될 때도 동일하다.)
- 증분 체크포인트로 RocksDB 상태 백엔드를 사용하고 타이머를 힙에 저장(기본 설정) 한다면 동기적으로 체크포인팅 된다. (이 때를 제외하면, 항상 비동기적으로 체크포인팅 된다.)
Q.중간 요약(ProcessFunction ~ Timer & TimerService)
: 해당 장의 내용을 여러번 보았는데, 책에 기재되어 있는 상세 내용이 아직 잘 이해가지 않는다. 내가 이해한 중간 요약을 적어보고 스터디에서 공유해보자.
- 내가 이해한 요약 내용
- Flink는 Event, State, Timer와 같은 기본 구성 요소에 접근하여 연산할 수 있도록 ProcessFunction 이란걸 지원한다.
- Flink에서는 8개의 ProcessFunction을 지원한다.
- ProcessFunction은 KeyedStream 에서 사용할 수 있다.
- ProcessFunction 중 KeyedProcessFunction은 추가로 processElement()와 onTimer() 메서드를 지원한다.
- ProcessElement()는 KeyedStream 내 모든 레코드의 id, 타임스탬프, 타이머 서비에 대해 액세스하기 위해 사용된다.(위: KeyedProcessFunction.class의 Context클래스 참고)
- onTimer()는 ProcessElement() 에서 사용자 정의에 만족하는 경우 타이머가 갱신 될 때 동작하는 콜백 함수이다.
- 예제로 확인해보기
// ProcessFunctionTimers.scala
package io.github.streamingwithflink.chapter6

import io.github.streamingwithflink.util.{SensorReading, SensorSource}
import org.apache.flink.api.scala._
import org.apache.flink.api.common.state.{ValueState, ValueStateDescriptor}
import org.apache.flink.api.scala.typeutils.Types
import org.apache.flink.streaming.api.TimeCharacteristic
import org.apache.flink.streaming.api.functions.KeyedProcessFunction
import org.apache.flink.streaming.api.scala.{DataStream, StreamExecutionEnvironment}
import org.apache.flink.util.Collector

object ProcessFunctionTimers {

  def main(args: Array[String]) {

    // set up the streaming execution environment
    val env = StreamExecutionEnvironment.getExecutionEnvironment

    // use event time for the application
    env.setStreamTimeCharacteristic(TimeCharacteristic.ProcessingTime)

    // ingest sensor stream
    val readings: DataStream[SensorReading] = env
      // SensorSource generates random temperature readings
      .addSource(new SensorSource)
    // 설명1. ProcessFunction은 KeyedStream에서 사용 가능 하므로
    // 설명1-1. keyby() 를 사용해서 KeyeStream으로 스트림을 만들고,
    // 설명1-2. 온도 상승을 모니터링 하기 위해 TempIncreaseAlertFunction 로 사용자 정의 ProcessFunction을 사용한다.
    val warnings = readings
      // key by sensor id
      .keyBy(_.id)
      // apply ProcessFunction to monitor temperatures
      .process(new TempIncreaseAlertFunction)

    warnings.print()

    env.execute("Monitor sensor temperatures.")
  }
}

/** Emits a warning if the temperature of a sensor
  * monotonically increases for 1 second (in processing time).
  */
class TempIncreaseAlertFunction
  extends KeyedProcessFunction[String, SensorReading, String] {
  // 설명2. ProcessFunction에서는 getRuntimeContext() 메서드를 제공하므로
  // 설명2-1. 아래와 같이 메서드를 이용해 센서 레코드의 lastTemp 값과 timer 값을 가져올 수 있다.
  // hold temperature of last sensor reading
  lazy val lastTemp: ValueState[Double] =
    getRuntimeContext.getState(
      new ValueStateDescriptor[Double]("lastTemp", Types.of[Double])
    )

  // hold timestamp of currently active timer
  lazy val currentTimer: ValueState[Long] =
    getRuntimeContext.getState(
      new ValueStateDescriptor[Long]("timer", Types.of[Long])
    )

  // 설명3. processElement()가 각 레코드에서 호출되어 아래 플로우를 탄다.
  override def processElement(
      r: SensorReading,
      ctx: KeyedProcessFunction[String, SensorReading, String]#Context,
      out: Collector[String]): Unit = {

    // get previous temperature
    val prevTemp = lastTemp.value()
    // update last temperature
    lastTemp.update(r.temperature)

    val curTimerTimestamp = currentTimer.value()
    if (prevTemp == 0.0) {
      // first sensor reading for this key.
      // we cannot compare it with a previous value.
    }
    else if (r.temperature < prevTemp) {
      // 설명4. 현재 온도가 상승 되지 않았을 경우 모니터할 필요가 없기 때문에 타이머를 clear() 해준다.
      // temperature decreased. Delete current timer.
      ctx.timerService().deleteProcessingTimeTimer(curTimerTimestamp)
      currentTimer.clear()
    }
    else if (r.temperature > prevTemp && curTimerTimestamp == 0) {
      // 설명5. 현재 온도가 상승되었고, 등록된 타이머가 없다면 인자값으로 전달 받은 Context()에서 timerService에 접근하여 현재 레코드의 현재 처리 시간을 반환 받아 온다.
      // 설명5-1. 그리고 현재 처리 시간에 1초를 더해서 1초간 온도 상승을 체크한다.
      // 설명5-2. 1초간 온도가 상승 될 경우 1초 후 현재 시점의 처리 시간 타임스탬프값을 타이머에 전달하여 업데이트 한다.
      // 설명5-3. 타이머가 갱신 되면서 onTimer() 콜백 함수를 호출 한다.
      // temperature increased and we have not set a timer yet.
      // set timer for now + 1 second
      val timerTs = ctx.timerService().currentProcessingTime() + 1000
      ctx.timerService().registerProcessingTimeTimer(timerTs)
      // remember current timer
      currentTimer.update(timerTs)
      out.collect("getCurrentKey: "+ ctx.getCurrentKey + "temperature: " + r.temperature + " |  prevTemp: "+ prevTemp)
    }
  }

  override def onTimer(
      ts: Long,
      ctx: KeyedProcessFunction[String, SensorReading, String]#OnTimerContext,
      out: Collector[String]): Unit = {
    // 설명6. 타이머가 갱신 되면서 onTimer() 함수가 호출 되고, 1초간 온도가 상승 되었다는 알람을 Collector에 전송하고 현재 타이머를 clear() 한다.
    out.collect("Temperature of sensor '" + ctx.getCurrentKey +
      "' monotonically increased for 1 second.")
    // reset current timer
    currentTimer.clear()
  }
}- 온도 상승 데이터 예시
1> getCurrentKey: sensor_58temperature: 68.2771877870539  |  prevTemp: 67.66293569327982
1> getCurrentKey: sensor_58temperature: 70.22113915422284 |  prevTemp: 69.45767478207411
1> getCurrentKey: sensor_58temperature: 69.70030532502547 |  prevTemp: 69.63249876364078
1> getCurrentKey: sensor_58temperature: 69.85322985787988 |  prevTemp: 69.0365850638901
1> getCurrentKey: sensor_58temperature: 69.80593202149456 |  prevTemp: 69.8000324175976
1> Temperature of sensor 'sensor_58' monotonically increased for 1 second.
2-2. 사이드 아웃풋으로 내보내기
사이드 아웃풋
- What?
- ProcessFunction의 기능 중 하나로 하나의 함수에서 여러 스트림으로 데이터를 내보낼 수 있게 한다.(이 때, 각 데이터 스트림의 데이터 유형은 다르게 정의할 수 있다.)
- How?
- ProcessFunction 에서 Context 객체를 사용하여 하나 이상의 사이드 아웃풋으로 레코드를 내보낼 수 있다.
- When?
- 기본적으로 Datastream API의 대부분 연산자는 특정 데이터 타입의 결과 스트림 하나만 출력 가능하다. 따라서, 억지로 스트림을 복제하고 필터링하지 않고 여러개의 스트림으로 데이터를 내보내고 싶을 때 사용하면 좋다.
- Context 객체
public abstract class Context {
    public Context() {
    }

    public abstract Long timestamp();

    public abstract TimerService timerService();

    // 사이드 아웃풋은 OutputTag<x> 객체로 식별한다. << 이게 무슨 말일까?
    public abstract <X> void output(OutputTag<X> var1, X var2);

    public abstract K getCurrentKey();
}- 언어별 사이드 아웃풋 선언 방법
// Scala
val outputTag = OutputTag[String]("side-output")
# Python
output_tag = OutputTag("side-output", Types.STRING())- Example
// SideOutputs.scala
package io.github.streamingwithflink.chapter6

import io.github.streamingwithflink.util.{SensorReading, SensorSource, SensorTimeAssigner}

import org.apache.flink.api.scala._
import org.apache.flink.streaming.api.TimeCharacteristic
import org.apache.flink.streaming.api.functions.ProcessFunction
import org.apache.flink.streaming.api.scala.{DataStream, OutputTag, StreamExecutionEnvironment}
import org.apache.flink.util.Collector

object SideOutputs {

  def main(args: Array[String]): Unit = {

    // set up the streaming execution environment
    val env = StreamExecutionEnvironment.getExecutionEnvironment

    // checkpoint every 10 seconds
    env.getCheckpointConfig.setCheckpointInterval(10 * 1000)

    // use event time for the application
    env.setStreamTimeCharacteristic(TimeCharacteristic.EventTime)
    // configure watermark interval
    env.getConfig.setAutoWatermarkInterval(1000L)

    // ingest sensor stream
    val readings: DataStream[SensorReading] = env
      // SensorSource generates random temperature readings
      .addSource(new SensorSource)
      // assign timestamps and watermarks which are required for event time
      .assignTimestampsAndWatermarks(new SensorTimeAssigner)

    // 설명1. 센서 데이터에서 어는점을 확인하기 위해 FreezingMonitor라는 ProcessFunction을 사용한다.
    val monitoredReadings: DataStream[SensorReading] = readings
      // monitor stream for readings with freezing temperatures
      .process(new FreezingMonitor)

    // retrieve and print the freezing alarms
    // 설명5. FreezingMonitor에서 사이드 아웃풋으로 내보내진 스트림을 읽고 출력한다.
    monitoredReadings
      .getSideOutput(new OutputTag[String]("freezing-alarms"))
      .print()

    // print the main output
    // 설명6. collect()로 내보내진 모든 레코드를 출력한다.
    readings.print()

    env.execute()
  }
}

/** Emits freezing alarms to a side output for readings with a temperature below 32F. */
class FreezingMonitor extends ProcessFunction[SensorReading, SensorReading] {

  // define a side output tag
  // 설명2. 사이드 아웃풋의 태그를 'freezing-alarms'라 식별하여 선언한다.
  lazy val freezingAlarmOutput: OutputTag[String] =
    new OutputTag[String]("freezing-alarms")

  override def processElement(
      r: SensorReading,
      ctx: ProcessFunction[SensorReading, SensorReading]#Context,
      out: Collector[SensorReading]): Unit = {
    // emit freezing alarm if temperature is below 32F.
    // 설명3. 각 레코드의 온도가 32도 이하인지 확인하고
    // 설명3-1. 온도가 32도 이하일 경우 사이드 아웃풋 태그 데이터와, 문자열 데이터를 output으로 내보낸다.
    if (r.temperature < 32.0) {
      ctx.output(freezingAlarmOutput, s"Freezing Alarm for ${r.id}")
    }
    // forward all readings to the regular output
    // 설명4. 모든 레코드 정보는 일반 collect()로 내보낸다
    out.collect(r)
  }
}


// 6> SensorReading(sensor_56,1682266031768,30.563619836059083)
// 6> Freezing Alarm for sensor_56
2-3. CoprocessFunction
What?
- 두 입력 스트림을 합성(연산)하여 단일 스트림 출력이 가능하도록 지원하는 저수준 연산자이다.
How?
- 각 입력 스트림에 processElement1()과 processElement2() 변환 메서드를 호출한다.
- 두 메서드는 이벤트, 타이머의 타임스탬프, TimerService, 사이드 아웃풋 요소에 접근 가능한 Context 객체를 인자로 넘긴다.
Example(Q. 잘 이해 못함)
package io.github.streamingwithflink.chapter6

import io.github.streamingwithflink.util.{SensorReading, SensorSource}
import org.apache.flink.api.scala._
import org.apache.flink.api.common.state.{ValueState, ValueStateDescriptor}
import org.apache.flink.api.scala.typeutils.Types
import org.apache.flink.streaming.api.TimeCharacteristic
import org.apache.flink.streaming.api.functions.co.CoProcessFunction
import org.apache.flink.streaming.api.scala.{DataStream, StreamExecutionEnvironment}
import org.apache.flink.util.Collector

object CoProcessFunctionTimers {

  def main(args: Array[String]) {

    // set up the streaming execution environment
    val env = StreamExecutionEnvironment.getExecutionEnvironment

    // use event time for the application
    env.setStreamTimeCharacteristic(TimeCharacteristic.ProcessingTime)

    // 센서 이벤트를 내보내는 필터 스위치
    // 설명1. 스트림1 -> 센서 이벤트를 내보내는 필터 스위치
    // filterSwitches 변수의 데이터 타입은 DataStream[(String, Long)]이다
    // env 객체에서 제공하는 fromCollection 메서드를 사용하여 값을 할당 받는다.
    // Seq 메서드는 문자열과 long 값으로 이루어진 튜플의 시퀀스를 생성하는 데 사용된다.
    val filterSwitches: DataStream[(String, Long)] = env
      .fromCollection(Seq(
        ("sensor_2", 10 * 1000L), // 10초 동안 sensor_2 방출
        ("sensor_7", 60 * 1000L)) // 1분 동안 sensor_7 방출
      )

    // ingest sensor stream
    // 설명2. 스트림2 -> 수집된 모든 센서 데이터 레코드
    val readings: DataStream[SensorReading] = env
      // SensorSource generates random temperature readings
      .addSource(new SensorSource)

    // 설명3. 스트림2에 스트림1을 connect() 로 연결하고 _id를 기준으로 keyby() 진행하여
    // 설명3-1. ReadingFilter에서 사용자 정의 CoProcessFunction 사용
    val forwardedReadings = readings
      // connect readings and switches
      .connect(filterSwitches)
      // key by sensor ids
      .keyBy(_.id, _._1)
      // apply filtering CoProcessFunction
      .process(new ReadingFilter)

    forwardedReadings
      .print()

    env.execute("Monitor sensor temperatures.")
  }
}

class ReadingFilter
  extends CoProcessFunction[SensorReading, (String, Long), SensorReading] {

  // switch to enable forwarding
  // 내보내기 가능한 스위치(레코드를 내보내는 스위치)
  lazy val forwardingEnabled: ValueState[Boolean] =
    getRuntimeContext.getState(
      new ValueStateDescriptor[Boolean]("filterSwitch", Types.of[Boolean])
    )

  // hold timestamp of currently active disable timer
  // 센서 읽음 레코드를 내보내는 것을 중지하는 타이머의 타임스탬프 저장
  lazy val disableTimer: ValueState[Long] =
    getRuntimeContext.getState(
      new ValueStateDescriptor[Long]("timer", Types.of[Long])
    )

  // 설명4.
  // ProcessElement1 에서 센서(아이디, 온도, 타임스탬프) 읽음 레코드가 들어오면
  // forwardingEnabled 값을 확인하고 true 이면 레코드를 collect()로 내보낸다.
  override def processElement1(
      reading: SensorReading,
      ctx: CoProcessFunction[SensorReading, (String, Long), SensorReading]#Context,
      out: Collector[SensorReading]): Unit = {

    // check if we may forward the reading
    // 설명4-1. 레코드를 받아서 출력 가능한지 체크하고 가능할 경우 일반 collect()로 레코드를 내보낸다.
    if (forwardingEnabled.value()) {
      out.collect(reading)
    }
  }

  // 설명5.
  // processElement2에서 filterSwitches 스위치 데이터가 들어오면,
  // forwardingEnabled 값을 true로 바꾸고
  // 현재 레코드의 처리 시간 + 10초를 더한 타임스탬프 값을 timerTimestamp변수에 저장한다.
  // 그 다음, 최근 타이머 중지 시 업데이트 했던 타이머의 타임스탬프 값을 disableTimer 변수에 저장한다.
  // 최근 타임스탬프 값이 새로 선언한 것보다 작으면 기존 타임스탬프 값을 삭제하고 새로운 타이머의 타임스탬프 값을 선언한다.
  // disableTimer 을 새로운 타임스탬프 값으로 선언하여 타이머를 트리깅한다.
  override def processElement2(
      switch: (String, Long),
      ctx: CoProcessFunction[SensorReading, (String, Long), SensorReading]#Context,
      out: Collector[SensorReading]): Unit = {

    // enable reading forwarding
    // 설명6. 센서 읽음 레코드를 내보내도록 forwardingEnabled 값을 true 선언한다.
    forwardingEnabled.update(true)
    // set disable forward timer
    val timerTimestamp = ctx.timerService().currentProcessingTime() + switch._2
    val curTimerTimestamp = disableTimer.value()
    if (timerTimestamp > curTimerTimestamp) {
      // remove current timer and register new timer
      ctx.timerService().deleteProcessingTimeTimer(curTimerTimestamp)
      ctx.timerService().registerProcessingTimeTimer(timerTimestamp)
      disableTimer.update(timerTimestamp)
    }
  }

  // 설명7.
  // 타이머가 새로 갱신 되면 onTimer 콜백 함수가 호출되고
  // forwardingEnabled 값을 false 로 바꾸고
  // disableTimer 값을 초기화하여 다음 타이머가 선언될 수 있도록한다.
  override def onTimer(
      ts: Long,
      ctx: CoProcessFunction[SensorReading, (String, Long), SensorReading]#OnTimerContext,
      out: Collector[SensorReading]): Unit = {

    // remove all state. Forward switch will be false by default.
    forwardingEnabled.clear()
    disableTimer.clear()
  }
}
Example 데이터 결과
: 결과적으로 10초 동안 sensor_2 레코드가 출력되고, 1분 동안 sensor_7 레코드가 출력되는 것을 확인할 수 있다.
8> SensorReading(sensor_7,1682271490317,88.46913758179487)
2> SensorReading(sensor_2,1682271490317,75.91437154538198)
2> SensorReading(sensor_2,1682271490421,75.27610125572255)
8> SensorReading(sensor_7,1682271490421,88.2588389889681)
8> SensorReading(sensor_7,1682271490521,87.71091885536485)
2> SensorReading(sensor_2,1682271490521,75.0144029640268)
2> SensorReading(sensor_2,1682271490628,74.70574187268318)
8> SensorReading(sensor_7,1682271490628,86.9227533362839)
2> SensorReading(sensor_2,1682271490728,74.96867312979697)
8> SensorReading(sensor_7,1682271490728,86.46586606680201)
2> SensorReading(sensor_2,1682271490831,75.66137461955259)
8> SensorReading(sensor_7,1682271490831,86.44857582441172)
... 10초가 지나면 sensor_2 레코드는 출력되지 않고, 1분이 지나면 sensor_7 레코드도 출력되지 않는다.
3. 윈도우 연산자
What?
- 무한 스트림에서 유한 간격으로 윈도우를 지정하여 집계 연산 등을 수행할 수 있다.
How?
- 유한 크기의 버킷으로 이벤트를 모으며, 이 버킷에 모인 유한 개수의 이벤트에 어떤 연산(reduce, aggregate, process 등)을 적용할 수 있게 해준다.
Example(윈도우 연산 상황)
- 어떤 스트림의 이벤트를 5분 크기로 윈도우로 모아 각 윈도우가 얼마나 많은 이벤트를 받았는지 카운트할 수 있다.
3-1. 윈도우 연산자 정의
Config
-
KeyedStream에 적용하는 윈도우 연산자는 병렬 태스크로 처리되고, 그 외의 스트림에 적용한 윈도우 연산자는 단일 태스크로 처리된다.
-
윈도우 연산자를 생성할 때 필수로 지정해야하는 두 가지 윈도우 컴포넌트:
- 입력 스트림의 이벤트를 어떤 윈도우로 보낼지 결정하는 WindowAssigner: WindowAssigner는 WindowStream(또는 KeyedStream이 아닐 때는 AllWindowedStream)을 생성한다.
- WindowedStream(또는 AllWindowedStream의 윈도우에 할당된 이벤트를 처리하는 윈도우 함수
// 윈도우 연산자 함수 적용하는 예제

// KeyedStream 에 윈도우 연산자 정의
stream
  .keyBy(...)
  .window(...)                            // WindowAssigner 지정
  .reduce or aggregate or process(...)    // 윈도우 함수 지정

// KeyedStream 이 외의 스트림에 WindowAll 연산자 정의
stream
  .windowAll(...)                         // WindowAssiger 지정
  .reduce or aggregate or process(...)    // 윈도우 함수 지정
3-2. 기본 WindowAssigner
시간 기반 윈도우
-
What?
- WindowAssinger는 레코드의 이벤트 시간 타임스탬프나 현재 처리 시간을 기준으로 윈도우에 레코드를 할당한다. 또하느 windowAssinger가 생성한 TimeWindow 객체는 시작과 종료 타임스탬프를 갖고 있다.
-
Config
- 모든 기본 WindowAssigner는 처리 시간이 또는 이벤트 시간이 윈도우 종료 시각을 지날 때마다 윈도우를 내보내는 기본 Trigger를 제공한다.
- 윈도우는 첫 번째 레코드가 할당될 때 생성된다.(빈 윈도우는 생성하지 않아서 자원 관리에 용이하다.)
개수 기반 윈도우
- What?
- 윈도우 연산자에 도착한 순서대로 고정 길이의 레코드들을 모은 후 연산한다.
- Cons
- 연산 처리가 이벤트 도착 순서에 의존하므로 결과가 결정적이기 힘들다.
- 윈도우가 생성 된 후 오랫동안 이벤트가 도착하지 않을 경우에 대한 사용자 정의를 제공하지 않을 경우 여러 문제가 발생될 수 있다.
텀블링 윈도우
-
What?
- 텀블링 윈도우는 아래 이미지와 같이 겹치지 않는 고정 길이의 윈도우에 레코드를 할당한다.
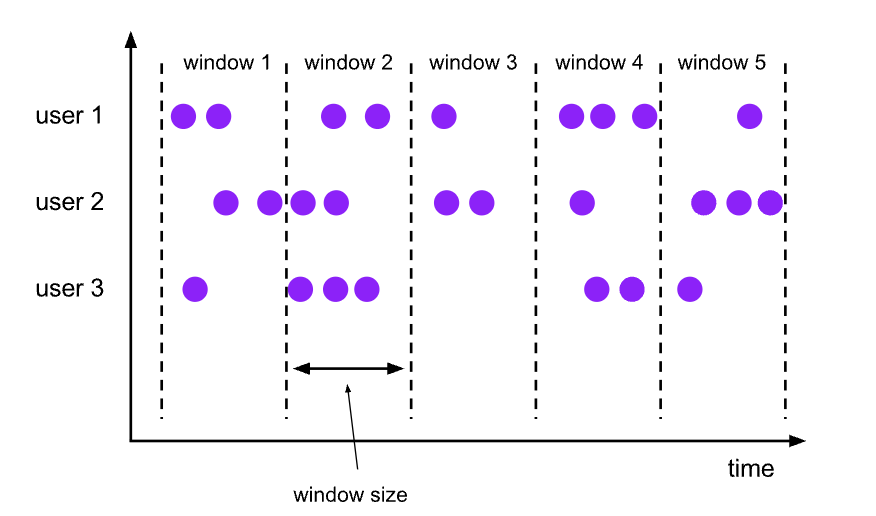
- 텀블링 윈도우는 아래 이미지와 같이 겹치지 않는 고정 길이의 윈도우에 레코드를 할당한다.
-
Type?
- TumblingEventTimeWindow: 윈도우를 구분할 때 이벤트 시간을 기준으로 윈도우를 생성한다.
- TunblingProcessingTimeWindow: 윈도우를 구분할 때 처리 시간을 기준으로 윈도우를 생성한다.
-
Config
- 텀블링 WindowAssigner는 윈도우 크기 인자를 시간 단위로 받는다.
- WindowAssigner 의 of(Time size) 메서드를 사용해 지정할 수 있다.
- 시간 간격은 밀리초, 초, 분, 시간, 일로 구분하여 지정할 수 있다.
-
Example
// Scala
val sensorData: DataStream[SensorReading] ...

val avgTemp = sensorData
    .keyBy(_.id)
    .window(TumblingEventTimeWindows.of(Time.seconds(1))) // 1초 이벤트 시간 윈도우
    .process(new TemperatureAverager)

val avgTemp = sensorData
    .keyBy(_.kd)
    .window(TumblingProcessingTimeWindows.of(Time.seconds(1))) // 1초 처리 시간 윈도우
    .process(new TemperatureAverager)

val avgTemp = sensorData
    .keyBy(_.id)
    .timeWindow(Time.seconds(1)) // window(TumblingEventTimeWindows.of(Time.seconds(1))) 의 단축 표현
    .process(new TemperatureAverager)

// 00:15:00 -> 01:15:00 -> 02:15:00 와 같이 텀블링 윈도우가 흘러간다
val avgTemp = sensorData
    .keyBy(_.id)
    .window(TumblingEventTimeWindows.of(Time.hours(1), Time.minutes(15))) // 1시간 이벤트 시간 윈도우 + 15분 오프셋 지정
    .process(new TemperatureAverager)
# Python
input = ...  # type: DataStream

# tumbling event-time windows
input \
    .key_by(<key selector>) \
    .window(TumblingEventTimeWindows.of(Time.seconds(5))) \
    .<windowed transformation>(<window function>)

# tumbling processing-time windows
input \
    .key_by(<key selector>) \
    .window(TumblingProcessingTimeWindows.of(Time.seconds(5))) \
    .<windowed transformation>(<window function>)

# daily tumbling event-time windows offset by -8 hours.
input \
    .key_by(<key selector>) \
    .window(TumblingEventTimeWindows.of(Time.days(1), Time.hours(-8))) \
    .<windowed transformation>(<window function>)
슬라이딩 윈도우
-
What?
- 슬라이딩 윈도우는 아래 이미지와 같이 개발자가 지정한 슬라이드 간격으로 이동하는 고정 길이의 윈도우에 레코드를 할당한다.

- 슬라이딩 윈도우는 아래 이미지와 같이 개발자가 지정한 슬라이드 간격으로 이동하는 고정 길이의 윈도우에 레코드를 할당한다.
-
Config
- 얼마나 자주 새로운 윈도우를 시작할지 정의하는 윈도우 크기와 슬라이드 간격을 지정해야한다.
- 슬라이드 간격으로 지정한 시간 이후에 새로운 윈도우가 생성되는 의미이다.
-
Example
// 이벤트 시간 슬라이딩 WindowAssigner
val slidingAvgTemp = sensorData
    .keyBy(_.id)
    .window(SlidingEventTimeWindows.of(Time.hours(1), Time.minutes(15))) // 15분마다 1시간 길이의 이벤트 시간 윈도우를 생성한다.
    .process(new TemperatureAverager)

// 처리 시간 슬라이딩 WindowAssigner
val slidingAvgTemp = sensorData
    .keyBy(_.id)
    .window(SlidingProcessingTimeWindows.of(Time.hours(1), Time.minutes(15))) // 15분마다 1시간 길이의 처리 시간 윈도우를 생성한다.
    .process(new TemperatureAverager)

// 단축 표현 메서드를 사용하는 슬라이딩 WindowAssigner
val slidingAvgTemp = sensorData
    .keyBy(_.id)
    .timeWindow(Time.hours(1), Time.minutes(15)) // .window(SlidingEventTimeWindows.of(Time.hours(1), Time.minutes(15))) 의 단축표현
    .process(new TemperatureAverager)
# Python
input = ... # type: DataStream
# sliding event-time windows
input \
.key_by(<key selector>) \
.window(SlidingEventTimeWindows.of(Time.seconds(10), Time.seconds(5))) \
.<windowed transformation>(<window function>)
# sliding processing-time windows
input \
.key_by(<key selector>) \
.window(SlidingProcessingTimeWindows.of(Time.seconds(10), Time.seconds(5))) \
.<windowed transformation>(<window function>)
# sliding processing-time windows offset by -8 hours
input \
.key_by(<key selector>) \
.window(SlidingProcessingTimeWindows.of(Time.hours(12), Time.hours(1), Time.hours(-8))) \
.<windowed transformation>(<window function>)세션 윈도우
-
What?
- 슬라이딩 윈도우는 아래 이미지와 같이 다양한 크기의 겹치지 않는 윈도우로 레코드를 할당한다.
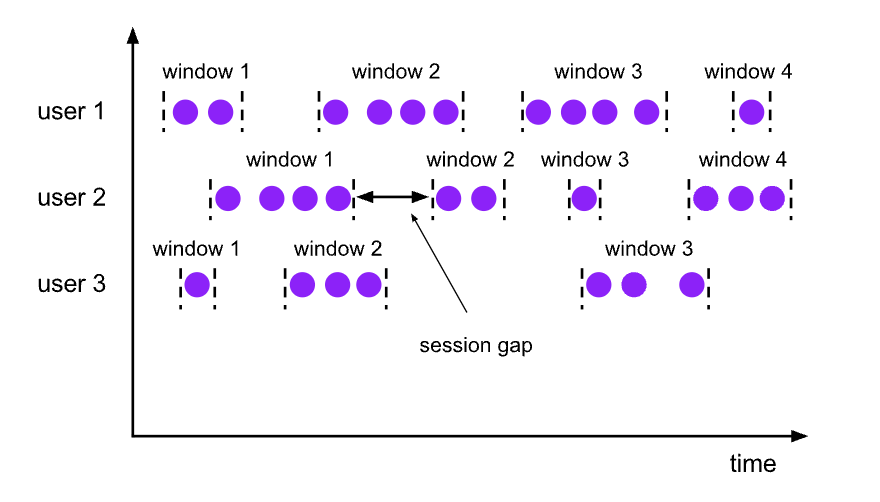
- 슬라이딩 윈도우는 아래 이미지와 같이 다양한 크기의 겹치지 않는 윈도우로 레코드를 할당한다.
-
Config
- 세션 윈도우의 경계는 아무런 레코드도 받지 못하는 시간 간격을 나타내는 비활성 갭(gaps of inactivity)으로 정의할 수 있다.
-
Example
// 이벤트 시간 세션 WindowAssigner
val sessionWindows = sensorData
    .keyBy(_.id)
    .window(EventTimeSessionWindows.withGap(Time.minutes(15))) // 15분 격차로 정의한 이벤트 시간 세션 윈도우 생성
    .process(...)

// 처리 시간 세션 WindowAssigner
val sessionWindows = sensorData
    .keyBy(_.id)
    .window(ProcessingTimeSessionWindows.withGap(Time.minutes(15))) // 15분 격차로 정의한 처리 시간 세션 윈도우 생성
    .process(...)
input = ... # type: DataStream
class MySessionWindowTimeGapExtractor(SessionWindowTimeGapExtractor):
def extract(self, element: tuple) -> int:
# determine and return session gap
# event-time session windows with static gap
input \
.key_by(<key selector>) \
.window(EventTimeSessionWindows.with_gap(Time.minutes(10))) \
.<windowed transformation>(<window function>)
# event-time session windows with dynamic gap
input \
.key_by(<key selector>) \
.window(EventTimeSessionWindows.with_dynamic_gap(MySessionWindowTimeGapExtractor())) \
.<windowed transformation>(<window function>)
# processing-time session windows with static gap
input \
.key_by(<key selector>) \
.window(ProcessingTimeSessionWindows.with_gap(Time.minutes(10))) \
.<windowed transformation>(<window function>)
# processing-time session windows with dynamic gap
input \
.key_by(<key selector>) \
.window(DynamicProcessingTimeSessionWindows.with_dynamic_gap(MySessionWindowTimeGapExtractor())) \
.<windowed transformation>(<window function>)3-3. 윈도우에 함수 적용
What?
- 윈도우 함수는 윈도우 레코드에 수행할 계산을 정의한다.
Type
- 증분 집계 함수(Incremental aggregation function)
- 새로 수신한 레코드는 즉시 집계 되고 결과는 윈도우의 상태로 저장된다.
- 윈도우 상태를 단일 값으로 유지하고 갱신한다.
- 공간 효율적이며 집계 값을 최종 결과로 내보낸다.
- 종류: ReduceFunction(), AggregateFunction()
- 전체 윈도우 함수(Full Window Function)
- 윈도우의 모든 레코드를 모아 전체 레코드를 순회하며 계산을 수핸한다.
- 새로 도착한 레코드는 윈도우에 할당된 모든 레코드를 저장하는 ListState에 추가된다.
- 보통 증분 집계 함수보다 더 많은 저장 공간을 요구하지만, 더 복잡한 로직을 구현할 수 있다.
- 종류: ProcessWindowFunction
ReduceFunction
: 5장 KeyedStream 변환 연산 절에서 어떻게 적용 되는지 소개 되었다.
-
What?
- 증분 집계 함수에 해당한다.
- 같은 타입의 두 값을 인자로 받아 같은 타입의 한 값으로 합친다.
-
Work?
- 윈도우 스트림에 ReduceFunction을 적용하면 윈도우에 할당된 레코드를 증분으로 집계한다.
- 윈도우는 현재 집계 값만 저장하며(히스토리를 알 필요가 없다.), 이 때 집계값은 동일한 데이터 타입의 단일 값이다.
- 새 레코드가 들어오면 새 레코드와 윈도우 상태에서 마지막 집계 값을 인자로 넘겨 받아 호출된다. 그리고 계산된 결과값을 새로운 상태로 교체한다.
-
Pros
- 각 윈도우마다 고정 길이의 작은 상태를 갖게 되며, 함수 인터페이스도 단순히 구현된다.
-
Cons
- ReduceFunction으로 구현 가능한 로직에 한계가 있어 입/출력이 동일한 단순 집계에 제한적으로 사용한다.
-
Example
- Q. r1, r2는 어디서 나온거지..? _1과 _2도 뭔지 모르겠다...
- A. reduce 함수에서 생성된 것이다.
// ReduceFunction을 람다 함수로 적용
// 15초마다 각 센서의 최소 온도를 계산
val minTempPerWindow: DataStream[(String, Double)] = sensorData
    .map(r => (r.id, r.temperature))
    .keyBy(_.id)
    .timeWindow(Time.seconds(15))
    .reduce((r1, r2) => (r1._1, r1._2.min(r2._2)))
AggregateFunction
-
What?
- 증분 집계 함수에 해당한다.
-
Work?
- ReduceFunction과 비슷하게 윈도우의 레코드로 증분 계산을 수행하며, 윈도우 연산자 상태도 단일 값이다.
- ReduceFunction과 대조적으로 중간 데이터 타입과 출력 데이터 타입이 입력 타입과 다르다.
-
Pros
- ReduceFunction 보다 인터페이스가 좀 더 유연하다.
-
Cons
- ReduceFUnction 보다 구현이 조금 더 복잡하다.
-
Example
- accumulator는 현재까지의 집계 결과와 레코드 개수를 보관한다.
- getResult() 메서드를 호출할 때 평균값을 계산한다.
// AggregateFunction.class

package org.apache.flink.api.common.functions;

import java.io.Serializable;
import org.apache.flink.annotation.PublicEvolving;

@PublicEvolving
public interface AggregateFunction<IN, ACC, OUT> extends Function, Serializable {
    ACC createAccumulator();

    ACC add(IN var1, ACC var2);

    OUT getResult(ACC var1);

    ACC merge(ACC var1, ACC var2);
}
class AvgTempFunction
extends AggregateFunction[(String, Double), (String, Double, Int), (String, Double)] {
override def createAccumulator() = {
("", 0.0, 0)
}
override def add(in: (String, Double), acc: (String, Double, Int)) = {
// in._1: 새로 들어온 레코드의 id값
// in._2: 새로 들어온 레코드의 온도값
// acc._2: 지금까지 집계된 온도값(합계)
// acc._3: 지금까지 집계된 레코드 개수
(in._1, in._2 + acc._2, 1 + acc._3)
}
override def getResult(acc: (String, Double, Int)) = {
// id 값, 평균값 계산
(acc._1, acc._2 / acc._3)
}
override def merge(acc1: (String, Double, Int), acc2: (String, Double, Int)) = {
// 이 부분에 왜 merge가 들어오는지는 잘 모르겠다.
(acc1._1, acc1._2 + acc2._2, acc1._3 + acc2._3)
}
}ProcessWindowFunction
-
What?
- 윈도우의 전체 내용으로 계산을 수행할 수 있다.
-
When?
- 증분 계산으로 대응 불가능한 상황일 때 사용한다. 예를 들어, 윈도우 전체 이벤트에 접근해 이벤트 값들의 중앙값을 확인하거나, 출현 빈도가 높은 이벤트를 확인 하는 등의 값처럼 좀 더 복잡한 계산이 필요할 때 사용한다.
-
Pros
- 증분 계산 함수(ReduceFunction, AggregateFunction)보다 다양한 윈도우 계산을 할 수 있다.
-
Cons
- 윈도우에 해당하는 모든 이벤트를 모아 저장해야 하기 때문에 증분 계산 함수를 사용할 때보다 윈도우 상태가 훨씬 커질 수 있다.
-
아래 코드(
ProcessWindowFunction.class)와 같이 ProcessWindowFunction 의 process() 메서드는 4개의 인자값을 받는다.- 윈도우 키
- Context 객체:
- ProcessWindowFunction의 Context객체는 현재 처리시간, 윈도우 메타데이터(워터마크, 윈도우 시작, 종료 타임스탬프), 윈도우별 상태, 키별 글로벌 상태 저장소, 사이드 아웃풋에 대한 접근을 제공한다.
- 윈도우의 모든 레코드에 접근할 수 있는 Iterable 객체
- 결과를 내보내는 Collector 객체
// ProcessWindowFunction.class
package org.apache.flink.streaming.api.scala.function

@_root_.org.apache.flink.annotation.PublicEvolving
abstract class ProcessWindowFunction[IN, OUT, KEY, W <: _root_.org.apache.flink.streaming.api.windowing.windows.Window] extends _root_.org.apache.flink.api.common.functions.AbstractRichFunction {
  @_root_.scala.throws[_root_.scala.Exception]
  def process(key: KEY, context: ProcessWindowFunction.this.Context, elements: _root_.scala.Iterable[IN], out: _root_.org.apache.flink.util.Collector[OUT]): _root_.scala.Unit

  abstract class Context {
    def window: W

    def currentProcessingTime: _root_.scala.Long

    def currentWatermark: _root_.scala.Long

    def windowState: _root_.org.apache.flink.api.common.state.KeyedStateStore

    def globalState: _root_.org.apache.flink.api.common.state.KeyedStateStore

    def output[X](outputTag: _root_.org.apache.flink.streaming.api.scala.OutputTag[X], value: X): _root_.scala.Unit
  }

  @_root_.scala.throws[_root_.scala.Exception]
  def clear(context: ProcessWindowFunction.this.Context): _root_.scala.Unit = ???
}-
윈도우별 상태(Q. 잘 이해 못함.)
- 현재 평가 중인 윈도우 인스턴스를 참조한다.
- 연착 시간(lateness) 설정 값, 사용자 정의 Trigger로 인해 같은 윈도우에 여러 번 process() 함수가 호출 될 수 있다.
- ProcessWindowFunction에서 윈도우별 상태를 사용할 때는 윈도우가 제거 되기 전에 clear() 메서드로 정리해야한다.
-
글로벌 상태(Q. 잘 이해 못함.)
- 어떤 윈도우에도 속하지 않는 키 상태이다.
- 같은 키로 여러 윈도우에서 공유하는 정보로 사용할 수 있다.
-
Example
// WindowFunctions.scala
// output the lowest and highest temperature reading every 5 seconds
// 센서 읽음 스트림을 5초 길이의 텀블링 윈도우로 모아 윈도우 내에서 발생한 가장 낮은 온도와 높은 온도를 구한다.
// HighAndLowTempProcessFunction에서는 각 윈도우별로 윈도우의 시작과 종료 타임스탬프, 최대 온도와 최소 온도를 포함하는 레코드 하나를 내보낸다.
val minMaxTempPerWindow: DataStream[MinMaxTemp] = sensorData
  .keyBy(_.id)
  .timeWindow(Time.seconds(5))
  .process(new HighAndLowTempProcessFunction)

case class MinMaxTemp(id: String, min: Double, max:Double, endTs: Long)

// 윈도우별로 최저 및 최고 온도 레코드를 계산하고 윈도우의 종료 타임스탬프와 함께 내보내는 ProcessWindowFunction 이다.
class HighAndLowTempProcessFunction
  extends ProcessWindowFunction[SensorReading, MinMaxTemp, String, TimeWindow] {

  override def process(
                        key: String, // 윈도우 키
                        ctx: Context, // Context 객체
                        vals: Iterable[SensorReading], // 윈도우의 모든 레코드에 접근할 수 있는 Iterable 객체
                        out: Collector[MinMaxTemp]): Unit = { // 결과를 내보내는 Collector 객체

    val temps = vals.map(_.temperature)
    val windowEnd = ctx.window.getEnd

    out.collect(MinMaxTemp(key, temps.min, temps.max, windowEnd))
  }
}

// * 참고: ProcessWindowFunction으로 평가할 윈도우는 윈도우에 할당된 모든 이벤트를 ListState에 저장한다.
증분 집계 함수와 ProcessWindowFunction(함께 사용)
-
When?
- 증분 집계 로직에서 윈도우 메타데이터에 접근해야할 때
-
How?
- 증분 집계 함수에서 레코드를 즉시 집계하고, 윈도우 트리거가 작동할 때 집계 결과를 ProcessWindowsFunction으로 넘긴다. 이 때, ProcessWindowsFunction.process()의 Iterable 인자는 증분 집계 결과 한 개만 제공된다.
-
Example
- ReduceFunction과 ProcessWindowsFunction을 조합해 5초마다 센서별 최대, 최소 온도와 각 윈도우의 종료 타임스탬프를 내보내는 예제
// WindowsFunctions.scala

val minMaxTempPerWindow2: DataStream[MinMaxTemp] = sensorData
  .map(r => (r.id, r.temperature, r.temperature))
  .keyBy(_._1)
  .timeWindow(Time.seconds(5))
  .reduce(
    // incrementally compute min and max temperature
    // 최대, 최소 온도의 증분 계산
    (r1: (String, Double, Double), r2: (String, Double, Double)) => {
      (r1._1, r1._2.min(r2._2), r1._3.max(r2._3))
    },
    // finalize result in ProcessWindowFunction
    // 증분 계산 후 집계 결과를 아래 ProcessWindowFunction인 AssignWindowEndProcessFunction에서 결과 처리
    new AssignWindowEndProcessFunction()
  )

class AssignWindowEndProcessFunction
  extends ProcessWindowFunction[(String, Double, Double), MinMaxTemp, String, TimeWindow] {

  override def process(
                        key: String,
                        ctx: Context,
                        minMaxIt: Iterable[(String, Double, Double)], // 이 때 Iterable한 인자의 요소는 1개
                        out: Collector[MinMaxTemp]): Unit = {

    val minMax = minMaxIt.head
    val windowEnd = ctx.window.getEnd
    out.collect(MinMaxTemp(key, minMax._2, minMax._3, windowEnd))
  }
}
3-4. 사용자 정의 윈도우 연산자
When?
- 이미 결과를 내보냈는데 늦게 도착한 레코드도 결과에 반영해야할 때.
- 특정 레코드가 들어오면 윈도우를 시작하고 싶을 때 등...
How?
- 직접 WindowAssigner, Trigger, Evictor를 구현해 사용자 정의 윈도우 연산자를 정의할 수 있는 인터페이스와 메서드를 제공한다.
Work
- 레코드가 윈도우 연산자에 도착 --> (플링크가)레코드를 WindowAssigner로 넘김 --> (윈도우할당자가)이 레코드를 어떤 윈도우로 할당할지 결정 --> (윈도우할당자가)윈도우가 없으면 새로 생성
-
What?
- 할당된 레코드나 등록한 타이머를 기반으로 어떤 특정 시점 윈도우의 내용을 평가, 폐기, 내용 삭제할 지 결정한다.
- WindowAssigner에서 기본으로 Trigger를 제공한다. 사용자 정의 Trigger를 사용할 경우 기본 Trigger를 덮어쓴다.
-
Flow?
- 윈도우에 레코드가 추가 될 때마다 Trigger에도 레코드가 전달 된다.
-
Trigger 발생 시점 - 증분 집계 함수 사용 시
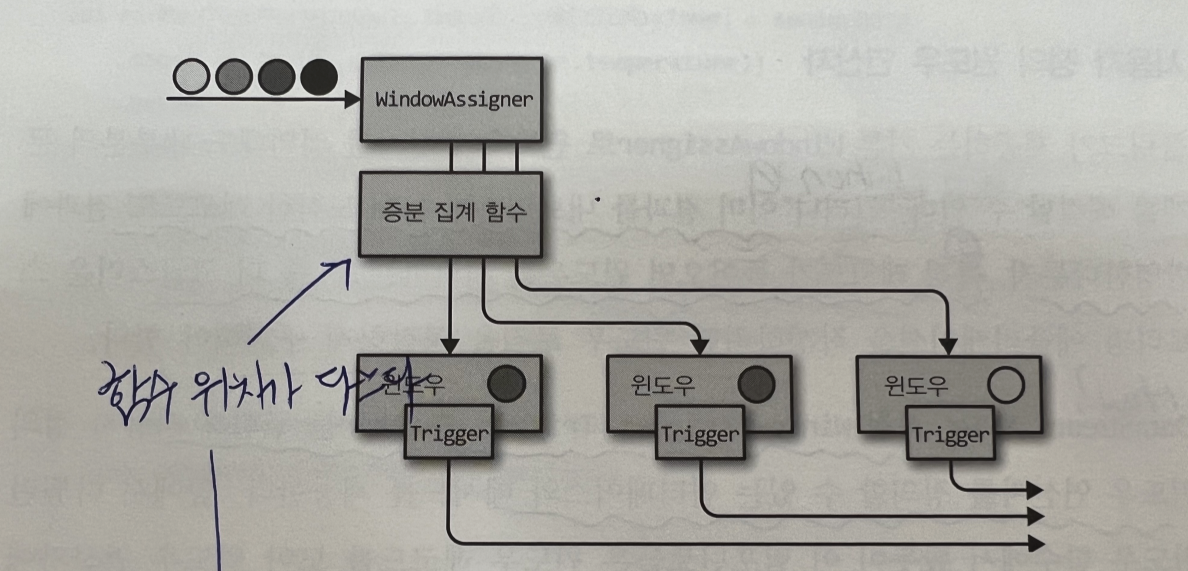
-
Trigger 발생 시점 - 전체 윈도우 함수 사용 시
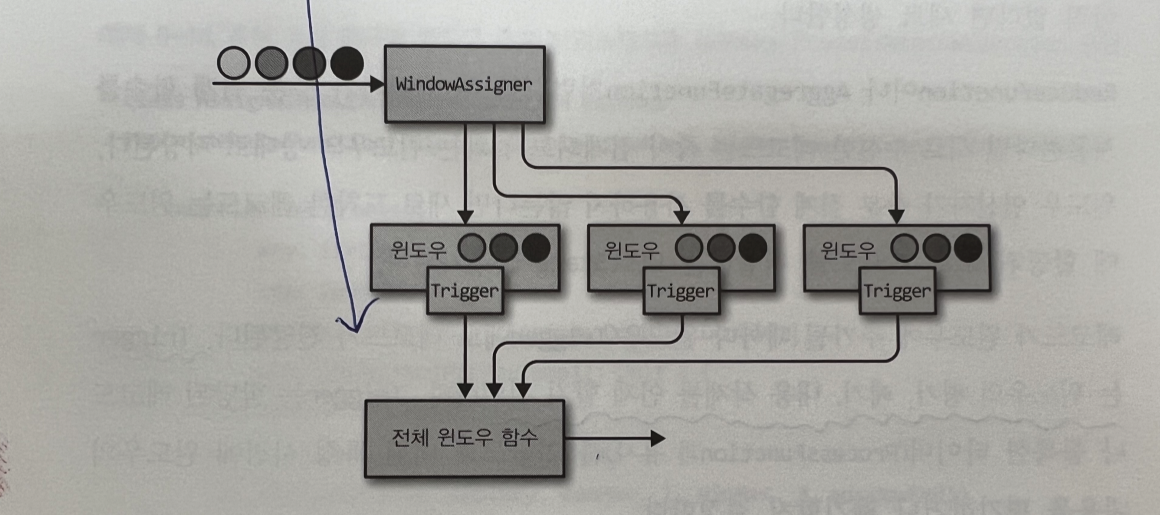
-
Trigger 발생 시점 - (증분 집계 함수 + 전체 윈도우 함수)를 함께 사용 시
-
What?
- ProcessWindowFunction 전후에 주입할 수 있는 '선택적인 컴포넌트'다.
- Trigger가 실행된 후 윈도우 함수가 적용 되기 전 or 후에 윈도우에서 요소(레코드)를 제거할 수 있다.
-
When?
- 모든 레코드를 순회해야 하므로 증분 집계 함수를 사용하지 않을 때만 사용한다.(예: 전체 윈도우 함수 사용할 때)
-
Evictor 사용법
// Evictor
stream.
    .keyBy(...)
    .window(...)                   // WindowAssiger 설정
    [.trigger(...)]                // 선택 사항: Trigger 설정
    [.evictor(...)]                // 선택 사항: Evictor 설정
    .reduce or aggregate or process(...)  // 윈도우 함수 설정

// evictBefore() 윈도우 함수 이전에 적용할 ecvitor 로직을 구현할 때 사용한다.
void evictBefore(Iterable<TimestampedValue<T>> elements, int size, W window, EvictorContext evictorContext);

// evictAfter() 윈도우 함수 이후에 적용할 ecvitor 로직을 구현할 때 사용한다.
void evictAfter(Iterable<TimestampedValue<T>> elements, int size, W window, EvictorContext evictorContext);-
What?
- 윈도우가 어떤 메타데이터를 갖고 있고 언제 생성, 삭제 하는지 등을 의미한다.
-
윈도우 생성 시점
- WindowAssiger가 윈도우의 첫 번째 레코드를 윈도우에 할당할 때 새 윈도우가 생성된다.
(즉, 적어도 하나의 레코드가 있어야 윈도우가 생성된다.)
- WindowAssiger가 윈도우의 첫 번째 레코드를 윈도우에 할당할 때 새 윈도우가 생성된다.
-
윈도우 상태(정보)
- 윈도우 내용:
- 윈도우에 할당된 레코드 또는 증분 집계 결과를 상태로 저장
- Window 객체:
- WindowAssignersms 0개 이상의 Window를 반환한다.
- Window 객체는 각 윈도우를 식별할 수 있는 정보를 가지고 있다.(윈도우키)
- 윈도우 종료 타임스탬프를 갖고 있다.
- Trigger 타이머:
* 콜백 타이머(함수)의 동작 시점을 등록할 수 있다.
( 윈도우를 평가할 때, 윈도우의 내용을 삭제할 때 등) - Trigger의 사용자 정의 상태
- 윈도우별 또는 키별 사용자 정의 상태를 정의하고 사용한다. (Q. 잘 이해 못함)
- 윈도우 내용:
- 윈도우가 삭제될 때
- 윈도우가 삭제될 때 윈도우 연산자는 자동으로 윈도우의 내용을 정리하고 Window 객체를 버린다.
- 단, 사용자 정의 Trigger 상태와 Trigger 타이버는 삭제 되지 않는다. 때문에, 사용자 정의 단계에서 Trigger.close() 메서드로 모든 Trigger 상태를 정리해야한다.
4. 시간 기반 스트림 조인
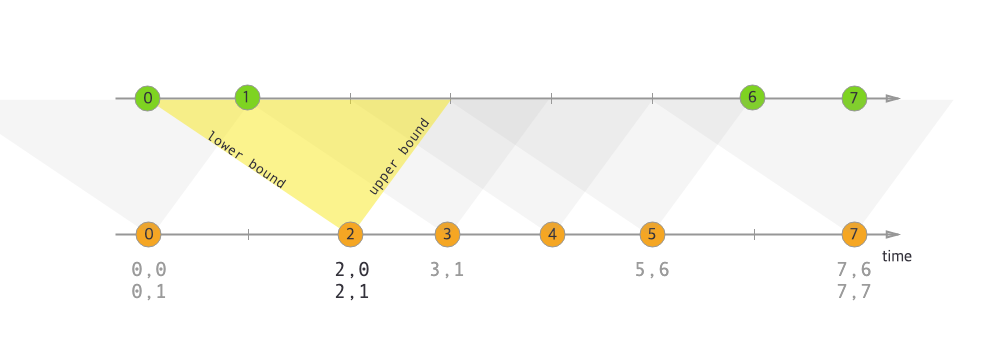
4-1. 간격 조인
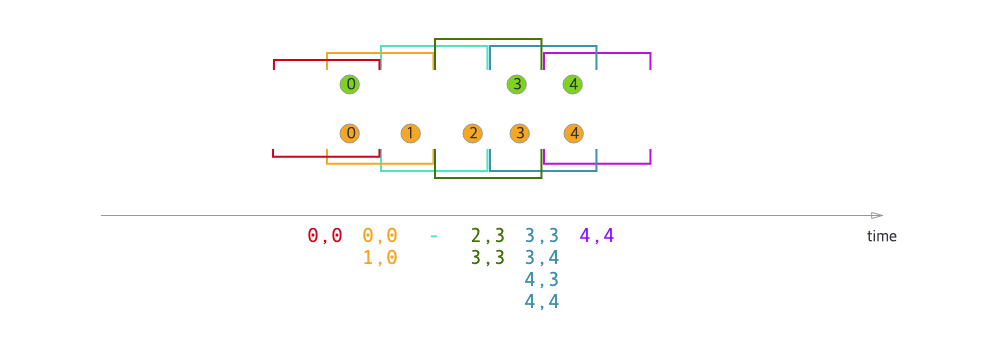
What?
- 서로 다른 스트림 A, B가 있을 때, 공통 키를 사용하여 두 스트림의 요소(레코드)를 결합하고 스트림...(The interval join joins elements of two streams (we’ll call them A & B for now) with a common key and where elements of stream B have timestamps that lie in a relative time interval to timestamps of elements in stream A.) (Q. 잘 이해 못함)
Example
import org.apache.flink.streaming.api.functions.co.ProcessJoinFunction
import org.apache.flink.streaming.api.windowing.time.Time

...

val orangeStream: DataStream[Integer] = ...
val greenStream: DataStream[Integer] = ...

orangeStream
    .keyBy(elem => /* select key */)
    .intervalJoin(greenStream.keyBy(elem => /* select key */))
    .between(Time.milliseconds(-2), Time.milliseconds(1))
    .process(new ProcessJoinFunction[Integer, Integer, String] {
        override def processElement(left: Integer, right: Integer, ctx: ProcessJoinFunction[Integer, Integer, String]#Context, out: Collector[String]): Unit = {
            out.collect(left + "," + right)
        }
    })
4-2. 윈도우 조인
What?
- 동일한 윈도우에 있는 두 스트림 레코드끼리 공통 키를 공유하고 요
소를 조인한다.
Config
- Window Assigner를 이용하여 윈도우를 정의할 수 있다.
Work
- 두 스트림의 요소가 키로 묶여 사용자 정의 JoinFunction 또는 FlatJoinFunction으로 전달 되어 사용자가 조인 기준을 충족하는 결과를 내보낸다.
- 한 윈도우에서 한 쪽 스트림의 요소가 없을 경우
Example
stream.join(otherStream)
.where(<KeySelector>)
.equalTo(<KeySelector>)
.window(<WindowAssigner>)
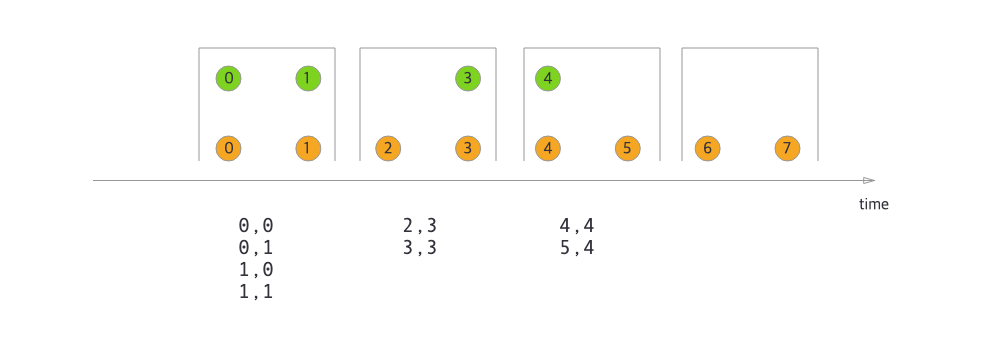
.apply(<JoinFunction>);Type
- Tumbling Window Join
- Sliding Window Join
- Session Window Join
Tumbling Window Join
import org.apache.flink.streaming.api.windowing.assigners.TumblingEventTimeWindows
import org.apache.flink.streaming.api.windowing.time.Time

...

val orangeStream: DataStream[Integer] = ...
val greenStream: DataStream[Integer] = ...

orangeStream.join(greenStream)
    .where(elem => /* select key */)
    .equalTo(elem => /* select key */)
    .window(TumblingEventTimeWindows.of(Time.milliseconds(2)))
    .apply { (e1, e2) => e1 + "," + e2 }
Sliding Window Join
import org.apache.flink.streaming.api.windowing.assigners.SlidingEventTimeWindows
import org.apache.flink.streaming.api.windowing.time.Time

...

val orangeStream: DataStream[Integer] = ...
val greenStream: DataStream[Integer] = ...

orangeStream.join(greenStream)
    .where(elem => /* select key */)
    .equalTo(elem => /* select key */)
    .window(SlidingEventTimeWindows.of(Time.milliseconds(2) /* size */, Time.milliseconds(1) /* slide */))
    .apply { (e1, e2) => e1 + "," + e2 }
Session Window Join
import org.apache.flink.streaming.api.windowing.assigners.EventTimeSessionWindows
import org.apache.flink.streaming.api.windowing.time.Time

...

val orangeStream: DataStream[Integer] = ...
val greenStream: DataStream[Integer] = ...

orangeStream.join(greenStream)
    .where(elem => /* select key */)
    .equalTo(elem => /* select key */)
    .window(EventTimeSessionWindows.withGap(Time.milliseconds(1)))
    .apply { (e1, e2) => e1 + "," + e2 }
5. 연착 데이터 처리
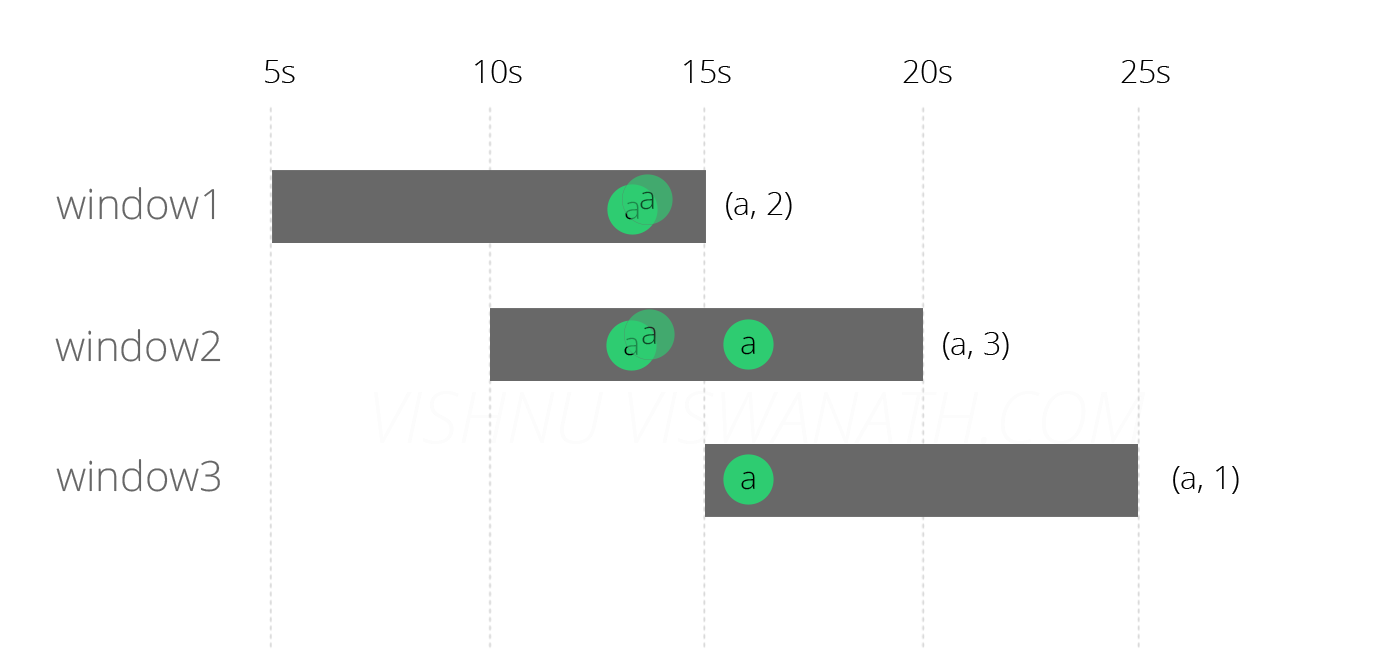
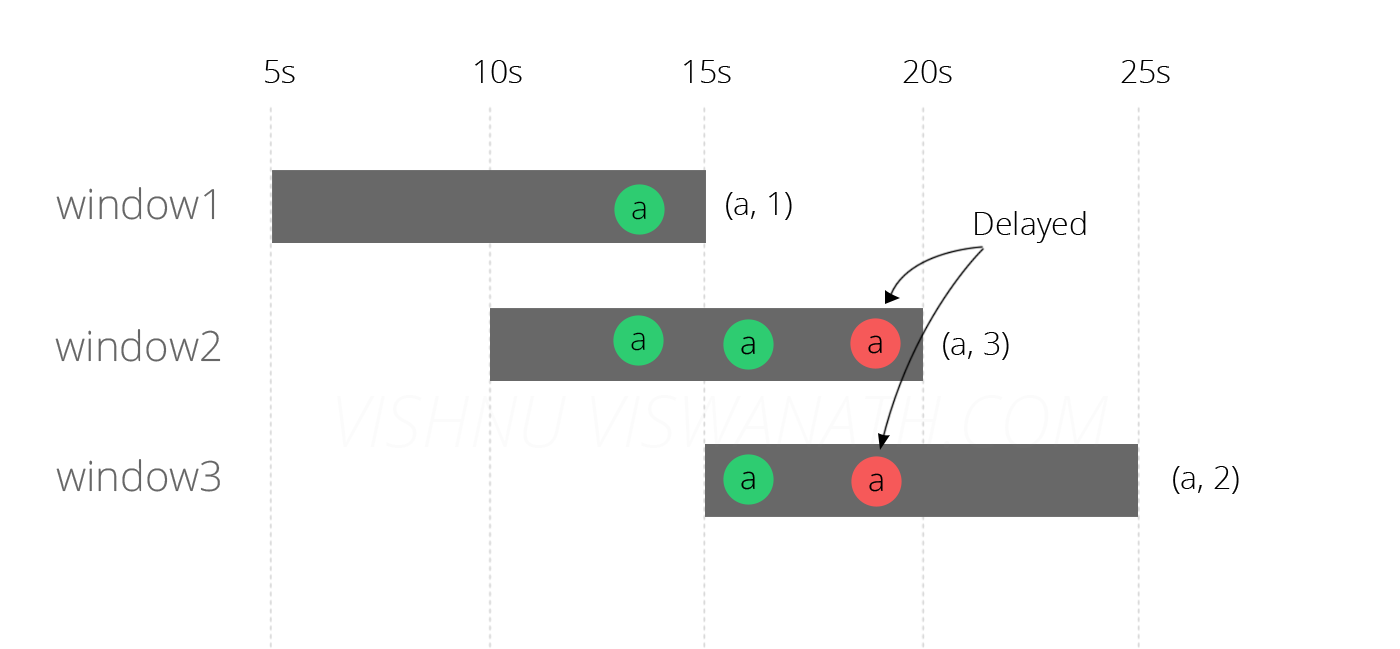
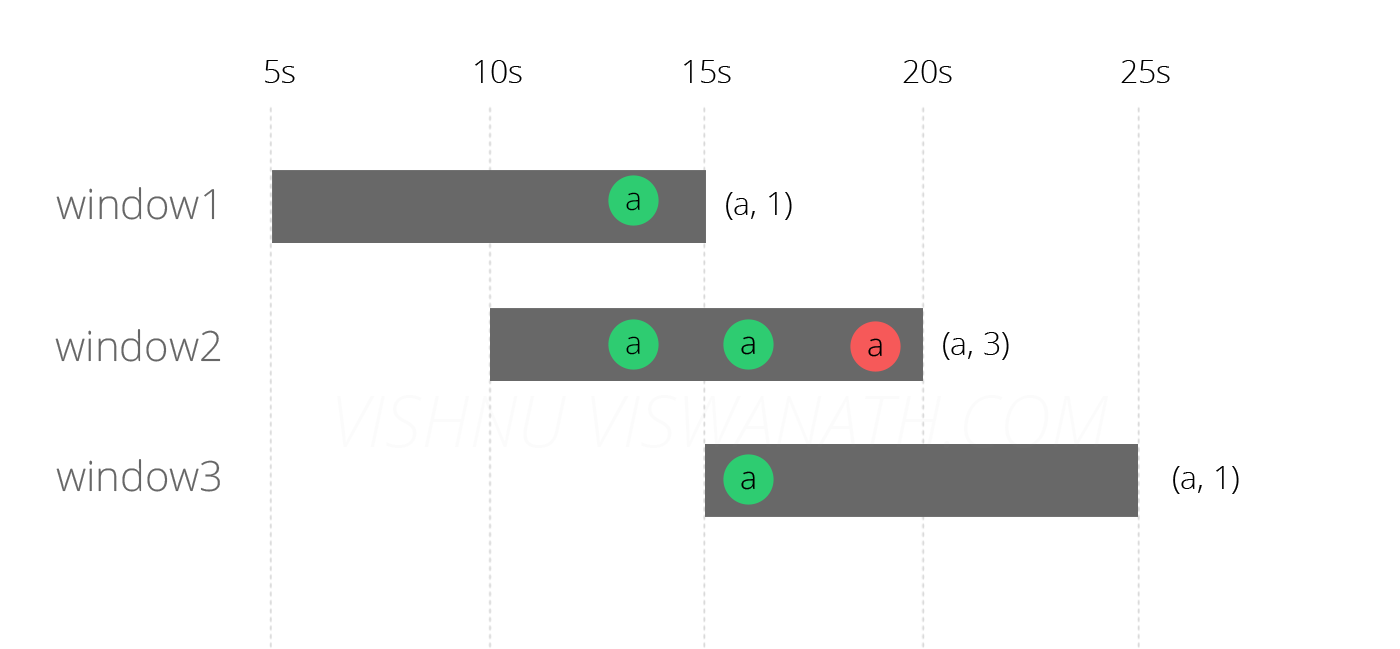
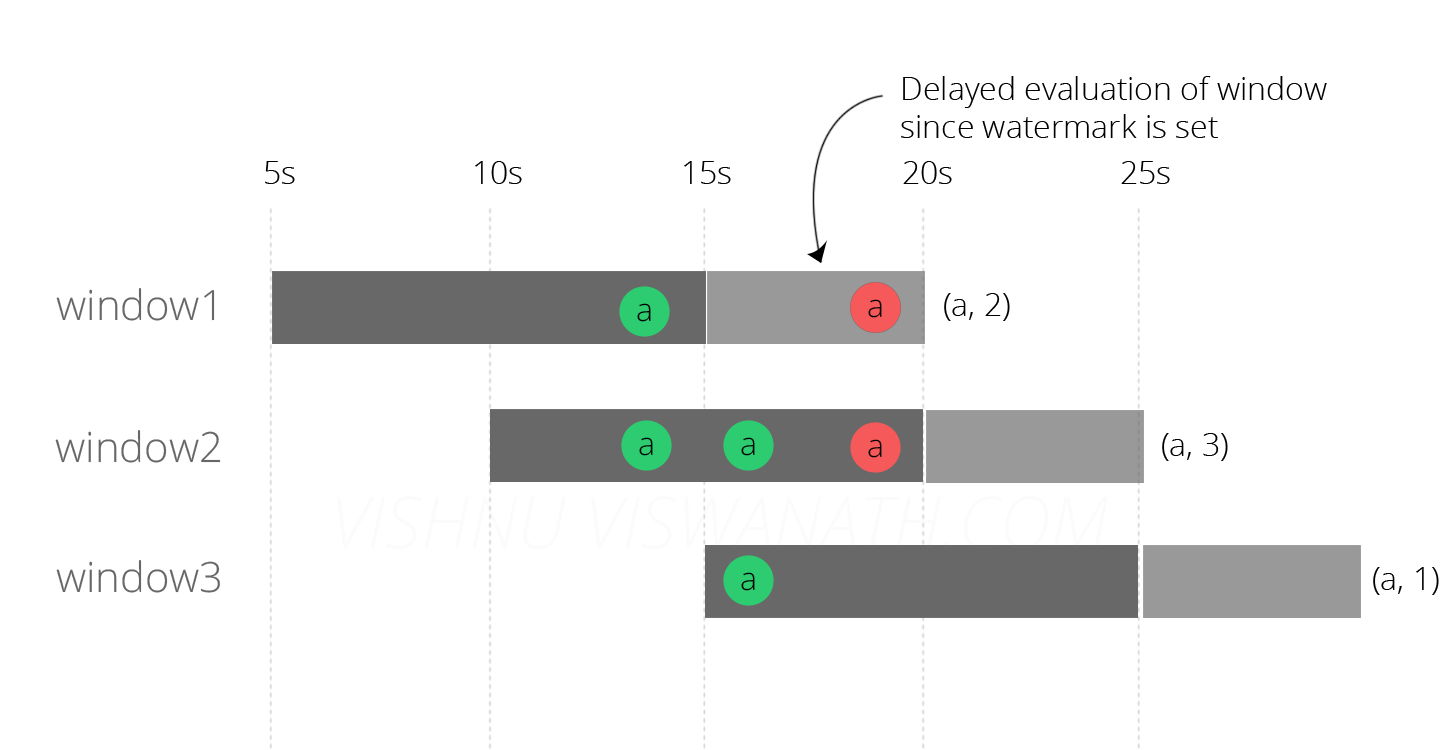
5-1. 연착 이벤트 버리기
5-2. 연착 이벤트 재전송
5-3. 연착 이벤트를 포함해 처리 결과 갱신