1. ASCII and Packed Decimal Arithmetic
ASCII and Packed Decimal Arithmetic
- Suppose a program is to input two numbers from the user and add them together(see the in/out example shown below).

ascii string을 계산을 해서 다시 ascii로 출력하는 방법이 있다.
- 이를 위해 우선 2진 계산하고 다시 ascii string으로 바꾸는 방법
- 아스키 두개를 직접 더해서 계산하는 두가지 방법이 존재한다.
- We have two options when calculating and displaying the sum:
- Convert both operands to binary, add the binary values, and convert the sum from binary to ASCII digit strings.
- Add the digit strings directly by successively adding each pair of ASCII digits ('2' + '6', '0' + '5', etc.). The sum is an ASCII digit string, so it can be directly displayed.
- 두번째 접근 방식으로 연산하기 위한 instruction들이 있다.
(1) Not work in 64-bit programming.
ASCII Decimal and Unpacked Decimal
- ASCII Decimal
- A number using ASCII Decimal representation stores a single ASCII digit in each byte
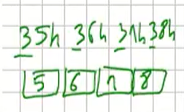
- Example: 5,678 is stored as the following sequence of hexadecimal bytes:

위와 같이 ASCII char string으로 표시하는 방법을 ASCII Decimal이라고 부른다.
-Binary-Coded Decimal (BCD)
- BCD integers use 4 binary bits to represent each decimal digit.
- Unpacked BCD representation stores a decimal digit in the lower four bits of each byte.
Example: 5,678 is stored as the following sequence of hexadecimal bytes.
숫자 아스키는 특이하게도 16진수로 표시시 3X의 형태를 띈다. 그래서 3을 제거해 주어서 원래 구하고자 하는 숫자 값을 구할 수도 있다.
byte당 10진수 숫자 1개를 저장
- Packed decimal(1) representation stores two decimal digits per byte.
- Example: 12,345,678 can be stored as the following sequence of hexadecimal bytes
위의 방식은 너무나도 공간 낭비가 심하다 그래서 2개씩 짝을 나누어서 넣자는 방법이다.

(1) Packed decimal is also known as packed BCD.
그래서 ASCII, UNPacked, Packed decimal 총 3가지가 존재한다. 이 세가지 방법은 instruction으로 제공하고 있다.
Instructions for ASCII Decimal Arithmetic
-
There are four instructions:

-
AAA (ASCII Adjust after Addition) Instruction
- Let AL contain a binary value produced by adding two ASCII digits.
- AAA converts AL to two unpacked decimal digits and stores them in AH and AL (In fact, AH = 1 or 0).
- AH and AL can then easily be converted to ASCII decimal.
- Example: Adding '8' and '2'

ah는 일단 0으로 만들어 주고 al에 드어가 있던 알 수 없는 값을 0100으로 바꾸어 주는 것이다.
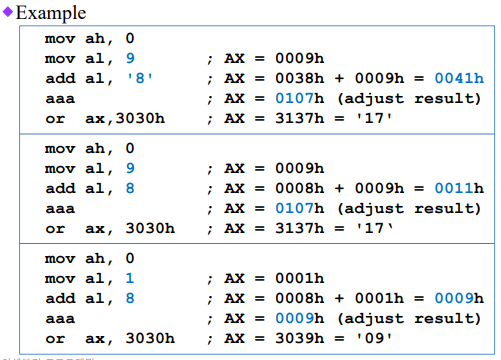
이걸 ascii로 바꾸겠다면 or ax, 3030h을 써주면 된다.
-
AAA instruction은 ASCII decimal 뿐만 아니라 Unpacked BCD에도, 이들이 혼합되어 더한 결과에도 적용된다.
-
Example
-
Multibyte Addition Using AAA
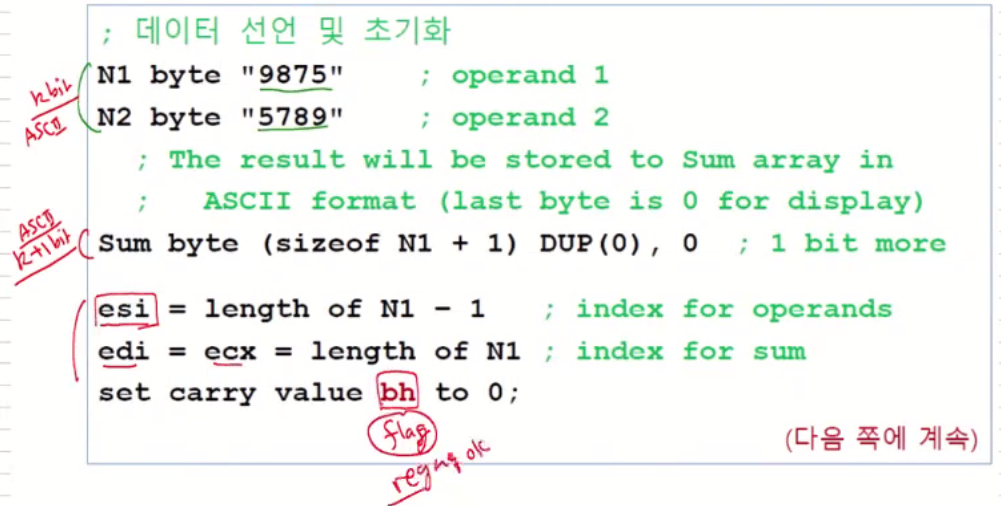
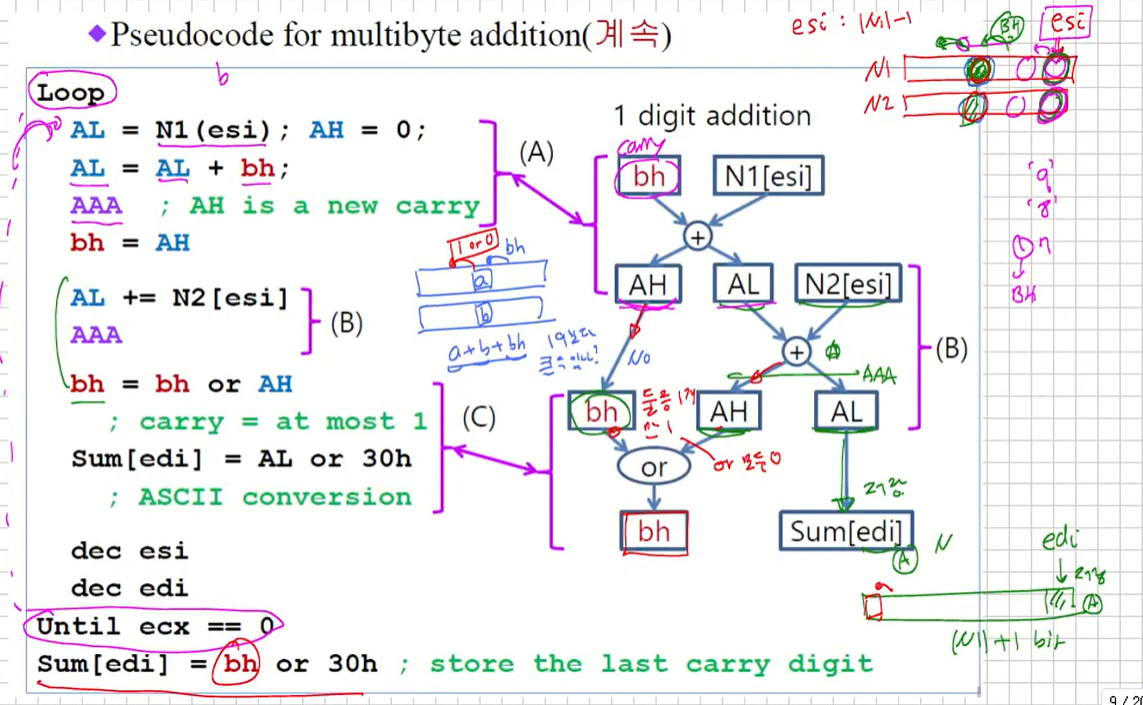
- 이를 위한 pseudocode를 다음에 보인다.
- Pseudocode for multibyte addition(계속)
- 이를 위한 pseudocode를 다음에 보인다.
-
AAS (ASCII Adjust after Subtraction) Instruction
- AAS follows a SUB or SBB instruction that has subtracted one unpacked decimal value from another and stored the result in AL.
- It makes the result in AL consistent with ASCII digit representation.
- Adjustment is necessary only when the subtraction generates a negative result.
- Example:

이건 뺄샘할때 사용한다. '8','9'를 빼준다음에 aas를 해주면 CF = 1인 FF09h가 된다. 그래서 AH 는 FF라는 것은 -1로 borrow를 하나 가지고 왔다는 것을 의미하게 된다.
-
AAM (ASCII Adjust after Multiplication) Instruction
- AAM adjusts the binary result of a MUL instruction.
- The multiplication must have been performed on unpacked BCD numbers.
- Example

곱했을때 결과가 저장된다.
-
AAD (ASCII Adjust before Division) Instruction
- AAD adjusts the unpacked BCD dividend in AX before a division operation.
- Example

이건 반대로 결과를 바꾸어 주는게 아닌 나누어 주기전에 값을 바꾸어주는 것이다.
이 아래부터는 DAA와 관련된 설명인데 교수님도 크게 설명안하고 넘어가셨다.
Instructions for Packed Decimal Arithmetic
DAA (Decimal Adjust After Addition) Instruction
DAA converts the binary result(in AL) of an ADD or ADC operation to packed decimal.
If the lower digit is adjusted, the Auxiliary Carry flag is set.
If the upper digit is adjusted, the Carry flag is set.
Example
CSE3030 어셈블리 프로그래밍 14
mov al,35h ; calculate BCD 35 + 48
add al,48h ; AL = 35h + 48h = 7Dh 8310 by DAA
daa ; AL = 83h, CF = 0
mov al,35h ; calculate BCD 35 + 65
add al,65h ; AL = 35h + 65h = 9Ah 10010 by DAA
daa ; AL = 00h, CF = 1
mov al,69h ; calculate BCD 69 + 29
add al,29h ; AL = 69h + 29h = 92h 9810 by DAA
daa ; AL = 98h, CF = 0DAA Logic
일단 8 bit ADD 또는 ADC를 실행한 후 DAA 실행.
ADD/ADC 실행 후 AF와 CF가 영향을 받는다.
Lower 4 bit와 이전 carry를 더하여 얻을 수 있는 값(1)
.
+6을 더할 때 CF = 1이면 이를 higher 4 bit 처리에 반영.
Higher 4 bit의 덧셈 결과 조정은 위 표에서 AF를 CF로 교
체하고, bias를 60h로 대체한 것과 동일.
CSE3030 어셈블리 프로그래밍 15
AL[3:0] AF bias AL[7:0]+bias AF AL[3:0]
0,1,...,9 0,1,...,9 0~9
A(10),B(11)
C(12),D(13)
E(14),F(15)
+6
10h(16),11h(17)
12h(18),13h(19)
14h(20),15h(21)
1(2)
0,1
2,3
4,5
0(16),1(17)
2(18),3(19)
1 +6 6(16),7(17)
8(18),9(19) 1
6,7
8,9
(1) [0~9] + [0~9] + CF = 0~19 Newly generated AFDAA의 동작을 pseudocode로 보이면 다음과 같다.
CSE3030 어셈블리 프로그래밍 16
AL[3:0] AF bias AL[7:0]+bias AF AL[3:0]
0,1,...,9 0,1,...,9 0~9
A(10),B(11)
C(12),D(13)
E(14),F(15)
+6
10h(16),11h(17)
12h(18),13h(19)
14h(20),15h(21)
1
0,1
2,3
4,5
0(16),1(17)
2(18),3(19)
1 +6 6(16),7(17)
8(18),9(19) 1
6,7
8,9
if (AL(lo) > 9) or (AuxCarry = 1)
AL = AL + 6;
AuxCarry = 1;
else
AuxCarry = 0;
endif
if (AL(hi) > 9) or (Carry = 1)
AL = AL + 60h;
Carry = 1;
else
Carry = 0;
endif
If AL = AL + 6 sets CF, its value is
used when evaluating AL(hi).
(Example: 78h+85h=FDh)DAA Examples : sum = P1 + P2
CSE3030 어셈블리 프로그래밍 17
mov sum,0 ; init sum & index
mov esi,0
mov al,BYTE PTR P1[esi]
add al,BYTE PTR P2[esi] ; add lower
daa
mov BYTE PTR sum[esi],al
inc esi
mov al,BYTE PTR P1[esi]
adc al,BYTE PTR P2[esi] ; add higher
daa
mov BYTE PTR sum[esi],al
inc esi
mov al,0
adc al,0 ; add final carry
mov BYTE PTR sum[esi],al
mov eax,sum
call WriteHex
P1 WORD 4536h
P2 WORD 7207h
sum DWORD ?DAS (Decimal Adjust after Subtraction) Instruction
DAS converts the binary result (in AL) of a SUB or SBB
operation to packed decimal.
Example:
DAS Pseudocode
CSE3030 어셈블리 프로그래밍 18
mov al,85h ; BCD 8510 – 4810 = 3710
sub al,48h ; AL = 3Dh
das ; AL = 37h CF = 0
if (AL(lo) > 9) or (AuxCarry = 1)
AL = AL − 6;
AuxCarry = 1;
else
AuxCarry = 0;
endif
if (AL > 9Fh) or (Carry = 1) ; 2nd if statement
AL = AL − 60h;
Carry = 1;
else
Carry = 0;
endif
If AL = AL - 6 sets CF, its value is
used when evaluating AL in the
2
nd if statement.mov al,48h ; subtract BCD 48 – 35
sub al,35h ; AL = 13h
das ; AL = 13h CF = 0
mov al,62h ; subtract BCD 62 – 35
sub al,35h ; AL = 2Dh, CF = 0
das ; AL = 27h, CF = 0
mov al,32h ; subtract BCD 32 – 29
add al,29h ; AL = 09h, CF = 0
das ; AL = 03h, CF = 0
mov al,32h ; subtract BCD 32 – 39
sub al,39h ; AL = F9h, CF = 1
das ; AL = 93h, CF = 1
DAS Examples
CSE3030 어셈블리 프로그래밍 19
Steps: AL = F9h
CF = 1, so subtract 6 from F9h
AL = F3h
F3h > 9Fh, so subtract 60h from F3h
AL = 93h, CF =
2. Advanced Procedures
Stack Frame
- Also known as an activation record
- Area of the stack set aside for a procedure's return address, passed parameters, saved registers, and local variables.
- Created by the following steps:
- Calling program pushes arguments on the stack and calls the procedure.
- The called procedure pushes EBP on the stack, and sets EBP to ESP. : EBP를 ESP로 셋팅해주어야 한다.
- If local variables are needed, a constant is subtracted from ESP to make room on the stack.
함수 호출시 Stack을 어떻게 다루는 stack 구조를 stack frame이라고 부른다.
return address, passed parameters, saved registers, localvariable을 어떻게 구성하는게 좋을까를 고민한다. 그것을 보고 stack frame이라고 부른다. stack frame을 사용하다보면 이런것들을 어떻게 해야한다는 것이 있다.
보통 호출하는 함수가 보통 argument들을 push한다. 그리고 호출을 당하면 EBP를 push한다. EBP를 ESP로 setting한다.
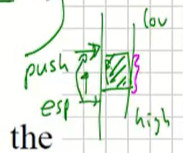
local 변수가 필요하면 ESP에서 얼마를 빼준다. 이 Stack이라는 것이 push 하면 esp값이 작아진다. 그런데 local 변수를 사용한다면 stack frame을 사용할경우 스택의 일부분을 사용하고 esp를 아래로 옮기어 local 변수를 사용할 수 있게 한다.
Stack Parameters
-
Register vs. Stack Parameters
Examples : parameter passing for the DumpMem procedure.

-
Register parameters require dedicating a register to each
parameter. -
Stack parameters are more convenient to invoke a procedure.
stack parameter을 사용한다는 이야기는 기존에 레지스터에 할당했던 것을 parameter을 stack을 사용하여 값을 push한다. 그리고 call DumpMem하면 stack parameter이 된다.
stack parameter은 보통 이건 C 프로그래밍을 할때 사용하게 된다.
- Passing Arguments by Value
Push argument values on the stack (32 bit values to keep the
stack aligned).
Call the called-procedure
Accept a return value in EAX, if any
Remove arguments from the stack if the called-procedure did not remove them.
Example
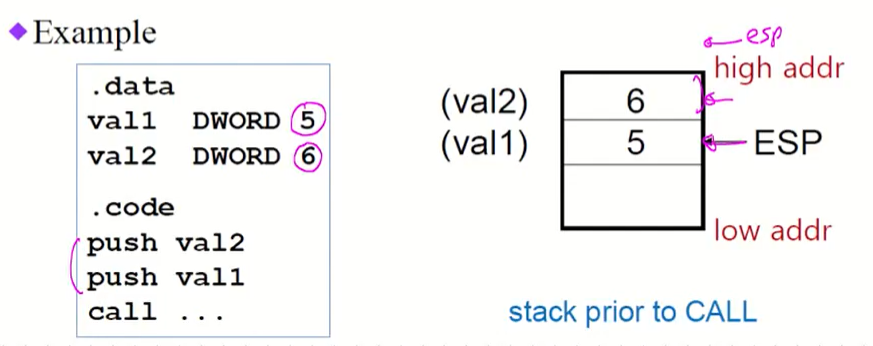
parameter을 passing할때 위의 예제외 같이 작동한다. 그런데 나중에 ESP가 원래 위치로 가야하는데(5,6은 누가 지우나) 이건 OS가 해준다.
- Passing Arguments by Reference
Push the offsets of arguments on the stack
Call the procedure
Accept a return value in EAX, if any
Remove arguments from the stack if the called procedure did not remove them.
Example
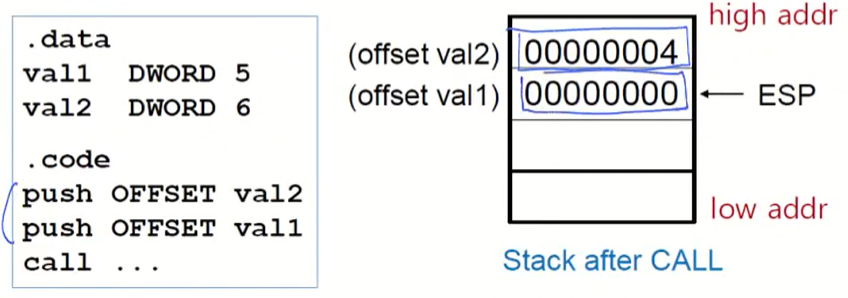
reference는 위와 같이 주게 된다.
- Stack after the CALL
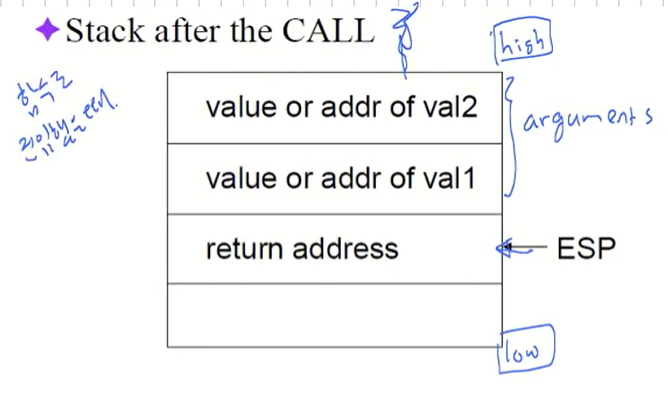
함수를 호출하면 argument들이 push가 되고 ESP에는 return address가 ESP 위치에 저장된다. 함수 내에서 esp value는 고정이 아니다.
Accessing Stack Parameters (C/C++)
C and C++ functions access stack parameters using constant offsets from EBP(1).
EBP is called the base pointer or frame pointer because it holds the base address of the stack frame.
EBP does not change value during the function.
EBP must be restored to its original value when returns.
stack parameter을 access하는데 EBP에 고정된 offset값을 집어넣어서 base pointer역활을 하게 한다. 혹은 frame pointer이라고 이야기 하기도한다.
EBP값은 함수내에서는 전혀 바뀌면 안된다. 그래서 EBP는 이 용도 아니면 가급적 사용하지 않는다.
그리고 이 함수가 다른 함수에서 호출받은 경우. EBP는 반드시 함수 초기에 저장해야 한다.
Example
함수 내에서 argument 가져오기
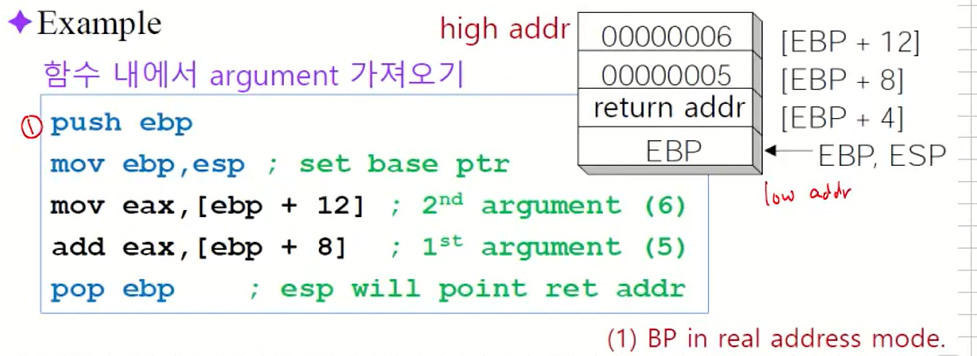
처음에는 mov ebp, esp로 같은 위치를 가리키게 한다.
ESP는 계속 이동할 거이다. EBP는 고정되어서 필요한 argument를 가져올 수 있게 한다.
끝나고 pop 해서 ebp값을 원래대로 바꾸어 주어야 한다.
RET Instruction
- Return from subroutine.
Pops stack into the instruction pointer (EIP or IP).
Control transfers to the target address. - Syntax:
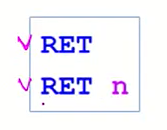
함수에서 빠져나오는 RET 함수는 두가지 종류가 있다.
- Optional operand n causes n bytes to be added to the stack pointer after EIP (or IP) is assigned a value.

RET 하면 esp가 한칸 높아진다.
그런데 return 할때 불필요 한 것들도 지워주어야 한다. 그때 ret n을 써서 지워줄 수 있다.
- Example
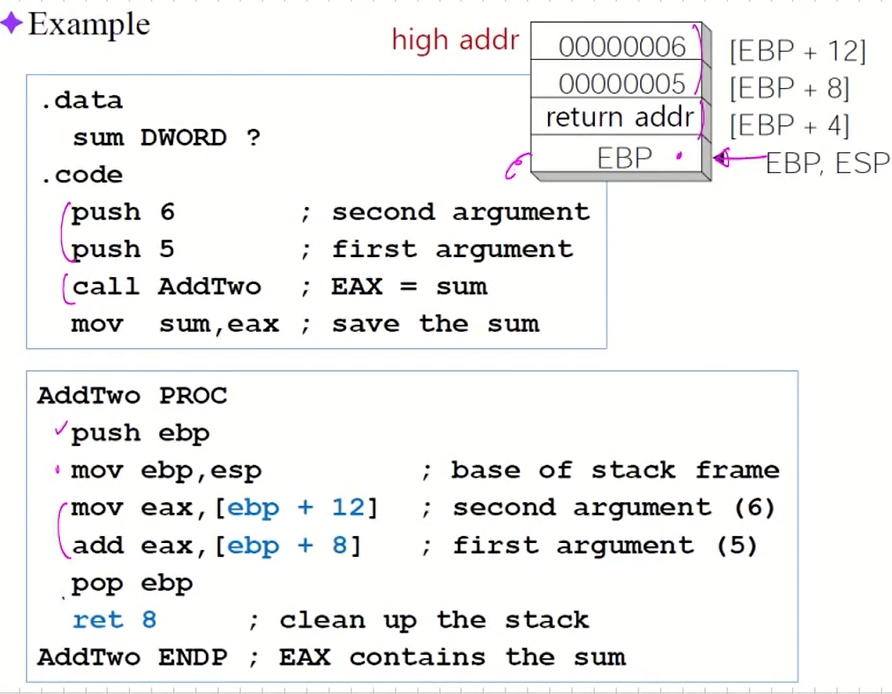
해서 위와 같이 변수를 저장하고 ebp만으로 연산을 하는 방법도 존재한다.
중간에 call AddTwo를 하는 부분이 있는데 이 부분을 위해서 다음의 과정을 거친다.
1. 현재의 Eip를 Stack에 push한다.
2. eip AddTwo의 주소를 넣는다.
그러면 Eip로 이동후 돌아올수 있다.
Who removes the parameters from the stack? (1)
- Caller removes the parameters (C language)

C언어일때는 Caller가 지운다. 호출 program에서 build시 .obj파일이 나오고 add esp, 8이라는 부분이 나온다. 이때 call AddTwo로
- Called procedure removes the parameters (STDCALL)
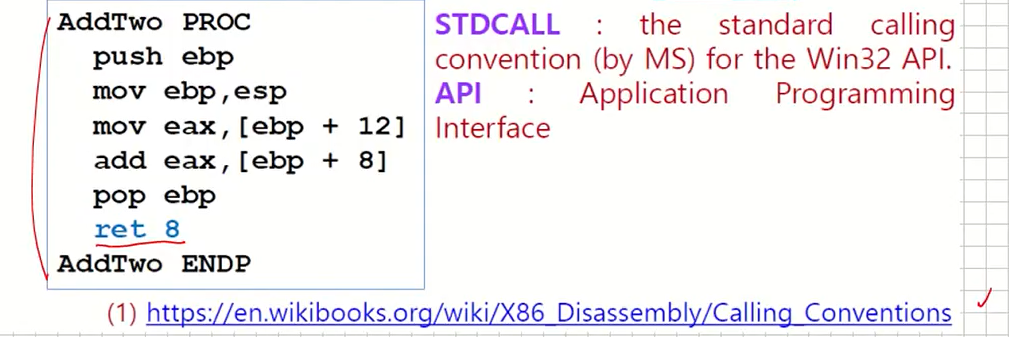
STDCALL에서는 함수내에서 stack에 넣은 변수를 지운다.
calling convention(함수 호출 규약)
Examples
- Procedure Difference
Create a procedure named Difference that subtracts the first argument from the second one.
Following is a sample call:
Procedure
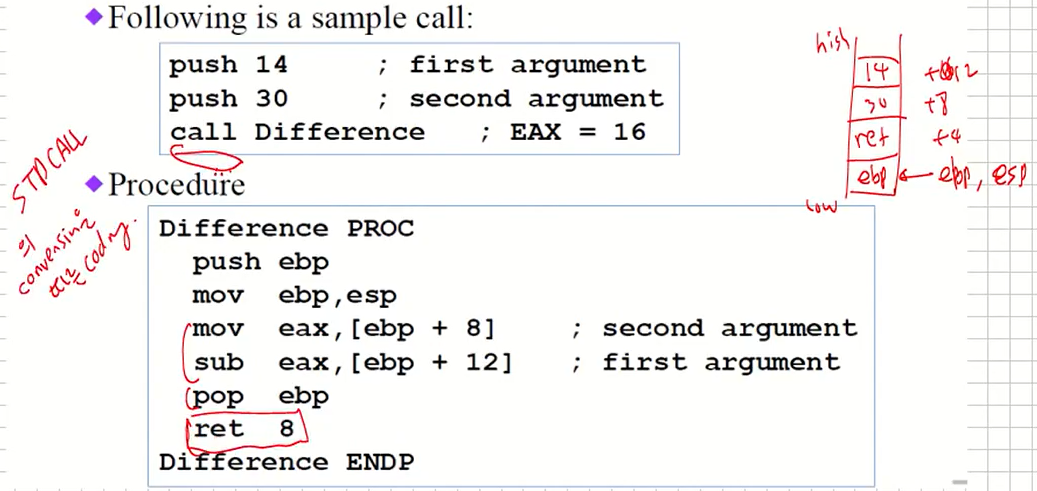
call Difference는 STDCALL의 convention을 따른 coding이라고 볼 수 있다.
- Procedure ArrayFill
ArrayFill fills an array with 16-bit random integers.
The calling program passes the address of the array, along with a count of the number of array elements:
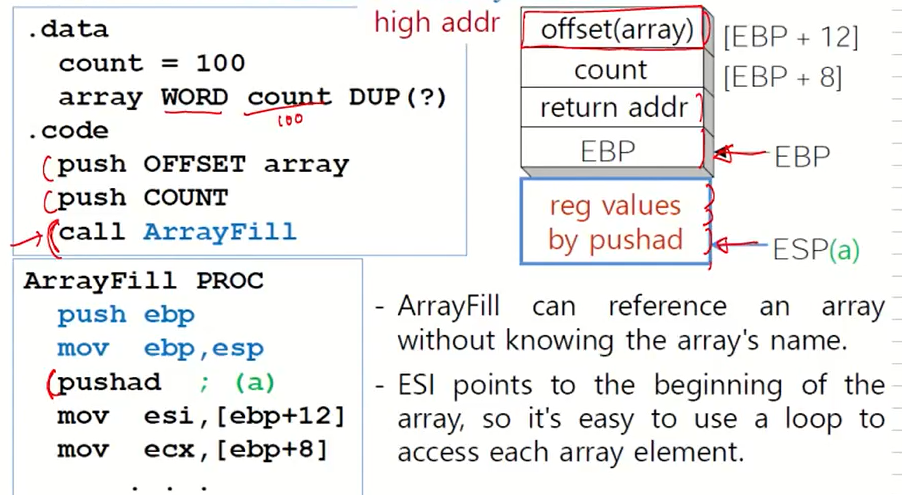
word array를 16bit random integer로 채우라는 코드이다.
이 함수를 만들려면 array offset을 push하고
count도 push한다.
그리고 ArrayFill 함수를 호출한다.
pushad를 ArrayFill에서 호출하니 EBP는 고정인데 ESP는 이후에 들어오는 값이 쭉 들어온다.
ArrayFill can reference an array without knowing the array's name.
ESI points to the beginning of the array, so it's easy to use a loop to access each array element.
- Complete Procedure Source
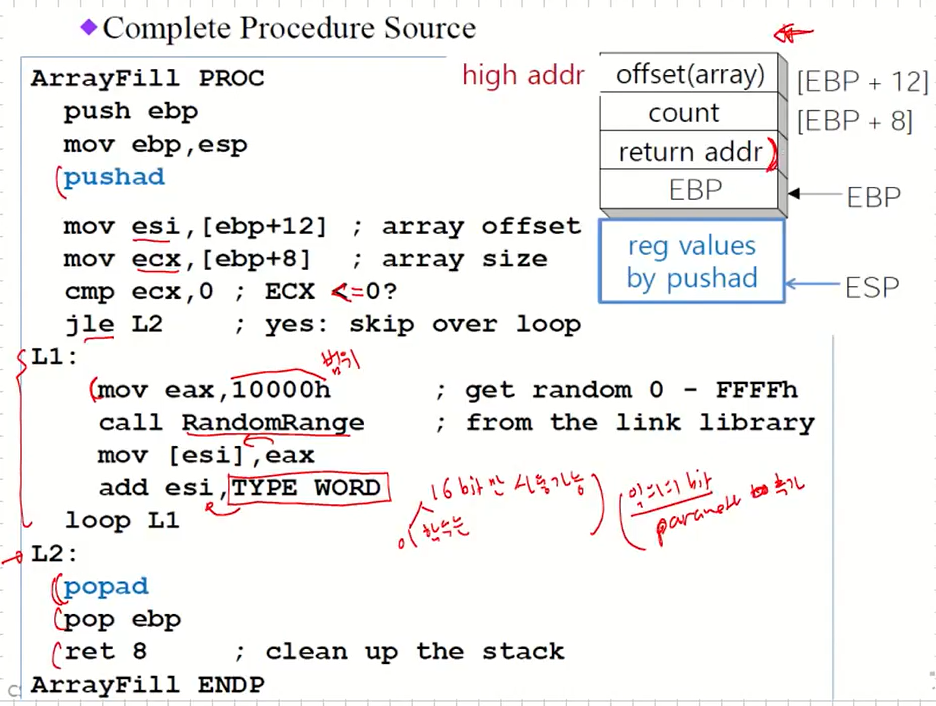
그럼 이제 loop를 돌게 된다.
중간에 나오는 RandomRange가 나온는데 랜덤범위의 값을 eax에 채워준다. 이를 위해 eax는 범위 10000h가 미리 들어가 있다.
add esi, TYPE WORD 이 함수는 16bit만 사용가능하다. 혹은 임의의 bit이 가능하도록 하고 싶다하면 parameter을 추가한다.
그 다음 popad로 스택을 지워버리면 된다.
Passing Arguments
- Passing 8-bit and 16-bit Arguments
- Cannot push 8-bit values on stack.
- Pushing 16-bit operand may cause page fault or ESP alignment problem.
- Incompatible with Windows API functions
- Expand smaller arguments into 32-bit values, using MOVZX or MOVSX.
우리가 프로그램할때는 MOVZX, MOVSX를 이용해서 32bit 연장후에 사용하자
argument로 8, 16bit가 들어오는 경우
일단 8bit은 stack에 넣을 수 없다.
그리고 16bit도 window api function과 호환안될 가능성이 높다.
그래서 가급적 32bit를 사용하자.
- Passing Multiword Arguments
Push high-order values on the stack first; work backward in memory.
Results in little-endian ordering of data
32bit를 넘는 경우에는 little-endian order을 이용해서 집어넣어야 한다.
Example:
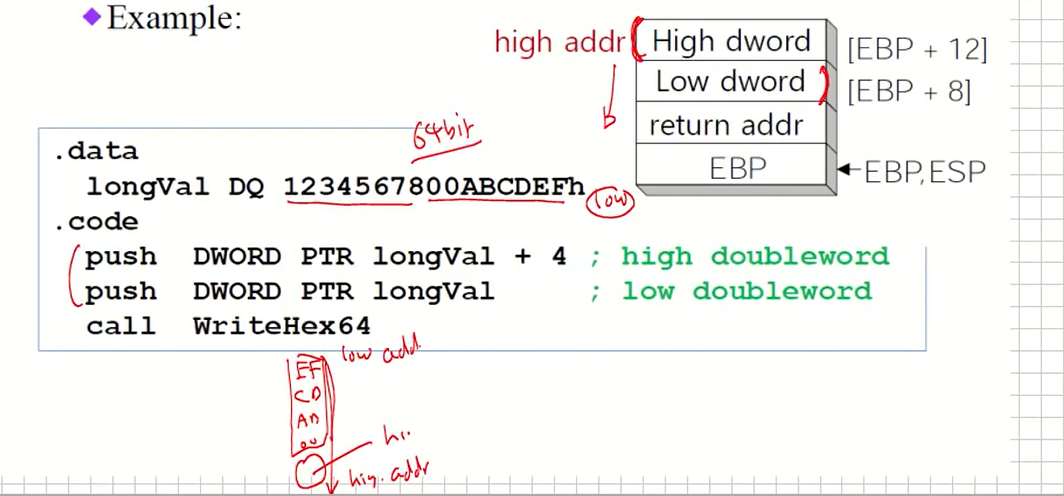
위의 예시에서 나오는 DQ는 8 byte word라고 한다.
그럼 little endian에 따라 코드의 high addr 부터 low까지 들어가게 된다.
Saving and Restoring Registers
- 내부에서 값을 바꾸는 register들은 stack에 그 내용을 사전에
저장할 필요가 있다. - Example
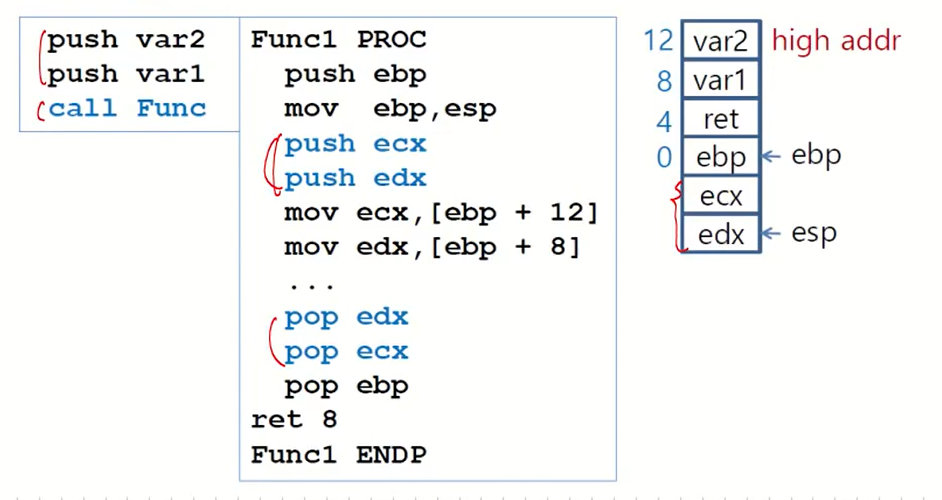
그래서 내부에서 ecx, edx값이 바뀌니 사전에 ecx, edx값을 push 해놓는다.
Creating Local Variables
-Local variables are allocated in the stack.
-Example : Create two DWORD local variables, x = 10, y = 20.
처음에는 esp가 ebp 위치에 있는데 sub esp, 8로 인하여 2개의 32bit area가 할당된다.
그다음 x,y의 offset을 미리 잡아놓는다. 그럼 각 위치를 변수처럼 사용할 수 있게 된다.
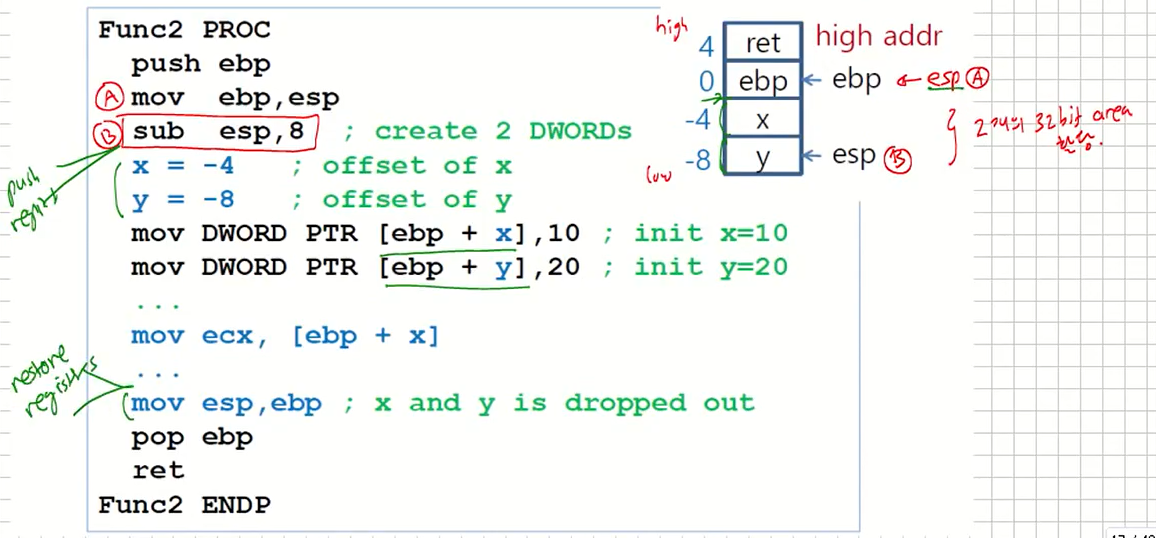
그리고 만약 register push가 필요한 경우라면 sub esp, 8 바로 다음에 push register한다.
그래서 모든 argument들, local 변수들을 stack에 저장/할당
A Comprehensive Example
- Function using 2 parameters, 2 local variables, and save & restore ebx, ecx.
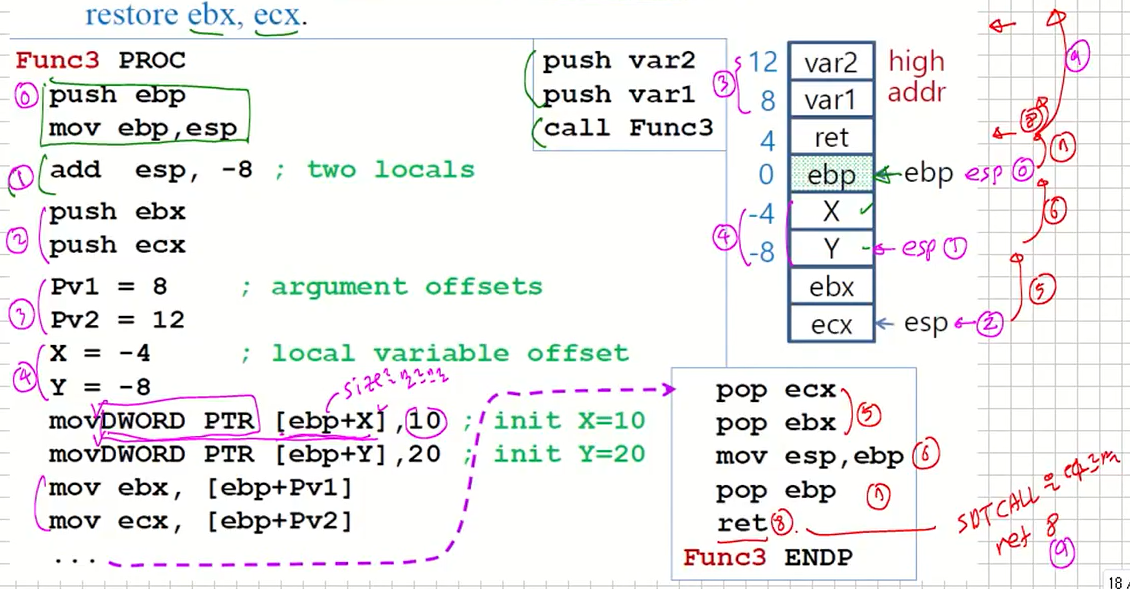
2 para, 2 local, ebx/ecx를 저장해야 하겠다 하는 경우.
그럼 push ebp, mov ebp,esp는 고정이고
add esp, -8로 메모리의 Y 위치로 esp가 이동한다.
그리고 ebx, ecx를 미리 메모리에 넣어놓고
pv1, pv2로 갈 수 있게 인덱스를 지정해 놓는다.
그러면 mov DWORD PTR [ebp + X], 10이 나오는데 [ebp + X] 부분과 10인 부분의 크기를 모르기 때문에 이렇게 PTR을 해주어야 한다.
그 다음 pop하고 esp값 바꾸고 pop ebp해서 stack pointer의 위치를 다시 바꾼다.
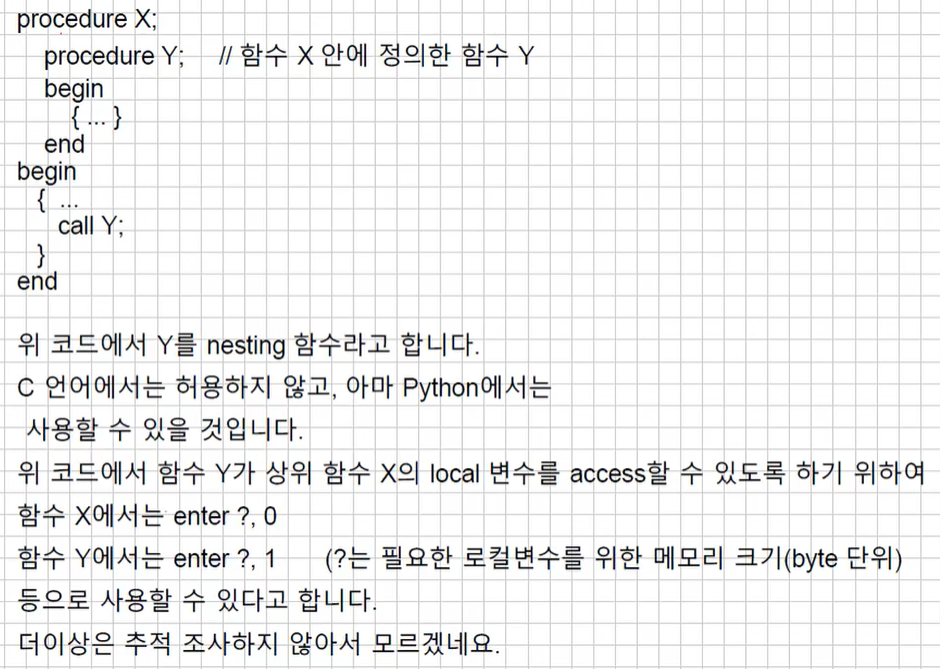
ENTER and LEAVE instructions
Stack frame을 생성, 소멸하는 instructions(함수 초반에 사용).
ENTER Instruction(1)
Syntax
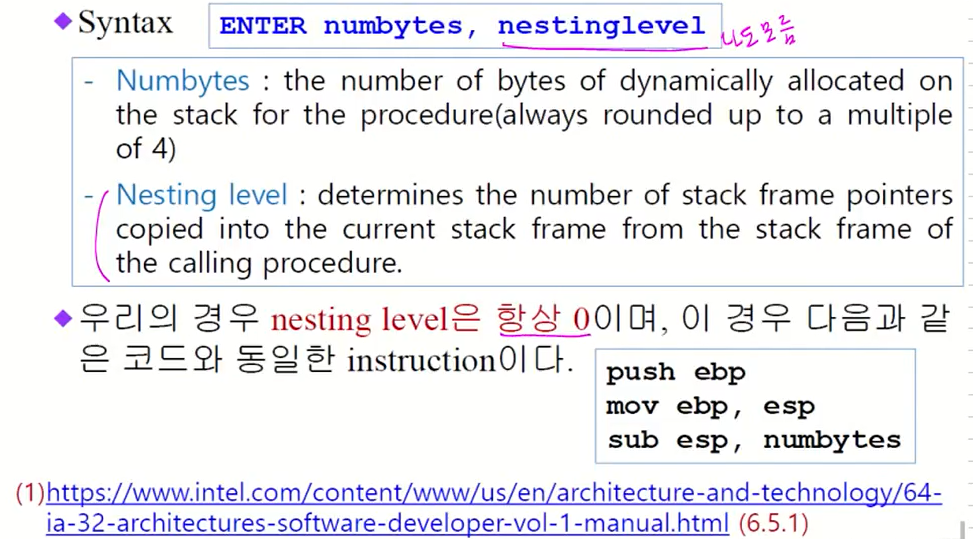
우리의 경우 nesting level은 항상 0이며, 이 경우 다음과 같
은 코드와 동일한 instruction이다.
stack frame을 생성하거나 소멸할때 쓰는 instruction
LEAVE Instruction
다음과 같은 코드와 동일하다.

이 코드와 동일하다.
LOCAL 등의 directive를 사용할 경우 이 두 instruction을 사용할 필요가 없다(자동으로 생성됨).
나중에 direcive를 LOCAL로 사용할 경우에는 Enter, Leave상관없이 자동으로 생성된다.
ENTER, LEAVE 사용 예
- 좌측 코드를 우측에 보인 것처럼 단순하게 작성할 수 있다.
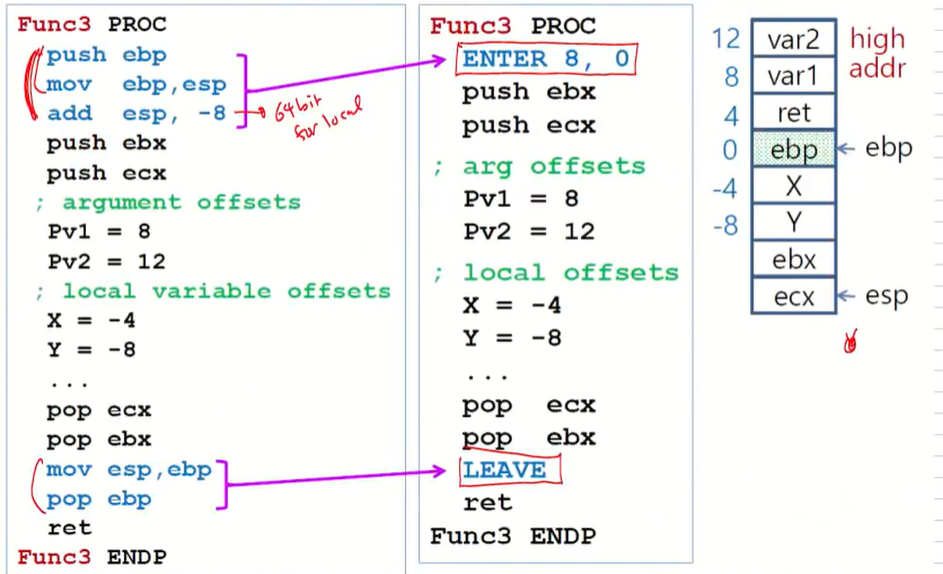
그래서 위의 코드와 같이 원래 쓰던 부분을 ENTER, LEAVE만으로 처리할 수 있게 할 수 있다는 것이다.
LOCAL Directive(중요)
- The LOCAL directive declares a list of local variables immediately follows the PROC directive.
- Each variable is assigned a type
- Syntax:

LOCAL 변수를 자동으로 잡아준다.
- Example:
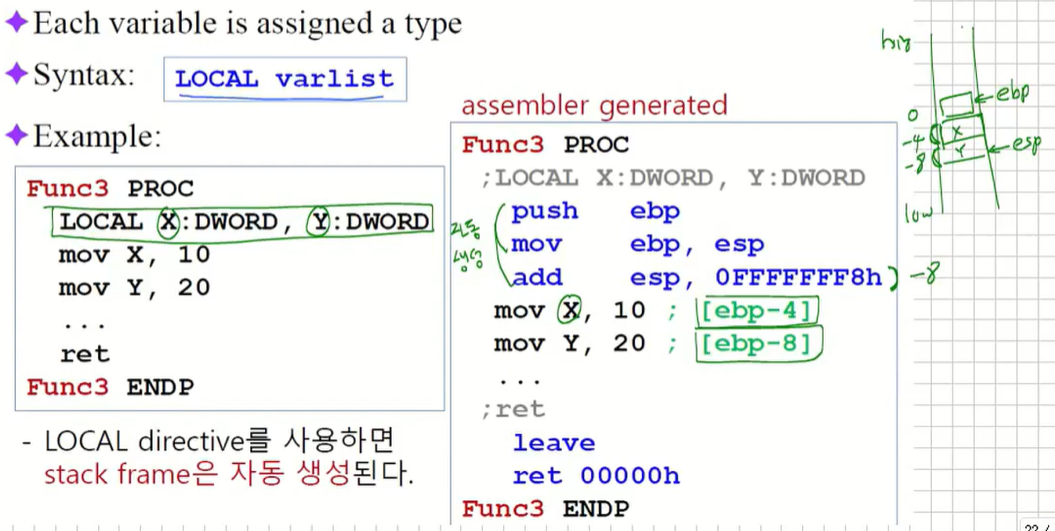
위의 예와 같이 X, Y를 지역변수로 만들 수 있다. 이때 X는 ebp-4를 Y는 ebp-8을 의미하게 된다.
이런식으로 stack frame이 자동으로 생성되기 때문에 enter, leave가 불필요해진다.
- LOCAL directive를 사용하면
USES Operator(중요)
- 필요한 register들을 stack에 저장하는 코드를 생성한다.
- 사용 예:
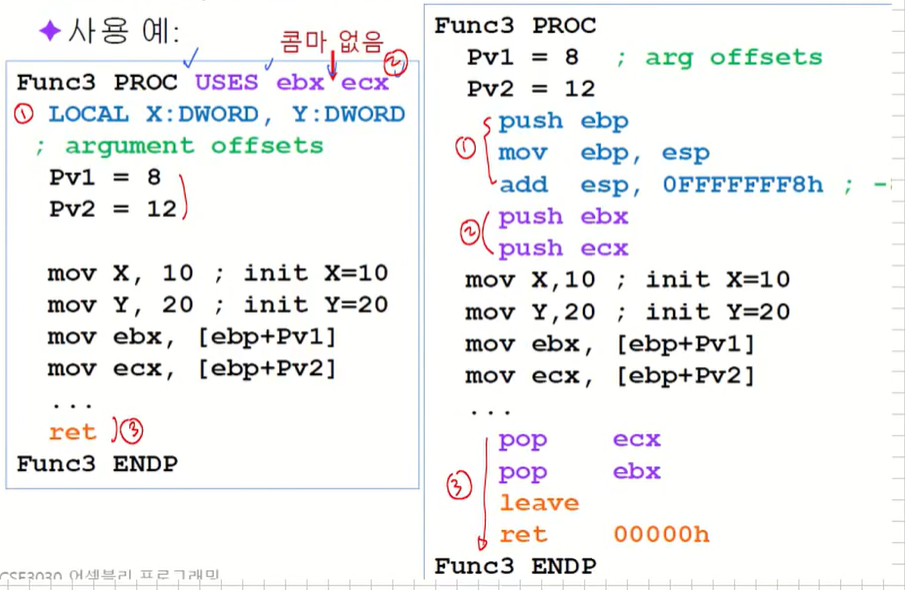
위와 같이 콤마 없이 사용하는 것이다. 그럼 1번에 의해서 push, mov, add로 이어지는 3가지가 생긴다. 그리고 USES에 있는 게 자동으로 stack에 드어간다. 그리고 ret도 자동으로 만들어진다.
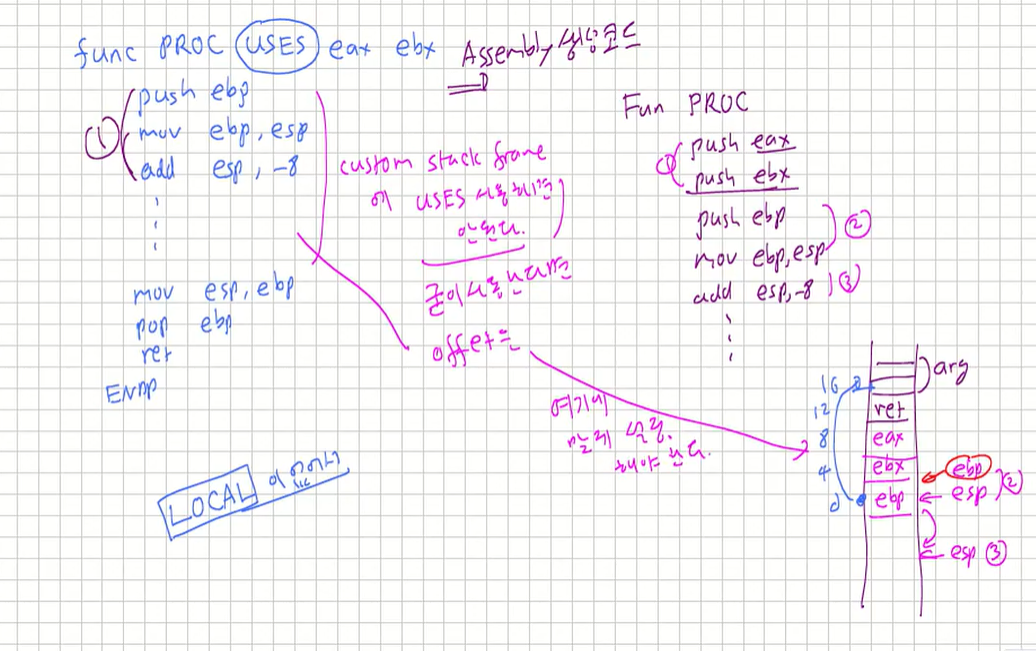
custome stack frame에 uses 사용하면 안된다. 굳이 사용한다면 offset을 스택에 맞게 설정해야 한다.
Non-Doubleword Local Variables
- Local variables can be different sizes
- How created in the stack by LOCAL directive:
- 8-bit: assigned to next available byte
- 16-bit: assigned to next even (word) boundary
- 32-bit: assigned to next doubleword boundary
- Example
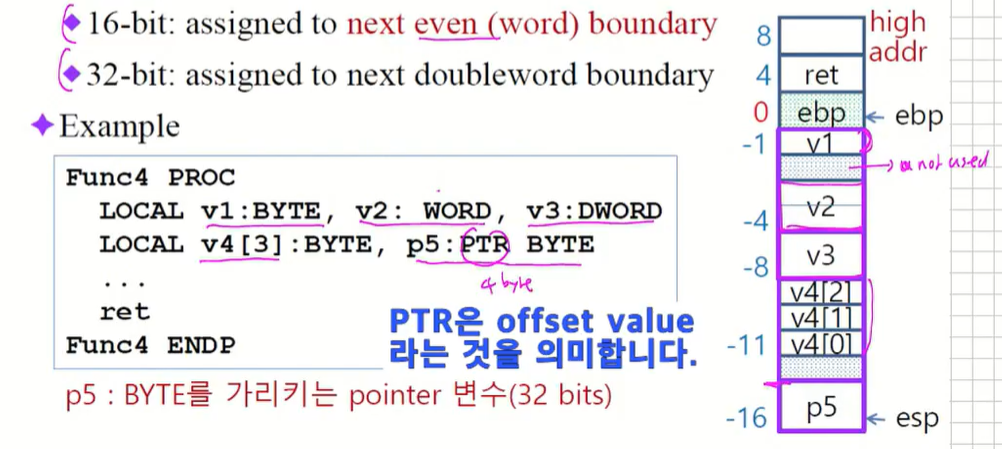
8, 16, 32bit를 local 변수로 사용하겠다는 것을 살피어 보면 8bit인 경우에는 다음에 가능한 byte에 할당해준다. 16bit는 offset이 짝수인곳에 할당해준다. 32bit는 4의 배수인곳에 할당해준다.
Example
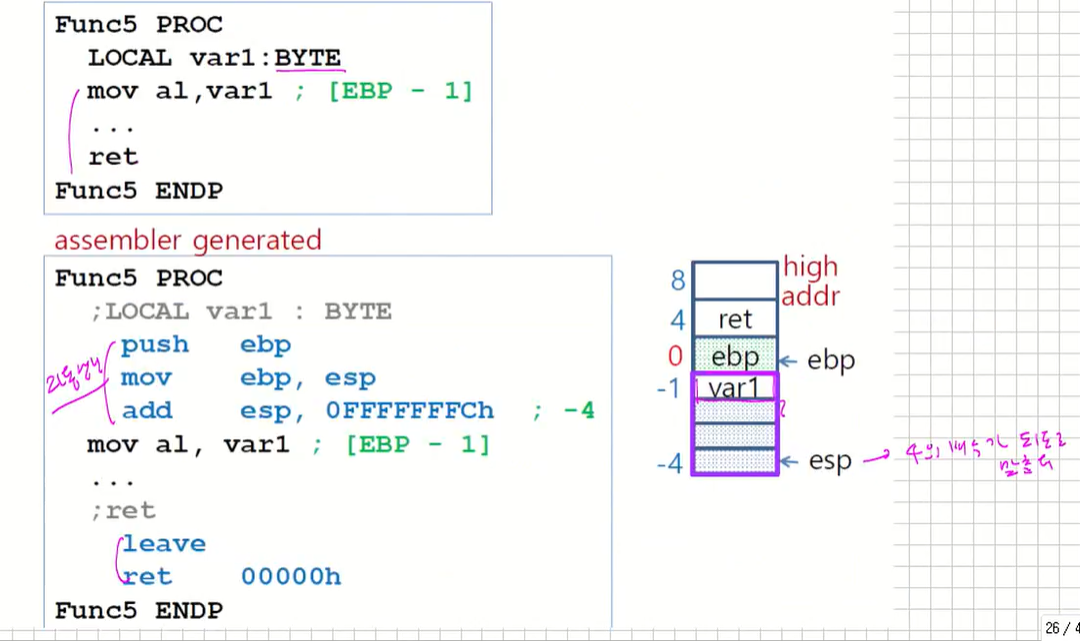
esp가 4의 배수가 되도록 맞춘다.
2. INVOKE, ADDR, PROC, and PROTO(1)
INVOKE Directive
-
지금까지 알고 있는 방법으로는 함수를 호출할 때 arguments를 먼저 stack에 push한 후 호출하여야 하므로, 프로그래밍이 다소 번거롭다.
-
INVOKE는 call instruction과는 달리 argument passing과 함께 함수를 호출하는 강력한 directive이다.
-
INVOKE를 사용하여 함수를 호출할 경우, procedure 작성에 사용하는 PROC directive에 parameter list를 추가하여야 하며, PROTO라는 directive도 사용해야 한다.
(1) 64 bit mode assembly에서는 사용할 수 없다. -> 32bit 모드에서만 사용한다.
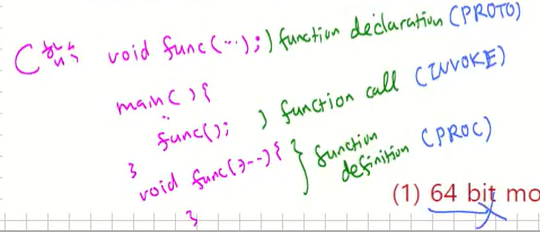
function call 대신에 INVOKE 사용, function declaration 대신에 PROTO 사용, function definition 대신에 PROC 사용한다.
INVOKE argument 하면 argument를 자동 push해준다.
-
INVOKE Syntax

- ArgumentList is an optional comma-delimited list of procedure arguments.
- Arguments can be:
immediate values and integer expressions
variable names
address and ADDR expressions
register names
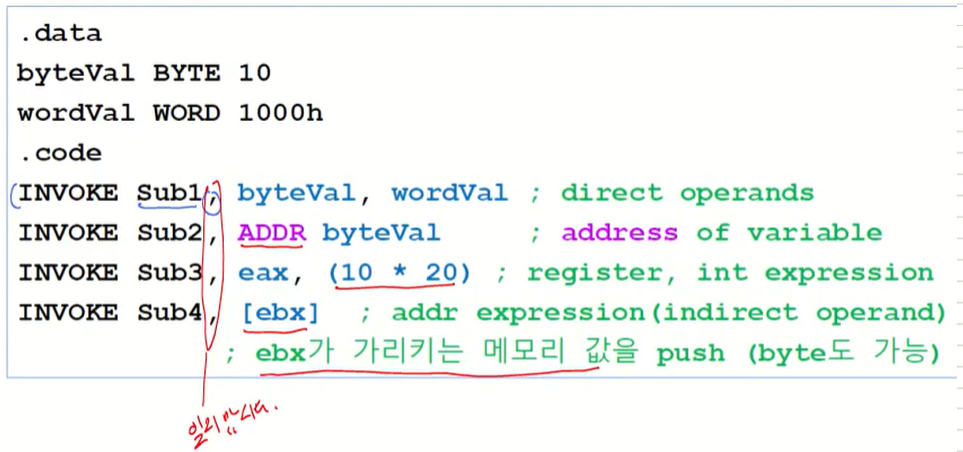
성분으로 상수, 변수, OFFSET 대신에 ADDR 사용, 레지스터도 가능 - ADDR Operator :
returns 32-bit offset in flat memory model.
-
Example
PROC Directive
- Declares a procedure with an optional list of named parameters.
- Syntax:

- paramList is a list of parameters separated by commas.
- Syntax:

파라미터는 위와 같이:로 타입을 반드시 적어주고,로 구분한다. - type must either be one of the standard ASM types (BYTE, SBYTE, WORD, etc.), or it can be a pointer to one of these types.
- Syntax:
Example : AddTwo Procedure
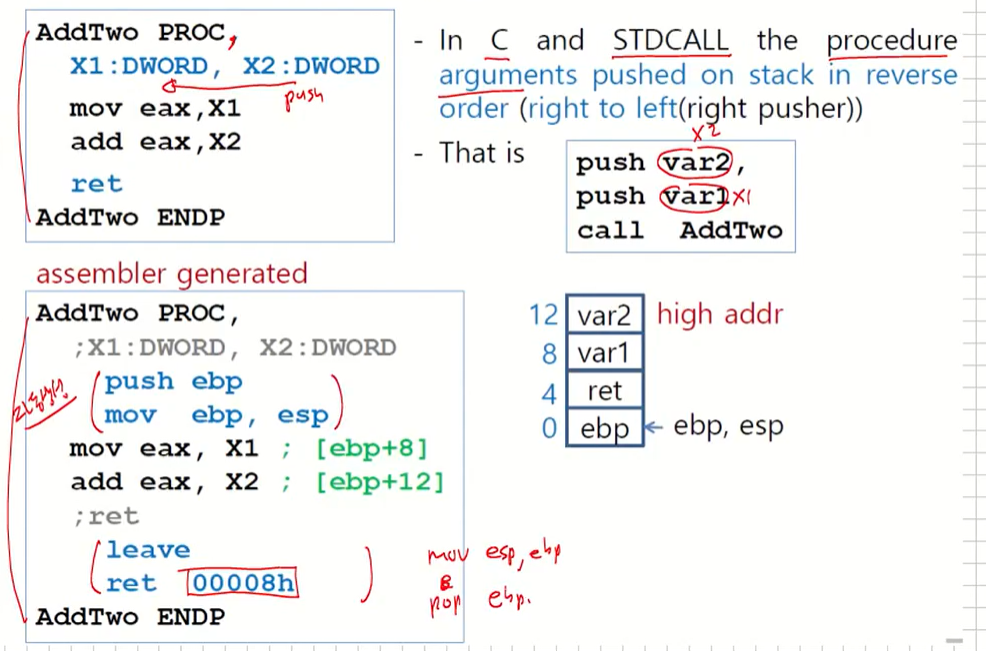
실재로 이것을 구현하면 위와 같이 생긴다. 파라미터를 ,로 해서 받기는 했는데 이어서 할거면 안해도 된다.
암튼 저렇게 하면 자동으로 어셈블리가 push, mov, leave, ret을 해준다.
C와 STDCALL에서는 절차를 right to left 방향으로 push한다.
Assembler generated code를 보고싶으면 속성-> MicroAssembler->Listing File->Enable Assembler Generated List.
- Example: Fill Array
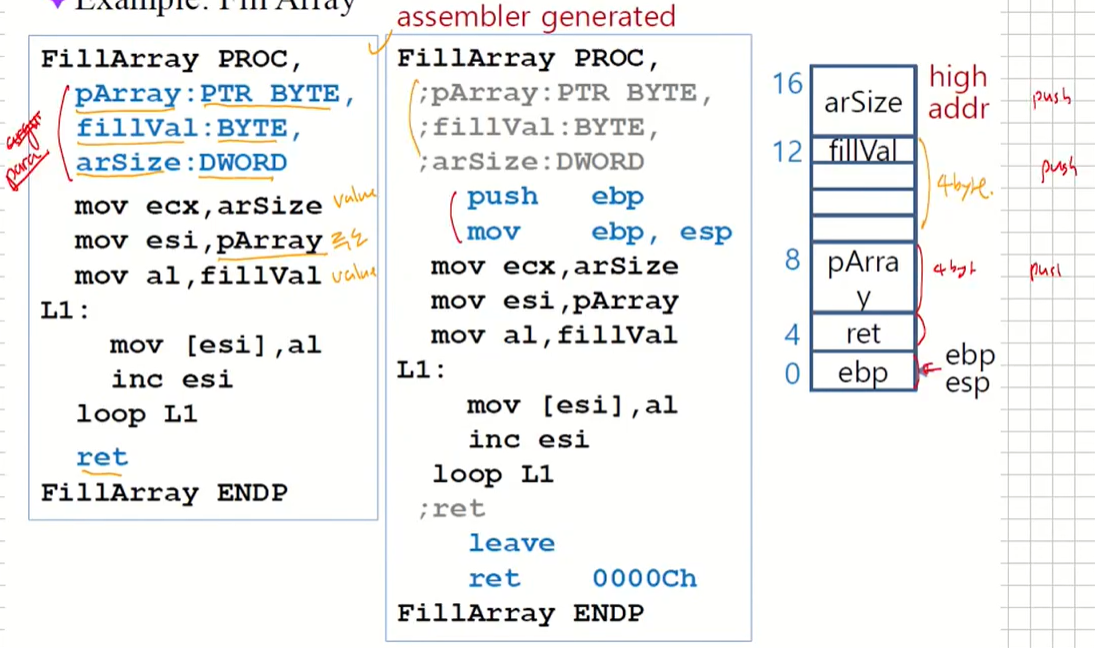
pArray는 BYTE 포인터임을 알려준다.
PROTO Directive (1)
- Creates a procedure prototype.
- Syntax:

- Every procedure called by the INVOKE directive must have a prototype
- PROC 정의에서 PROC를 PROTO로 바꾸면 된다.
- PROTO, INVOKE, PROC의 위치
- PROTO : 프로그램 맨 위에.
- INVOKE는 calling 함수 내에, PROC는 이후에 위치.

PROTO에서 USES는 쓰면 안된다.
(1) Parameter list not permitted in 64-bit mode.
Example : Integer Swapping
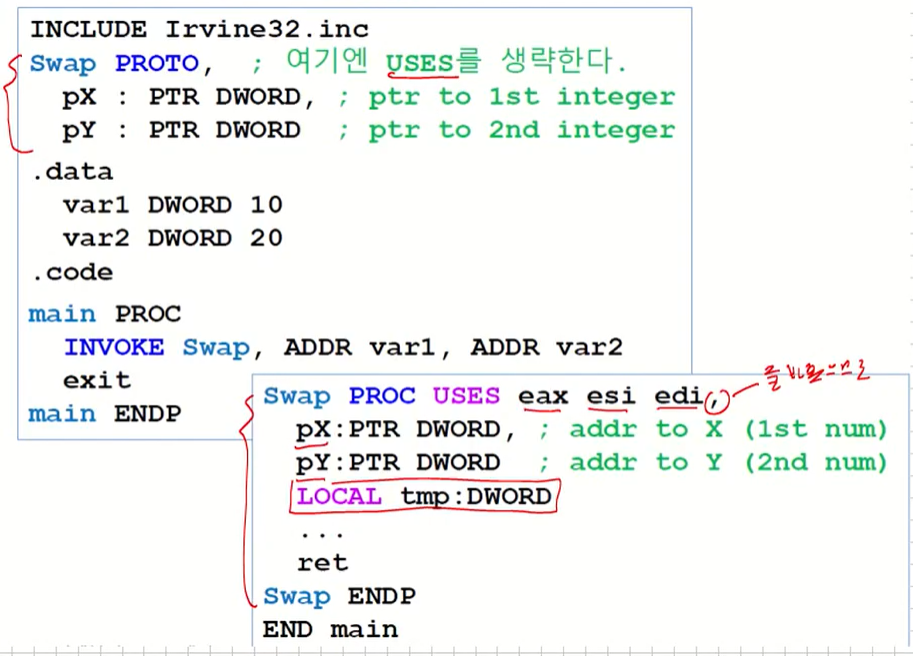
LOCAL tmp는 지역변수이다.
- Procedure Swap
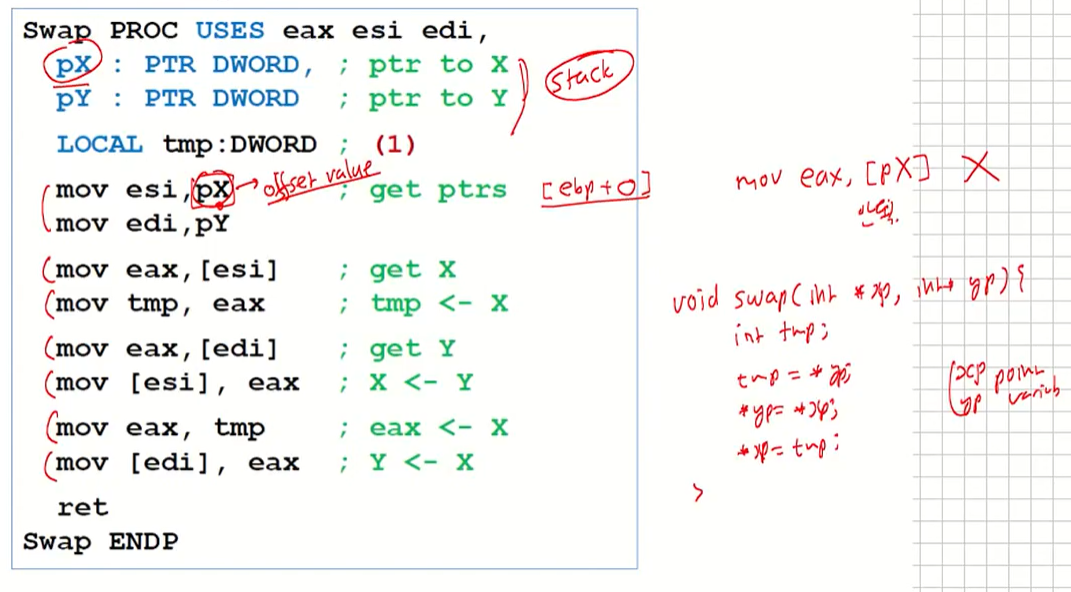
pX, pY에는 offset value를 포함하고 있다.
여기에서 하는 것은 바로 이 주소값(C언어의 포인터)를 이용해서 사용하고 있다. 어셈블리도 결국에는 call-by-value, reference 구조를 따른다고 생각할 수 있다.
(1) tmp 대신 push, pop instruction을 사용해도 된다.
Assembler Generated (~.lst 파일)
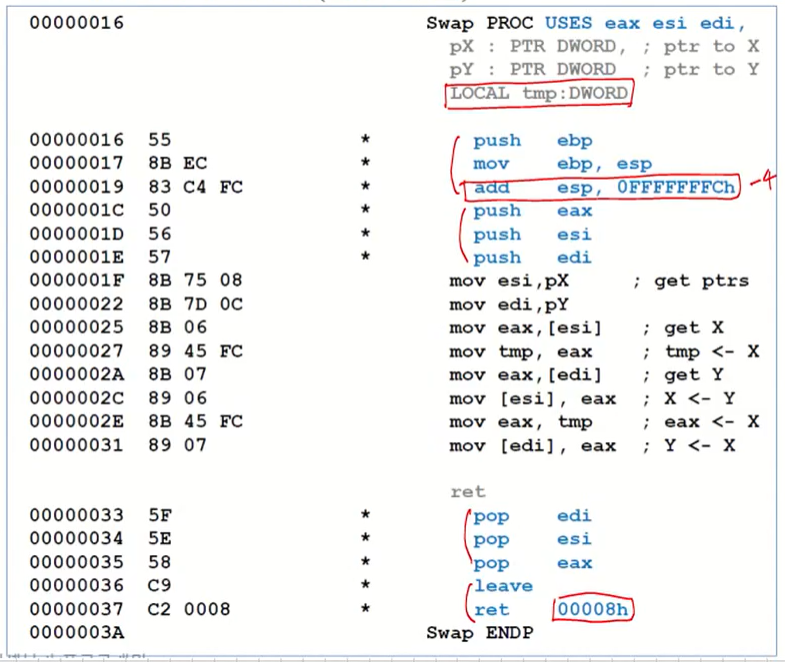
lst 파일을 까보면 실재로 저런형태로 되어 있다.
-
Assembler Generated (enlarged)
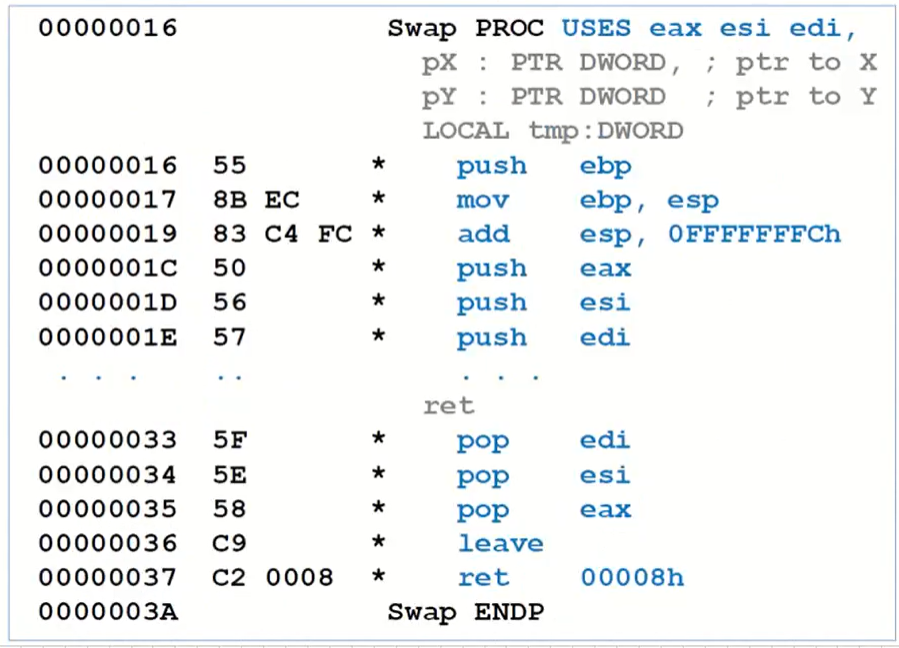
-
INVOKE Swap (assembler generated)

LEA (Load Effective Address) Instruction
- LEA returns offsets of both direct and indirect operands.
- OFFSET operator can only return constant offsets.
- LEA is required when obtaining the offset of a stack parameter or local variable.
- Example
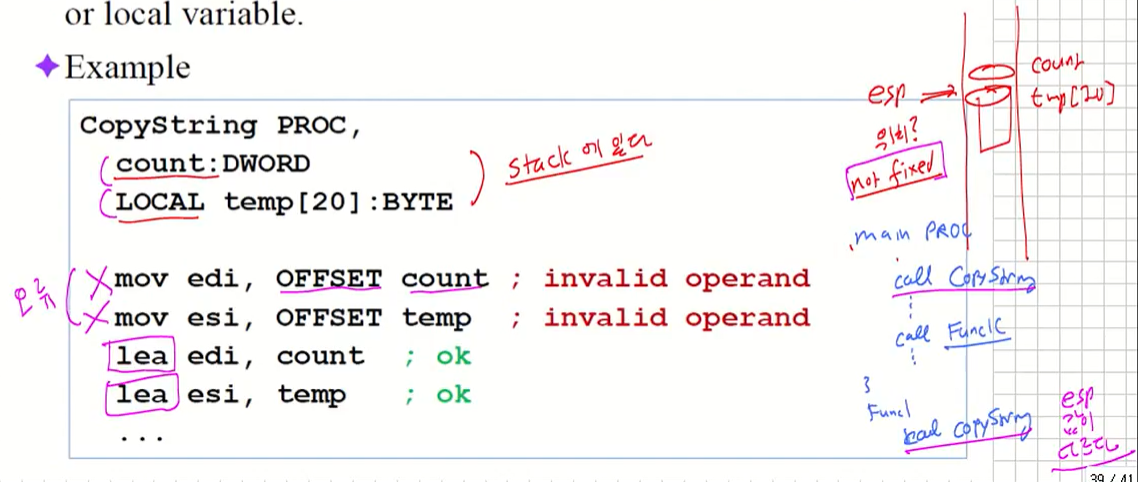
위 이미지의 count와 temp는 위치가 어떻게 될까? 이것은 고정되어 있지 않다. stack에 있는 변수의 offset을 가지고 오겠다고 하면 오류가 생긴다. 그래서 이를 해결하기 위해 lea라는 명령어가 존재한다.
stack에 있는 값의 주소를 가져오고 싶을때 사용한다.
LEA Example
- Suppose you have a Local variable at [ebp-8]
- And you need the address of that local variable in ESI
- You cannot use this:

- Use this instead:

