class Object: method equals
class object는 구지 extend하지 않아도 상속되어지는 클래스를 말한다고 하였다. 저번에는 toString을 배웠으니 이번에는 equals라는 함수에 대해서 알아보자
Employee empl1 = new Employee("John", 50000);
Employee empl2 = new Employee("John", 50000);
System.out.println(empl1.equals(empl2));
위와 같이 작성이 되어 있을 때 equals 라는 함수를 사용하면 두개의 클래스가 같은 객체인지(같은 메모리에 저장된 객체인지) 혹은 둘 중 하나가 null인지를 확인한다. 그렇기 때문에 위의 객체들은 인자가 같을지라도 객체가 다르기 때문에 false를 반환한다.
하지만 equals도 class object의 method 답게 오버라이딩이 가능한데 그 대표적인 예가 String 이다.
String s1 = new String("hello");
String s2 = new String("hello");
System.out.println(s1.equals(s2));
그래서 스트링 객체는 두 객체의 문자열을 비교하여서 true, false를 반환하게 된다. 그래서 위의 결과물은 false이다.
그럼 한 번 직접 우리가 만든 클래스에서 equals를 오버라이딩 한 것을 보도록 하자
class Employee {
	private String name;
	protected int salary;
	public Employee(String name, int salary) { this.name = name; this.salary = salary; }
	public String toString() { return getClass().getName() + "[name=" + name + ",salary=" + salary + "]"; }

	public boolean equals(Object otherObject) {
		if(this == otherObject) return true;
		if(otherObject == null) return false;
		if(getClass() != otherObject.getClass()) return false;
		Employee other = (Employee)otherObject;
		return (this.name == other.name && this.salary == other.salary);
}
	public String getName() { return this.name; }
	public int getSalary() { return this.salary; }
}
중간에 사용된 getClass() 함수는 동일하게 class Object의 함수이며 객체의 클래스 명을 반환해주는 역활을 수행한다.
이제 우리가 어떤 equals 함수를 재정의하든 다음 4가지의 과정으로 정의하면 된다.
1. 같은 객체인지 확인
2. 비교되는 객체가 null인지 확인
3. 들어오는 함수가 Object 타입이기 때문에 같은 클래스에 속해 있는지 확인
4. Object 클래스의 객체이기 때문에 우선 type casting해 주어서 사용한다.
Employee empl1 = new Employee("John", 50000);
Employee empl2 = new Employee("John", 50000);
System.out.println(empl1.equals(empl2));
그럼 최종적으로 true가 반환될 것이다.
하지만 위의 클래스도 한가지 문제점이 있을 수 있는데
return (this.name == other.name && this.salary == other.salary);public static void main(String[] args) {
Employee e1 = new Employee(new String("John"),50000);
Employee e2 = new Employee(new String("John"),50000);
System.out.println(e1==e2);
System.out.println(e1.equals(e2));
}반환 부분에서 String 객체를 그냥 ==으로 비교하고 있다. 이렇게 쓰면 문제가 생길 수 있기 때문에 가급적 .equals까지 사용한 형태로 사용되도록 하여야 한다.
return (this.name.equals(other.name) && this.salary == other.salary);class Object: method hashCode
객체가 뭐든 간에 integer value로 나타낸 것을 이야기 한다. 그래서 만약 객체 x와 y가 존재하고 이 함수를 사용하였다면 서로 다른 hash code가 반환될 가능성이 높다.
100%가 아니다. 왜냐하면 hash code에도 한계가 있다 보니 모든 hash code를 사용하면 어쩔 수 없이 같은 hash code가 나오는 것이다.(hash collision)
Employee empl1 = new Employee("John", 50000);
Employee empl2 = new Employee("John", 50000);
System.out.println(empl1.hashCode() + " " + empl2.hashCode());
그렇다면 이걸 도대체 어디에 사용하여야 하는걸까? 이건 차후에 배우게 될 HashCode에 기반한 java 라이브러리가 존재한다. 대표적으로 HashMap같은 것이 있을 수 있다. 이런 함수를 사용하기 위해서는 객체를 hashcode로 바꾸어주는 과정이 필요하기 때문에 만들어진 것이다.
File output: FileOutputStream
이제 파일 입출력에 대해서 다루어 보도록 하겠다.
이를 위해서 java의 FileOutputStream, IOException을 사용한다.
import java.io.FileOutputStream;
import java.io.IOException;
public class Lecture {
	//메인에는 throws를 받아야 한다.
	public static void main(String[] args) throws IOException {
    // 1. 파일을 연다
	FileOutputStream output = new FileOutputStream("src/out.txt");
	String str = "hello world";
    // 2. 저장한 문자열을 Byte Array로 변환한다.
	byte[] bytes = str.getBytes();
    // 3. output stream으로 bytes를 내보낸다.
	output.write(bytes);
    // 4. 마지막으로 스트림을 닫아주어야 한다.
	output.close();
	}
}
이때 출력 위치가 src/out.txt로 정의되어 있지만 정확하게는 워크 스페이스 디렉토리/src/out.txt 이다.
그렇다면 이것 과연 무엇일까?
- IOException와 throws IOException
우리가 만약 throws IOException 안한다면 에러가 발생하는데 이것은 output.write(bytes)에서 Exception이 발생하였을 때 이를 handling 하기 위한 행동 routine을 만들어 주어야 하는데 구지 다루지 않기 위해서는 throws IOException을 일부로 붙여 주어야 한다.
경로의 경우도 보통 두가지가 존재하는데
- Absolute path example: "c:/out.txt" 와 같이 작성하면 절대 경로로 반드시 이 경로에 작성이 된다.
- new FileOutputStream("src/out.txt"); 이 부분은 경로를 상대경로(Relative path)로 구현한 것이다. 현재 위치를 기준으로 경로를 찾아 파일을 만들기 때문이다.
파일 스트림은 반드시 사용 종료후 닫아주어야 한다.
- output.close(); 이 부분을 닫지 않으면 다른 코드에서 해당 파일을 사용못할 수 있기 때문이다.
File output: FileWriter
이제 File output 라이브러리 중에서는 FileWriter가 존재한다. 이것은 사용법은 동일한데 기존에 String을 bytes로 바꾸어야 했던것을 바로 write함수를 이용해서 출력할 수 있다는 장점이 있다.
import java.io.FileWriter;
import java.io.IOException;
public class Lecture {
	public static void main(String[] args) throws IOException {
		FileWriter fw = new FileWriter("src/out.txt");
		for(int i=0; i<10; i++) {
			String str = "This is line number " + i + "\r\n";
            //여기처럼 바로 String을 파일에 출력한다.
			fw.write(str);
		}
		fw.close();
	}
}
File output: PrintWriter
또하나의 라이브러리는 PrintWriter가 있다. 이 라이브러리는 기존에 우리가 사용하였던 print,println,printf와 같은 함수를 가지고 있기 때문에 편하게 출력을 할 수 있다는 장점이 존재한다.
import java.io.PrintWriter;
import java.io.IOException;
public class Lecture {
	public static void main(String[] args) throws IOException {
		PrintWriter pw = new PrintWriter("src/out.txt");
		for(int i=0; i<10; i++) {
			String str = "This is line number " + i + ".";
			pw.println(str);
		}
		pw.close();
	}
}
File output: appending to a file
이제 FileWriter에는 두가지 모드가 존재한다.
import java.io.FileWriter;
import java.io.IOException;
public class Lecture {
	public static void main(String[] args) throws IOException {
		FileWriter fw = new FileWriter("src/out.txt");
		for(int i=0; i<10; i++) fw.write("This is line number " + i + ".\r\n");
		fw.close();

		FileWriter fw2 = new FileWriter("src/out.txt", true);
		for(int i=10; i<20; i++) fw2.write("This is line number " + i + ".\r\n");
		fw2.close();
	}
}
FileWriter fw = new FileWriter("src/out.txt"); 기존의 방식으로 파일을 연다면 이미 존재했던 파일은 지워지고 새로운 파일이 생성되게 된다.
FileWriter fw2 = new FileWriter("src/out.txt", true);로 true 모드로 바꾸면 파일에 추가되는 형태(append)의 모드가 된다.
그런데 문제는 FileWriter 라이브러리는 output.wirte() 함수를 사용하여서 출력하여야 한다.(사실 이것도 그렇게 불편하지는 않지만...) 이걸 좀 더 편하게 사용하기 위해 PrintWriter을 사용하려면 다음과 같이 코드를 짜면 된다.
import java.io.FileWriter;
import java.io.PrintWriter;
import java.io.IOException;
public class Lecture {
	public static void main(String[] args) throws IOException {
		PrintWriter pw = new PrintWriter("src/out.txt");
for(int i=0; i<10; i++) pw.println("This is line number " + i + ".");
		pw.close();

		PrintWriter pw2 = new PrintWriter(new FileWriter("src/out.txt", true));
		for(int i=10; i<20; i++) pw2.println("This is line number " + i + ".");
		pw2.close();
	}
}
File input: FileInputStream
이제 파일에서부터 내용을 읽어오는 FileInputStream에 대해서 알아보자
import java.io.FileInputStream;
import java.io.IOException;
public class Lecture {
	public static void main(String[] args) throws IOException {
		byte[] b = new byte[1024];
		FileInputStream input = new FileInputStream("src/out.txt");
		input.read(b);
		System.out.println(new String(b));
		input.close();
	}
}
이번에는 read함수를 사용하는데 잘 보면 읽기용으로 사용하는 array가 byte array이다. 그리고 여기에서는 1024byte로 설정하였기 때문에 파일에서 1024byte까지 읽어들이고 만약 파일이 1024byte가 아니라면 끝까지 읽어드린다.
그리고 여기에서 한가지 더 read 함수의 return은 number of bytes 이기 때문에 만약 EOF에 도달하였다면 -1을 반환하게 된다.
출력을 할 경우에는 String으로 변환하여서 출력하여야 한다.
이를 활용하여서 100byte를 계속해서 읽어들이는 함수를 구현하여 보자
import java.io.FileInputStream;
import java.io.IOException;
public class Lecture {
	public static void main(String[] args) throws IOException {
		byte[] b = new byte[100];
		FileInputStream input = new FileInputStream("src/out.txt");
		while(input.read(b) != -1) {
			System.out.println(new String(b));
		}
		input.close();
	}
}
위와 같이 하면 100 byte씩 읽어들이지만 문제가 존재한다.

예를 들어 위와 같은 텍스트가 존재할때
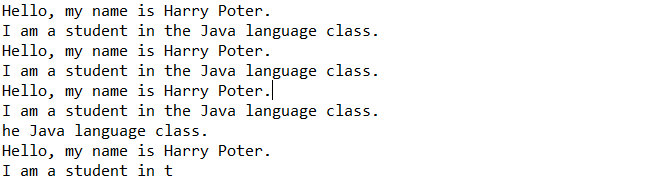
이걸 계속 읽어들이면 100바이트 단위로 계속 읽으며 정확히 100바이트를 읽어야 하기 때문에 두번째 읽을때는 남아 있는 글자 + 앞에 읽었던 글자의 형태로 구성된다.
그래서 다음과 같이 이를 수정하여야 한다.
import java.io.FileInputStream;
import java.io.IOException;

public class Ex12_04 {
	public static void main(String[] args) throws IOException{
		byte[] b= new byte[100];
		FileInputStream input = new FileInputStream("src/myfile1.txt");
		while(true) {
			int rv=input.read(b);
			if(rv==-1) break;
			System.out.print(new String(b).substring(0,rv));
		}
		input.close();
	}
}
위와 같이 필요한 만큼만 출력하는 형태로 문제를 해결할 수 있다.
File input: FileReader and BufferedReader
이것은 FileReader과 BufferedReader을 함께 사용하는 방식이다. 이렇게 했을때의 장점은 readLine() 함수를 사용할 수 있다는 것이다.
import java.io.BufferedReader;
import java.io.FileReader;
import java.io.IOException;
public class Lecture {
	public static void main(String[] args) throws IOException {
		BufferedReader br = new BufferedReader(new FileReader("src/out.txt"));
		while(true) {
			String line = br.readLine();
			if(line == null) break;
			System.out.println(line);
		}
	br.close();
	}
}