진행 중인 사이드 프로젝트에서 기존에 사용 중이던 Eslint + Prettier 조합 대신, Biome js를 사용해 보기로 하였습니다~!
본 포스팅에서는 Biome로 마이그레이션을 진행했던 간단한! 과정을 기록해 두고자 합니다.
P.S Biome js는 Node.js v14.18 이상의 버전에서만 사용 가능하다고 하네요!
참고자료
Biomejs 공식 문서
Biomejs Github
eslint/prettier 못 쓰겠다. Biome로 갈아보자
Biome js 마이그레이션
1. 패키지 설치
공식 문서에 적힌 대로, 우선 패키지를 설치해 줍니다.
저희는 pnpm을 사용 중이어서, 아래 명령어로 biome을 설치해 주었습니다!
pnpm add --save-dev --save-exact @biomejs/biome2. 설정 파일 생성
다음으로, 아래 명령어를 실행하여 biome.json 파일을 생성해 줍니다!
pnpm biome init명령어가 실행되면, 아래와 같은 초기 설정 파일이 루트 경로에 생성됩니다.
[ biome.json ]
{
	"$schema": "https://biomejs.dev/schemas/1.9.4/schema.json",
	"vcs": {
		"enabled": false,
		"clientKind": "git",
		"useIgnoreFile": false
	},
	"files": {
		"ignoreUnknown": false,
		"ignore": []
	},
	"formatter": {
		"enabled": true,
		"indentStyle": "tab"
	},
	"organizeImports": {
		"enabled": true
	},
	"linter": {
		"enabled": true,
		"rules": {
			"recommended": true
		}
	},
	"javascript": {
		"formatter": {
			"quoteStyle": "double"
		}
	}
}
3. Eslint, Prettier 설정 마이그레이션
Biome js로 설정 내용을 마이그레이션하는 과정도, CLI를 통해 간단히 가능했습니다!
https://biomejs.dev/guides/migrate-eslint-prettier/
Eslint
pnpm biome migrate eslint --write기존에도 기본적인 rule만 설정해 둔 탓에 자세하진 않지만,
명령어를 실행한 이후의 파일을 보면..
1. linter 필드에 규칙들이 추가되었고
2. 초기 파일에 기본적으로 켜져 있던 recommended 옵션은 false로 바뀌었고
3. ignore 필드에 eslintIgnore 파일 설정까지 잘 옮겨져 왔네요!
Biome은 rule의 의미를 보다 명확히 전달하기 위해 기존 eslint와 규칙명을 다르게 설정한 부분이 있다고 하는데,
이 부분도 공식 문서에 잘 나열되어 있어 추후에 필요한 부분을 설정해 보려 합니다.
[ biome.json ]
{
	"$schema": "https://biomejs.dev/schemas/1.9.4/schema.json",
	"vcs": { "enabled": false, "clientKind": "git", "useIgnoreFile": false },
	"files": { "ignoreUnknown": false, "ignore": [] },
	"formatter": { "enabled": true, "indentStyle": "tab" },
	"organizeImports": { "enabled": true },
	"linter": {
		"enabled": true,
		"rules": {
			"recommended": false,
			"complexity": { "noUselessTypeConstraint": "error" },
			"correctness": {
				"noUnusedVariables": "error",
				"useArrayLiterals": "off"
			},
			"style": {
				"noNamespace": "error",
				"useAsConstAssertion": "error",
				"useBlockStatements": "off"
			},
			"suspicious": {
				"noExplicitAny": "off",
				"noExtraNonNullAssertion": "error",
				"noMisleadingInstantiator": "error",
				"noUnsafeDeclarationMerging": "error",
				"useNamespaceKeyword": "error"
			}
		},
		"ignore": ["**/.eslintrc.js", "**/node_modules", "**/*.json"]
	},
	"javascript": { "formatter": { "quoteStyle": "double" } },
	"overrides": [
		{
			"include": ["*.ts", "*.tsx", "*.mts", "*.cts"],
			"linter": {
				"rules": {
					"correctness": {
						"noConstAssign": "off",
						"noGlobalObjectCalls": "off",
						"noInvalidBuiltinInstantiation": "off",
						"noInvalidConstructorSuper": "off",
						"noNewSymbol": "off",
						"noSetterReturn": "off",
						"noUndeclaredVariables": "off",
						"noUnreachable": "off",
						"noUnreachableSuper": "off"
					},
					"style": {
						"noArguments": "error",
						"noVar": "error",
						"useConst": "error"
					},
					"suspicious": {
						"noDuplicateClassMembers": "off",
						"noDuplicateObjectKeys": "off",
						"noDuplicateParameters": "off",
						"noFunctionAssign": "off",
						"noImportAssign": "off",
						"noRedeclare": "off",
						"noUnsafeNegation": "off",
						"useGetterReturn": "off"
					}
				}
			}
		}
	]
}
Prettier
동일하게 CLI로 prettier 설정도 마이그레이션해 줍니다.
biome migrate prettier --write다시 한 번 전체 파일 기준으로 살펴 보면, Prettier 설정을 옮겨 오면서
formatter 필드 쪽 설정이 추가되었네요.
[ biome.json ]
{
	"$schema": "https://biomejs.dev/schemas/1.9.4/schema.json",
	"vcs": { "enabled": false, "clientKind": "git", "useIgnoreFile": false },
	"files": { "ignoreUnknown": false, "ignore": [] },
	"formatter": {
		"enabled": true,
		"useEditorconfig": true,
		"formatWithErrors": false,
		"indentStyle": "space",
		"indentWidth": 2,
		"lineEnding": "lf",
		"lineWidth": 120,
		"attributePosition": "auto",
		"bracketSpacing": true
	},
	"organizeImports": { "enabled": true },
	"linter": {
		"enabled": true,
		"rules": {
			"recommended": false,
			"complexity": { "noUselessTypeConstraint": "error" },
			"correctness": {
				"noUnusedVariables": "error",
				"useArrayLiterals": "off"
			},
			"style": {
				"noNamespace": "error",
				"useAsConstAssertion": "error",
				"useBlockStatements": "off"
			},
			"suspicious": {
				"noExplicitAny": "off",
				"noExtraNonNullAssertion": "error",
				"noMisleadingInstantiator": "error",
				"noUnsafeDeclarationMerging": "error",
				"useNamespaceKeyword": "error"
			}
		},
		"ignore": ["**/.eslintrc.js", "**/node_modules", "**/*.json"]
	},
	"javascript": {
		"formatter": {
			"jsxQuoteStyle": "double",
			"quoteProperties": "asNeeded",
			"trailingCommas": "all",
			"semicolons": "always",
			"arrowParentheses": "always",
			"bracketSameLine": false,
			"quoteStyle": "double",
			"attributePosition": "auto",
			"bracketSpacing": true
		}
	},
	"overrides": [
		{
			"include": ["*.ts", "*.tsx", "*.mts", "*.cts"],
			"linter": {
				"rules": {
					"correctness": {
						"noConstAssign": "off",
						"noGlobalObjectCalls": "off",
						"noInvalidBuiltinInstantiation": "off",
						"noInvalidConstructorSuper": "off",
						"noNewSymbol": "off",
						"noSetterReturn": "off",
						"noUndeclaredVariables": "off",
						"noUnreachable": "off",
						"noUnreachableSuper": "off"
					},
					"style": {
						"noArguments": "error",
						"noVar": "error",
						"useConst": "error"
					},
					"suspicious": {
						"noDuplicateClassMembers": "off",
						"noDuplicateObjectKeys": "off",
						"noDuplicateParameters": "off",
						"noFunctionAssign": "off",
						"noImportAssign": "off",
						"noRedeclare": "off",
						"noUnsafeNegation": "off",
						"useGetterReturn": "off"
					}
				}
			}
		}
	]
}
4. IDE에 플러그인 설치하기
3까지만 해 주어도 사실 프로젝트에 설정 자체는 된 것이라고 볼 수 있지만, 편하게 사용하기 위해 사용 중인 IDE에 플러그인까지 설치해 보겠습니다~
Vscode, Jetbrains IDE, Zed에 대해
Biome 팀에서 maintain되는 익스텐션들이 있다고 하네요!
https://biomejs.dev/guides/editors/first-party-extensions/
저는 JetBrains IDE인 Webstorm을 사용 중이어서, 웹스톰 기준으로 따라가 보도록 하겠습니다!
4-1. 플러그인 설치
우선 플러그인을 설치해 줍니다!
https://plugins.jetbrains.com/plugin/22761-biome
+) 기존에 에러를 뱉곤 했던 Eslint는 이제 Disable 처리해 줍니다 :)

4-2. Biome enable 여부 확인
플러그인 설치가 완료되었다면,
Settings > Languages & Frameworks 탭에 아래와 같이 Biome이 나타나는데요,
해당 탭으로 들어가서 Disable Biome 되어있다면 Automatic, 또는 Manual로 활성화해주고, 필요한 설정들을 같이 활성화해 줍니다.
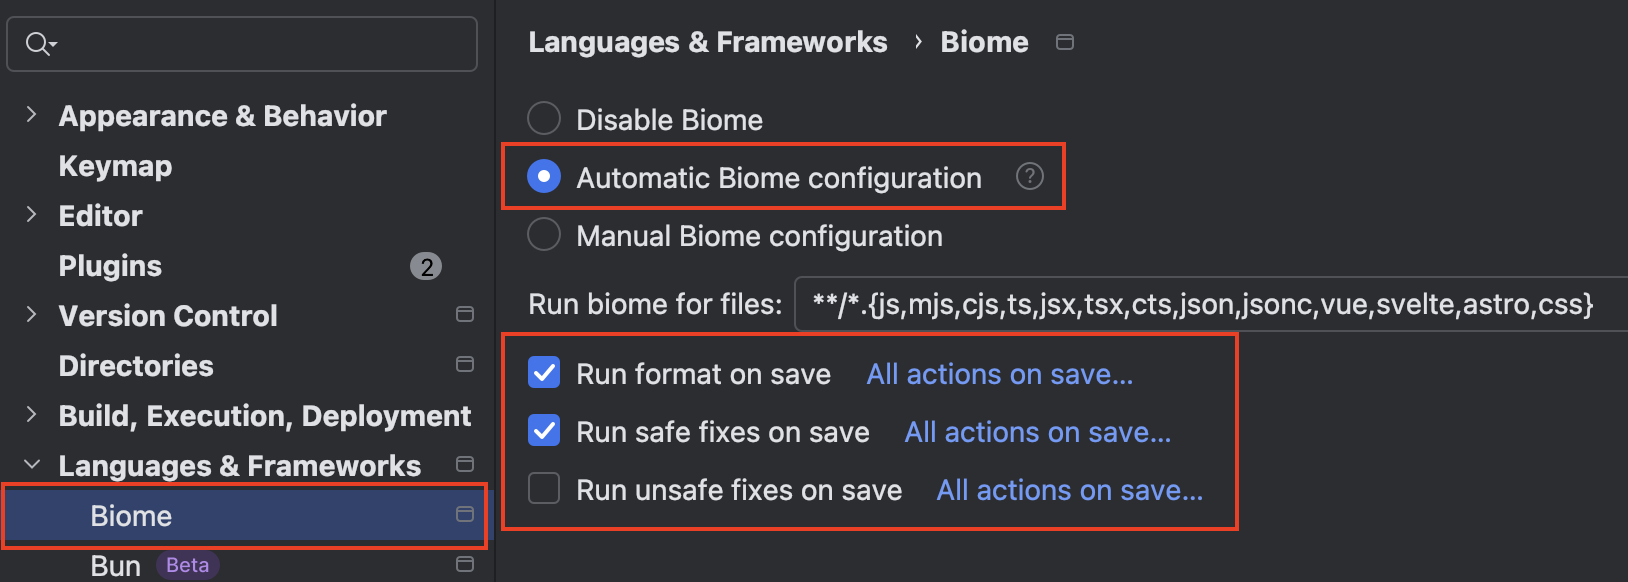
설정을 마치고, 코드를 수정 후 저장했을 때 설정이 자동으로 반영되는 것까지 확인하면 완료! :)
마무리
Eslint + Prettier를 사용하던 사이드 프로젝트에 Biome js를 적용해 보았습니다!
사실 프로젝트 규모가 크지 않아서인지, Prettier에 비해 최대 25배 가량 빠르다는 Biome의 설명을 체감하기까지는 어려웠지만,
- CLI로 간편하게 마이그레이션이 가능하고
- Eslint + Prettier를 하나의 설정 파일로 관리할 수 있고
- Webstorm과는 오히려 더 오류 없이 잘 돌아감
위와 같은 장점을, 마이그레이션하고 간단히 사용해 보면서도 느낄 수 있어서 앞으로의 사용 경험도 기대가 되네요!
나중에 세세히 설정할 때 Eslint와 규칙 이름을 어떻게 다르게 지었는지 비교해 보는 재미도 있을 것 같습니다 :)
JS 진영에 나타나는 새 기술들을 항상 응원하며..
본 포스팅은 여기서 마치려고 합니다!
감사합니다 (_ _)