edu day 21,22
중첩 클래스
중첩 클래스란 클래스 안에 또 다른 클래스가 정의되는 것을 의미한다.
일반적인 클래스는 독립적으로 정의하고 사용되지만 중첩 클래스는 멤버형태로 클래스를 포함할 수 있으며 중첩되는 클래스의 개수는 제한이 없다.
중첩 클래스의 용도는 독립적인 일반 클래스로 생성할 필요하는 없지만 나름대로 클래스 형식을 갖춰야 되는 경우에 사용된다.
(ex. A라는 클래스는 B클래스에서만 사용한다고만 할 때, A를 독립적인 클래스로 작성하기 보다는 B클래스의 중첩 클래스로 작성하는 것이 관리하기 쉽다.)
public class Outer{
 	...
 	class Inner{
		 ...
 	}//end Inner
 }//end Oute
중첩 클래스를 포함하는 바깥 클래스를 Outer클래스라고 하며 내부에 포함된 클래스를 중첩클래스 또는 Inner클래스라고 한다.
- Inner 클래스의 특징
- Inner 클래스는 Outer 클래스의 멤버를 마치 자신의 멤버처럼 사용할 수 있다. Outer 클래스 멤버의 접근 지정자가
private일지라도 접근할 수 있다.
- Inner 클래스 안에는
static 변수를 선언할 수 없다. 단,static Inner클래스는 선언 가능하다. Inner 클래스만 static 클래스로 설정할 수 있다.
- Inner 클래스의 접근은 반드시 Outer 클래스를 통해서 접근할 수 있다. 단, static Inner 클래스는 직접 접근이 가능하다.
- 소스 파일을 컴파일 하면 Inner 클래스는
Outer$Inner.class형식으로 클래스파일이 생성된다.
- 정의되는 위치에 따라서 4가지 형태의 Inner 클래스가 제공된다.
- Inner 클래스는 Outer 클래스의 멤버를 마치 자신의 멤버처럼 사용할 수 있다. Outer 클래스 멤버의 접근 지정자가
- 정의되는 위치에 따른 Inner 클래스의 종류
- member Inner 클래스 : Outer 클래스의 멤버변수나 메서드처럼 클래스가 정의된 경우이다.
- local Inner 클래스 : Outer 클래스의 특정 메서드 안의 로컬변수처럼 클래스가 정의된 경우이다.
- static Inner 클래스 : static 키워드를 이용해서 클래스가 정의된 경우이다.
- anonymous Inner 클래스 ( 익명 클래스 ) : 익명 클래스를 이용해서 클래스가 정의된 경우이다.
member Inner 클래스
객체를 생성해야만 사용할 수 있는 Outer 클래스의 변수, 메서드와 같은 수준으로 선언된 static 키워드를 사용하지 않은 클래스를 의미한다.
주의할 점은 Inner 클래스를 사용하기 위해서는 바늗시 Outer 클래스를 먼저 객체 생성해야 된다.
외부에서 Inner 클래스의 접근은 다음과 같이 Outer 클래스를 먼저 생성하고 Inner 클래스를 접근해야 된다.
Outer xxx = new Outer();
Outer.Inner yyy = xxx.new Inner();
Inner 클래스를 Outer 클래스에서 접근할 때는 직접 Inner 클래스를 객체생성하고 접근하면 된다.
Inner yyy = new Inner();- 예제
package com.test;

class Outer{
	int a = 10;
	private int b = 20;
	static int c = 30;

	class Inner {
		int d = 40;
		//static int e = 50;	//static 변수 사용 불가
		public void print() {
			System.out.println(a);
			System.out.println(b);
			System.out.println(c);
			System.out.println(d);
		}
	}// end Inner
	public void info() {
		Inner inner = new Inner();		//내부 접근
		inner.print();
	}
}

public class Ex07_4 {

	public static void main(String[] args) {

		Outer outer = new Outer();
		outer.info();

		Outer.Inner inner = outer.new Inner();	//외부 접근
		inner.print();
	}

}
local Inner 클래스
Outer 클래스의 메서드 안에서 정의한 클래스를 의미한다. 메서드 안에서 정의되었기 때문에 로컬변수처럼 인식된다.
따라서 local Inner 클래스는 메서드가 호출될 때 생성되며 메서드가 종료될 때 삭제된다.
package com.test;

class Outer2{
	int a = 10;
	private int b = 20;
	static int c = 30;

	public void info() {
		int size = 100;
		class Inner{
			int d = 40;
			//static int e = 50;	//static 변수 사용 불가
			public void print() {
				System.out.println(a);
				System.out.println(b);
				System.out.println(c);
				System.out.println(d);
				System.out.println(size);
			}
		}// end Inner

		Inner inner = new Inner();		//메서드 안에서 생성
		inner.print();
	}
}// end Info

public class Ex07_5 {

	public static void main(String[] args) {

		Outer2 outer = new Outer2();
		outer.info();
	}

}
info 메서드 안에서 Inner 클래스 객체생성하고 print 메서드 호출한다.
outer2 클래스를 객체생성하고 Inner 클래스가 정의된 info 메서드를 호출한다.
static Inner 클래스
Inner 클래스를 정의할 때 static 키워드를 사용하는 형태이다.
일반 Inner 클래스에는 static 변수를 포함할 수 없지만 static Inner 클래스로 정의하면 가능하다. 또한 Outer 클래스를 생성하지 않아도 inner 클래스를 직접 접근할 수 있다.
반면에 Outer 클래스의 멤버변수는 접근이 불가능하다. 따라서 Inner 클래스에서 static 변수를 포함해야 되는 경우에만 사용하도록 한다.
- Inner 클래스의 사용은 다음 형식을 따른다. static이기 때문에 Outer 클래스명으로 접근한다.
Outer.Inner inner = new Outer.Inner();- 예제
package com.test;

class Outer3 {
	int a = 10;
	private int b = 20;
	static int c = 30;

	static class Inner{
		static int d = 40;
		public void print() {
//			System.out.println(a);
//			System.out.println(b);
			System.out.println(c);
			System.out.println(d);
		}
	}	//end Inner
}

public class Ex07_6 {

	public static void main(String[] args) {

		Outer3.Inner inner = new Outer3.Inner();
		inner.print();
	}

}
static Inner 클래스에서는 static 변수를 제외한 Outer 클래스의 멤버변수를 접근할 수 없다.
Outer3 클래스명으로 직접 static Inner 클래스를 생성하고 print 메서드를 호출한다.
ananymous Inner 클래스 (익명 클래스)
ananymous Inner 클래스는 local Inner 클래스의 변형된 형태이다.
직접 클래스명을 지정하지 않으며 단지 인스턴스의 생성과 메서드 선언만을 정의한다.
일반적으로 인터페이스 또는 추상클래스를 구현하는 클래스로 자주 사용된다.
익명클래스를 함수형 프로그래밍 기반으로 확장 표현한 것이 람다식(lambda)이다.
-
형식 : 하위클래스 없이 바로 new 인터페이스명(){ 추상 메서드구현 }; 형식으로 사용한다. 따라서 하위 클래스명을 지정하기 않기 때문에 익명 클래스라고 부른다. 주의할 점은 맨 마지막 코드에서 반드시 ;(세미콜론)을 사용해야 된다.
//인터페이스 또는 추상클래스 정의
public interface 인터페이스명{
//추상 메서드
}
// anonymous class
인터페이스명 변수명 = new 인터페이스명(){
//추상 메서드 구현
};
변수명.메서드(); -
예제
package com.test2;

interface Flyer{
	public abstract void takeOff();

	public abstract void fly();

	public void land();		//추상 메서드 정의
}


public class Ex07_7 {

	public static void main(String[] args) {

		Flyer f = new Flyer() {

			@Override
			public void takeOff() {
				System.out.println("takeOff");
			}

			@Override
			public void land() {
				System.out.println("land");
			}

			@Override
			public void fly() {
				System.out.println("fly");
			}
		};	// 익명 클래스

		f.fly();
		f.land();
		f.takeOff();
	}
}
- Flyer 인터페이스를 정의하고 추상 메서드 takeOff, fly, land를 정의한다.
annoymous 클래스는 인터페이스 자신은 new하고 코드 블록안에서 추상메서드를 구현한다.
인터페이스는 new 할 수 없기 때문에 내부적으로는 Flyer을 구현한 익명의 클래스가 생성된다. 따라서 이 방법을 anonymous Inner 클래스라고 한다.
또한 인터페이스는 객체생성은 불가능하지만 다형성을 적용한 데이터형으로는 사용될 수 있기 때문에 Flyer f로 변수를 지정 가능하다.
Comparator 인터페이스를 이용한 Array 정렬
java.util.Comparator 인터페이스를 이용하면 배열에 저장된 클래스의 특정 변수 값으로 정렬할 수 있다.
package com.test;

import java.util.Arrays;
import java.util.Comparator;

class Person{
	String name;
	int age;

	public Person(String name, int age) {
		super();
		this.name = name;
		this.age = age;
	}

	@Override
	public String toString() {
		return "Person [name=" + name + ", age=" + age + "]";
	}

}	//end Person


class PersonComp implements Comparator<Person>{

	@Override
	public int compare(Person o1, Person o2) {
		int result = 1;
		if(o1.age >= o2.age) result = -1;
		return result;
	}
//	public int compare(Person o1, Person o2) {
//		int result = -1;
//		if(o1.age >= o2.age) result = 1;
//		return result;
//	}

}


public class Ex07_8 {

	public static void main(String[] args) {
		Person p = new Person("홍길동", 20);
		Person p2 = new Person("이순신", 44);
		Person p3 = new Person("유관순", 18);
		Person p4 = new Person("강감찬", 66);
		Person [] ps = {p, p2, p3, p4};

		Arrays.sort(ps, new PersonComp());
		for(Person person : ps) {
			System.out.println(person);
		}
	}
}
- Person 클래스의 age 값으로 정렬하기 위해서 Comparator 인터페이스를 구현한 PersonComp 클래스를 작성한다.
오버라이딩 된 compare 메서드의 파라미터값을 비교하여 내림차순이면 음수값을 리턴하고 오름차순이면 양수값 또는 0값을 리턴하도록 구현한다.
그 후 배열에 저장된 Person클래스를 정렬하기 위해서 Arrays.sort 메서드를 사용한다.
자바의 핵심 클래스
문자열 생성 관련 클래스
문자열은 가장 많이 사용되는 데이터이기 때문에 문자열을 생성하는 방법부터 문자열 길이, 부분열, 단어 치환 등 여러가지 처리 방법이 있다.
기본 데이터 형이 아닌 참조 데이터 형에 속한다. 또한 반드시 ""(double quotes)를 이용해서 리터럴(값)을 표현한다.
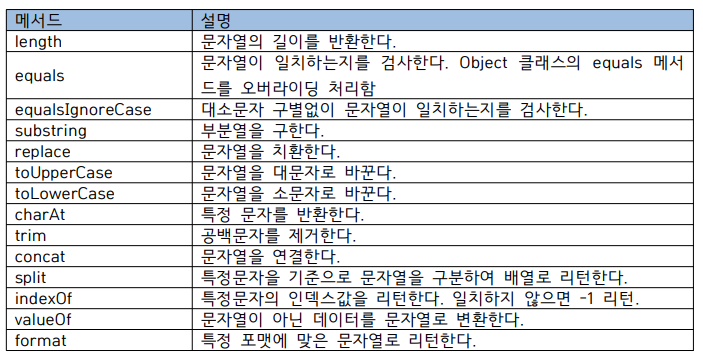
대표적인 String 클래스 메서드
❗외우도록 하자
StringBuffer 클래스
String 클래스는 '불변성' 특징을 갖기 때문에 문자열 연산시 매우 비효율적으로 메모리를 사용하게 된다.
문자열을 이용한 연산작업이 많은 경우에는 StringBuffer 또는 StringBuilder를 사용할 수 있다.
StringBuffer는 thread-safe하지만 무거운 특징을 가지며 StringBuilder는 thread-unsafe하지만 성능이 좋은 특징이 있다.
StringBuffer str = new StringBuffer( "Hello" );
- StringBuffer 클래스의 대표적인 메서드
- lenth : 문자열의 길이를 반환한다.
- capacity : 초기 버퍼크기를 지정한다.
- append : 버퍼에 문자열을 추가한다.
- insert : 버퍼에 문자열을 삽입한다.
- delete : 버퍼의 문자열을 삭제한다.
- toString : StringBuffer 객체를 String 객체로 변경한다.
StringBuffer 클래스의 주요 특징은 버퍼를 사용하여 문자열을 관리하기 때문에 버퍼에 저장된 문자열을 조작해도 String 클래스처럼 새로운 문자열이 생성되지 않고 버퍼에 저장된 문자열이 동적으로 변경되어진다.
--> 따라서 문자열 조작이 많은 경우에 매우 효율적이다.
- 예제
package com.test;

public class Ex08_3 {

	public static void main(String[] args) {

		StringBuffer s = new StringBuffer("Hello");

		s.append(" World");
		System.out.println(s);	//Hello World
		s.insert(5, "!!! ");
		System.out.println(s);	//Hello!!! World
		s.delete(0, 5);
		System.out.println(s);	//!!! World

		String data = s.toString();
		System.out.println(data);	//!!! World
	}

}
연결 연산자
package com.test;

public class Ex08_4 {

	public static void main(String[] args) {

		String str = "Hello" + 1 + 2 +3;	// Hello123
		String str2 = 1+2+3+"Hello";		// 6Hello

		System.out.println(str);
		System.out.println(str2);
	}

}
실행 처리 속도
append() > concat() > += 와 같이 append()의 처리 속도가 훨씬 빠른 것을 알 수 있다.
package com.test;

public class Test {

	public static void main(String[] args) {

		Test t= new Test();
		t.aaa();
		t.bbb();
		t.ccc();
	}

	public void ccc() {
		long start = System.currentTimeMillis();
		String x = "";
		for (int i = 0; i < 10000; i++) {
			x = x.concat("aaaaaaaaaaaaa");
		}
		System.out.println("x.length():"+x.length());
		System.out.println("ccc():" + (System.currentTimeMillis()-start));;
	}

	public void bbb() {
		long start = System.currentTimeMillis();
		StringBuffer x = new StringBuffer();
		for (int i = 0; i < 10000; i++) {
			x = x.append("aaaaaaaaaaaaa");
		}
		System.out.println("x.length():"+x.length());
		System.out.println("ccc():" + (System.currentTimeMillis()-start));;
	}

	public void aaa() {
		long start = System.currentTimeMillis();
		String x = "";
		for (int i = 0; i < 10000; i++) {
			x += "aaaaaaaaaaaaa";
		}
		System.out.println("x.length():"+x.length());
		System.out.println("ccc():" + (System.currentTimeMillis()-start));;
	}


}
Wrapper
기본형 데이터를 객체로 변경시킨다. 기본 데이터를 효율적으로 처리하고자 하는 목적으로 사용된다.
Wrapper 클래스의 주요 메서드
Integer.parseInt() : "123"과 같은 문자열로 된 수치데이터를 연산 가능한 123으로 변경하는 메서드
String.valueOf() / Integer.toString() : 역으로 123 수치데이터를 "123" 문자열로 변경할 때 사용하는 메서드
기본형을 Wrapper클래스로, Wrapper 클래스를 기본형으로 변경하기
기본형을 Wrapper로 만드는 방법은 각각의 생성자에 기본형을 인자로 전달하면 된다.
int num = 10;
Integer x = new Integer(num);
역으로 Wrapper을 기본형으로 만드는 방법은 다음과 같이 xxxVaule() 메서드를 사용하면 된다.
Integer x = new Integer(10);
int x2 = x.intvalue();- 예제
package com.test;

public class Ex08_8 {

	public static void main(String[] args) {

		//1.기본형을 Wrapper로 변경
		int num = 10;
		Integer x = new Integer(num);

		//2. Wrapper을 기본형으로 변경
		int x2 = x.intValue();

		System.out.println(x);
		System.out.println(x2);
	}

}
기본형과 Wrapper 클래스는 서로 다른 타입이다. 하나는 기본형이고 하나는 참조형이기 때문이다.
오토박싱과 언박싱 (auto boxing, unboxing)
JDK 1.5 버전부터 기본 데이터형에서 Wrapper 클래스로 자동 변환되는 기능(오토박싱)과 Wrapper클래스형에서 기본 데이터형으로 자동 변환되는 기능(언박싱)을 제공한다.
//기본 데이터형을 Wrapper로 자동 변환 ( 오토박싱 )
int num = 10;
Integer num2 = num;

//Wrapper 타입을 기본 데이터로 자동 변환 ( 언박싱 )
int num3 = num2;
Random 클래스
java.util.Random 클래스는 정수 및 실수 그리고 boolean 타입의 임의의값인 난수값을 생성할 수 있는 클래스이다.
-
Random 메서드
nextInt: 임의의 정수값을 구한다.
nextInt(n): 0 부터 n-1 까지의 임의의 정수값을 구한다. nextBoolean: 임의의 불린값을 구한다.
nextFloat: 0.0 과 1.0 사이의 임의의 float 값을 구한다. nextDouble: 0.0 과 1.0 사이의 임의의 double 값을 구한다. -
사용 예제
import java.util.Random;

public class RandomTest {

	public static void main(String[] args) {

		Random random = new Random();
		int num = random.nextInt(100)+1;
		System.out.println("1부터 100 사이의 임의의 값:" + num);

		float f = random.nextFloat();
		System.out.println("0.0부터 1.0 사이의 임의의 값:" + f);

		boolean b = random.nextBoolean();
		System.out.println("임의의 논리값:"+b);
	}
}
Calendar, Date 클래스
날짜 데이터를 처리하기 위해서 java.util.Calendar 클래스 또는 java.util.Date 클래스를 사용한다.
날짜를 조작하는 작업은 일반적으로 Calendar 클래스를 사용하고 Date 클래스는 날짜를 표현할 때 사용한다.
//1. Calendar 클래스 생성
Calendar cal = Calendar.getInstance();

//2. Date 클래스 생성
Date now = new Date();
SimpleDateFortmat 클래스
Date 클래스만으로는 필요한 년도 또는 월 데이터만 추출할 수 있는 방법에 많은 제약이 있다.
하지만 java.text.SimpleDateFormat 클래스를 사용하면 java.util.Date 클래스에서 얻은 날짜데이터를 특정 형식에 맞게 원하는 데이터를 변경하여 출력할 수 있다.
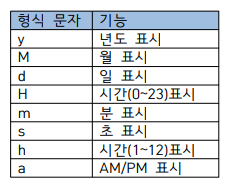
-
주요 형식문자
-
예제
import java.text.SimpleDateFormat;
import java.util.Date;

public class DateTest2 {

	public static void main(String[] args) throws Exception {

		Date d = new Date();
		System.out.println(d);		//Tue Jun 13 13:59:01 KST 2023

		SimpleDateFormat sdf = new SimpleDateFormat("yyyy년 MM월 dd일 HH:mm:ss (a)");
		String date = sdf.format(new Date());
		System.out.println(date);		//2023년 06월 13일 13:59:01 (오후)


		SimpleDateFormat sdf2  =
				new SimpleDateFormat("yyyy년 MM월 dd일");
		String mesg2 = sdf2.format(d);
		System.out.println(mesg2);		//2023년 06월 13일

		//String -->Date
		Date d2 = sdf2.parse("2020년 10월 20일");
		System.out.println(d2);		//Tue Oct 20 00:00:00 KST 2020

	}//end main

}//end class
enum (열거형 상수)
enum은 열거형 상수로 부르며, 데이터가 몇 개의 한정된 상수값으로 구성될 때 주로 사용된다.
이전에는 public static final로 지정된 일반적인 상수를 사용하였으나 값 충돌 및 논리적인 문제점이 발생되어 enum으로 대체되어 사용된다.
- 예제
public class EnumTest2 {

	//상수
	public static final int SELECT = 1;	//상수 클래스이름, 상수이름 사용
	public static final int INSERT = 2;
	public static final int DELETE = 3;


	public static void check(int num) {
		//byte, short, int, char, String, enum
		switch(num) {
		case SELECT : System.out.println("1");break;
		case INSERT : System.out.println("2");break;
		case DELETE : System.out.println("3");break;
		default : System.out.println("default");break;
		}
	}

	public static void main(String[] args) {
		//enum은 상수 대체 가능
		check(SELECT);	//1.SELECT 2.INSERT 3.DELETE
		check(INSERT);
		check(DELETE);
		check(99);	//의미없는 숫자지정가능

	}//end main0
}//end class

	}

}
public class EnumTest3 {

	//멤버변수 위치에 선언
	//public enum 타입  {상수값,상수값2,상수값3}
	public enum Color {BLUE,RED,YELLOW} //static final

	public static void main(String[] args) {
		//타입.상수값
		Color c = Color.BLUE;
		Color c2 = Color.RED;
		Color c3 = Color.YELLOW;
//		Color c4 = Color.GREEN;		//GREEN은 없어서 error.
		System.out.println(c+"\t"+c.ordinal());
		System.out.println(c2+"\t"+c2.ordinal());
		System.out.println(c3+"\t"+c3.ordinal());


		Color [] xx = Color.values();
		for (Color color : xx) {
			System.out.println(color.name()+"\t"+color.ordinal());
		}

	}// end main

}// end class
public class EnumTest4 {

	//상수
	public enum DML { SELECT, INSERT, DELETE }

	public static void check(DML num) {
		//byte, short, int, char, String, enum
		switch(num) {
		case SELECT : System.out.println("SELECT");break;
		case INSERT : System.out.println("INSERT");break;
		case DELETE : System.out.println("DELETE");break;
		default : System.out.println("default");break;
		}
	}

	public static void main(String[] args) {
		//enum은 상수 대체 가능
		check(DML.SELECT);	//1.SELECT 2.INSERT 3.DELETE
		check(DML.INSERT);
		check(DML.DELETE);
//		check(99);	//의미없는 숫자지정 불가능

	}//end main0
}//end class
어노테이션 (annotation)
어노테이션은 컴파일러가 검증할 때 필요한 부가 정보 및 메타 데이터를 쉽게 활용할 수 있도록 JDK5.X 버전에서 추가된 기능으로 명시적으로 자바코드에 @로 시작하는 문자열을 사용하여 설정한다.
어노테이션을 설정 가능한 곳은 클래스, 변수, 메서드이며 각각 클래스 레벨, 변수 레벨, 메서드 레벨이라고 부른다.
- @Override 어노테이션 : 해당 메서드가 부모 클래스의 메서드를 오버라이딩 한다는 정보를 알려준다.
- @Depercated 어노테이션 : 해당 클래스 및 변수, 메서드는 과거 버전에서는 사용되었으나 향상된 기능이 추가되어 현재는 사용하지 않도록 알려준다.
- @SuppressWaring 어노테이션 : 컴파일러에게 경고(warning)정보를 표시하지 않도록 알려준다.
❗StringTokenizer API❗
-
형식: 생성자의 첫 번쨰 인자값으로 문자열을 설정하고, 두 번째 값으로 구분자를 지정한다. 두 번째 구분자가 생략되면 기본 구분자인 공백을 기준으로 분리된다.
StringTokenizer st = new StringTokenizer( "홍길동,이순신,유관순", "," );
-
StringTokenizer 메서드
- hasMoreTokens() == hasMoreElements() : 남아있는 토큰이 있는지 여부를 boolean 값으로 반환
- nextToken() : 다음 토큰을 문자열로 반환
- countTokens() : 사용하지 않고 남아있는 토큰의 개수 반환
-
예제
package com.test;

import java.util.StringTokenizer;

public class StringTokenizerTest {

	public static void main(String[] args) {

		String ss = "홍길동,이순신,유관순";
		StringTokenizer tt = new StringTokenizer(ss, ",");

//		System.out.println(tt.nextToken());
//		System.out.println(tt.nextToken());
//		System.out.println(tt.nextToken());

		while (tt.hasMoreTokens()) {
			System.out.println("123");
			System.out.println(tt.nextToken());

		}

//		while(tt.countTokens() != 0) {
//			System.out.println(tt.nextToken());
//		}


	}
}
--> nextToken으로 토큰을 문자열로 반환하면 다시 처음부터 출력하지 못하기 때문에 주석처리를 해줘야 출력을 확인할 수 있다.
- StringTokenizer의 두번 째 값인 구분자를 여러 개 사용할 수 있다.
StringTokenizer st = new StringTokenizer(data, "/,");
'/'와 ','를 둘 다 구분자로 받는다.
예외 / 예외처리
예외
일반적으로 에러(error)라고 일컫는 예외는 프로그램 실핼 중에 발생되는 의도하지 않은 문제를 의미한다.
- 예외 상황 예제
public class ExceptionTest0 {

	public static void main(String[] args) {

		System.out.println("start program\n");

//		int num = 0;
//		int result = 10/num;	//ArithmeticException
		String name = null;
		int result = name.length();		//NullPointerException
		System.out.println("result : "+result);

		System.out.println("\nend program");
	}

}
예외처리
예외처리란 발생된 예외코드를 다시 수정해서 예외가 발생되지 않도록 처리하는 작업이 아니고 발생된 예외 때문에 프로그램 자체가 비정상 종료되는 것을 방지하여 정상 종료되게 처리하는 것을 의미한다.
-
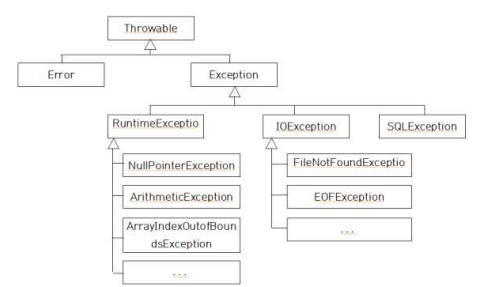
예외처리 클래스들 간의 상속관계 (계층구조로 표현)
-
compile unchecked Exception 계열
- 컴파일시에 예외처리 여부를 검사하지 않는 클래스
ex) RuntimeException
- 컴파일시에 예외처리 여부를 검사하지 않는 클래스
RunTimeException 클래스의 대표적인 하위 클래스들
- ArithmeticException
- NullPointerException
- compile checked Exception 계열
- 컴파일시에 예외처리 여부를 검사하는 클래스 계열. 예외처리 코드를 구현하지 않으면 컴파일시에 에러가 발생된다.
ex) IOException & SQLException
- 컴파일시에 예외처리 여부를 검사하는 클래스 계열. 예외처리 코드를 구현하지 않으면 컴파일시에 에러가 발생된다.
자바에서의 예외처리를 하기 위한 2가지 방법
try~catch~finally 문 : 오류코드에서 직접 처리
throws 키워드: 위임 처리
try~catch~finally 문
try{
//예외발생코드
}catch(예외클래스명 변수명){
//예외처리코드
}
-
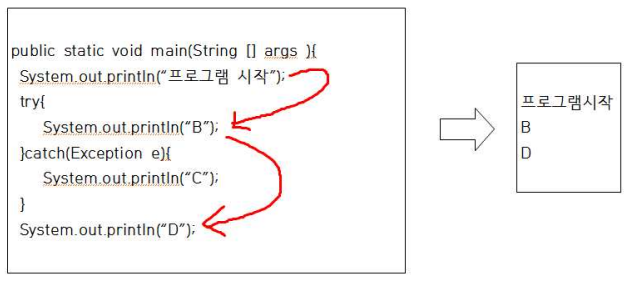
try 블록 내에서 Exception이 발생되지 않은 경우:
catch 블록을 거치지 않고 전체 try~catch 블록을 빠져나가서 수행을 계속한다.
-
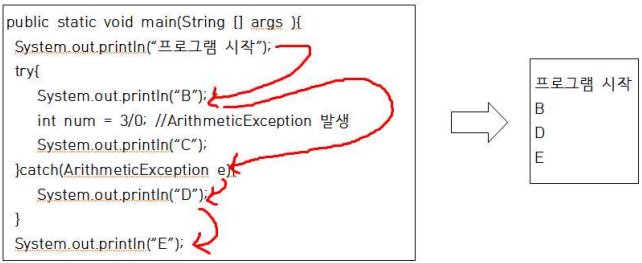
try블록 내에서 Exception가 발생한 경우:
발생된 Exception과 일치하는 catch 블록이 있는지 확인한다.
일치하는 catch 블록이 있는 경우 catch 블록내의 문장을 수행하고 전체 try~catch문을 빠져나가서 그 다음 문장을 계속해서 수행한다.
-
예제
public class ExceptionTest1 {

	public static void main(String[] args) {

		int num = 0;
		int result = 0;

		try {
			result = 10 / num;
		}catch(ArithmeticException e) {
			System.out.println("exception");
		}

		System.out.println(result);
	}

}
--> 10 / num 에서 ArithmeticException 발생하므로 try가 아닌 catch를 실행한다.
출력 : exception
0
- 다른 예제: catch를 다중으로 사용할 수 있다.
public class ExceptionTest2 {

	public static void main(String[] args) {

		System.out.println("start program\n");

		int num = 0;
		int result = 0;
		String name = "홍길동";
		try {
			num = 10;
			result = num / 10;

//			name = null;

//			int [] arr = new int[3];
//			arr[10] = 10;

		}catch (ArithmeticException e) {
			System.out.println("ArithmeticException");
			System.out.println(e.getMessage());
		}catch (NullPointerException e) {
			System.out.println("NullPointerException");
			System.out.println(e.getMessage());
		}catch (Exception e){	//Exception을 제일 마지막으로 비교
			System.out.println("Exception");
			System.out.println(e.getMessage());
		}

		System.out.println(result);
		System.out.println(name);
		System.out.println("\nend program");
	}

}
--> getMessage()는 어떤 오류가 났는지 String type으로 리턴해준다.
finally 문
예외 발생 여부와 상관없이 항상 실행되는 문장이다.
파일 및 DB와 같은 외부 자원을 사용하는 경우에는 정상적으로 실행되건 실행 중에 예외가 발생되건 항상 사용했던 자원을 해제하는 작업이 반드시 필요하다.
try{
//예외발생코드1
}catch(예외클래스명1 변수명){
//예외처리코드
}finally{
//반드시 수행하는 문장
}
- finally 문을 이용한 예외처리하기
public class ExceptionTest6 {

	public static void main(String[] args) {

		System.out.println("start program\n");

		try {
            int num = 3 / 0;
            System.out.println("결과값: " + num);

		} catch (Exception e) {
			System.out.println("예외발생 "+e.getMessage());
		}
		finally {
			System.out.println("반드시 수행되는 문장");
		}
		System.out.println("\nend program");
	}

}
--> 예외가 생기든 안생기든 finally는 반드시 수행된다.
- catch가 없을 때 end program은 출력되지 않고, exception 경고가 출력된다.
public class ExceptionTest7 {

	public static void main(String[] args) {

		System.out.println("start program\n");

		try {
			// 작업 1
			int num = 10;
			int result = 10/0;

		}finally {
			System.out.println("반드시 수행되는 문장");
		}
		System.out.println("\nend program");
	}

}
- 출력 :
start program

반드시 수행되는 문장
Exception in thread "main" java.lang.ArithmeticException: / by zero
	at ExceptionTest7.main(ExceptionTest7.java:11)
throws 키워드
예외가 발생되는 기본단위는 메서드이다. 메서드를 호출하고 호출된 메서드가 실행되면서 예외가 발생될 수 있다.
예외가 발생된 곳에서 예외처리를 하는 것이 일반적이지만 호출한 곳으로 예외처리를 위임하는 것이 throws 방법이다. 따라서 계속적으로 위임하면 main() 메서드까지 위임하게 되며 최종적으로 try~catch로 예외처리를 할 수 있다.
만약 main()메서드에서도 try~catch로 예외처리를 하지 않으면 프로그램은 비정상 종료가 된다.
기본적인 구현방법은 발생된 예외를 호출한 곳으로 넘겨주고 호출한 곳에서 try~catch문을 사용하여 예외처리를 구현하는 것이다
지정자 리턴타입 메서드명( [파라미터] ) throws 예외클래스,예외클래스2 { }
- 예제
public class ExceptionTest8_0 {

	public static void b() throws Exception { // throw 이용. 호출한 곳으로 처리를 위임
		Class.forName(null);
		System.out.println("\nend b function");	//실행되지 않는다.
	}

	public static void a() {

		try {
			b();
		} catch (Exception e) {
			System.out.println("a()함수 catch 실행 ");
		}

		System.out.println("\nend a function");
	}

	public static void main(String[] args) {

		System.out.println("start main program\n");

		a();

		System.out.println("\nend main program");
	}

}
- 결과
start main program

a()함수 catch 실행

end a function

end main program
--> 'end b function'이 실행되지 않고 예외문이 나온 즉시 a()함수의 catch로 이동한다.
다중 catch문 처럼 필요시 다중 throws 문도 가능하다.
- 다중 throws를 사용하여 try~catch의 적용 위치를 main으로 변경했다.
public class ExceptionTest8_1 {

	public static void b() throws Exception { // throw 이용. 호출한 곳으로 처리를 위임
		Class.forName(null);
		System.out.println("\nend b function");	//실행되지 않는다.
	}

	public static void a() throws Exception {

		b();

		System.out.println("\nend a function");
	}

	public static void main(String[] args) {

		System.out.println("start main program\n");

		try {
			a();
		} catch (Exception e) {
			System.out.println("main에서 처리함 : "+ e.getMessage());
		}

		System.out.println("\nend main program");
	}

}
throws 이용한 오버라이딩 사용시 주의사항
- 메서드 리턴타입이 반드시 동일해야 된다. 단, 상속관계인 경우에 작은 타입으로 지정이 가능하다.
- 메서드명이 반드시 동일해야 된다.
- 메서드 인자 리스트가 반드시 동일해야 된다.
- 접근지정자는 같거나 큰 레벨만 가능하다.
- throws 예외클래스는 계층구조에서 같거나 작은 타입만 가능하다.
- 이는 부모 메서드에서 throws 예외 클래스를 사용시 자식의 오버라이딩 메서드에서는 부모에서 사용한 예외클래스와 같거나 또는 계층구조가 낮게 또는 throws문을 사용하지 않아야 된다는 것이다.
- 이전에 올린 사진: '예외처리 클래스들 간의 계층구조'를 참고한다.
❗throws 키워드를 이용한 명시적 예외 발생
프로그램에서 예외가 발생되는 경우는 특정 조건에 위배되는 경우이다. 예를 들어 정수값을 0으로 나누거나 배열에서 인덱스값을 초과하거나 null값을 가진 참조변수가 객체를 접근하거나 파일에서 데이터를 읽을 때 존재하지 않은 파일을 접근하는 경우가 대표적이다.
이러한 상황은 자동으로 예외처리를 지원한다.
그러나 특정 조건(특정 값이 100보다 작다)에 맞지 않는 경우를 예외라고 가정할 수 있고 이 경우는 예외를 명시적으로 발생시켜야 된다.
if(조건) throw new XXXException([인자]);
사용하고자 하는 예외클래스를 객체생성하고 반드시 throw를 이용하여 예외를 강제적으로 발생시킨다.
- 예제
package com.test;

public class Ex09_7 {

	public static void check(int num) throws Exception{
		//throw를 이용한 exception 강제발생
		if(num < 100) {
			throw new Exception("num 값이 100 보다 작다.");
		}
	}

	public static void main(String[] args) {

		System.out.println("프로그램 시작");
		try {
			check(70);
		} catch (Exception e) {
			System.out.println("예외 발생: "+ e.getMessage());
		}
		System.out.println("프로그램 정상 종료");
	}

}
- 출력
프로그램 시작
예외 발생: num 값이 100 보다 작다.
프로그램 정상 종료
--> check함수에서 throws를 하지 않고, 명시적 예외에 바로 try~catch 를 적용할 수 있다.
package com.test;

public class Ex09_7_1 {

	public static void check(int num){
		try {//1. Exception 강제 발생 후 직접 try ~ catch
			if(num < 100) {
				throw new Exception("num 값이 100 보다 작다.");
			}
		} catch (Exception e) {
			System.out.println("check함수에서 Exception발생, 처리함: "+e.getMessage());
		}
	}

	public static void main(String[] args) {

		System.out.println("프로그램 시작");

		check(70);

		System.out.println("프로그램 정상 종료");
	}

}
사용자 정의 예외 클래스
사용자 정의 예외 클래스를 사용하는 경우는 2가지 경우가 있다.
사용자가 지정한 조건에 위배되는 경우
사용자가 정의해야 하는 예외 조건은 예외클래스가 제공되지 않기 때문에 강제적으로 발생시킨 예외를 처리하기 위해서 사용자가 정의한 예외클래스를 작성할 필요가 있다.
-
작성하는 기본 형식
public class UserException extends Exception{
public UserException( String mesg ){
super( mesg );
}
} -
예제
package com.test;

class UserException extends Exception{//1.

	public UserException(String mesg) {//2.
		super(mesg);
	}

}

public class Ex09_8 {

	public static void check(int num) throws UserException{
		if (num < 100){
			//사용자정의 ex발생
			throw new UserException("num 값이 100보다 작다.");
		}
	}

	public static void main(String[] args){
		System.out.println("메인시작");
		try {
			check(70);
		} catch (UserException e) {
			System.out.println("사용자 정의 ex: "+e.getMessage());
		}
		System.out.println("메인종료");
	}

}
- 출력
메인시작
사용자 정의 ex: num 값이 100보다 작다.
메인종료
--> 예외클래스를 사용자가 직접 만들어준다. 만드는 예외 클래스는 시스템에 적용되어 있는 기본 예외 클래스를 상속받는다. 이는 클래스이기 때문에 같은 패키지 내 다른 파일로도 따로 만들 수 있다.
시스템의 예외를 사용자 예외로 변환하는 경우
시스템에서 제공되는 예외클래스를 이용하여 예외처리를 한 경우 catch블록에서 출력된 예외정보의 대부분은 사용자가 쉽게 이해할 만한 내용이 아니다. 대부분이 영어로 된 전문용오러 출력이 된다.
따라서 시스템 예외클래스를 사용자 예외 클래스로 변환시켜 일반 사용자에게 발샐된 예외정보를 쉽게 이해할 수 있도록 처리할 수 있다.
- 차이점
위에 했던 예제는 예외조건을 사용자가 지정하는 것이고 지금 예제는 시스템에서 제공하는 예외 조건을 사용자가 예외 정보를 보기 쉽게 임의로 변환하는 것이다.
package com.test;

class ByzeroException2 extends Exception{

	public ByzeroException2(String message) {
		super(message);
	}

}

public class Ex09_9_1 {

	private static void divide() throws ByzeroException2{

//사용자가 예외 조건을 지정하는 것이 아닌 시스템에서 제공하는
//예외를 try~catch, throw new를 이용한 출력문 변환
		try {
			int num = 3 / 0;
		} catch (ArithmeticException e) {
			throw new ByzeroException2("0으로 나누어 예외 발생~");
		}

	}

	public static void main(String[] args) {

		System.out.println("프로그램 시작");

		try {
			divide();
		} catch (ByzeroException2 e) {
			System.out.println("예외 발생 : " + e.getMessage());
		}

		System.out.println("프로그램 종료");

	}


}
- 마찬가지로 divide함수에서 throw를 안하고 try~catch 내부에 try~catch를 넣어도 동일하다.
package com.test;

class ByzeroException extends Exception{

	public ByzeroException(String message) {
		super(message);
	}

}

public class Ex09_9 {

	private static void divide(){

		try {
			int num = 3 / 0;
		} catch (Exception e) {
			try {
				throw new ByzeroException("0으로 나누어 예외 발생~");
			} catch (Exception e2) {
				System.out.println(e2.getMessage());
			}
		}

	}

	public static void main(String[] args) {

		System.out.println("프로그램 시작");

		divide();

		System.out.println("프로그램 종료");

	}


}
