HTTPS 에 관련 기술을 아래에서 확인 가능하다.
위 내용에서 중요한 것은
💡 SSL 인증서를 사용한 보안처리를 해야만 안전한 웹사이트로 인정받아 HTTPS 프로토콜을 사용 가능하다.
HTTPS 를 만들기 위해 필요한 것
- 도메인
- 인증서
도메인
도메인은 가비아에서 1900 주고 1년 치 도메인을 구매 했다.
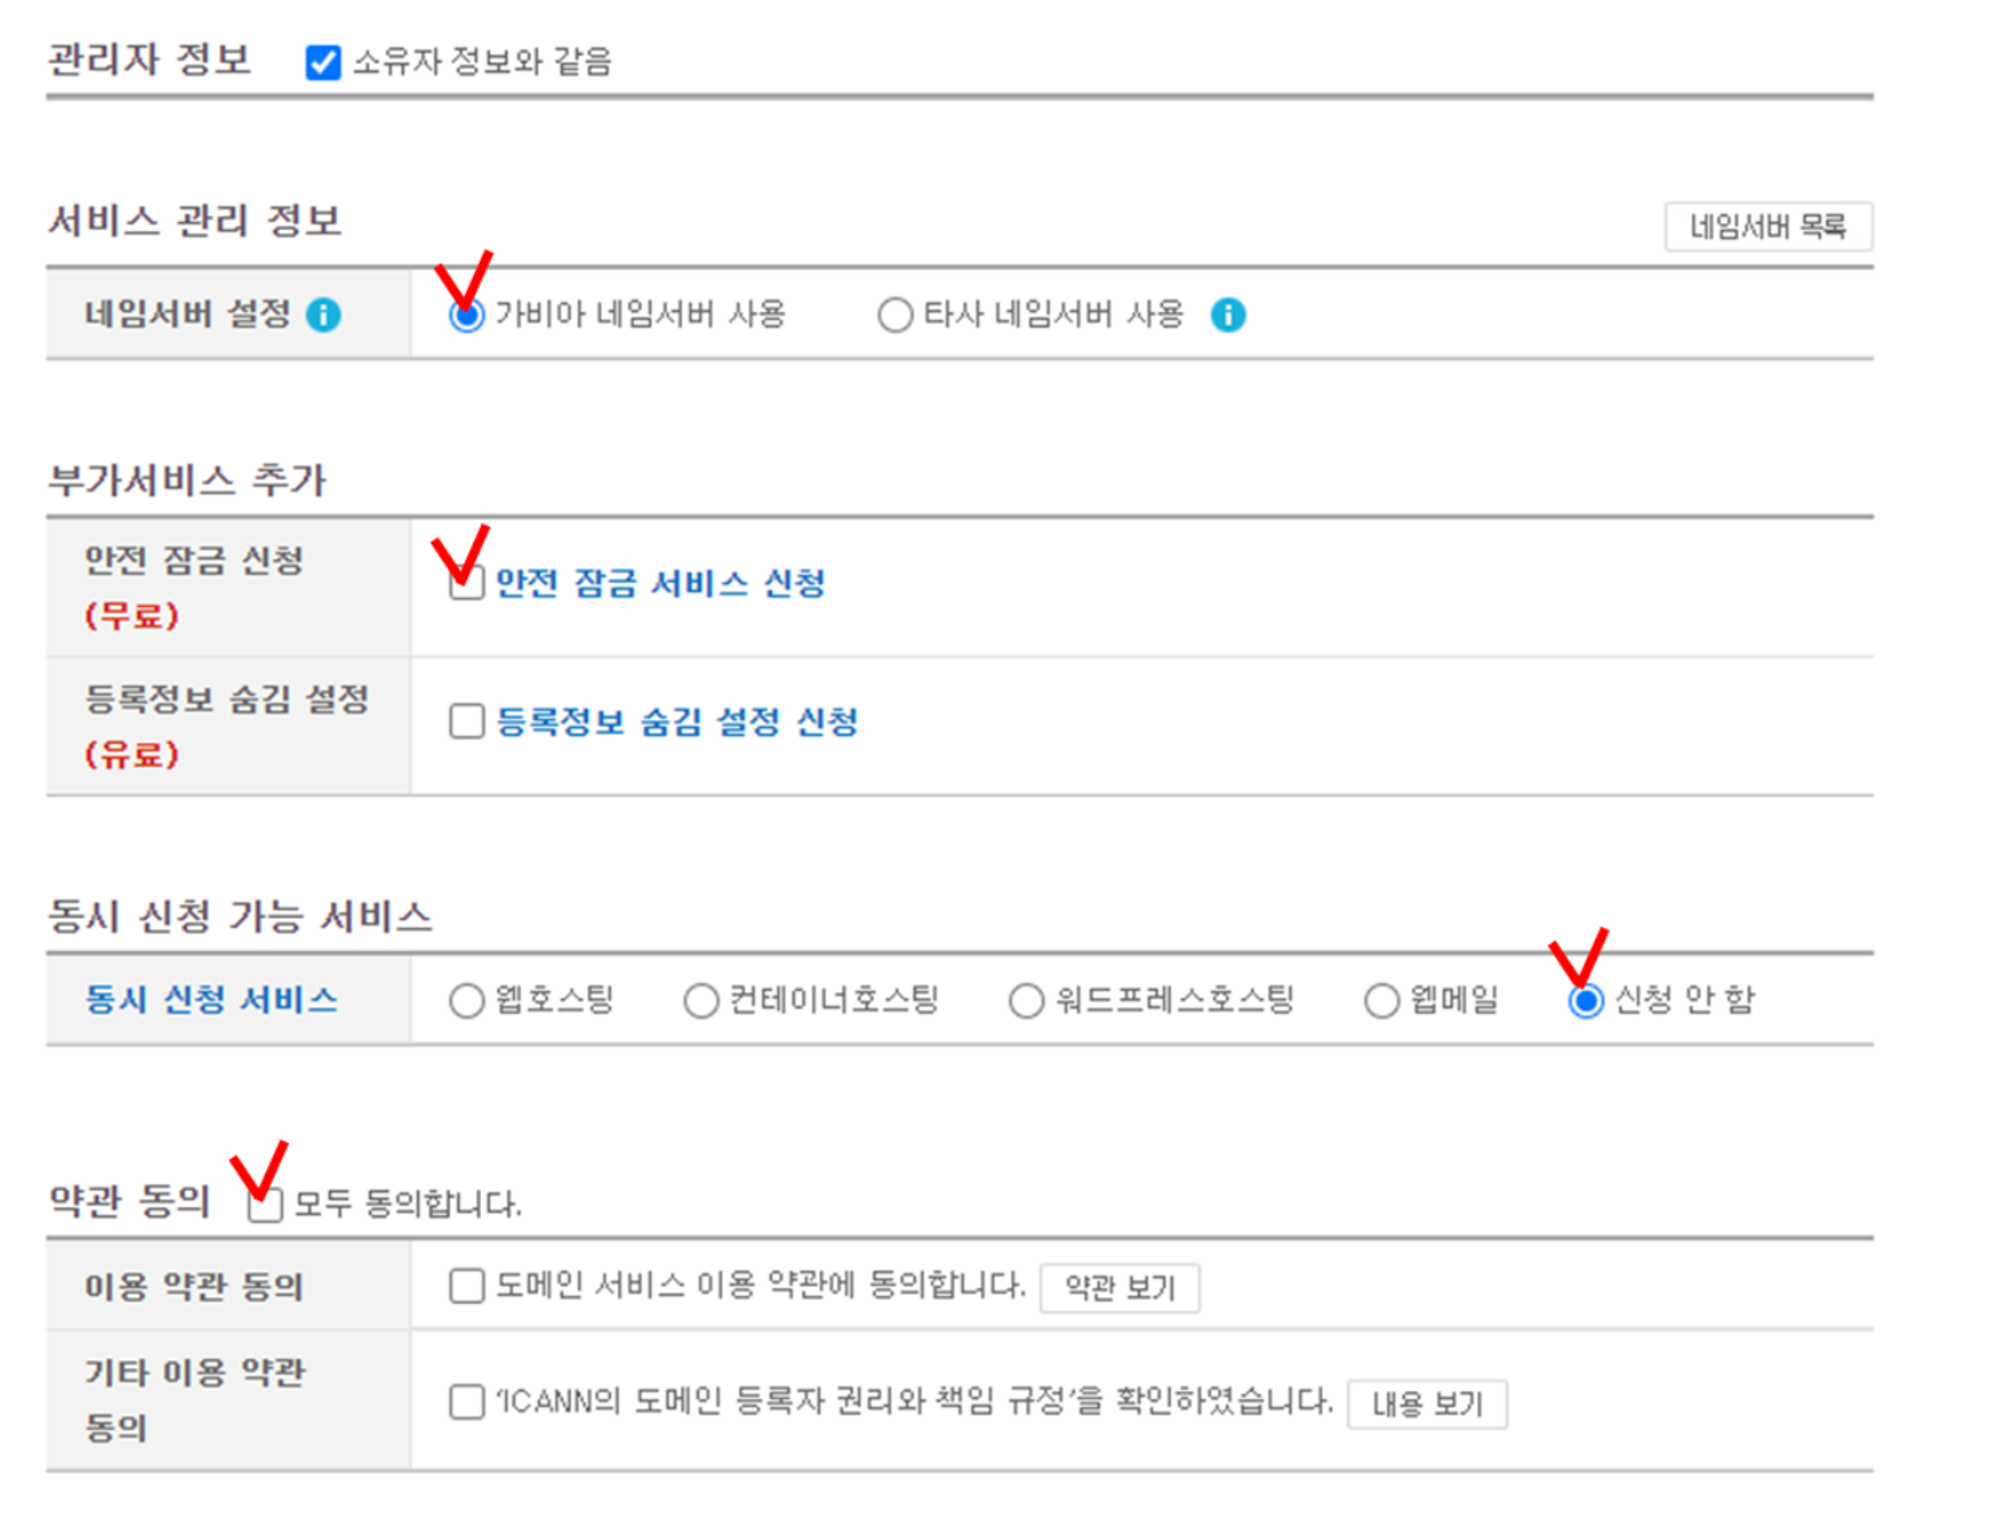
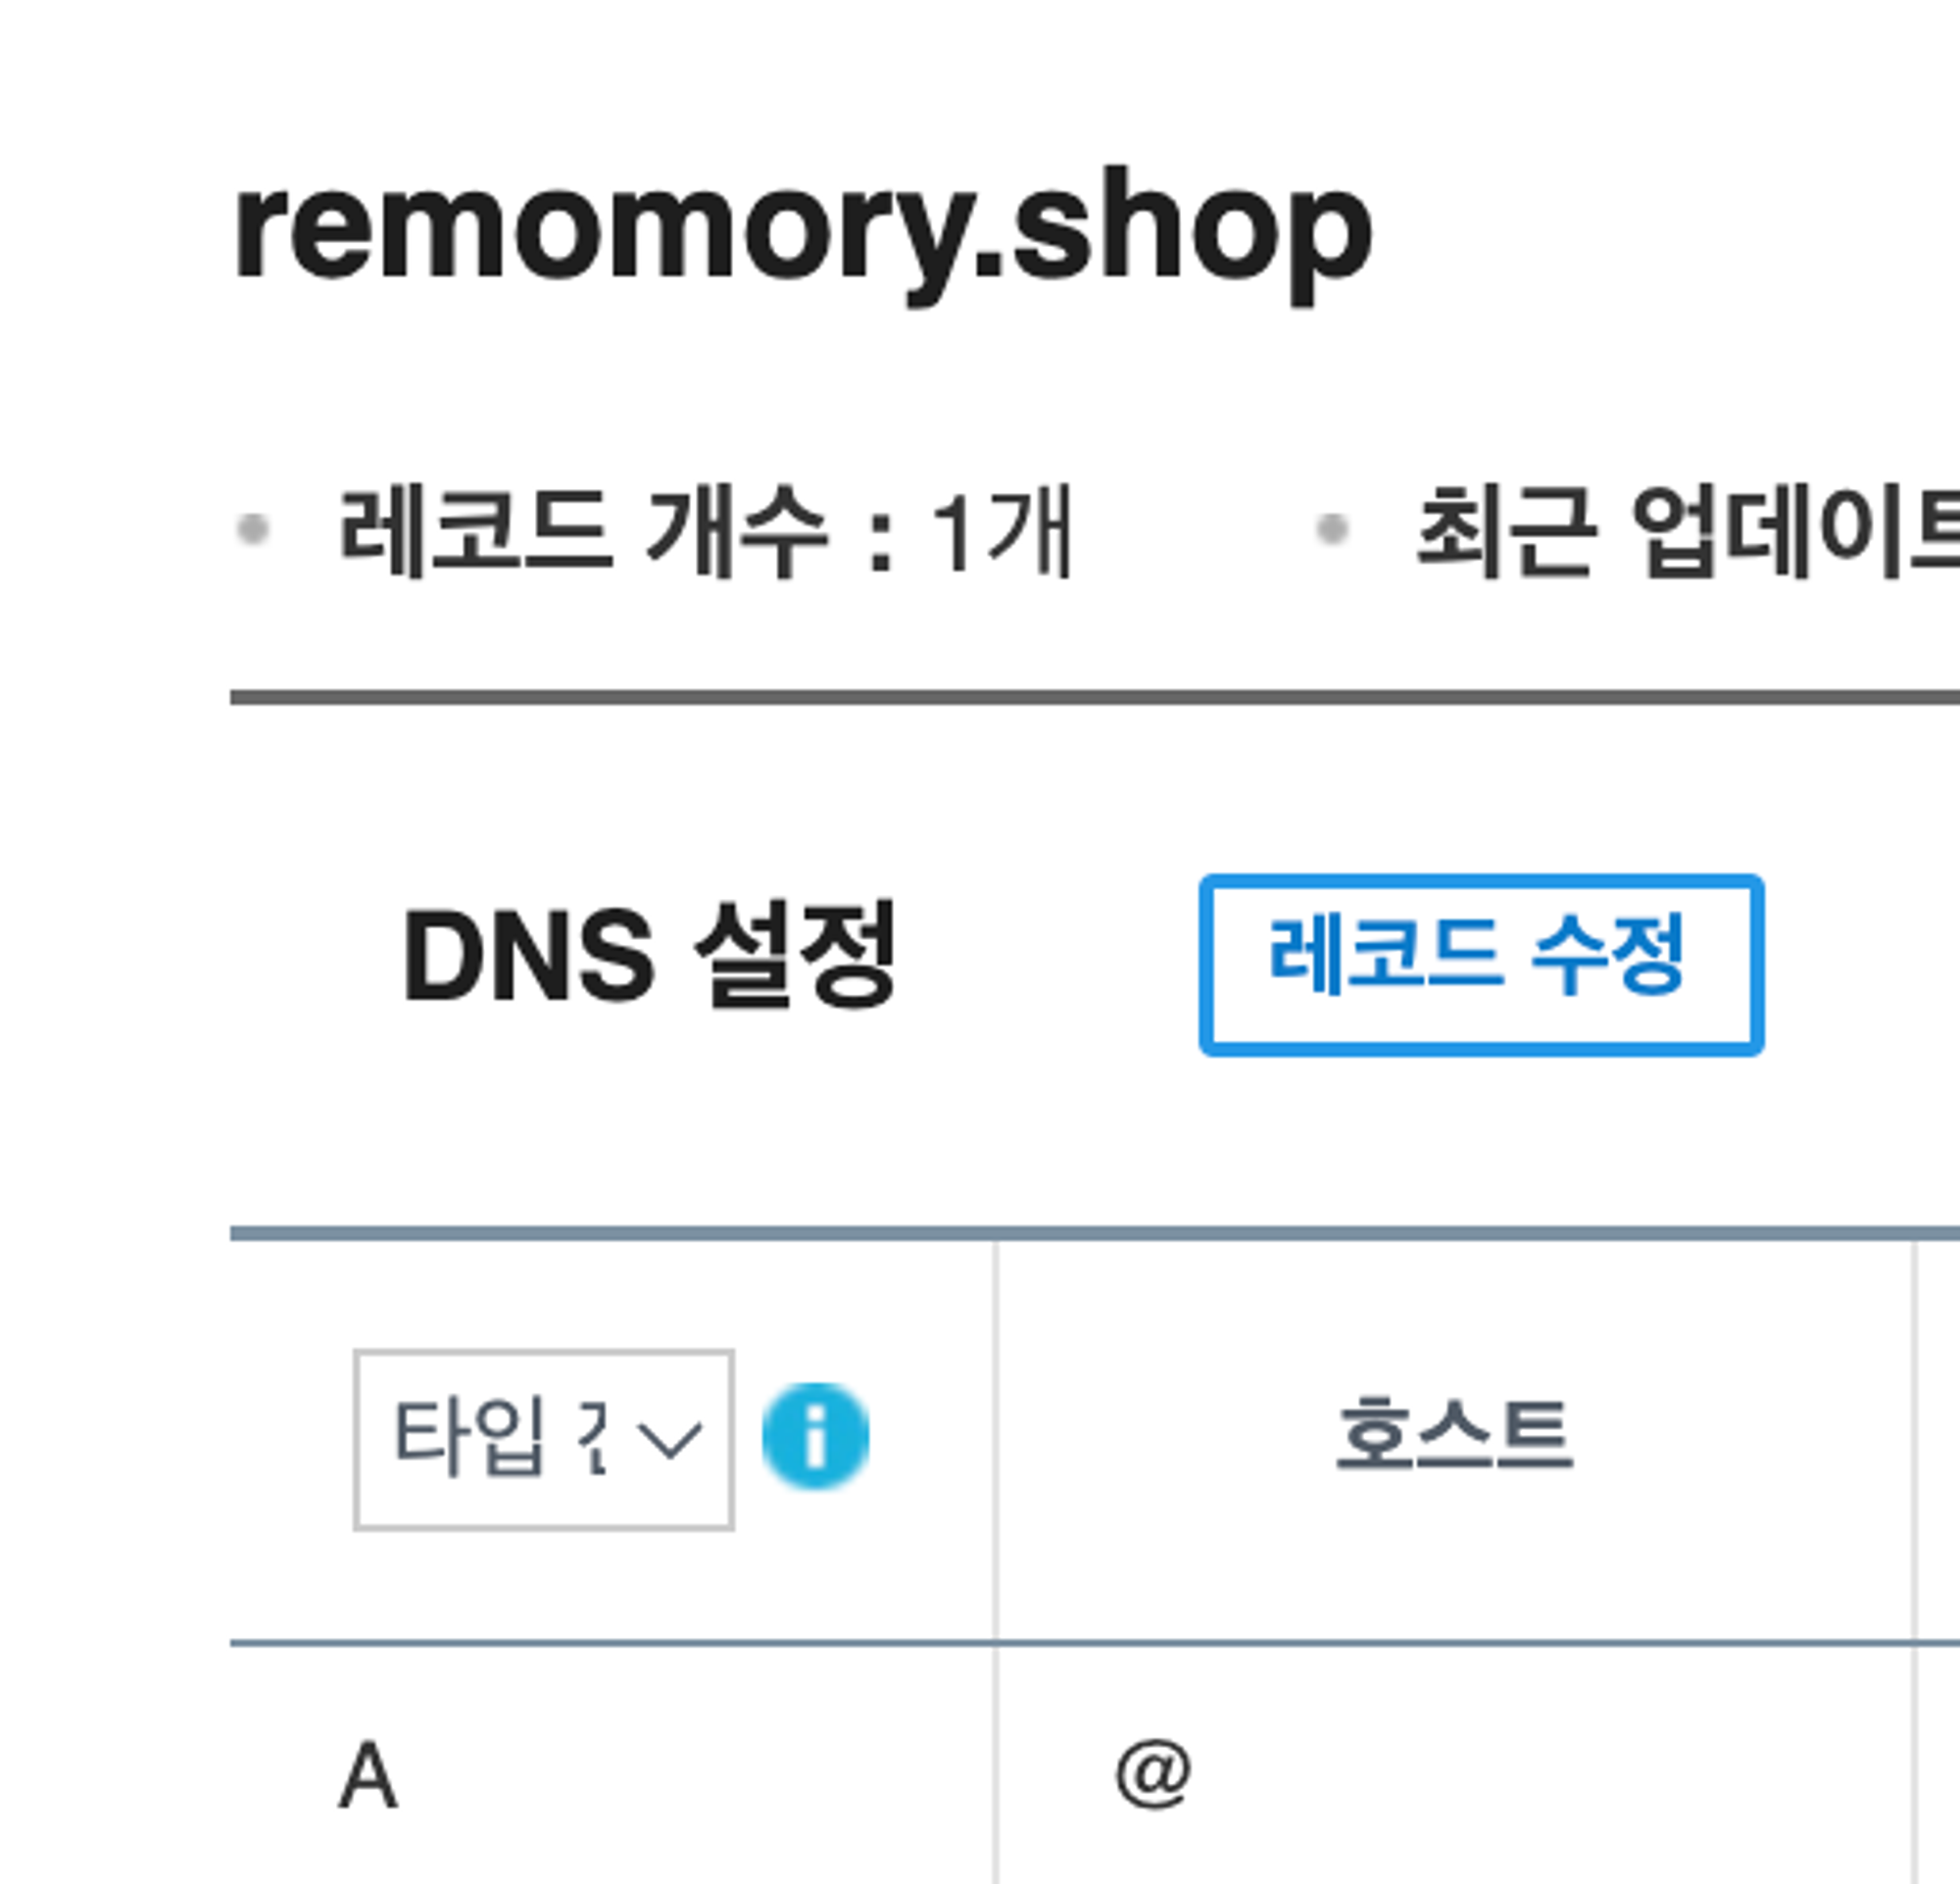
레코드를 수정하여 A 타입을 추가 하였다. ( 호스트 (www 같은거) 가 없을때는 @ 를 적는다고 한다.)
SSL/TLS 인증서
Let’s Encrypt라는 비영리 기관에서 무료고 기한이 90일인 TLS 인증서를 발급 해준다.
(서비스를 운영한다면 더욱 보안등급이 높은 유료 인증서를 사용해야 한다.)
쉽게 인증서를 발급받기 위해 오픈소스 툴인 CertBot 를 이용한다.
나는 docker-compose 로 django 와 nginx 가 연결 되어 있기 때문에 docker compose 를 이용한 https 를연동시킬 것이다.
일단 https를 적용하려는 nginx의 docker-compose 파일이다
nginx docker-compose.yml
version: '3'

services:
  nginx:
    image: nginx:alpine
    container_name: nginx
    networks:
      - dp_dp
    ports:
      - "80:80"
      - "443:443"
    volumes:
      - ./nginx.conf:/etc/nginx/nginx.conf
      - ./public:/public
      - ./data/certbot/www:/var/www/certbot
      - ./data/certbot/conf:/etc/letsencrypt
    command:
      - /bin/sh
      - -c
      - "while :; do sleep 6h & wait $${!}; nginx -s reload; done & nginx -g 'daemon off;'"

  certbot:
    image: certbot/certbot
    container_name: certbot
    networks:
      - dp_dp
    volumes:
      - ./data/certbot/conf:/etc/letsencrypt
      - ./data/certbot/www:/var/www/certbot
    entrypoint: "/bin/sh -c 'trap exit TERM; while :; do certbot renew; sleep 12h & wait $${!}; done;'"

networks:
  dp_dp:
    external: true
중요한 설정을 적어보자면
- nginx의 포트는 80, 443 을 열어준다.
http는 80포트를 사용하고https는 443 포트를 사용하기 때문에 열어 주어야 한다.
- nginx 와 certbot은 같은 도커 네트워크를 사용하고 컨테이너 이름은 nginx, certbot으로 한다. nginx는 밑에서 나올 스크립트에서 컨테이너 이름이 nginx 이기 때문에 nginx로 작성해준다. (물론 밑에 스크립트를 본인이 수정해도된다.)
- nginx 와 certbot 의 볼륨은
./data/certbot을 공유한다. nginx에서는 certbot 컨테이너에서 받은 인증서를 이용해 https 설정을 하기 때문에 위 설정과 같은 볼륨을 공유해야하고 밑에서 사용될 스크립트에서./data/certbot에 접근하기 때문에 볼륨 경로는 위와 같이 한다. (물론 스크립트에서 수정 가능하다)
- 도커 컨테이너 커맨드는 위와같이 설정한다. 자동으로 인증서를 업데이트 해주는 커맨드이다. 그냥 사용하면된다.
서버,DB docker-compose.yml
밑은 서버, DB가 설정되어있는 docker-compose 파일이다.
version: '3'

services:
  django:
    build:
      context: .
      dockerfile: Dockerfile
    container_name: dp
    networks:
      - dp

    restart:
      on-failure
    depends_on:
      - mysql
      - neo4j

  neo4j:
    container_name: neo4j
    image: neo4j:latest
    networks:
      - dp

  mysql:
    container_name: mysql
    image: mysql
    volumes:
      - ./vol:/var/lib/mysql
    networks:
      - dp
    command:
      - --character-set-server=utf8
      - --collation-server=utf8_general_ci

networks:
  dp:
driver: bridge- 위 컨테이너들도 nginx와 같은 네트워크에 물려있다.
docker-compose -f docker-compose.yml -f docker-compose-prod -p dp up -d —build로 실행시켜 도커 네트워크 이름을dp_dp로 만들어 주었다.
docker-compose-prod.yml
밑은 docker-compose-prod.yml 이다.
services:
  django:
    volumes:
      - .:/app
    ports:
      - "8001:8000"
    env_file:
      - .env-django
      - .env-s3
    command:
      - /bin/bash
      - -c
      - |
        dos2unix /app/wait-for-services.sh
        ./wait-for-services.sh python3 manage.py makemigrations
        python3 manage.py migrate
        gunicorn config.wsgi:application --bind 0.0.0.0:8000

  neo4j:
    ports:
      - "7474:7474"
      - "7473:7473"
      - "7687:7687"
    volumes:
      - ./neo4j-volume/data:/data
      - ./neo4j-volume/logs:/logs
    env_file:
      - .env-neo4j

  mysql:
    volumes:
      - ./mysql-volume/mysql:/var/lib/mysql
    env_file:
      - .env-mysql
    ports:
- "3305:3306"- 배포할 클라우드 환경은
3306포트를 이미 사용중이라
nginx.conf
이제 nginx.conf 를 살펴 보자
user  nginx;
worker_processes  auto;

error_log  /var/log/nginx/error.log error;
pid        /var/run/nginx.pid;

events {
    worker_connections  1024;
}

http {
    include mime.types;

     # 80 포트로 접근시 443 포트로 리다이렉트
    server {
        listen 80;
        server_name remomory.shop;

        location /.well-known/acme-challenge/ {
            allow all;
            root /var/www/certbot;
        }
    }
}
먼저 위와같이 작성 한뒤 docker-compose up 으로 nginx와 certbot 컨테이너들을 실행 시킨다.
이제 certbot 을 이용해 인증서를 받아보자 인증서를 받는 명령어는
https://raw.githubusercontent.com/wmnnd/nginx-certbot/master/init-letsencrypt.sh
에 예쁘게 정리되어 있다.
init-letsencrypt.sh
위 명령어 파일은 대충 이렇게 생겼다.
#!/bin/bash

if ! [ -x "$(command -v docker-compose)" ]; then
  echo 'Error: docker-compose is not installed.' >&2
  exit 1
fi

domains=(example.org www.example.org)
rsa_key_size=4096
data_path="./data/certbot"
email="" # Adding a valid address is strongly recommended
staging=0 # Set to 1 if you're testing your setup to avoid hitting request limits

if [ -d "$data_path" ]; then
  read -p "Existing data found for $domains. Continue and replace existing certificate? (y/N) " decision
  if [ "$decision" != "Y" ] && [ "$decision" != "y" ]; then
    exit
  fi
fi

if [ ! -e "$data_path/conf/options-ssl-nginx.conf" ] || [ ! -e "$data_path/conf/ssl-dhparams.pem" ]; then
  echo "### Downloading recommended TLS parameters ..."
  mkdir -p "$data_path/conf"
  curl -s https://raw.githubusercontent.com/certbot/certbot/master/certbot-nginx/certbot_nginx/_internal/tls_configs/options-ssl-nginx.conf > "$data_path/conf/options-ssl-nginx.conf"
  curl -s https://raw.githubusercontent.com/certbot/certbot/master/certbot/certbot/ssl-dhparams.pem > "$data_path/conf/ssl-dhparams.pem"
  echo
fi

echo "### Creating dummy certificate for $domains ..."
path="/etc/letsencrypt/live/$domains"
mkdir -p "$data_path/conf/live/$domains"
docker-compose run --rm --entrypoint "\
  openssl req -x509 -nodes -newkey rsa:$rsa_key_size -days 1\
    -keyout '$path/privkey.pem' \
    -out '$path/fullchain.pem' \
    -subj '/CN=localhost'" certbot
echo

echo "### Starting nginx ..."
docker-compose up --force-recreate -d nginx
echo

echo "### Deleting dummy certificate for $domains ..."
docker-compose run --rm --entrypoint "\
  rm -Rf /etc/letsencrypt/live/$domains && \
  rm -Rf /etc/letsencrypt/archive/$domains && \
  rm -Rf /etc/letsencrypt/renewal/$domains.conf" certbot
echo

echo "### Requesting Let's Encrypt certificate for $domains ..."
#Join $domains to -d args
domain_args=""
for domain in "${domains[@]}"; do
  domain_args="$domain_args -d $domain"
done

# Select appropriate email arg
case "$email" in
  "") email_arg="--register-unsafely-without-email" ;;
  *) email_arg="--email $email" ;;
esac

# Enable staging mode if needed
if [ $staging != "0" ]; then staging_arg="--staging"; fi

docker-compose run --rm --entrypoint "\
  certbot certonly --webroot -w /var/www/certbot \
    $staging_arg \
    $email_arg \
    $domain_args \
    --rsa-key-size $rsa_key_size \
    --agree-tos \
    --force-renewal" certbot
echo

echo "### Reloading nginx ..."
docker-compose exec nginx nginx -s relo
여기서 이메일, 도메인, 파일 경로 등을 바꾸어 준다. (이메일, 도메인 필수!)
chmod +x init-letsencrypt.sh 으로 실행 권한을 준다음 (필수!)
sudo ./init-letsencrypt.sh 으로 실행 시켜 준다. (컨테이너들이 올라간뒤 실행해야함!)
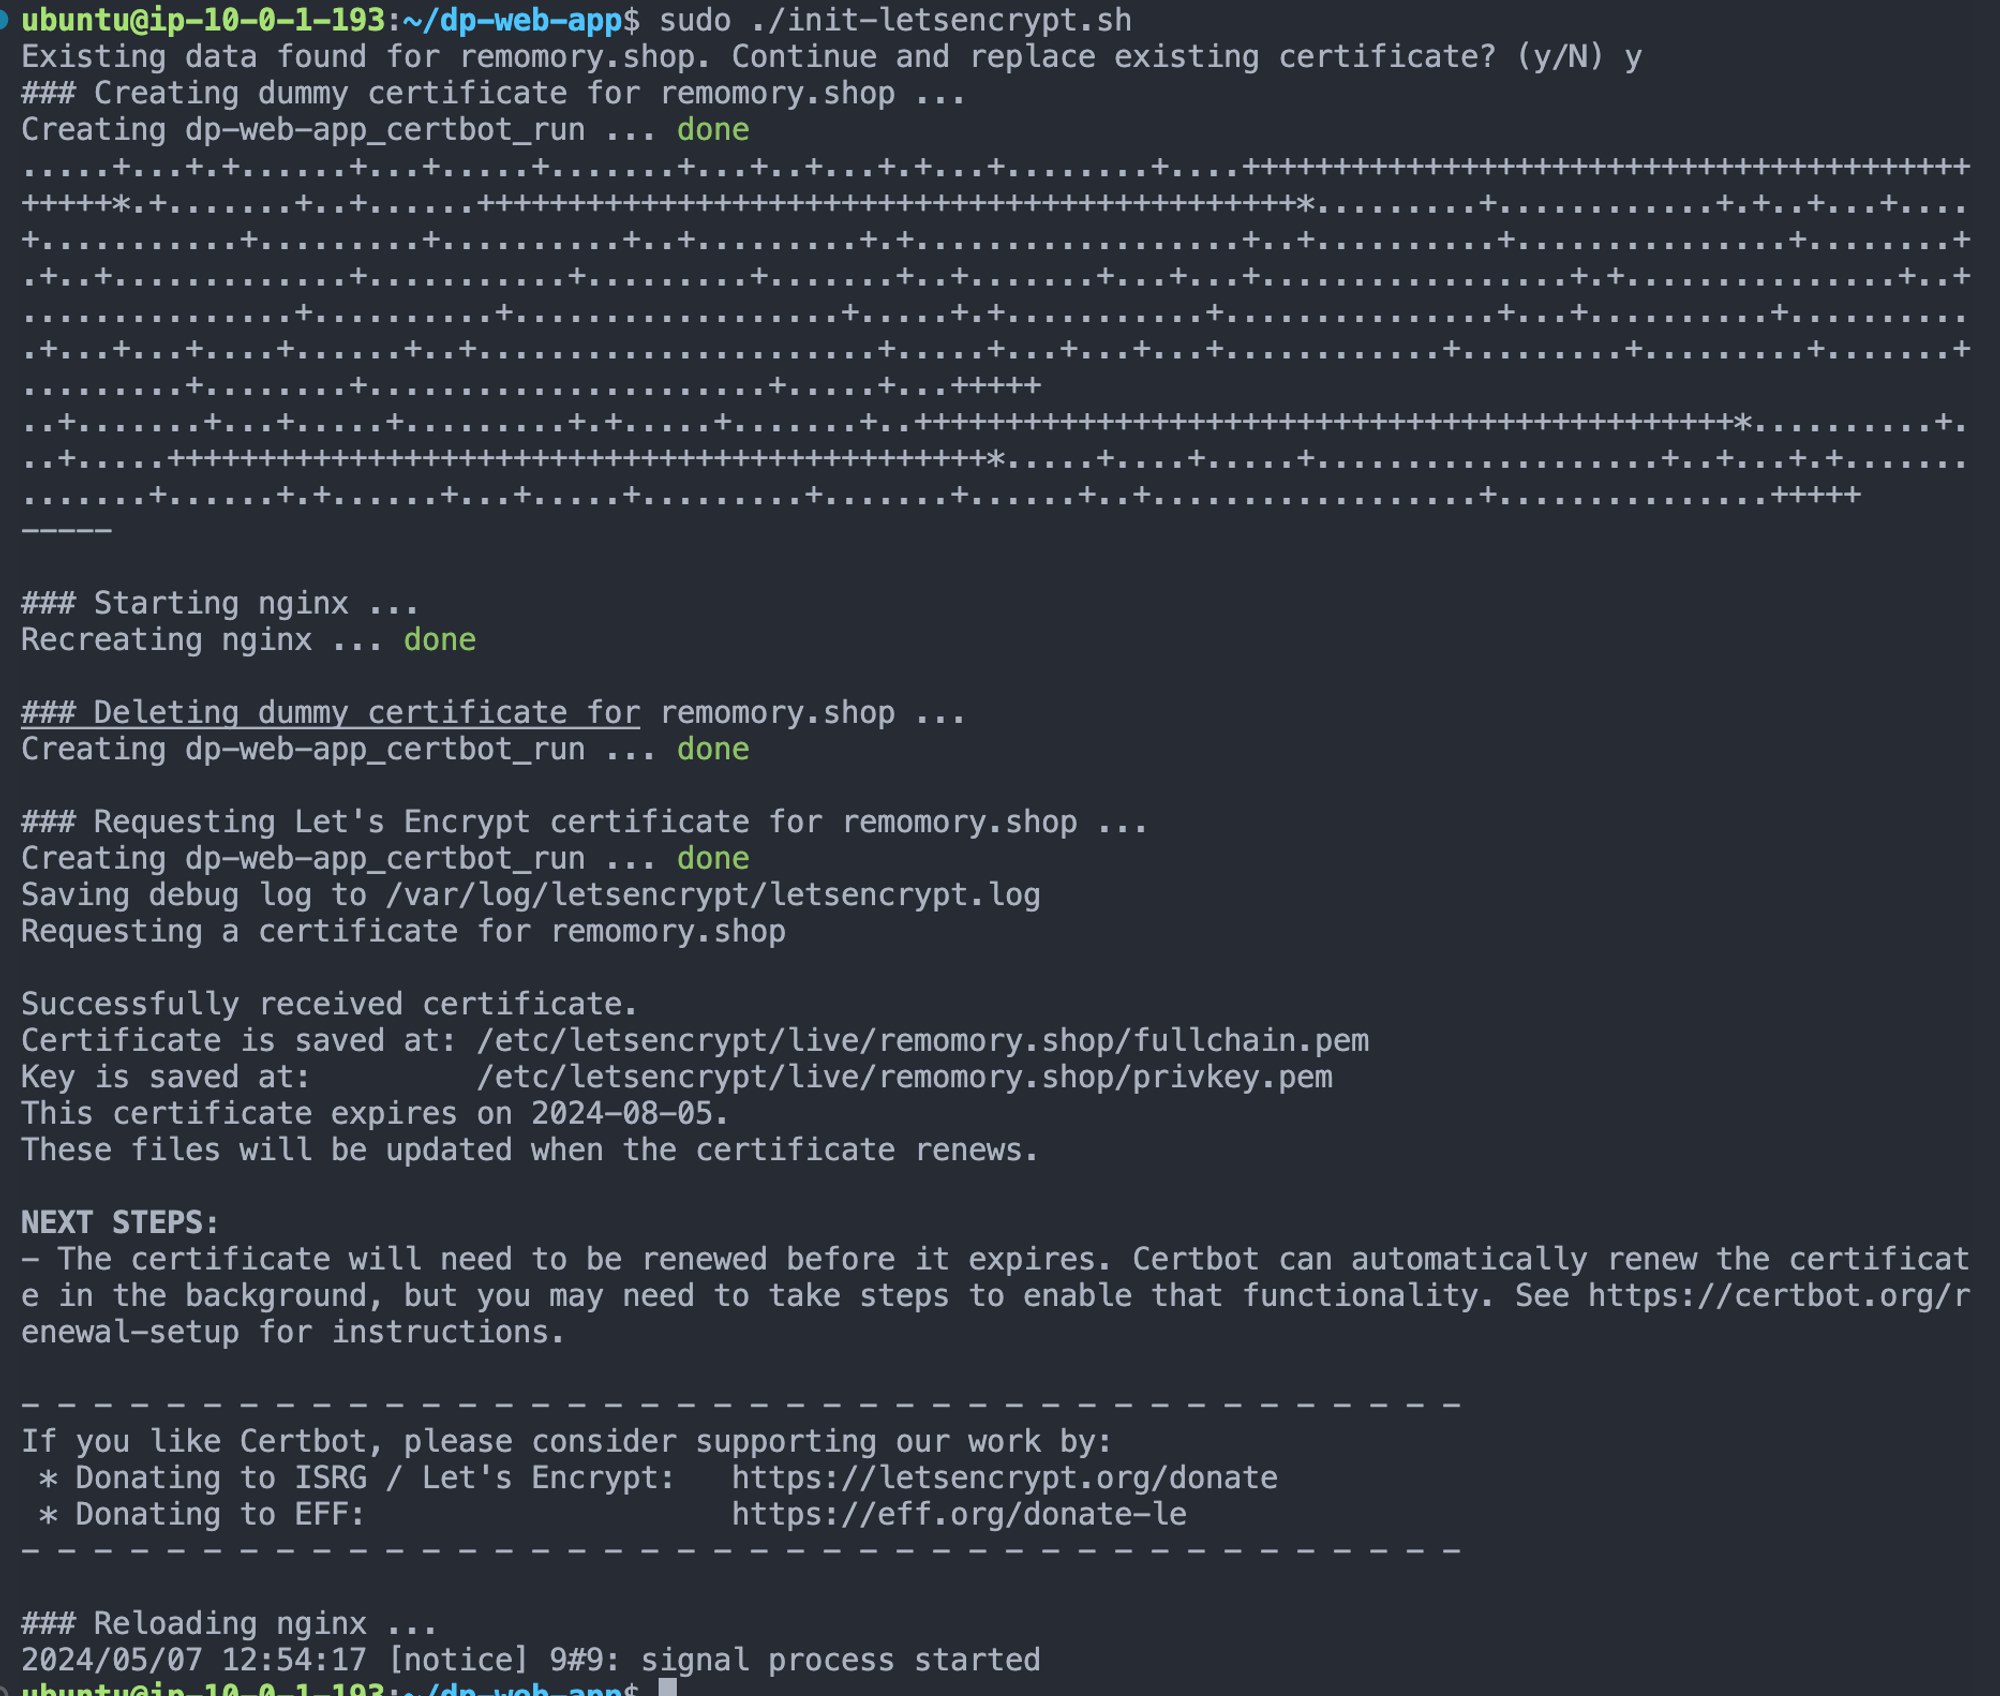
잘 됐다
최종 nginx.conf
이제 nginx.conf 에 ssl 추가 설정을 해 준다.
user  nginx;
worker_processes  auto;

error_log  /var/log/nginx/error.log error;
pid        /var/run/nginx.pid;

events {
    worker_connections  1024;
}

http {
    include mime.types;

    upstream dp {
        server dp:8000;
    }

    upstream dp-survey{
        server survey:8080;
    }

    upstream dp-game{
        server game:3000;
    }

    server {
        listen 443 ssl;

        server_name remomory.shop;

        location / {
            # /public 의 index.html 파일을 제공
            root /public;
            index index.html;
            try_files $uri $uri/ /index.html;
        }

        location /.well-known/acme-challenge/ {
            allow all;
            root /var/www/certbot;
        }

        location /api {
            proxy_pass http://dp;
            proxy_http_version 1.1;
            proxy_set_header Upgrade $http_upgrade;
            proxy_set_header Connection 'upgrade';
            proxy_set_header Host $host;
            proxy_cache_bypass $http_upgrade;
        }

        location /api/survey {
            proxy_pass http://dp-survey;
            proxy_http_version 1.1;
            proxy_set_header Upgrade $http_upgrade;
            proxy_set_header Connection 'upgrade';
            proxy_set_header Host $host;
            proxy_cache_bypass $http_upgrade;
        }

        location /api/game {
            proxy_pass http://dp-game;
            proxy_http_version 1.1;
            proxy_set_header Upgrade $http_upgrade;
            proxy_set_header Connection 'upgrade';
            proxy_set_header Host $host;
            proxy_cache_bypass $http_upgrade;
        }

        location /static/drf-yasg {
            proxy_pass http://dp/static/drf-yasg;
        }

        ssl_certificate /etc/letsencrypt/live/remomory.shop/fullchain.pem;
        ssl_certificate_key /etc/letsencrypt/live/remomory.shop/privkey.pem;

        include /etc/letsencrypt/options-ssl-nginx.conf;
        ssl_dhparam /etc/letsencrypt/ssl-dhparams.pem;
    }

    # 80 포트로 접근시 443 포트로 리다이렉트
    server {
        listen 80;
        server_name remomory.shop;
        return 301 https://$host$request_uri;
    }
}- SSL/TLS 설정을 위해
위 부분을 추가 하였다.ssl_certificate /etc/letsencrypt/live/remomory.shop/fullchain.pem; ssl_certificate_key /etc/letsencrypt/live/remomory.shop/privkey.pem; include /etc/letsencrypt/options-ssl-nginx.conf; ssl_dhparam /etc/letsencrypt/ssl-dhparams.pem;
- 벡엔드 서버도 같이 HTTPS 설정을 하기 위해 프록시 세팅을 했다. upstream으로 각 서버 origin을 설정하고 각 벡엔드 서버에 url prefix를 매칭시켰다.
- 벡엔드 Swagger 문서의 정적 문서를 찾지 못하여
/static/drf-yasg경로로 찾는 데이터는http://dp/static/drf-yasg에서 찾도록 했다.
docker compose로 컨테이너 재시작을한다면
- docker-compose down
- docker-compsoe up -d
드럽게 잘되는것을 확인 가능! (chrome 브라우저의 “주의요함!” 문구가 뜨지 않는 것을 확인 가능함)
참고 링크
Docker Nginx에서 HTTPS를 위한 SSL 인증서 적용 (Let's encrypt, Docker compose)