Calander(달력) 만들어 보기
Date Picker 만들어 보기 (Cupertino UI)
이번 글에서는 Calander를 만들어 보도록 하겠다.
Flutter에서는 달력을 기본적으로 제공하고 있는데, 직접 만들어 보고 싶다면 글을 참고해서 나만의 달력을 만들도로 해보자.
Cupertino 디자인의 달력을 원하면, 이전에 작성했던 글을 참고하길 바라며, 여기서는 Material 디자인 달력을 만들도록 하겠다.
글로벌 릴리즈 서비스라면 달력을 만드는 작업도 고난이도의 개발 영역으로 볼 수 있다. 국가마다의 공휴일이 다르고, Direction, DateTime 등 고려해야 할 사항이 너무 많다. 그래서 여기서는 대한민국을 기준으로 개발을 할 것이고, UI는 보여줄 수 있는 수준으로만 만들었다.
해당 코드를 가져다 커스텀해서 사용하셔도 되고, 로직만 가져다 사용하셔도 된다.
달력을 어떻게 만들 수 있는지 개발을 해보자 !
Flutter
달력을 만드는 것은 생각보다 어렵지는 않다. 31일인 월과 30일인 월은 이미 알고 있으니, 어렵지 않지만 문제는 2월달인 경우 윤년을 계산해 주어야 한다.
추가로 달력을 보여줄 때, 어떤 달은 수요일 부터 시작되고, 어떤 달은 일요일 부터 시작될 수도 있다.
어떻게 해야 시작달 부터 UI를 그려나갈 수 있을까 ?
내가 생각한 방법은 해당 월의 일자를 배열에 담아서 사용하는 방법이다.
일요일 -> 토요일 까지를 순서로 달력을 만드는데, 만일 2023년 3월달의 시작 수요일이라면, 배열의 시작은 "[0,0,0,1,2,3,4...]" 이런식으로 생성해 주는 것이다.
그리고 UI 영역에서 0번인 값은 전부 제거해 주면 자연스럽게 달력은 월의 시작 요일을 기준으로 보여주게 된다.
마찬가지로 월의 마지막 날의 요일을 계산해서 나머지 배열의 빈공간을 0으로 채워주면 달력이 만들어지게 된다.
이번 UI를 생성할 때 저는 Wrap으로 생성했는데, GridView를 사용하는 것이 베스트 방식이다.
상태 관리는 BLoC Pattern을 사용했으며, 다른 상태 관리를 사용하길 원하시면 로직만 가져다 사용하시면 된다.
Model
먼저 사용할 모델을 생성해보자. 연/월/일을 각각 변수로 가지고 있으며, 일자는 정수형을 담는 배열로 생성해 줄 것이다.
CalanderModel의 객체 복사를 하기위해 copyWith()와 Nullable 타입으로 선언을 하지 않으려고, empty()를 따로 만들어 주었다.
class CalanderModel {
  final int year;
  final int month;
  final List<int> days;
  const CalanderModel({
    required this.year,
    required this.month,
    required this.days,
  });

  CalanderModel copyWith({
    final int? year,
    final int? month,
    final List<int>? days,
  }) {
    return CalanderModel(
      year: year ?? this.year,
      month: month ?? this.month,
      days: days ?? this.days,
    );
  }

  factory CalanderModel.empty() =>
      const CalanderModel(year: 0, month: 0, days: []);
}
Presentation
이번엔 UI 부분을 살펴보자. UI 부분은 코드도 많고 그래서 Git 저장소를 참고하면 좋을 것 같다.
달력을 보여주는 것인데, 위에서 생성한 CalanderModel의 days 배열로 보여주게 될 것이다.
일~토요일 까지 7개의 정사각형 박스가 나열되어야 하기에, 디바이스 가로 사이즈를 7로 나눠서 보여주고 있다.
텍스트 스타일 부분을 보면, DateTime.now()와 동일한 일자에는 amber 색상을 주었고, index % 7 - 6 == 0에 해당되는 토요일에는 blue, index % 7 == 0에 해당되는 인덱스는 일요일로써, red 색상으로 해주었다.
Wrap(
	children: [
		...List.generate(state.calander.days.length,
			(index) => BackdropFilter(
					filter: ImageFilter.blur(
						sigmaX: state.blur,
						sigmaY: state.blur),
						child: Container(
							decoration: BoxDecoration(
								border: Border.all(
									color: const Color.fromRGBO(51, 51, 51, 1))),
								height: MediaQueryData.fromWindow(window).size.width / 7.0001,
								width: MediaQueryData.fromWindow(window).size.width / 7.0001,
                                      child: Padding(
                                        padding: const EdgeInsets.only(
                                            left: 4, top: 4),
                                        child: Text(
                                          state.calander.days[index] == 0
                                              ? ""
                                              : state.calander.days[index]
                                                  .toString(),
                                          style: TextStyle(
                                              fontWeight: FontWeight.bold,
                                              color: (state.calander.year ==
                                                          DateTime.now().year &&
                                                      state.calander.month ==
                                                          DateTime.now()
                                                              .month &&
                                                      state.calander
                                                              .days[index] ==
                                                          DateTime.now().day)
                                                  ? Colors.amber
                                                  : index % 7 - 6 == 0
                                                      ? Colors.blue
                                                      : index % 7 == 0
                                                          ? Colors.red
                                                          : Colors.white),
                                        ),
                                      ),
                                    ),
                                  ),
                                )
                              ],
                            )
Application
이번에는 BLoC Pattern을 만들어 주도록 하자.
State
BLoC의 State 부분을 생성해주는데, copyWith State 방식을 사용하였으며, 상태 변경을 비교하기 위해 Equatable을 상속받았다.
calander, currentDate 값은 초기 Bloc 생성시 필수 값으로 받아오도록 했다.
class CalanderState extends Equatable {
final CalanderModel calander;
final DateTime currentDate;
const CalanderState({
required this.calander,
required this.currentDate,
});
CalanderState copyWith({
final CalanderModel? calander,
final DateTime? currentDate,
}) {
return CalanderState(
calander: calander ?? this.calander,
currentDate: currentDate ?? this.currentDate,
);
}
List<Object?> get props => [calander, currentDate];
}
Event
먼저 Event를 추상 클래스로 생성해준다.
abstract class CalanderEvent extends Equatable {}Bloc 생성시 사용할 이벤트로 여기서 DateTime.now() 값을 받아오도록 하였다.
class CalanderStartEvent extends CalanderEvent {
final DateTime? datTime;
CalanderStartEvent({
this.datTime,
});
List<Object?> get props => [];
}월을 변경할 때에 사용되는 이벤트로 isNext라는 불리언 값을 사용해서 다음 달인지 이전 달인지를 구분하여 데이터를 바인딩해 줄 것이다.
class CalanderChangeEvent extends CalanderEvent {
final bool isNext;
CalanderChangeEvent({required this.isNext});
List<Object?> get props => [];
}Bloc
Bloc 생성시 이벤트를 먼저 만들어 주자. 여기서 현재 날짜를 사용해서 일자를 세팅하고 있다.
    add(CalanderStartEvent());

    Future<void> _start(
      CalanderStartEvent event, Emitter<CalanderState> emit) async {
    DateTime _dateTime = event.datTime ?? DateTime.now();
    List<int> _day = _days(_dateTime);
    emit(state.copyWith(
        calander: state.calander.copyWith(
            year: _dateTime.year, month: _dateTime.month, days: _day)));
  }
연/월에 해당하는 일자를 세팅하기 위해 먼저 일자의 길이를 받아오고 있다. 여기서 "1, 3, 5, 7, 8, 10, 12"에 해당하면 31일이고, 아니면 30일인데, 만일 2에 해당하면 윤년 계산을 추가로 해주고 있다.
윤년을 계산하는 로직이다.
((dateTime.year % 4 == 0) && (dateTime.year % 100 != 0)) ||
(dateTime.year % 400 == 0)
생각보다 윤년 계산 로직이 단순한데, 윤년은 연을 4로 나눈 나머지가 0이면서, 100으로 나눈 나머지가 0이 아니어야 하지만, 400으로 나눈 나머지가 0이면 윤년이 된다.
일자의 길이를 계산해주고, 월의 시작 요일과 마지막 요일에 해당하는 빈 값을 0으로 생성해주면 된다.
이렇게 해주면 2023년 3월에 해당하는 배열은 아래의 형태를 가지게 된다.
[0,0,0,1,2,3,4,5 ... 29,30,31,0]
List<int> _days(DateTime dateTime) {
    int _dayLenght = _daysLengthChecked(dateTime);
    int _frontSpaces = _spaceDays(
        type: DateFormat('EEEE')
            .format(DateTime(dateTime.year, dateTime.month, 1)));
    int _rearSpaces = _spaceDays(
        type: DateFormat('EEEE')
            .format(DateTime(dateTime.year, dateTime.month, _dayLenght)),
        isLast: true);

    List<int> _days = [
      ...List.generate(_frontSpaces, (_) => 0),
      ...List.generate(_dayLenght, (index) => index + 1),
      ...List.generate(_rearSpaces, (_) => 0),
    ];
    return _days;
  }

  int _spaceDays({
    required String type,
    bool isLast = false,
  }) {
    int _spaceLength = 0;
    switch (type) {
      case "Monday":
        _spaceLength = isLast ? 5 : 1;
        break;
      case "Tuesday":
        _spaceLength = isLast ? 4 : 2;
        break;
      case "Wednesday":
        _spaceLength = isLast ? 3 : 3;
        break;
      case "Thursday":
        _spaceLength = isLast ? 2 : 4;
        break;
      case "Friday":
        _spaceLength = isLast ? 1 : 5;
        break;
      case "Saturday":
        _spaceLength = isLast ? 0 : 6;
        break;
      case "Sunday":
        _spaceLength = isLast ? 6 : 0;
        break;
      default:
    }
    return _spaceLength;
  }

  int _daysLengthChecked(DateTime dateTime) {
    int _dayLength = 0;
    List _thiryFirst = [1, 3, 5, 7, 8, 10, 12];

    if (dateTime.month == 2) {
      if (((dateTime.year % 4 == 0) && (dateTime.year % 100 != 0)) ||
          (dateTime.year % 400 == 0)) {
        _dayLength = 29;
      } else {
        _dayLength = 28;
      }
    } else {
      _dayLength = _thiryFirst.contains(dateTime.month) ? 31 : 30;
    }
    return _dayLength;
  }
월을 변경했을 때에 사용되는 로직으로 초기 세팅시 로직을 사용하면 된다.
Future<void> _change(
CalanderChangeEvent event, Emitter<CalanderState> emit) async {
int _index = event.isNext ? 1 : -1;
DateTime _dateTime =
DateTime(state.currentDate.year, state.currentDate.month + _index);
List<int> _day = _days(_dateTime);
emit(state.copyWith(
currentDate: _dateTime,
calander: state.calander.copyWith(
year: _dateTime.year, month: _dateTime.month, days: _day)));
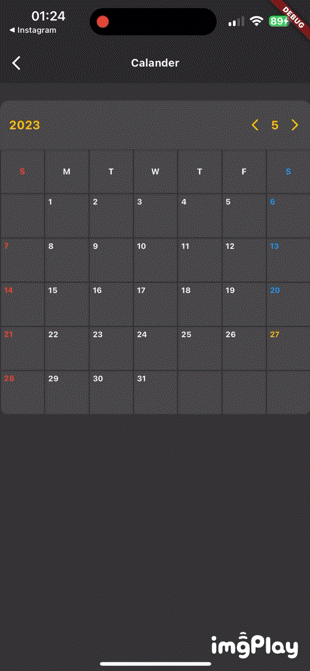
}Result
Git
https://github.com/boglbbogl/flutter_velog_sample/tree/main/lib/app/calander
마무리
간단하게 달력을 만들었는데, 한 번 따라해 보면서 더 좋은 방법으로 개발을 하시면 될 것 같다.
저도 한 번 만들어보고 싶어서 만들어 본 것이라, 릴리즈 서비스에 사용하기 까지는 더 단순한 구조로 개선해야 한다.
도움이 되거나 궁금한 사항 있으시면 댓글 남겨주세요 !