[Flutter] Scroll Focus (Scroll To Index) 만들어 보기
Flutter
Scroll Focus (Scroll To Index) 만들어 보기
scroll_to_index | Flutter Packages
english_words | Dart Package
이번 글에서는 Scroll 포커싱에 대해서 작성해보도록 하겠다.
해당 작업과 동일하게 작동되는 라이브러리로는 scroll_to_index 라이브러리가 가장 유명하다. 여기서는 라이브러리를 통한 개발이 아닌 직접 스크롤의 포커싱 기능을 만들어 볼 예정이다.
Flutter
수평 또는 수직으로 배치된 리스트 뷰에서 원하는 위치로 스크롤을 움직일 수 있는 기능을 만들어보자. 먼저, Horizontal ListView 에서 아이템을 터치시 스크롤 포커스에 맞춰 스크롤을 원하는 위치로 이동할 수 있는 기능에 대해서 살펴볼 예정이고, Vertical ListView에서 버튼을 터치해 스크롤을 각 아이템의 포커스에 맞도록 이동하는 방법에 대해서 살펴보도록 하겠다.
리스트 뷰에 사용될 아이템을 만들기 위해 english_words 라는 랜덤 영단어를 생성해주는 라이브러리를 사용하도록 하겠다.
dependencies
dependencies:
	english_words: ^4.0.0
Horizontal
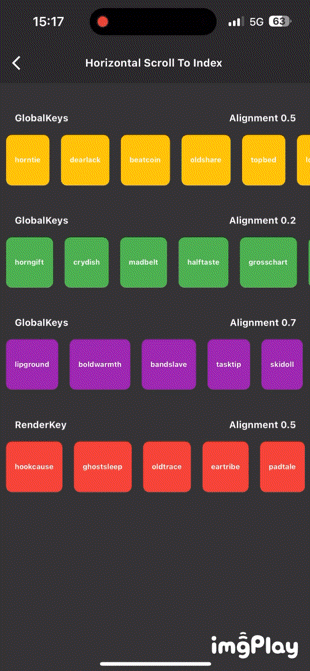
수평 구조의 리스트 뷰에서는 스크롤 포커싱을 위해 두 가지 방법을 사용할 것이다. 첫 번째 방법은 아이템 갯수에 맞는 GlobalKey를 사용하여 각 GlobalKey의 currentContext를 찾아서 포커싱이 될 수 있도록 작업을 해볼 예정이고, 두 번째 방법은 하나의 GlobalKey를 사용하면서 해당되는 context로 RenderBox를 생성해서 포커싱을 잡아보는 방법으로 진행해 볼 것이다.
GlobalKeys
먼저 랜덤 영단어를 담아줄 words 변수와, words 아이템과 동일한 갯수로 GlobalKey를 생성할 변수를 선언해주자.
final List<String> _words = [];
List<GlobalKey> firstKeys = [];
initState에서 firstKeys에 GlobalKey 20개를 생성해주고, english_words 라이브러리를 통해서 20개의 랜던 영단어를 가져와 words 리스트에 아이템을 담아주자.
void initState() {
firstKeys = List.generate(20, (index) => GlobalKey());
generateWordPairs().take(20).forEach((e) {
_words.add(e.asString);
});
super.initState();
}Horizontal ListView를 빌더를 사용하여 UI를 만들어 주고, 각 리스트 뷰 아이템에 위에서 생성한 GlobalKey를 선언해 준다.
SizedBox(
          width: MediaQueryData.fromWindow(window).size.width,
          height: 70,
          child: ListView.builder(
              scrollDirection: Axis.horizontal,
              itemCount: items.length,
              itemBuilder: (context, index) {
                return GestureDetector(
                  key: globalkeys[index],
                  onTap: () {},
                  child: Padding(
                    padding: const EdgeInsets.symmetric(horizontal: 8),
                    child: Center(
                      child: Container(
                        height: 70,
                        decoration: BoxDecoration(
                          borderRadius: BorderRadius.circular(8),
                          color: color,
                        ),
                        child: Padding(
                          padding: const EdgeInsets.symmetric(horizontal: 12),
                          child: Center(
                              child: Text(
                            items[index],
                            style: const TextStyle(
                                fontWeight: FontWeight.bold,
                                fontSize: 12,
                                color: Colors.white),
                          )),
                        ),
                      ),
                    ),
                  ),
                );
              }),
        ),
각 아이템을 터치 했을 때 Scrollable.ensureVisibl을 사용하여 현재 GlobalKey의 currentContext를 사용하여 스크롤의 포커싱을 이동시켜 주면된다.
alignment의 값을 조정하여 0~1 사이의 값으로 스크롤 포커싱의 비율을 넣어주면 된다.
onTap : () {
	Scrollable.ensureVisible(firstKeys[i].currentContext!,
		alignment: 0.7, duration: const Duration(milliseconds: 350));
}
GlobalKey (RenderBox)
이번에는 하나의 GlobalKey를 사용하는 방법이다. renderKey 변수를 생성해주고, currentIndex의 index를 통해서 아이템의 key를 index와 동일하게 넘겨주어 사용하는 방법이다.
final GlobalKey renderKey = GlobalKey();
int currentIndex = 0;
UI 구조는 거의 동일하다고 보면 된다. key를 전달하는 부분에서 보면 현재 index와 currentIndex가 동일한 경우에만 renderKey를 전달해주고 있다.
onTap 부분을 보면 탭이 터치시 터치된 index 값으로 currentIndex의 값을 변경해주고, ListView의 빌더가 호출될 때 renderKey의 currentContext를 사용하여 RenderBox 객체를 생성해 준다.
해당 방법은 사용해 보시면 스크롤이 부자연 스럽게 작동되는 것을 알 수 있다. animation이 없는 경우에는 사용할 수 있지만 animation 효과를 넣고 싶다면 적절한 방식은 아니다.
위에서 살펴본 방법을 사용하는게 좋다.
SizedBox(
              width: MediaQueryData.fromWindow(window).size.width,
              height: 70,
              child: ListView.builder(
                  scrollDirection: Axis.horizontal,
                  itemCount: _words.sublist(61, 80).length,
                  itemBuilder: (context, index) {
                    WidgetsBinding.instance.addPostFrameCallback((_) {
                      final RenderBox renderBox = renderKey.currentContext!
                          .findRenderObject() as RenderBox;
                      Scrollable.of(renderKey.currentContext!)
                          .position
                          .ensureVisible(renderBox,
                              alignment: 0.5, duration: _duration());
                    });
                    return GestureDetector(
                      key: index == currentIndex ? renderKey : null,
                      onTap: () {
                        setState(() {
                          currentIndex = index;
                        });
                      },
                      child: Padding(
                        padding: const EdgeInsets.symmetric(horizontal: 8),
                        child: Center(
                          child: Container(
                            height: 70,
                            decoration: BoxDecoration(
                              borderRadius: BorderRadius.circular(8),
                              color: Colors.red,
                            ),
                            child: Padding(
                              padding:
                                  const EdgeInsets.symmetric(horizontal: 12),
                              child: Center(
                                  child: Text(
                                _words.sublist(61, 80)[index],
                                style: const TextStyle(
                                    fontWeight: FontWeight.bold,
                                    fontSize: 12,
                                    color: Colors.white),
                              )),
                            ),
                          ),
                        ),
                      ),
                    );
                  }),
            ),
Vertical
이번에는 Vertical 리스트 뷰에서 스크롤 포커싱을 이동하는 방법에 대해서 살펴보도록 하겠다. 사용 방법 위에서 살펴본 Horizotal과 동일한 방법으로 작동이 된다.
전체 소스코드이다. 직접 가져가서 실행해보면 쉽게 이해할 수 있다.
import 'dart:ui';
import 'package:flutter/material.dart';
import 'package:flutter/services.dart';
import 'package:flutter_velog_sample/_core/app_bar.dart';
class ScrollToIndexVerticalScreen extends StatelessWidget {
const ScrollToIndexVerticalScreen({super.key});
Widget build(BuildContext context) {
List<GlobalKey> _globalKeys = List.generate(100, (index) => GlobalKey());
int _currentIndex = 0;
return Scaffold(
appBar: appBar(title: "Vertical Scroll To Index"),
floatingActionButton: SizedBox(
height: 120,
child: Column(
children: [
_button(
onTap: () {
if (_currentIndex > 0) {
HapticFeedback.mediumImpact();
_currentIndex = _currentIndex - 1;
Scrollable.ensureVisible(
_globalKeys[_currentIndex].currentContext!,
alignment: 0,
duration: const Duration(milliseconds: 350));
}
},
icon: Icons.keyboard_arrow_up_outlined),
const SizedBox(height: 12),
_button(
onTap: () {
if (_currentIndex < 99) {
HapticFeedback.mediumImpact();
_currentIndex = _currentIndex + 1;
Scrollable.ensureVisible(
_globalKeys[_currentIndex].currentContext!,
alignment: 0,
duration: const Duration(milliseconds: 350));
}
},
icon: Icons.keyboard_arrow_down_outlined),
],
),
),
body: ListView(
physics: const NeverScrollableScrollPhysics(),
children: [
...List.generate(
100,
(index) => Padding(
key: _globalKeys[index],
padding: const EdgeInsets.symmetric(vertical: 12, horizontal: 20),
child: Container(
width: MediaQueryData.fromWindow(window).size.width,
height: 150,
decoration: BoxDecoration(
color: const Color.fromRGBO(31, 31, 31, 1),
borderRadius: BorderRadius.circular(12),
border: Border.all(
color: Colors.accents[index % 15],
)),
child: Center(
child: Text(
"$index",
style: TextStyle(
fontWeight: FontWeight.bold,
fontSize: 20,
color: Colors.accents[index & 15]),
),
),
),
),
)
],
),
);
}
GestureDetector _button({
required Function() onTap,
required IconData icon,
}) {
return GestureDetector(
onTap: onTap,
child: Container(
height: 50,
width: 50,
decoration: BoxDecoration(
borderRadius: BorderRadius.circular(50),
color: Colors.white,
),
child: Icon(
icon,
color: Colors.black,
size: 40,
),
),
);
}
}
Result

Git
Horizontal
Vertical
마무리
직접 Git 저장소에 공유된 코드를 사용해서 실행해보세요.