CSS 기초
선택자의 용도와 사용법
- step1. 선택자(대상) 표현 방법
- step2. 스타일 - 어떤 속성이 있고, 어떤 값을 줄 수 있느냐, 그럼 화면에 어떻게 보이냐
- 속성 하나당 한 줄 권장
기본 선택자
-
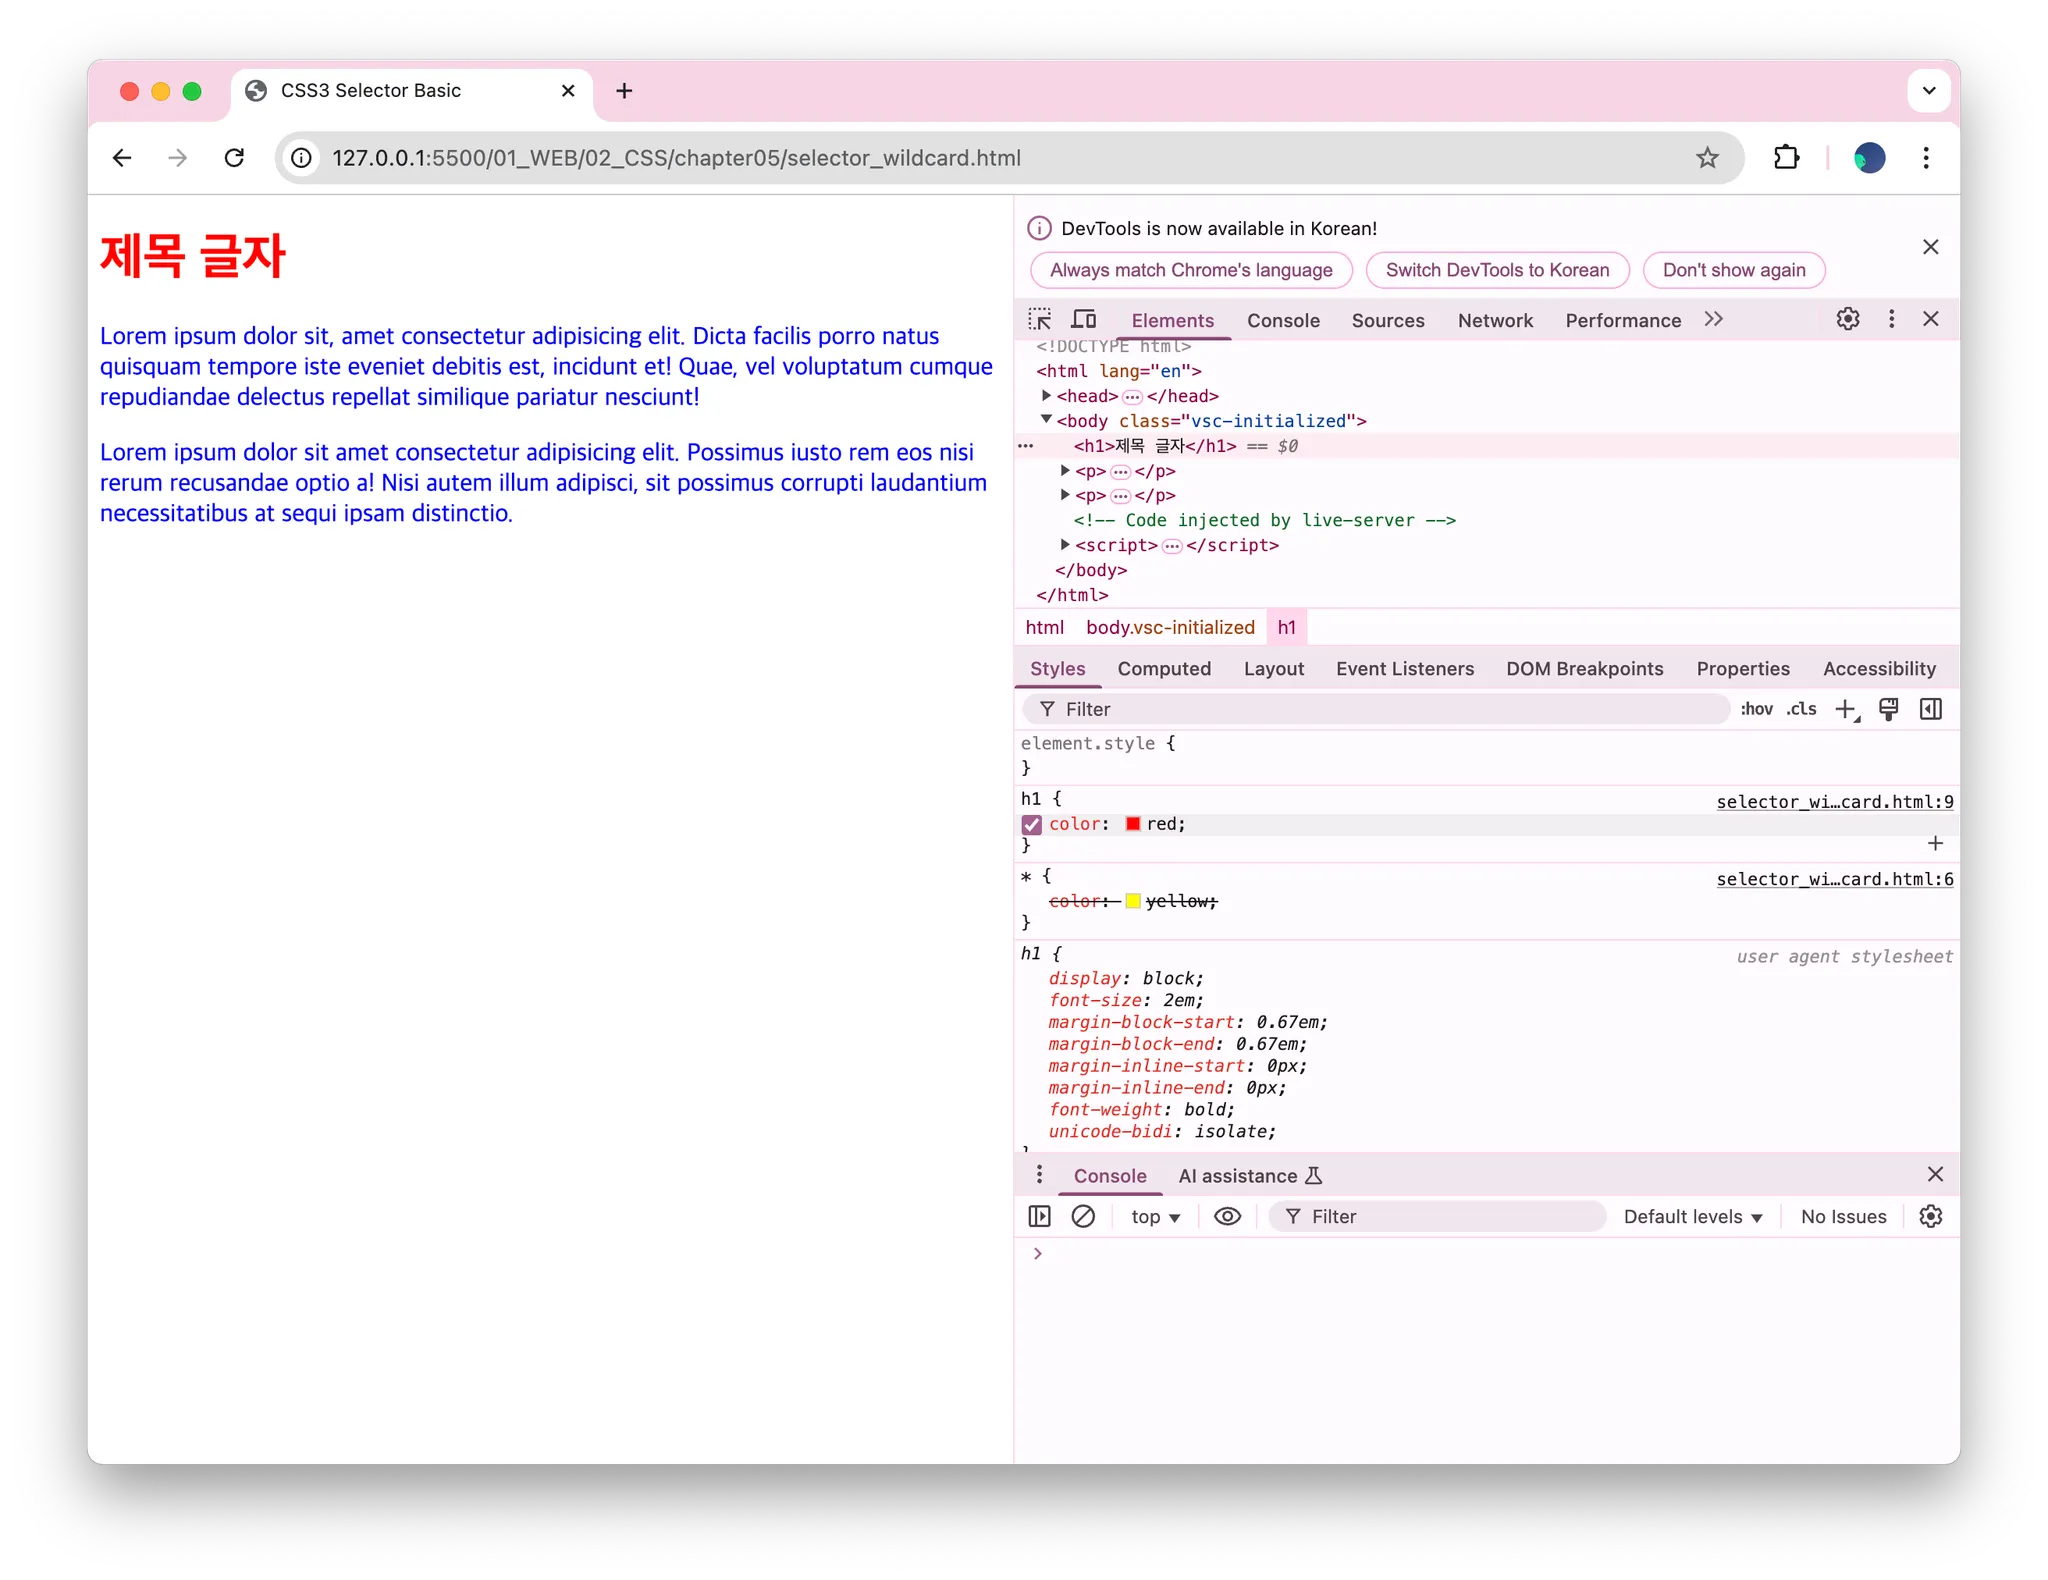
전체 선택자
- *
- 용도: 디폴트값
-
태그 선택자
- 태그명으로 지정
-
아이디 선택자
- #아이디
- 식별자이니 중복이 있으면 안 됨(유일)
-
클래스 선택자
- 가장 많이 사용하는 선택자
- .클래스
- <태그 class=” “>
- 태그는 다른데(같아도 상관없음) 스타일은 동일하게 하고 싶을 때
- 다른 거랑 결합해서 사용할 수 있음
- 예) h1.header
- 한 태그에 여러 개의 클래스 배정 가능(공백을 사용해서 나열)
- <h1 class=”item header”>동해물과 백두산이</h1>
- 하나로 하지 않고 분리하면 유연성이 생김
- 자바스크립트로 제어가 가능
- 배열로 되어 있는 클래스 목록
<!DOCTYPE html>
<html lang="en">
  <head>
    <title>CSS3 Selector Basic</title>
    <style>
      * {
        color: yellow;
      }
      h1 {
        color: red;
      }
      p {
        color: blue;
      }
    </style>
  </head>
  <body>
    <h1>제목 글자</h1>
    <p>
      Lorem ipsum dolor sit, amet consectetur adipisicing elit. Dicta facilis
      porro natus quisquam tempore iste eveniet debitis est, incidunt et! Quae,
      vel voluptatum cumque repudiandae delectus repellat similique pariatur
      nesciunt!
    </p>
    <p>
      Lorem ipsum dolor sit amet consectetur adipisicing elit. Possimus iusto
      rem eos nisi rerum recusandae optio a! Nisi autem illum adipisci, sit
      possimus corrupti laudantium necessitatibus at sequi ipsam distinctio.
    </p>
  </body>
</html>- 중첩된다! 개발자 도구에서 보면 알 수 있음(테스트도 가능)
-
여러 태그에 동일 스타일 적용? 태그 선택자를 쉼표로 연결
-
중앙 정렬
#header {
width: 800px; margin: 0 auto;
background: red;
}- margin: 0 auto;
- 위 아래 0
- 왼 오 auto - 알아서 1/2
#aside {
width: 200px; float: left;
background: blue;
}-
float: left;- 줄바꿈을 하지 않고 같은 줄에 배치
-
id의 중복 사용
- 에러는 아니다
- id 속성을 중복 사용하면 해당 id 속성을 표시한 모든 태그에 스타일이 적용됨
- 다만, 스타일시트에서는 문제가 없으나 자바스크립트에서 제어할 때에는 문제 발생
속성 선택자
- 선택자[속성]
- 선택자[속성=값] 지정한 값을 가지는 선택자가 대상
후손 / 자손 선택자
-
기본 선택자(클래스) 다음으로 많이 쓰는 선택자
-
부모 자식 관계를 보고 선택
- 자손: 지정한 태그를 기존으로 바로 한 단계 아래에 위치한 태그
- 선택자A > 선택자B : 선택자A의 자손인 선택자B 선택
<style>
      /* table에서 <tbody> 생략 시, 코드에서는 안 보여도 개발자 모드 보면 자동 추가되어 있음 */
      /* 그래서 table > tr > th로 작성시 스타일이 적용 안 됨 */
  	  /* table > tbody > tr > th로 작성 or table tr > th 둘다 출력값은 같음 */
      table tr > th {
        color: red;
      }
</style>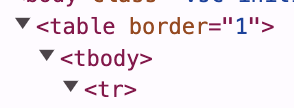
- 선택자A > 선택자B : 선택자A의 자손인 선택자B 선택
- 후손: 아래에 위치한 모든 태그
- 선택자A 선택자B : 선택자A의 후손인 선택자B 선택
- 자손: 지정한 태그를 기존으로 바로 한 단계 아래에 위치한 태그
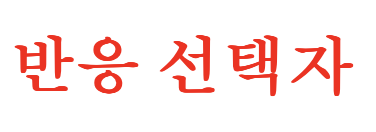
반응·상태·구조 선택자
-
반응 선택자
- hover: 특정 태그 위에 마우스 커서를 올린 상태
- 버튼, (테이블의)행에 많이 준다
- active: 특정 태그를 마우스로 클릭한 상태
- 두 상태를 다 만족할 때 좀 더 구체적인 상황이 우선순위가 높다
- 클릭이 더 구체적
- hover가 되고나서 클릭이 되기 때문에
- 우선순위가 같은 경우(구체성이 같음), 나중에 기술한 것이 적용됨
- hover: 특정 태그 위에 마우스 커서를 올린 상태
-
상태 선택자
- checked, focus, enabled, disabled
input:enabled- input 선택자를 생략하기도 함, 대부분 작성해서 가독성을 높여줌
-
구조 선택자
-
first-child, last-child
- 첫 번째와 마지막은 자주 쓰기에 정해져 있음
-
nth-child(수열), nth-last-child(수열)
- 중간은 수열을 사용해서 설정해줌(예.2n)
-
수직으로 나오는 리스트를 수평으로 바꾸는 방법 : float, flex
<style> ul { overflow: hidden; /* 초과된 내용 숨김 */ } li { list-style: none; /* 불릿 포인트(동그라미) 없애기 */ float: left; /* 수평 배치, 왼쪽으로 붙여라 */ padding: 15px; /* 경계선과 컨텐츠 사이의 여백처리 */ } li:first-child { border-radius: 10px 0 0 10px; } li:last-child { border-radius: 0 10px 10px 0; } li:nth-child(2n) { background-color: #ff0003; } li:nth-child(2n + 1) { background-color: #800000; } </style> -
메뉴를 만들 때 많이 등장하는 패턴이다
-
CSS3 단위
-
키워드 단위
-
크기 단위
- % 백분율 단위
- em 배수 단위
- px 픽셀 단위
- 반응형웹 - 절대값 비권장, 상대값(영역크기 - %, 폰트크기 - em, rem)
-
색상 단위
- 키워드 지정
- rgb() 함수 지정
- rgb(red, green, blue) - 0~255
- rgba(red, green, blue, alpha)
- 알파 값인 투명도까지 지정
- 0,0은 완전 투명 상태, 1.0은 완전 불투명 상태
- 알파 값인 투명도까지 지정
- HEX 코드
- #rrggbb, #rgb, #aarrggbb, #argb
-
url
- url(이미지 경로)
- 상대 경로
- 현재 폴더의 Desert.jpg
background-image: url('Desert.jpg’); - Other 폴더의 Desert.jpg
background-image: url('Other/Desert.jpg’);
- 현재 폴더의 Desert.jpg
- 절대 경로
- 루트 폴더의 Desert.jpg
background-image: url('/Desert.jpg');
- 루트 폴더의 Desert.jpg
- 상대 경로
- url(이미지 경로)
실습
<style>
  #header {
  	width: 800px;
  	margin: 0 auto;
  	background: red;
  }
  #wrap {
  	width: 800px;
  	margin: 0 auto;
  }
  #aside {
  	width: 200px;
  	float: left;
  	background: blue;
  }
  #content {
  	width: 600px;
  	float: left;
  	background: green;
  }
</style>

<body>
  <div id="header">
     <h1>#header 태그</h1>
  </div>
  <div id="wrap">
    <div id="aside">
      <h1>#aside 태그</h1>
    </div>
    <div id="content">
      <h1>#content 태그</h1>
    </div>
  </div>
</body>

- id 선택자 사용
<style>
  input[type='text'] {
  	background-color: red;
  }
  input[type='password'] {
  	background-color: blue;
  }
</style>

<body>
  <form>
    <input type="text" />
    <input type="password" />
  </form>
</body>
- 속성 선택자로 input 태그 선택
<!DOCTYPE html>
<html lang="en">
  <head>
    <meta charset="UTF-8" />
    <meta name="viewport" content="width=device-width, initial-scale=1.0" />
    <title>Document</title>
    <style>
      #header h1 {
        color: red;
      }
      #section h1 {
        color: orange;
      }
    </style>
  </head>
  <body>
    <div id="header">
      <h1 class="title">Lorem ipsum</h1>
      <div id="nav">
        <h1>Navigation</h1>
      </div>
    </div>
    <div id="section">
      <h1 class="title">Lorem ipsum</h1>
      <p>Lorem ipsum dolor sit amet, consectetur adipiscing elit.</p>
    </div>
  </body>
</html>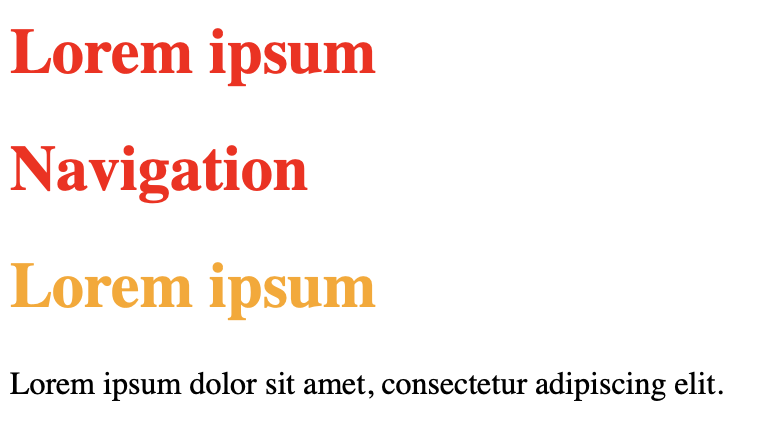
- 후손 선택자(선택자A 선택자B)
<!DOCTYPE html>
<html lang="en">
  <head>
    <meta charset="UTF-8" />
    <meta name="viewport" content="width=device-width, initial-scale=1.0" />
    <title>Document</title>
    <style>
      #header > h1 {
        color: red;
      }
      #section > h1 {
        color: orange;
      }
    </style>
  </head>
  <body>
    <div id="header">
      <h1 class="title">Lorem ipsum</h1>
      <div id="nav">
        <h1>Navigation</h1>
      </div>
    </div>
    <div id="section">
      <h1 class="title">Lorem ipsum</h1>
      <p>Lorem ipsum dolor sit amet, consectetur adipiscing elit.</p>
    </div>
  </body>
</html>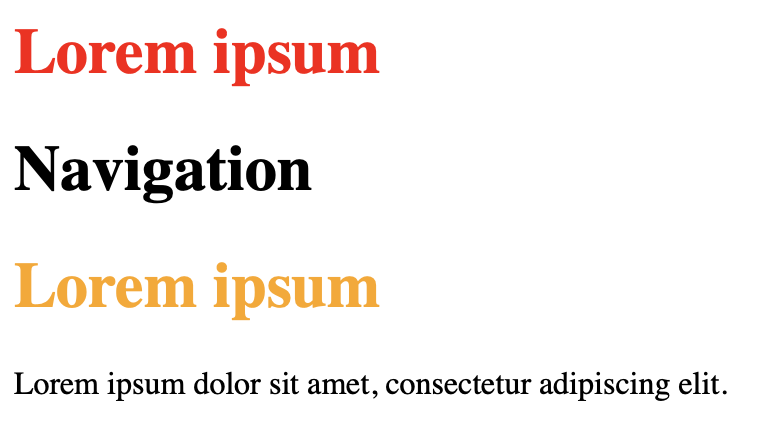
- 자손 선택자(선택자A > 선택자B)
<style>
  h1:hover {
  	color: red;
  }
  h1:active {
  	color: blue;
  }
</style>
- 기본, 호버했을 때(hover 상태), 클릭했을 때(active 상태)
CSS 속성
박스 속성
-
margin
- 다른 요소와의 거리, 바깥쪽 여백
- 위쪽 1 오른쪽 2 아래쪽 3 왼쪽 4
- margin: 0 30px 0 30px;
- margin: <위아래> <왼쪽오른쪽>
-
padding
- 안쪽 여백
-
border
- 테두리 0(default)
- 굵기 border-width
- 형태 border-style
- 색상 border-color
- 둥근 테두리
- border-radius: "왼쪽 위" "오른쪽 위" "오른쪽 아래" "왼쪽 아래"
-
width, height
- content의 영역
가시 속성
-
태그가 화면에 보이는 방식을 지정
-
display 속성
- none : 화면에 보이지 않음
- block : 블록 박스 형식으로 지정
- inline : 인라인
- inline-block : 블록과 인라인의 중간
- inline과 inline-block의 차이
- inline : width, height, margin, padding 속성이 지정되지 않음
- inline-block : width, height, margin, padding 속성이 지정됨
- inline과 inline-block의 차이
배경 속성
-
배경 이미지나 색상 지정
- 배경은 부모 영역을 벗어날 수 없다
- background 속성
- background-image
- 배경 이미지 2개 지정하려면 , 사용
body {
/* 각각의 그림을 레이어 */
background-image: url('BackgroundFront.png'),
url('BackgroundBack.png');
}
- 배경 이미지 2개 지정하려면 , 사용
- background-size
- x축, y축
- background-repeat
- 배경 이미지는 반복이 default, 크기가 작아지는 경우
- background-attachment
- 배경 이미지 부착 형태
- background-position
- 배경 이미지의 배치 위치를 지정
- background : 한 번에 모든 배경 속성 입력
- background-image
글자 속성
-
글자 크기
- font-size
-
글꼴
- font-family
- 공백이 있는 경우 ‘’써주기
- { font-family:'없는 글꼴', Arial; }
- ,로 여러개 지정 가능
- 웹폰트(로컬에 있으면 다른 사람들이 같은 코드로 폰트 적용 불가능 이슈 -> 해결하고자 웹폰트 사용)
-
글자 스타일(기울기 등)
- font-style
-
글자 굵기
- font-weight
-
글자 정렬
- text-align
- left, right 글을 왼쪽에서 오른쪽으로 써 나간다는 전제로 이렇게 쓰임
- start, end 어떤 언어는 글의 순서가 반대인 경우도 있으므로 등장(국제적으로 생각하는 경우)
- inline인 곳에서는 의미가 없음
- span 태그는 중앙이라는 개념이 없으므로 text-align 속성을 적용할 수 없음
- text-align
-
링크 글자의 밑줄
- a 태그에 href 속성을 지정하면 글자에 밑줄이 생기면서 파란색으로 변경됨
text-decoration: none;- 링크의 밑줄 제거
위치 속성
- 요소의 고정 위치와 상대 위치 지정
- position 속성은 요소의 위치 지정 형식을 설정
- absolute : 절대 위치 좌표 지정
- 어디든지 원하는 위치에 자유롭게 배치
- 부모의 position 속성에 영향을 받음
- 상위 요소 중에 position 속성이 relative인 요소가 있다면,
- 그 중 가장 가까운 요소의 내부에서만 요소를 자유롭게 배치
- 전체 화면이 아닌 해당 상위 요소를 기준으로 offset 속성(top, left, bottom, right)이 적용
- fixed : 화면을 기준으로 절대 위치 좌표 설정
- 예) 오른쪽 하단에 있는 맨 위로 가는 버튼 만들 때 사용(언제나 그 자리에 고정)
- relative : 초기 위치에서 상하좌우로 위치 이동
- static : 원래 위치를 나타냄, 위쪽에서 아래쪽으로 순서대로 배치(default)
- absolute : 절대 위치 좌표 지정
- position 속성은 요소의 위치 지정 형식을 설정
<style>
      .box {
        width: 100px;
        height: 100px;
        /* position: absolute; */
      }
      .box:nth-child(1) {
        background-color: red;
      }
      .box:nth-child(2) {
        background-color: green;
      }
      .box:nth-child(3) {
        background-color: blue;
      }
</style>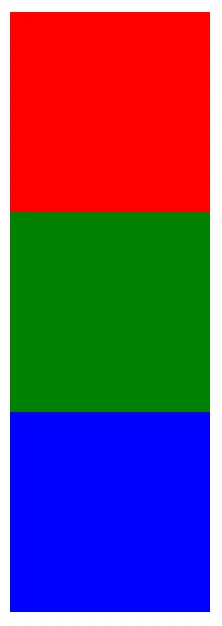
- 기본 static 상태
- absolute 키워드 적용(3가지가 겹쳐있는 상태)
<style>
      .box {
        width: 100px;
        height: 100px;
        position: absolute;
      }
      .box:nth-child(1) {
        background-color: red;
        left: 10px;
        top: 10px;
      }
      .box:nth-child(2) {
        background-color: green;
        left: 50px;
        top: 50px;
      }
      .box:nth-child(3) {
        background-color: blue;
        left: 90px;
        top: 90px;
      }
</style>
- 기본
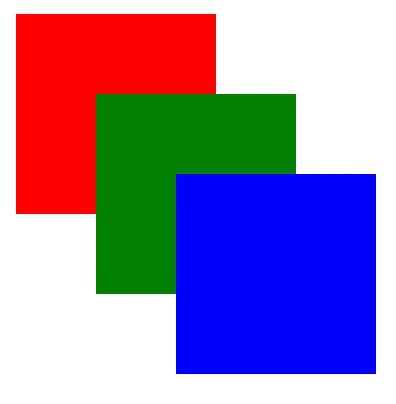
position: absolute;준 경우
-
요소의 고정 위치와 상대 위치 지정
- z-index 속성은 요소의 앞/뒤 순서를 변경
- 정수 값 배정
- 큰 값일수록 앞에 배치
-
absolute 사용법
- absolute 속성값이 배정된 요소가 자식 클래스인 경우
- 부모 요소에 height 속성 지정
- 자손의 position 속성에 absolute 키워드를 적용하려면 부모의 position 속성에 relative 키워드를 적용
- 부모 영역을 벗어나는 경우 처리 → overflow 속성 지정
- hidden, scroll
- absolute 속성값이 배정된 요소가 자식 클래스인 경우
유동 속성
- float 속성
- left : 태그를 왼쪽에 붙임
- right: 태그를 오른쪽에 붙임
그림자와 그레이디언트 속성
-
그림자 속성
- text-shadow 속성
- 글자에 그림자를 부여
- box-shadow 속성
- 박스에 그림자를 부여
- (거리)오른쪽 아래 흐림도 색상
- 중첩 가능
- text-shadow 속성
-
그레이디언트 속성
- 두 가지 이상의 색상을 혼합하는 채색 기능
- linear-gradient() 함수 이용
- 색상 블록의 왼쪽에는 색상 단위, 오른쪽에는 퍼센트 단위를 입력해 그레이디언트 색상과 위치를 지정
- liner-gradient(각도, 색상 블록-색상 위치, 색상 위치)
실습
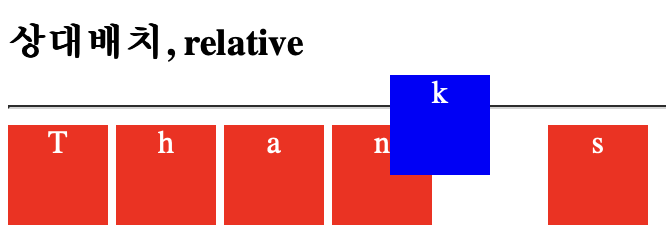
<!DOCTYPE html>
<html lang="en">
  <head>
    <title>relative는 기준이 나</title>
    <style>
      div {
        display: inline-block;
        /* border: 1px solid red; */
        width: 50px;
        height: 50px;
        background-color: red;
        color: white;
        text-align: center;
      }
      #down:hover {
        position: relative; -> 자기 자신의 원래 위치(static 위치)를 기준으로 이동함
        left: 25px; -> 왼쪽에서 오른쪽으로 25px 이동, 왼쪽에 공간이 생김!
        /* right: -25px; */
        top: 25px;
        background-color: blue;
      }
      #up:hover {
        position: relative;
        right: 25px;
        bottom: 25px;
        background-color: blue;
      }
    </style>
  </head>
  <body>
    <h3>상대배치, relative</h3>
    <hr />
    <div>T</div>
    <div id="down">h</div>
    <div>a</div>
    <div>n</div>
    <div id="up">k</div>
    <div>s</div>
  </body>
</html>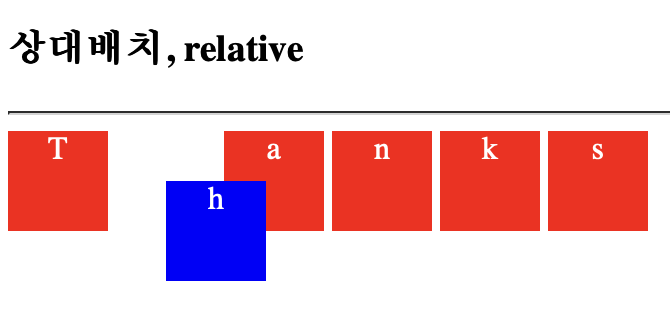
visibility: hidden;
- 영역의 변동이 없음
display: none;
- 영역까지 사라짐
숨기면 이벤트 발생이 안 됨
span {
	visibility: hidden;
}
span:hover {
	visibility: visible;
	color: red;
}
=> 해결 방법
<!DOCTYPE html>
<html lang="en">
<head>
<title>span이 아닌 li를 hover</title>
<style>
span {
visibility: hidden;
}
/* 이렇게 하면 블럭 단위로 잡혀서 빈 공간을 호버해도 글씨가 나타나게 됨 */
li:hover span {
visibility: visible;
color: red;
}
</style>
</head>
<body>
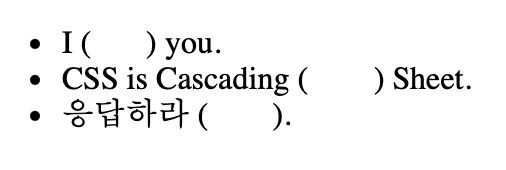
<h3>다음 빈 곳에 숨은 단어?</h3>
<hr />
<ul>
<li>I (<span>love</span>) you.</li>
<li>CSS is Cascading (<span>Style</span>) Sheet.</li>
<li>응답하라 (<span>1988</span>).</li>
</ul>
</body>
</html>
<!DOCTYPE html>
<html lang="en">
  <head>
    <title>2개의 span</title>
    <style>
      #item span {
      	/* opacity: 0; */
        /* display: none; */
        visibility: hidden;
      }
	  /* <span>을 하나 더 걸어줘서 해결하는 방법 or opacity: 0, 1으로 주는 방법도 있음 */
      #item:hover span {
        visibility: visible;
        color: red;
      }
    </style>
  </head>
  <body>
    <h3>다음 빈 곳에 숨은 단어?</h3>
    <hr />
    <ul>
      <li>
        I (<span id="item"><span>love</span></span
        >) you.
      </li>
      <li>
        CSS is Cascading (<span id="item"><span>Style</span></span
        >) Sheet.
      </li>
      <li>
        응답하라 (<span id="item"><span>1988</span></span
        >).
      </li>
    </ul>
  </body>
</html>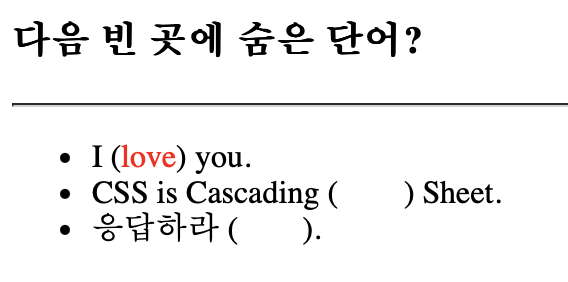
- ( ) 공간에 마우스 커서를 가져가면 빨간 글씨가 보임
<!DOCTYPE html>
<html lang="en">
  <head>
    <title>Document</title>
    <style>
      img {
        float: left; -> 이미지를 왼쪽으로 띄움
        width: 100px;
        height: 100px;
      }
      #container::after { -> 부모 요소(#container)가 float된 요소를 감싸도록 설정
        content: '';
        display: block;
        clear: both; -> float로 인해 부모 높이가 사라지는 문제 해결
      }
    </style>
  </head>
  <body>
    <div id="container">
      <img src="BackgroundBack.png" />
      <p>
        Lorem ipsum dolor sit amet consectetur adipisicing elit. Nihil nulla
        nostrum expedita deserunt, sequi rerum porro, veniam sed repellat
        veritatis iusto optio quas illum soluta, possimus molestiae pariatur
        labore? Nostrum!
      </p>
    </div>
    <p> -> container 바깥의 p 태그들 → 새로운 단락들이 추가됨
      Lorem ipsum dolor sit amet consectetur adipisicing elit. Nihil nulla
      nostrum expedita deserunt, sequi rerum porro, veniam sed repellat
      veritatis iusto optio quas illum soluta, possimus molestiae pariatur
      labore? Nostrum!
    </p>
    <p>
      Lorem ipsum dolor sit amet consectetur adipisicing elit. Nihil nulla
      nostrum expedita deserunt, sequi rerum porro, veniam sed repellat
      veritatis iusto optio quas illum soluta, possimus molestiae pariatur
      labore? Nostrum!
    </p> -> clear: both;가 적용되어 container 바깥의 문장이 이미지 영향을 받지 않고 정상적으로 배치됨
  </body>
</html>
- float 속성 적용
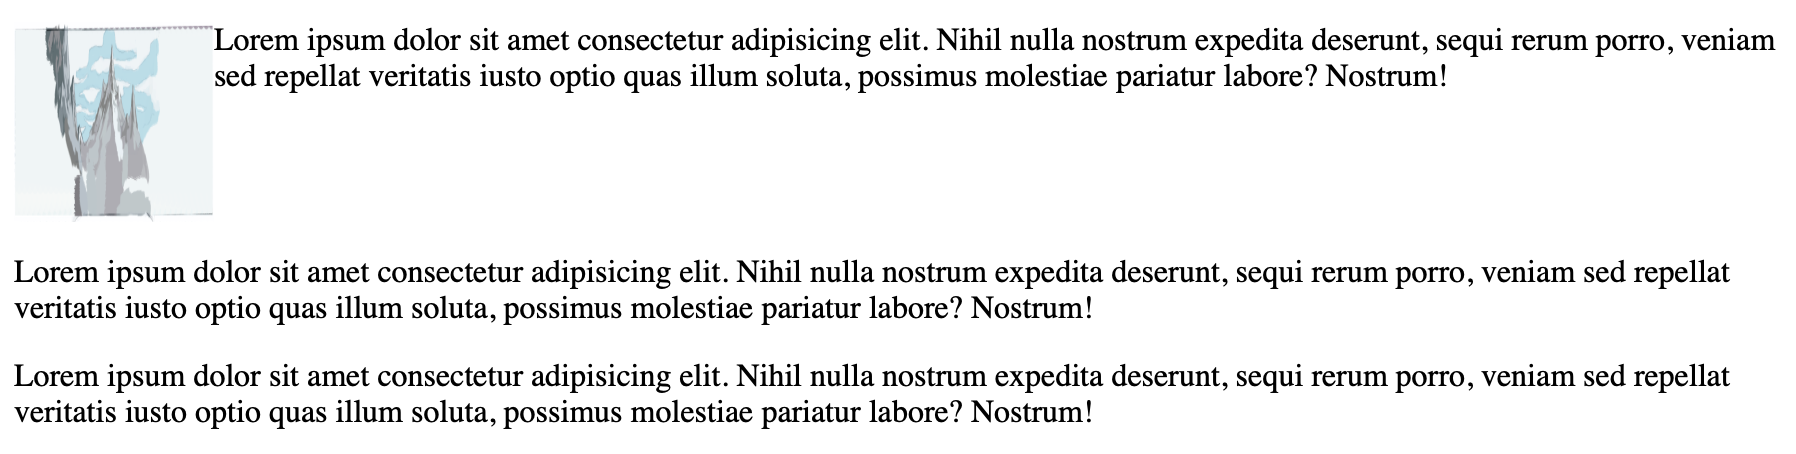
- 부모 요소 #container 내부의 float 속성을 해제(clearfix)하는 역할
✅ 첫 번째 단락(p)은 이미지 오른쪽에 배치됨
✅ 이후 단락들은 이미지 영향을 받지 않고 아래로 정렬됨
✅ 부모(#container)의 높이가 0이 되는 문제를 ::after가 해결
사용자를 고려한 디자인과 UX를 중심으로 더 나은 경험을 만들어갑니다