Service
Kubernetes Cluster 안에는 크게 Service Network과 Pod Network가 존재하며 Master Node와 Worker Node가 Service Network 안의 서비스에 접근을 해 Pod에 접근하는 방식
사용자의 입장에서 Service의 ip를 확인 후 이에 접근하면 되지만, pod의 경우 동시배포와 같은 상황이 많이 발생하고 이럴 경우 한 pod이 다른 pod에 접근을 해야할때 pod의 ip는 동적할당이 되기 때문에 접근하는 pod가 접근하려는 pod의 ip를 알 방법이 없고, pod이 죽게 된다면 재생성 시 ip가 변경이 되기 때문에 문제가 발생한다
이런 문제를 해결하기 위해 Headless, DNS Server가 필요
Pod가 외부 연결 시 Pod을 수정하는 번거로움을 없애기 위해 Service의 External Name을 사용해 변경이 가능
DNS Server
Kubernetes cluster 안에 service network과 pod network과 별도로 존재하며 service의 도메인 이름과 ip가 저장되어있다.
Pod가 service의 ip 주소를 알 수 있게 도와준다.
Internal network에도 존재하게 하여 접근하는 유저들의 ip를 알 수 있게 해준다.
외부 사이트에 접근을 하는 경우에도 DNS 네트워크를 따라 외부 사이트의 ip 주소를 알 수 있게 된다.
DNS Server Practice
- Service와 그 service에 연결 된 pod 생성
- Service
apiVersion: v1
kind: Service
metadata:
  name: clusterip1
spec:
  selector:
    svc: clusterip
  ports:
  - port: 80
targetPort: 8080- Pod
apiVersion: v1
kind: Pod
metadata:
  name: pod1
  labels:
    svc: clusterip
spec:
  containers:
  - name: container
image: kubetm/app- RequestPod 생성
apiVersion: v1
kind: Pod
metadata:
  name: request-pod
spec:
  containers:
  - name: container
image: kubetm/init- Master Node에서 request pod에 연결
kubectl exec request-pod -it /bin/bash- DNS를 통한 IP 조회 (NS Lookup)
nslookup clusterip1- 도메인 주소로 접근
curl clusterip1/hostnameHeadless Service
특정 pod에 연결하고 싶을때 pod의 이름과 service의 이름이 붙여저 도메인 이름으로 등록하여 pod의 입장에서 ip를 알필요 없이 해당 도메인으로 접근 가능
Headless Service의 경우 service 안에 'clusterIP'값을 None으로 설정하여 만들고 연결하는 pod들에서 'hostname'은 pod의 이름 'subdomain'은 service 명을 넣어준다.
Headless Service Practice
- Headless Service 만들기
apiVersion: v1
kind: Service
metadata:
  name: headless1
spec:
  selector:
    svc: headless
  ports:
    - port: 80
      targetPort: 8080
clusterIP: None- Headless Service에 연결 된 pod 생성
apiVersion: v1
kind: Pod
metadata:
  name: pod4
  labels:
    svc: headless
spec:
  hostname: pod-a
  subdomain: headless1
  containers:
  - name: container
    image: kubetm/app
Headless Service를 만들면 clusterIp가 만들어지지 않는 것을 확인할 수 있다
- NSLookup을 통해 service 조회
nslookup headless1서비스의 clusterIP 반환 대신 연결돼 있는 pod의 ip를 반환한다
Server:		10.96.0.10
Address:	10.96.0.10#53

Name:	headless1.default.svc.cluster.local
Address: 20.109.131.2- Headless Service를 통해 pod에 접근
curl pod-a.headless1:8080/hostnameEndpoint
Pod가 service와 연결을 할때 selector의 label을 사용하지만, label의 원리가 endpoint를 생성해 해당 label을 갖고 있는 pod의 ip와 port 정보를 들고 있는 것
label을 사용하지 않고 endpoint를 직접 지정해주어서 pod와 연결이 가능하나 ip는 가변적이여서 좋은 방법은 아니다.
Endpoint Practice
- Endpoint Service 생성
apiVersion: v1
kind: Service
metadata:
  name: endpoint1
spec:
  selector:
    svc: endpoint
  ports:
- port: 8080- Endpoint Service와 연결되는 pod 생성
apiVersion: v1
kind: Pod
metadata:
  name: pod7
  labels:
    svc: endpoint
spec:
  containers:
  - name: container
image: kubetm/app- Master Node에서 상세내역 확인
kubectl describe endpoints endpoint1- 조회 내용
Name:         endpoint1
Namespace:    default
Labels:       <none>
Annotations:  endpoints.kubernetes.io/last-change-trigger-time: 2022-01-16T03:03:07Z
Subsets:
  Addresses:          20.111.156.66
  NotReadyAddresses:  <none>
  Ports:
    Name     Port  Protocol
    ----     ----  --------
    <unset>  8080  TCP

Events:  <none>
연결 된 pod의 ip와 port값을 조회 할 수 있는 것을 확인
External Name
외부 도메인 주소를 DNS에 등록할 수 있고, DNS 서버를 타고 외부 서버의 ip에 연결 할 수 있게 된다
Service의 'externalName' 속성을 사용해 접근하려는 외부 도메인의 이름(ex. google.com)을 넣을 수 있다.
DNS cahce가 ip를 알아낸다.
External Name Practice
- 직접 endpoint를 지정하는 service 생성
apiVersion: v1
kind: Service
metadata:
  name: endpoint2
spec:
  ports:
- port: 8080- 13번 서비스에 연결될 pod 생성
apiVersion: v1
kind: Pod
metadata:
  name: pod9
spec:
  containers:
  - name: container
    image: kubetm/app
아직 이 단계에선 pod이 연결되지 않은 것을 확인 할 수 있다.
- Endpoint 생성
apiVersion: v1
kind: Endpoints
metadata:
  name: endpoint2
subsets:
 - addresses:
   - ip: 20.111.156.67
   ports:
   - port: 8080
이떄 ip는 연결되는 pod의 ip를 넣어줘야 한다
Kubernetes Dashboard상 연결된 pod이 아직 보이지 않는다.
- Request-pod에서 endpoint2 조회
curl endpoint2:8080/hostname결과
Hostname : pod9정상적으로 pod이 연결 된 것을 확인
- 외부 IP(Guthub)로도 작동이 되는지 확인해보기 위해 service 생성
apiVersion: v1
kind: Service
metadata:
  name: endpoint3
spec:
  ports:
- port: 80- Github IP 주소 확인
nslookup https://www.github.com- Github IP 주소에 해당하는 Endpoint 생성
apiVersion: v1
kind: Endpoints
metadata:
  name: endpoint3
subsets:
 - addresses:
   - ip: 185.199.109.153
   ports:
   - port: 80
해당 endpoint를 호출하면 정상적으로 github이 호출 되는 것을 확인
- 도메인 네임이 있는 외부(Github)에 접속하는 endpoint 생성
apiVersion: v1
kind: Service
metadata:
 name: externalname1
spec:
 type: ExternalName
 externalName: github.github.io
Request-pod에서 호출 시 정상적으로 호출 되는 것을 확인
Volume
Kubernetes cluster 밖에 volume이 마련되어 있으면, 관리자는 PVE를 만드는데 storage와 accessMode를 정하고 volume을 선택해서 연결
사용자는 원하는 storage와 accessMode로 PVC를 만들면 Kubernetes가 적절한 PVE와 연결하고 해당 PVC를 pod에서 사용
AccessMode는 ReadWriteOnce, ReadOnlyMany, ReadWriteMany 3가지 종류가 있다
Dynamic Provisioning
사용자가 PVC를 만들면 알아서 PVE를 만들어 주고 volume과 연결해준다.
StorageClass의 name을 참조하여 PVE를 만들어준다
Status
PVE가 PVC와 연결이 되면 Available에서 Bound 상태로 변경이 된다
PVC와 연결 된 pod이 삭제되더라도 volume에는 영향이 없다
PVC를 삭제를 해주면 PVE는 Released 상태로 변하게 된다
PVE와 실제 데이터가 연결이 끊기면 Failed 상태가 된다
ReclaimPolicy
PVC를 삭제해 PVE가 Released 상태일때 PVE는 'Retain', 'Delete', 'Recycle' 3가지 상태 중 하나로 ReclaimPolicy를 설정하여 PVE 상태를 조정할 수 있다
Retain: PVE 상태는 'Released', 디폴트 값이며 데이터가 보존이 되지만 재사용은 불가
Delete: PVE가 지워지면서 Volume도 같이 삭제, 재사용은 불가능, StorageClass 사용 시 default 값
Recycle: 데이터가 삭제 되지만 재사용은 가능
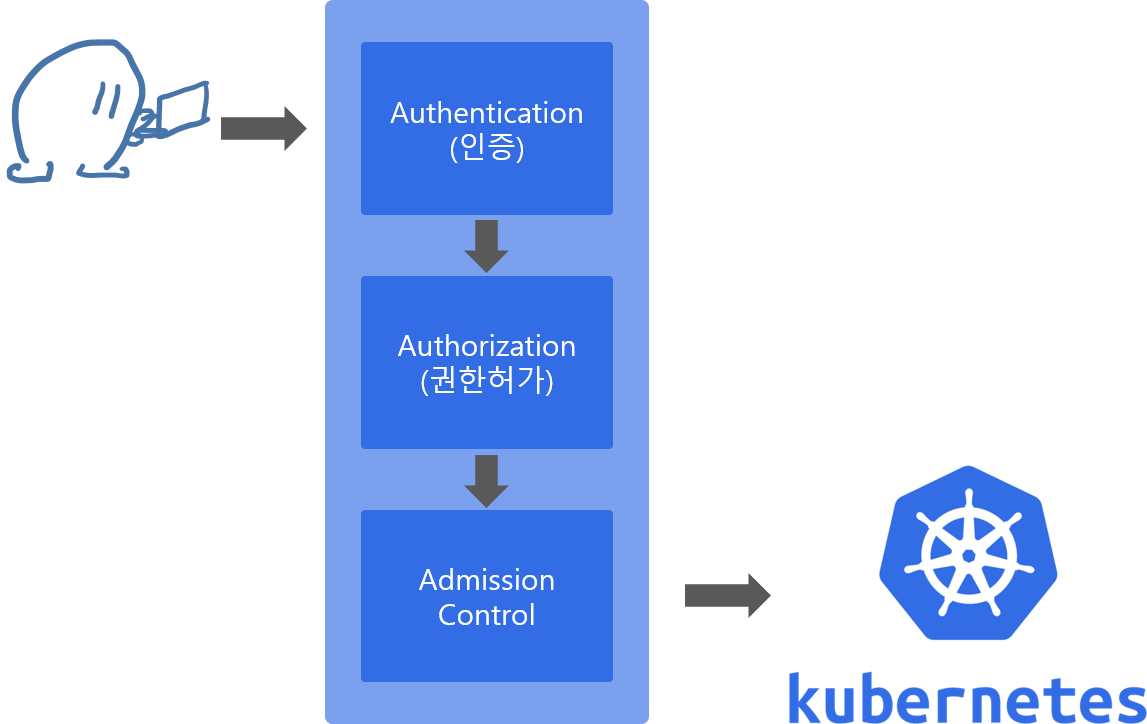
Kubernetes API
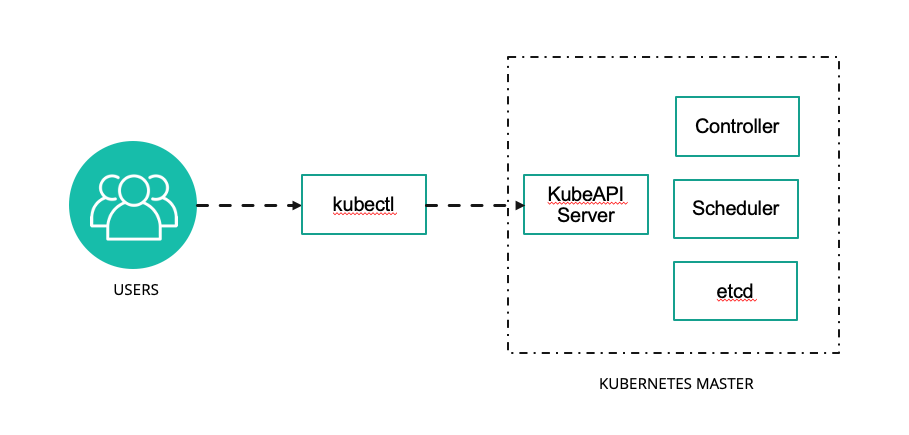
Master Node에 Kubernetes API server가 존재하며 이 API 서버를 통해서만 자원을 만들거나 조회가 가능
Kubectl을 활용해 Kubernetes API server에 접근하여 정보를 가져온다
API server에 접근하기 위해서 내부는 kubectl을 통한 CLI로 외부에서는 인증서와 https 혹은 proxy를 활용해 접근이 가능하다
Pod이 API 서버에 접근하기 위해선 Service Account를 활용
Kubernetes API server에서는 Authentication, Authorization, Admission Control의 과정을 거친다.
Authentication
X509 Client Cert
Kubernetes API server 안에는 kubeconfig이 존재하며 이 안에 인증서들이 존재
https를 통해 접속하기 위해선 이 인증서들을 갖고 있어야함
kubectl에 있는 kubeconfig과 비교하여 accept 할지 reject 할지 결정
kubectl
kubectl에 kubeconfig을 각 cluster의 kube config와 비교하여 authentication을 진행
Config 안에는 name, cluster, user 정보등을 담는다
Service Account
Namespace를 만들시 'default'명의 ServiceAccount가 생성된다.
해당 ServiceAccount에는 secret이 있는데 CA crt 정보와 token 값이 들어있다.
Pod 생성시 ServiceAccount가 연결되고 pod은 token값을 통해 API server에 연결
Token 값을 알고 있다면 이 값을 활용해 사용자도 접근 API server에 접근 가능하다
Authorization
RBAC
Namespace 안에 service account 설정에 따라 namespace 안에 있는 자원 혹은 cluster에 있는 자원을 접근할 수 있다
Namespace 안의 role로 read 혹은 write 권한 설정해줄 수 있다.
Rolebinding을 통해 service account와 role을 연결
Rolebinding에선 role은 한개만 지정 가능, service account는 여러개 지정 가능
ClusterRole은 cluster 단위의 오브젝트(Node, PV, Namespace...)의 권한 설정
ClusterRoleBinding은 RoleBinding과 같은 역할이나 cluster 단위의 오브젝트일때, clusterRoleBinding은 service account와 연결
모든 네임스페이스를 통채로 관리할때 유용
Kubernetes Dashboard
사용자가 Http 방식으로 proxy에 접근 -> proxy는 Kubernetes API server에 접근 -> Kubernetes API server는 service에 접근 -> service가 pod에 접근

