1. CRUD란?
| 기능 | 의미 | 설명 |
|---|---|---|
| C – Create | 생성 | 새로운 데이터를 DB에 추가 |
| R – Read | 조회 | 저장된 데이터를 불러오기 |
| U – Update | 수정 | 기존 데이터를 변경하기 |
| D – Delete | 삭제 | 데이터를 삭제하기 |
2. CRUD API란?
서버를 통해 데이터베이스의 CRUD 기능을 수행하는 API
즉, 클라이언트가 서버에 요청을 보내면, 서버가 그 요청에 맞게 DB의 데이터를 생성·조회·수정·삭제하는 구조이다.
3.CRUD와 HTTP 메서드의 관계
| 기능 | HTTP 메서드 | 설명 | 예시 요청 |
|---|---|---|---|
| Create | POST | 새로운 데이터 생성 | POST /api/students |
| Read | GET | 데이터 조회 | GET /api/students, GET /api/students/:id |
| Update | PUT 또는 PATCH | 기존 데이터 수정 | PUT /api/students/:id |
| Delete | DELETE | 데이터 삭제 | DELETE /api/students/:id |
-> 이 구조가 바로 RESTful CRUD API의 표준 설계이다
(CRUD API는 REST API 원칙을 따라 구현한 실제 서버 코드)
4. Crud API 실습하기
4.1 초기 설정
- Node.js 설치(브라우저 밖에서 자바스크립트를 실행할 수 있게 만들어주는 프로그램)
- 프로젝트 폴더 생성 후
npm init -y: package.json 파일을 초기화 - index.js 파일 생성
- package.json 파일의 scripts 섹션에 "serve": "node index.js"를 추가하여 npm run serve 명령어로 서버 실행
cf) nodemon 설치: 개발 중 코드 변경 시 서버를 자동으로 다시 시작하기 위해npm install nodemon --save-dev명령어를 사용하여 설치
-> package.json 파일의 scripts 섹션에 "dev": "nodemon index.js"를 추가하여 npm run dev 명령어로 개발 서버 실행
4.2 Express.js 설정
- Express 설치:
npm i express명령어를 사용하여 설치( Node.js 위에서 서버를 더 쉽게 만들 수 있게 도와주는 웹 프레임워크)
//index.js파일
const express = require('express');
const app = express();
app.listen(3000, () => {
    console.log('Server is running on Port 3000'); // 3000번 포트에서 서버 실행시키기(localhost:3000)
});
 app.get('/', (req, res) =>
    res.send('Hello from node API')); //루트 경로(/)로 들어오는 GET 요청 처리(테스트용)
4.3 MongoDB 연동
-
MongoDB Atlas(MongoDB를 클라우드에서 쓸 수 있게 해주는 사이트)
-> 새 프로젝트, 새 클러스터(= 데이터베이스 서버) 생성
-> 사용자 생성(이 계정으로 서버에서 로그인함), 모든 IP 주소 허용) -
MongoDB 드라이버 & Mongoose 설치:
npm i mongodb mongoose명령어를 사용하여 설치* MongoDB 드라이버: 기본 도구
* Mongoose: MongoDB 드라이버를 더 편리하게 사용할 수 있도록 해줌
-> 둘 다 Node.js 환경에서 MongoDB 데이터베이스와 통신하기 위해 사용하는 도구(=통역사) -
MongoDB 연결
//index.js 파일
const mongoose = require('mongoose'); //Mongoose를 import
mongoose.connect('mongodb+srv://<username>:<password>@cluster0.vsqbwpj.mongodb.net/?retryWrites=true&w=majority&appName=Cluster0')
  .then(() => console.log('Connected to database!'))
  .catch(() => console.log('Connection failed!'));
//제공된 연결 문자열(Atlas가 생성해준 MongoDB 접속 주소)을 사용하여 Node.js 서버와 MongoDB 연결하기- Product 모델 생성
-> MongoDB에 저장할 product 데이터의 스키마(이름, 수량, 가격, 이미지)를 정의하고 이 스키마를 기반으로 데이터를 조작할 수 있는 모델 생성
// models/product.model.js 파일

const mongoose = require('mongoose');
// Product 데이터의 스키마 정의
const ProductSchema = mongoose.Schema(
        name: {
            type: String,//문자열 타입
            required: [true, "Please enter product name"]//required: true → 반드시 있어야 함, "Please enter product name" → 없을 때 표시할 오류 메시지
        },
        quantity: {
            type: Number,
            required: true,
            default: 0 //안 적으면 자동으로 0
        },
        price: {
            type: Number,
            required: true,
            default: 0
        },
        image: {
            type: String, //상품 이미지 URL
            required: false //없어도 됨
        },
    },
    {
        timestamps: true //Mongoose의 자동 옵션-> MongoDB가 자동으로 아래 두 필드를 만들어줌 (createdAt : 문서가 만들어진 시간, updatedAt : 문서가 수정된 시간)
    }
);
const Product = mongoose.model("Product",ProductSchema); //스키마를 실제 모델로 등록-> MongoDB안에 products라는 컬렉션(SQL의 테이블과 같은 개념)이 자동으로 생기고, 그 안에 문서가 저장됨
module.exports=Product;
4.4 CRUD API 구축
| 동작 | HTTP 메서드 | 경로 | 설명 |
|---|---|---|---|
| Create | POST | /api/products | 새 상품 추가 |
| Read All | GET | /api/products | 모든 상품 조회 |
| Read One | GET | /api/products/:id | 특정 상품 조회 |
| Update | PUT | /api/products/:id | 특정 상품 수정 |
| Delete | DELETE | /api/products/:id | 특정 상품 삭제 |
cf) index.js파일에 다음 코드 추가
//우리가 만든 모델 불러오기
const Product = require('./models/product.model');

// 미들웨어 설정
// Express 서버가 JSON 형식의 데이터를 이해할 수 있도록 설정합니다.
app.use(express.json());
// Express 서버가 Form 형식의 데이터를 이해할 수 있도록 설정합니다.
app.use(express.urlencoded({ extended: false }));
- 제품 추가 (Create)
app.post('/api/products', async (req, res) => {
  try {
    const product = await Product.create(req.body);
    res.status(200).json(product);
  } catch (error) {
    res.status(500).json({ message: error.message });
  }
});- 모든 제품 조회 (Read All)
app.get('/api/products', async (req, res) => {
  try {
    const products = await Product.find({});
    res.status(200).json(products);
  } catch (error) {
    res.status(500).json({ message: error.message });
  }
});- 단일 제품 조회 (Read One)
app.get('/api/products/:id', async (req, res) => {
  try {
    const { id } = req.params; // URL에서 id 값을 추출
    const product = await Product.findById(id);
    if (!product) {
      return res.status(404).json({ message: 'Product not found' });
    }
    res.status(200).json(product);
  } catch (error) {
    res.status(500).json({ message: error.message });
  }
});- 제품 수정 (Update)
app.put('/api/products/:id', async (req, res) => {
  try {
    const { id } = req.params;
    // 해당 ID의 제품을 찾아 req.body의 내용으로 업데이트
    const product = await Product.findByIdAndUpdate(id, req.body);
    if (!product) {
      return res.status(404).json({ message: 'Product not found' });
    }
    // 수정된 최신 정보를 다시 DB에서 찾아 반환
    const updatedProduct = await Product.findById(id);
    res.status(200).json(updatedProduct);
  } catch (error) {
    res.status(500).json({ message: error.message });
  }
});- 제품 삭제 (Delete)
app.delete('/api/products/:id', async (req, res) => {
  try {
    const { id } = req.params;
    const product = await Product.findByIdAndDelete(id);
    if (!product) {
      return res.status(404).json({ message: 'Product not found' });
    }
    res.status(200).json({ message: 'Product deleted successfully' });
  } catch (error) {
    res.status(500).json({ message: error.message });
  }
});
cf) 보안을 위해...
- 연결 문자열을 .env파일에 저장 -> .gitignore 파일에 .env 추가
MONGODB_URI=mongodb+srv://<username>:<password>@cluster0.vsqbwpj.mongodb.net/?retryWrites=true&w=majority&appName=Cluster0-
dotenv 라이브러리 설치(.env 파일을 읽은 후 코드에서 사용할 수 있도록 도와주는 도구)
npm install dotenv -
index.js 다음 코드로 수정
require('dotenv').config();
mongoose.connect(process.env.MONGODB_URI);
4.5 실습하기
이제 우리가 만든 API가 실제로 잘 작동하는지 확인해보아야한다. 브라우저 주소창에서는 GET 요청만 보낼 수 있으므로, 다양한 HTTP 메서드를 테스트할 수 있는 Postman을 사용하겠다.
가장 먼저 npm run dev로 서버를 실행한다.
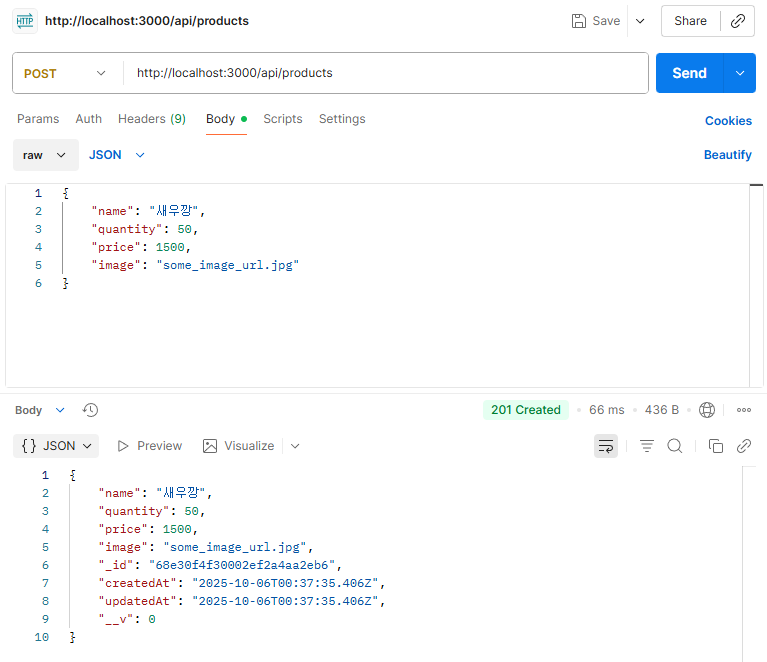
- 제품 추가
HTTP 메서드를 POST로 변경
Body 탭 -> raw 옵션을 클릭 -> JSON 형식으로 변경 -> JSON 데이터 입력
{
    "name": "맛있는 새우깡",
    "quantity": 50,
    "price": 1500,
    "image": "some_image_url.jpg"
}
- 모든 제품 조회
HTTP 메서드를 GET으로 변경
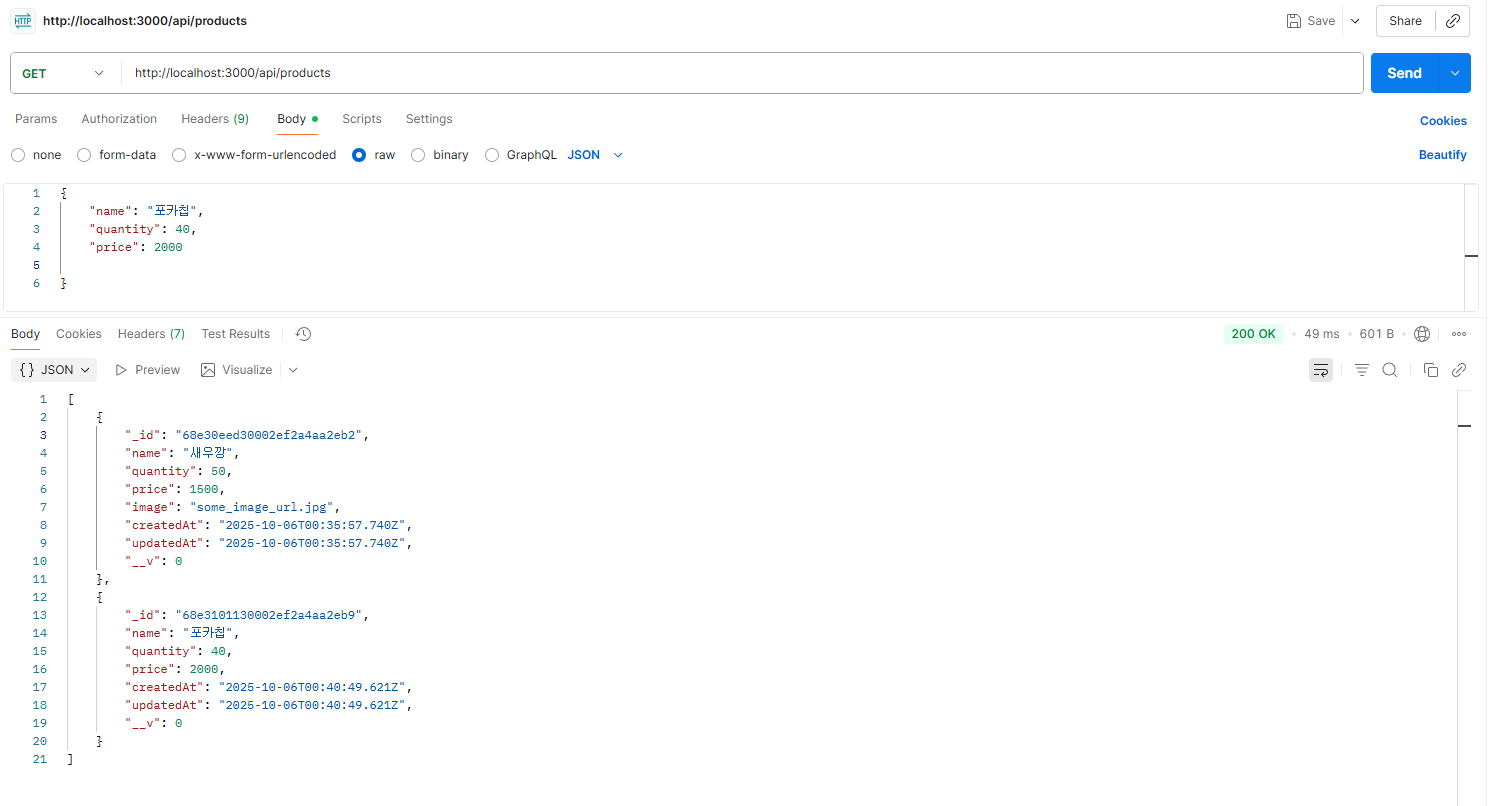
->postman

->브라우저
- 특정 제품 조회
HTTP 메서드를 GET으로 변경
URL의 :id 부분에 앞서 제품을 추가했을 때 받은 _id 값 넣기.
(ex:http://localhost:3000/api/products/65d5a9b8c3b4e...)
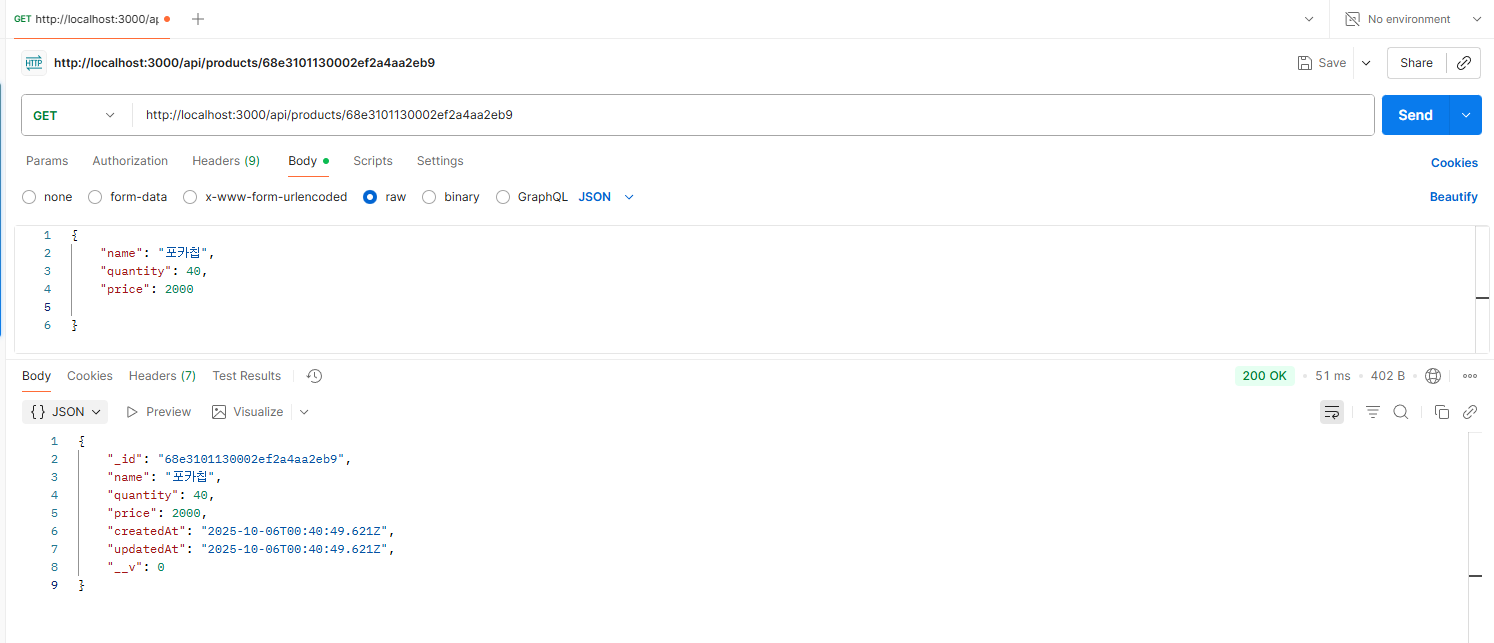
->postman

->브라우저
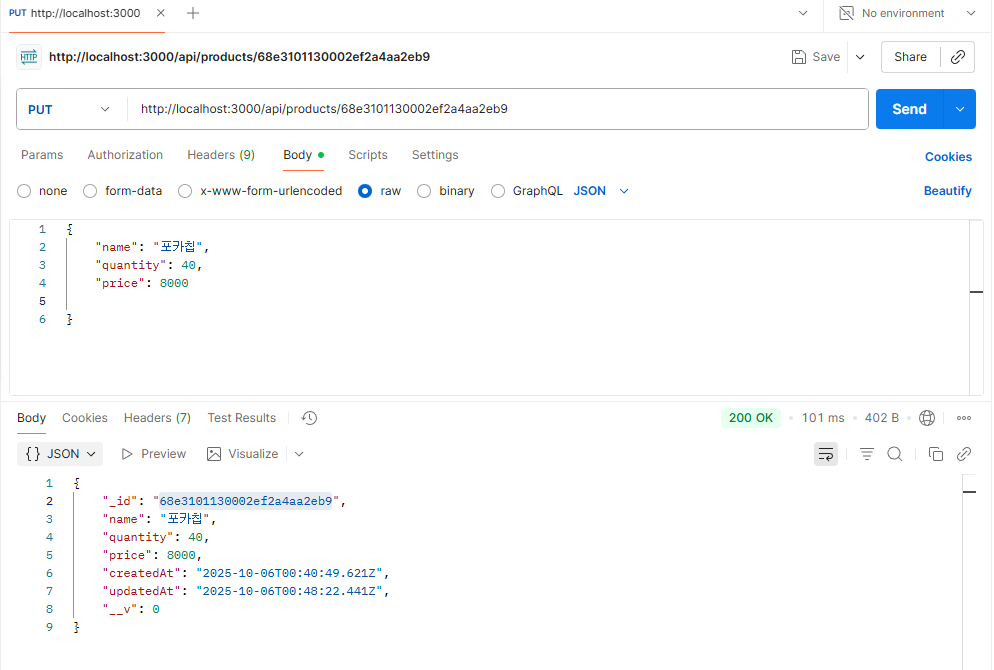
- 제품 수정
HTTP 메서드를 PUT으로 변경
수정하고 싶은 상품의 _id를 URL에 넣기,
Body 탭에서 raw, JSON을 선택하고, 변경할 내용만 담아 보내기
- 제품 삭제
HTTP 메서드를 DELETE로 변경
삭제하고 싶은 상품의 _id를 URL에 넣기
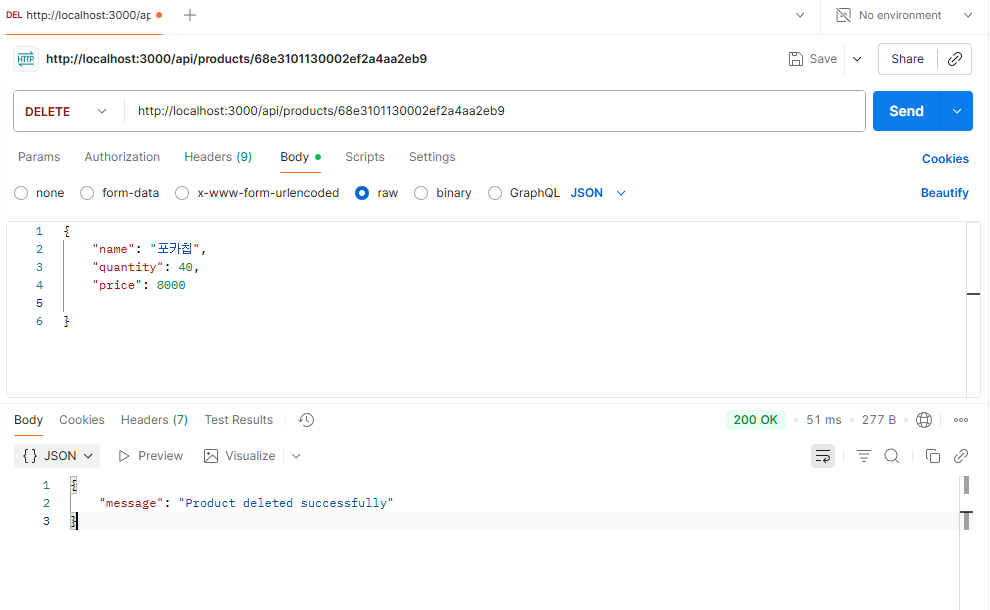
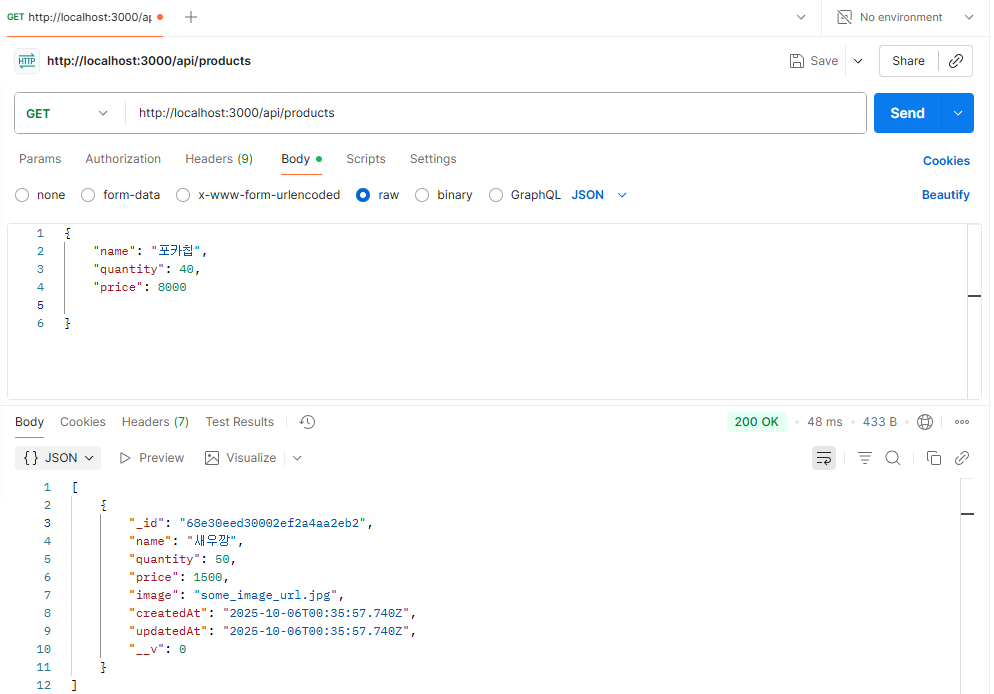
->새우깡만 남아있는 것을 볼 수 있다!
이번 실습을 통해 CRUD(생성, 조회, 수정, 삭제) 기능이 실제로 어떻게 동작하는지를 직접 눈으로 보며 배울 수 있었다. 클라이언트의 요청이 서버를 거쳐 데이터베이스에 도달하고, 그 결과가 다시 응답으로 되돌아오는 전체 흐름을 이해할 수 있는 시간이었다.
