입사 초에 만들었던 달력 컴포넌트를 공유해 본다 🗓️

달력에 필요한 기능은 다음과 같다.
<,>버튼으로 월이 변경되며 달력 타이틀도 변경된다.오늘버튼을 누르면 오늘 날짜가 선택된다.- 일자를 누르면 해당 날짜가 선택된다.
- 저번 달 or 다음 달의 날짜는 회색 font를 적용한다.
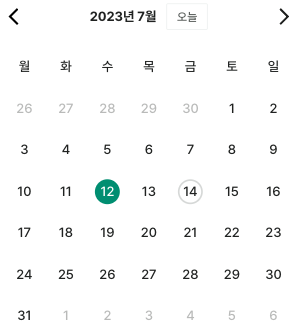
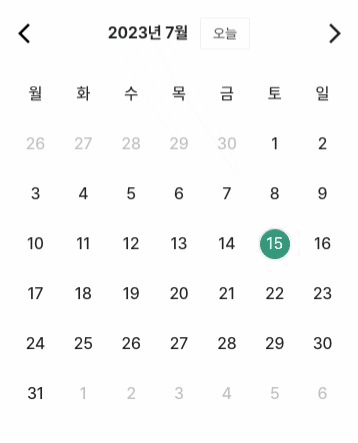
- 오늘 날짜는 회색 circle, 선택된 날짜는 초록색 circle로 표시한다.
이 기능들을 구현하기 위해,
- timestamp를 통해 구현한다. 값을 서로 비교하기 쉽고, timestamp로 year/month/date/day 등을 구할 수 있기 때문이다.
1-2. 그리고 정확한 비교를 위해 timestamp를 0시 0분 0초 0밀리초로 통일한다.<,>버튼을 눌렀을 때 선택된 날짜가 변하진 않지만 보여줄 달력 데이터가 달라지므로 선택된 년도/월에 해당되는selectedYearAndMonthstate가 필요하고,- 일자를 누르면 선택되는 날짜가 달라지므로
selectedTimestampstate가 필요하다.
3-2. 그리고selectedTimestamp가 변할 때selectedYearAndMonth가 함께 변해야 한다.- 다른 달 날짜를 보여주기 위해서는
selectedYearAndMonth의 1일의 요일과 마지막 날의 요일을 구해야 한다.
달력이 월요일부터 시작하므로, 1일이 토요일 (javaScriptday값 = 6)이라면 월~금 (5개)이 저번 달 날짜여야 하고,
마지막 날이 월요일 (javaScriptday값 = 0)이라면 화~일 (6개)이 다음 달 날짜여야 하기 때문이다.
4-2. 이를 위해 1일과 마지막 날의 Date 객체를 구해야 한다.- 날짜를 어떻게 표시할지 (font, circle)는 조건문을 통해 결정한다.
위 넘버링과 함께 아래 코드를 살펴 보자!
css 코드는 거의 제외하였다.
1. Calendar
const Calendar = () => {
  // 현재 날짜를 초기 상태로 갖는다.
  const nowDate = toDate(Date.now(), { timeZone: 'Asia/Seoul' }); // toDate는 date-fns-tz의 timeZone 관련 util 함수이다.
  // 2.
  const [selectedYearAndMonth, setSelectedYearAndMonth] =
    useState<YearAndMonthType>({
      year: nowDate.getFullYear(),
      month: nowDate.getMonth(),
    });
  // 3.
  const [selectedTimestamp, setSelectedTimestamp] = useState<number>(
    nowDate.setHours(0, 0, 0, 0),
  );

    // '<' 클릭 시
  const handleLeftClick = () => {
    // 1월일 땐 year 1 감소, month는 12월로 설정한다.
    if (selectedYearAndMonth.month === 0) {
      return setSelectedYearAndMonth(prev => ({
        year: prev.year - 1,
        month: 11,
      }));
    }
    // month 1 감소
    setSelectedYearAndMonth(prev => ({ ...prev, month: prev.month - 1 }));
  };

  // '>' 클릭 시
  const handleRightClick = () => {
    // 12월일 땐 year 1 증가, month는 1월로 설정한다.
    if (selectedYearAndMonth.month === 11) {
      return setSelectedYearAndMonth(prev => ({
        year: prev.year + 1,
        month: 0,
      }));
    }
    // month 1 증가
    setSelectedYearAndMonth(prev => ({ ...prev, month: prev.month + 1 }));
  };

  // 날짜 클릭 시
  const handleDayClick = (timestamp: number) => () => {
    setSelectedTimestamp(timestamp);
  };

  // '오늘' 클릭 시
  const handleTodayClick = () => {
    const nowDate = toDate(Date.now(), { timeZone: 'Asia/Seoul' });
    setSelectedTimestamp(nowDate.setHours(0, 0, 0, 0));
    setSelectedYearAndMonth({
      year: nowDate.getFullYear(),
      month: nowDate.getMonth(),
    });
  };

  // 3-2.
  useEffect(() => {
    const selectedDate = toDate(selectedTimestamp, { timeZone: 'Asia/Seoul' });
    setSelectedYearAndMonth({
      year: selectedDate.getFullYear(),
      month: selectedDate.getMonth(),
    });
  }, [selectedTimestamp]);

  return (
    <Presenter
      selectedYearAndMonth={selectedYearAndMonth}
      selectedTimestamp={selectedTimestamp}
      onLeftClick={handleLeftClick}
      onRightClick={handleRightClick}
      onTodayClick={handleTodayClick}
      onDayClick={handleDayClick}
    />
  );
};

export default Calendar;
2. Calendar Presenter
interface Props {
  selectedYearAndMonth: YearAndMonthType;
  selectedTimestamp: number;
  onLeftClick: () => void;
  onRightClick: () => void;
  onTodayClick: () => void;
  onDayClick: (timestamp: number) => () => void;
}

const Presenter = ({
  selectedYearAndMonth,
  selectedTimestamp,
  onLeftClick,
  onRightClick,
  onTodayClick,
  onDayClick,
}: Props) => (
  <Wrapper>
    <Header>
      <Btn onClick={onLeftClick}>
        <Back width={24} height={24} />
      </Btn>
      <Center>
        <Typo>
          // 달력 타이틀
          {selectedYearAndMonth.year}년 {selectedYearAndMonth.month + 1}월
        </Typo>
        <TodayBtn onClick={onTodayClick}>
          <Typo>
            오늘
          </Typo>
        </TodayBtn>
      </Center>
      <Btn onClick={onRightClick}>
        <Forward width={24} height={24} />
      </Btn>
    </Header>

    <Calendar>
      // 월 ~ 일
      <KoreanDays>
        {Object.values(KoreanDayEnum).map(koreanDay => (
          <Cell key={koreanDay}>
            <Typo>
              {koreanDay}
            </Typo>
          </Cell>
        ))}
      </KoreanDays>

      // 날짜 영역, grid로 구현했다.
      <Days>
        {getTimestampListForCalendar(
          selectedYearAndMonth.year,
          selectedYearAndMonth.month,
        ).map(timestamp => (
         // 5.
          <Day
            key={timestamp}
            // selected 여부
            isSelected={timestamp === selectedTimestamp}
            // 오늘 여부
            isToday={isToday(timestamp)}
            // 이번 달 여부
            isCurrentMonth={isCurrentMonth(
              timestamp,
              selectedYearAndMonth.month,
            )}
            onClick={onDayClick(timestamp)}
          >
            <Typo
              // 5.
              color={
                // selected된 날짜는 white font
                timestamp === selectedTimestamp
                  ? Colors.white
                     // 이번 달이면 black font
                  : isCurrentMonth(timestamp, selectedYearAndMonth.month)
                  ? Colors.black
                     // 다른 달이면 gray font
                  : Colors.gray
              }
            >
              // 날짜
              {toDate(timestamp, { timeZone: 'Asia/Seoul' }).getDate()}
            </Typo>
          </Day>
        ))}
      </Days>
    </Calendar>
  </Wrapper>
);
// 5. styled component를 사용 중이다.
const Day = styled(Cell)<{
isSelected: boolean;
isToday: boolean;
isCurrentMonth: boolean;
}>`
cursor: pointer;
${props =>
// selected된 경우 green circle로 표시한다.
props.isSelected &&
`background: ${Colors.green};
border-radius: 50%;
`}
${props =>
// 오늘이지만 selected 되지 않은 경우 gray circle로 표시한다.
props.isToday &&
!props.isSelected &&
`border: 2px solid ${Colors.gray};
border-radius: 50%;
`}
`;3. utils
// timestamp가 오늘인지 확인하는 함수
function isToday(timestamp: number) {
  return (
    toDate(timestamp, { timeZone: 'Asia/Seoul' }).toDateString() ===
    toDate(Date.now(), { timeZone: 'Asia/Seoul' }).toDateString()
  );
}

// 보여줘야 하는 timestamp array를 반환하는 함수
function getTimestampListForCalendar(
  selectedYear: number,
  selectedMonth: number,
) {
  // 4-2. 이번 달 1일의 Date 객체
  const dateObjOfStartDay = toDate(new Date(selectedYear, selectedMonth), {
    timeZone: 'Asia/Seoul',
  });
  // 4-2. 이번 달 마지막 날의 Date 객체 (다음 달의 0일)
  const dateObjOfEndDay = setDate(
    setMonth(dateObjOfStartDay, dateObjOfStartDay.getMonth() + 1),
    0,
  ); // setDate, setMonth는 date-fns의 util 함수이다.
  // 이번 달 마지막 날의 일자
  const endDay = dateObjOfEndDay.getDate();

  // 4. 이번 달 1일과 마지막 날의 요일
  const dayOfStartDay = dateObjOfStartDay.getDay();
  const dayOfEndDay = dateObjOfEndDay.getDay();
  // 필요한 다른 달 일자들의 개수
  const numOfNecessaryDaysFromPreviousMonth =
    dayOfStartDay === 0 ? 6 : dayOfStartDay - 1; // 저번 달
  const numOfNecessaryDaysFromNextMonth =
    dayOfEndDay === 0 ? 0 : 7 - dayOfEndDay; // 다음 달

  // 저번 달 timestamp array
  const timeStampsFromPreviousMonth = Array.from(
    { length: numOfNecessaryDaysFromPreviousMonth },
    (_, index) =>
      dateObjOfStartDay.valueOf() -
      24 * 60 * 60 * 1000 * numOfNecessaryDaysFromPreviousMonth +
      24 * 60 * 60 * 1000 * index,
  );
  // 이번 달 timestamp array
  const timeStampsForCurrentMonth = Array.from(
    { length: endDay },
    (_, index) => dateObjOfStartDay.valueOf() + 24 * 60 * 60 * 1000 * index,
  );
  // 다음 달 timestamp array
  const timeStampsFromNextMonth = Array.from(
    { length: numOfNecessaryDaysFromNextMonth },
    (_, index) => dateObjOfEndDay.valueOf() + 24 * 60 * 60 * 1000 * (index + 1),
  );
  // timestamp 합치기
  const timestamps = timeStampsFromPreviousMonth.concat(
    timeStampsForCurrentMonth,
    timeStampsFromNextMonth,
  );
  return timestamps;
}

// 이번 달인지 확인하는 함수
function isCurrentMonth(timestamp: number, month: number) {
  return toDate(timestamp, { timeZone: 'Asia/Seoul' }).getMonth() === month;
}
그럼 이렇게 구현된다!
코드를 되돌아 보니 아쉬운 점이 보여서 useEffect 로직을 추가했다. 변수명도 더 쉽게 짓고 주석도 좀 남겨놀 것 그랬다 😅
그리고 방금 충격을 받았는데, 회사에서 쓰고 있는 date-fns 라이브러리에 유용한 util들이 더 있었다는 걸 알게 되었다,,, 알았으면 더 빠르게 개발할 수 있었을 텐데 아쉽다.
복잡한 UI를 만들 땐 충분한 리서치를 해보자는 것이 오늘의 가장 큰 TIL이다. 🔥🔥🔥