26번) 예외 처리를 활용한 간단한 계산기
26-1) java 코드
import java.util.Scanner;

public class Main {
    public static void main(String[] args) throws Exception {
        Scanner s = new Scanner(System.in);
        int a, b;
        char ch;
        String str;

        try {
            System.out.print("첫번째 수를 입력하세요 : ");
            a = s.nextInt();
            System.out.print("계산할 연산자를 입력하세요 : ");
            str = s.next();
            ch = str.charAt(0);
            System.out.print("두번째 수를 입력하세요 : ");
            b = s.nextInt();

            switch (ch) {
                case '+':
                    System.out.printf("%d %c %d = %d", a, ch, b, a + b);
                    break;
                case '-':
                    System.out.printf("%d %c %d = %d", a, ch, b, a - b);
                    break;
                case '*':
                    if ((a == 0) || (b == 0))
                        throw new Exception("0으로 곱하면 어차피 0입니다\n");
                    else {
                        System.out.printf("%d %c %d = %d", a, ch, b, a * b);
                        break;
                    }
                case '/':
                    if ((a == 0) || (b == 0))
                        throw new Exception("0으로 나누면 안됩니다\n");
                    else {
                        System.out.printf("%d %c %d = %d", a, ch, b, a / b);
                        break;
                    }
                case '%':
                    if ((a == 0) || (b == 0))
                        throw new Exception("0으로 나머지를 구할 수 없습니다\n");
                    else {
                        System.out.printf("%d %c %d = %d", a, ch, b, a % b);
                        break;
                    }
            }
        } catch (Exception e) {
            System.out.print("발생 오류 ==> ");
            System.out.println(e.getMessage());
        }
    }
}
26-2) 실행 결과

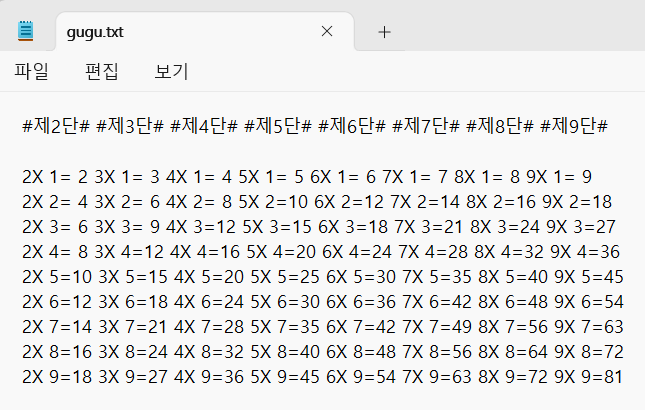
27번) 구구단을 파일에 출력
27-1) java 코드
import java.io.PrintWriter;

public class Main {
    public static void main(String[] args) throws Exception {
        int i, k;

        PrintWriter pw = new PrintWriter("C:/java book/gugu.txt");
        String str = "";

        for (i = 2; i <= 9; i++) {
            str += " #제" + i + "단#";
        }

        pw.println(str);
        pw.println();
        str = "";

        for(i=1; i<=9; i++){
            for(k=2; k<=9; k++){
                str += String.format("%2dX%2d=%2d", k, i, k*i);
            }
            pw.println(str);
            str="";
        }

        pw.close();
    }
}
27-2) 실행 결과
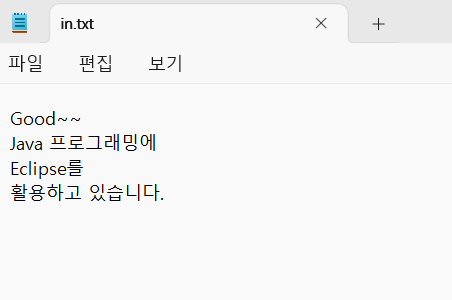
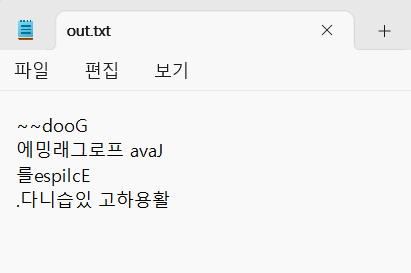
28번) 파일에서 읽어온 문자열을 파일에 거꾸로 출력
28-1) java 코드
import java.io.File;
import java.io.PrintWriter;
import java.util.Scanner;

public class Main {
    public static void main(String[] args) throws Exception {
        Scanner s = new Scanner(new File("C:/java book/in.txt"));
        PrintWriter pw = new PrintWriter("c:/java book/out.txt");

        String str1, str2 = "";

        while (s.hasNextLine()) {
            str1 = s.nextLine();
            int size = str1.length();
            for (int i = size - 1; i >= 0; i--)
                str2 += str1.charAt(i);

            pw.println(str2);
            str2 = "";
        }

        s.close();
        pw.close();
    }
}
28-2) 실행 결과
29번) 클래스의 기본
29-1) java 코드
class Pet {
    String str;
    int num;

    Pet(String str, int num) {
        this.str = str;
        this.num = num;
    }

    public void move() {
        System.out.println(str + "가 움직입니다.");
    }

    public void live() {
        System.out.println(str + "는 " + num + "개월입니다.");
    }
}

public class Main {
    public static void main(String[] args) {
        Pet myPet1 = new Pet("강아지", 8);
        Pet myPet2 = new Pet("고양이", 13);

        myPet1.move();
        myPet2.move();
        myPet1.live();
        myPet2.live();
    }
}
29-2) 실행 결과

30번) 클래스의 기본 - 접근 제어 수식어 활용
30-1) java 코드
class Pet {
    private String str;
    private int num;

    public void setStr(String str) {
        this.str = str;
    }

    public void setNum(int num) {
        this.num = num;
    }

    public String getStr() {
        return this.str;
    }

    public int getNum() {
        return this.num;
    }

    public void move() {
        System.out.println(str + "가 움직입니다.");
    }
}

public class Main {
    public static void main(String[] args) {
        Pet myPet1 = new Pet();
        Pet myPet2 = new Pet();

        myPet1.setStr("강아지");
        myPet1.setNum(8);
        myPet2.setStr("고양이");
        myPet2.setNum(13);

        myPet1.move();
        myPet2.move();
        System.out.println(myPet1.getStr() + "는 " + myPet1.getNum() + "개월입니다.");
        System.out.println(myPet2.getStr() + "는 " + myPet2.getNum() + "개월입니다.");
    }
}
30-2) 실행 결과

31번) 클래스의 기본-생성자, 클래스 변수, 클래스 메소드 활용
31-1) java 코드
class Pet {
    private String str;
    private int num;
    static private int count;

    Pet(){
        count++;
    }

    Pet(String str, int num) {
        this.str = str;
        this.num = num;
        count++;
    }

    static public int Count(){
        return count;
    }

    public void setStr(String str) {
        this.str = str;
    }

    public void setNum(int num) {
        this.num = num;
    }

    public String getStr() {
        return str;
    }

    public int getNum() {
        return num;
    }

    public void move() {
        System.out.println(str + "가 움직입니다.");
    }
}

public class Main {
    public static void main(String[] args) {
        Pet myPet1 = new Pet("강아지", 8);
        Pet myPet2 = new Pet();

        myPet2.setStr("고양이");
        myPet2.setNum(13);

        myPet1.move();
        myPet2.move();
        System.out.println(myPet1.getStr() + "는 " + myPet1.getNum() + "개월입니다.");
        System.out.println(myPet2.getStr() + "는 " + myPet2.getNum() + "개월입니다.");
        System.out.println("현재 우리집 애완동물 수는 " + Pet.Count() + "마리 입니다.");
    }
}
31-2) 실행 결과

32번) 클래스의 응용-상속
32-1) java 코드
class Pet {
    String name, type;
    int weigth;

    public void setName(String name) {
        this.name = name;
    }

    public void setType(String type) {
        this.type = type;
    }

    public void setWeigth(int weigth) {
        this.weigth = weigth;
    }

    public String getName() {
        return name;
    }

    public String getType() {
        return type;
    }

    public int getWeigth() {
        return weigth;
    }

    public void move() {
        System.out.println("애완동물이 움직입니다.");
    }
}

class Dog extends Pet {
}

class Bird extends Pet {
    boolean flightYN;

    public void setFlightYN(boolean flightYN) {
        this.flightYN = flightYN;
    }

    public boolean getFlight() {
        return flightYN;
    }
}

public class Main {
    public static void main(String[] args) {
        Dog dog = new Dog();
        Bird bird = new Bird();

        dog.setName("누렁이");
        dog.setWeigth(10);
        bird.setType("앵무새");
        bird.setFlightYN(true);
        dog.move();
        bird.move();

        System.out.println("강아지의 이름은 " + dog.getName() + "고, 몸무게는 " + dog.getWeigth() + "Kg입니다.");
        System.out.println("새의 종류는 " + bird.getType() + "고, 날 수" + (bird.getFlight() ? "있" : "없") + "습니다.");
    }
}
32-2) 실행 결과

33번) 클래스의 응용 - 메소드 오버라이딩
33-1) java 코드
class Pet {
    Pet() {
        System.out.println("슈퍼 클래스 move() : 애완동물이 움직입니다.");
    }
}

class Dog extends Pet {

}

class Bird extends Pet {
    Bird() {
        System.out.println("서브 클래스 move() : 새가 날아갑니다.");
    }
}

public class Main {
    public static void main(String[] args) {
        Bird bird1 = new Bird();
    }
}
33-2) 실행 결과

34번) 클래스의 응용 - 다중 상속
34-1) java 코드
interface Mammal {
    abstract void moveMammal();
}

abstract class Fish {
    void swim() {
        System.out.println("물고기는 헤엄치며 움직입니다.");
    }
}

class Whale extends Fish implements Mammal {
    public void moveMammal() {
        System.out.println("포유류는 새끼를 낳습니다.");
    }
}

public class Main {
    public static void main(String[] args) {
        Whale whale = new Whale();
        whale.swim();
        whale.moveMammal();
    }
}
34-2) 실행 결과

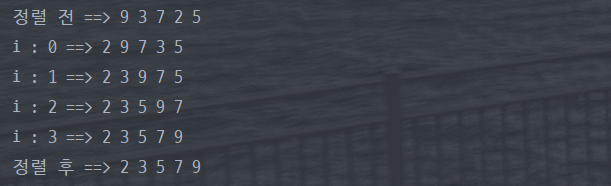
실습 14-6번) 선택 정렬
14-6-1) java 코드
public class Main {
    public static void main(String[] args) {
        Integer[] s = {9, 3, 7, 2, 5};
        Integer maxVal, minVal;
        int i, k;

        System.out.print("정렬 전 ==> ");
        for (int n = 0; n < 5; n++)
            System.out.print(s[n] + " ");
        System.out.println();
        for (i = 0; i < 4; i++) {
            for (k = i; k < 5; k++) {
                minVal = Math.min(s[i], s[k]);
                maxVal = Math.max(s[i], s[k]);
                s[i] = minVal;
                s[k] = maxVal;
            }
            System.out.print("i : " + i + " ==> ");
            for (int j = 0; j < 5; j++) {
                System.out.print(s[j] + " ");
            }
            System.out.println();
        }

        System.out.print("정렬 후 ==> ");
        for (i = 0; i < 5; i++)
            System.out.print(s[i] + " ");
    }
}
14-6-2) 실행 결과
38번) 버블 정렬
38-1) java 코드
public class Main {
    public static void main(String[] args) {
        int[] s = {9, 3, 7, 2, 5};
        int i, k;
        int max, min;

        System.out.print("정렬 전 ==> ");
        for (i = 0; i < 5; i++) {
            System.out.print(s[i] + " ");
        }
        System.out.println();

        for (i = 0; i < 4; i++) {
            for (k = 0; k < 4 - i; k++) {
                if (s[k] > s[k + 1]) {
                    min = Math.min(s[k], s[k + 1]);
                    max = Math.max(s[k], s[k + 1]);
                    s[k] = min;
                    s[k + 1] = max;
                }
            }
            for (k = 0; k < 5; k++) {
                System.out.print(s[k] + " ");
            }
            System.out.println();
        }

        System.out.print("정렬 후 ==> ");
        for (i = 0; i < 5; i++) {
            System.out.print(s[i] + " ");
        }
    }
}
38-2) 실행 결과

39번) 버블 정렬 - 효율성 고려
39-1) java 코드
public class Main {
    public static void main(String[] args) {
        int[] s = {3, 2, 5, 9, 7};
        int i, k;
        int max, min;
        int count = 0;
        boolean changeYN = false;

        System.out.print("정렬 전 ==> ");
        for (i = 0; i < 5; i++) {
            System.out.print(s[i] + " ");
        }

        for (i = 0; i < 4; i++) {
            count++;
            for (k = 0; k < 4 - i; k++) {
                if (s[k] > s[k + 1]) {
                    changeYN = true;
                    min = Math.min(s[k], s[k + 1]);
                    max = Math.max(s[k], s[k + 1]);
                    s[k] = min;
                    s[k + 1] = max;
                }
            }
            if (changeYN)
                changeYN = false;
            else
                break;
        }

        System.out.print("\n총 회전수 : " + count);
        System.out.print("\n정렬 후 ==> ");
        for (i = 0; i < 5; i++) {
            System.out.print(s[i] + " ");
        }
    }
}
39-2) 실행 결과

실습 14-9번) 스레드 Runnable 인터페이스를 이용한 구현
14-9-1) java 코드
public class Main {
    public static void main(String[] args) {
        class Car {
            String carName;
        }

        class Truck extends Car implements Runnable {
            Truck(String carName) {
                this.carName = carName;
            }

            public void run() {
                for (int i = 0; i < 3; i++) {
                    try {
                        Thread.sleep(10);
                        System.out.println(carName + "~~ 달립니다.");
                    } catch (Exception e) {
                    }
                }
            }
        }

        Truck car1 = new Truck("$트럭1");
        Thread truck1 = new Thread(car1);
        truck1.start();

        Truck car2 = new Truck("@트럭2");
        Thread truck2 = new Thread(car2);
        truck2.start();

        Truck car3 = new Truck("*트럭3");
        Thread truck3 = new Thread(car3);
        truck3.start();
    }
}
14-9-2) 실행 결과


블로그 이전했습니다 -> https://young-code.tistory.com