https://create-react-app.dev/docs/getting-started
리엑트로 작동하는 클라이언트 사이드를 만들 것이다.
아래 폴더 구조에서 client 부분을 먼저 설정한다.
/
├── /server
│   ├── /public      # React앱을 빌드한 파일
│   ├── index.js     # node.js로 작성된 웹 서버 진입점
│   ├── ...          # 기타 여러분들이 필요에 따라 만드는 파일들
│   └── package.json
│
├── /client
│   ├── README.md    # create-react-app이 만들어낸 파일
│   ├── /build       # React앱을 빌드한 파일
│   ├── /public      # create-react-app이 만들어낸 파일, yarn start로 실행할 시에 쓰입니다
│   └── /src         # React 컴포넌트가 들어가는 폴더
│        ├── App.js
│        ├── App.css
│        ├── index.js
│        ├── index.css
│        ├── ...
│        └── package.json
│
└.gitignore # gitignore를 이용해서 node_modules가 repository에 포함되지 않도록 하세요- create-react-app을 이용해서 리엑트 프로젝트를 만든다.
- 시작하는 폴더에서 npx create-react-app client를 입력해 client 폴더를 생성하고 그 안에 리엑트 관련 파일을 설치한다.
  npx create-react-app client
  //아래 글을 입력하면 설치와 동시에 react가 실행된다.
  cd my-app
  npm start
설치가 끝나면 react-router-dom을 설치한다.
client 폴더 경로에서 터미널로 npm install react-router-dom --save를 입력해 관련 파일을 설치한다.
--save를 입력하지 않으면 node_modules에 패키지가 설치되고 package.json에 나타나지 않는다.
--save를 입력하여 package.json 파일의 dependencies 항목에 관련 정보를 저장할 수 있다.
--save-dev로 입력하면 개발에 도움이 되는 프로그램을 package.json에 dev-dependencies 항목에 저장한다.
https://docs.npmjs.com/cli/install
https://stackoverflow.com/questions/22891211/what-is-the-difference-between-save-and-save-dev/31358981#31358981
- react router의 Quick Start의 예제 코드를 참고하여, 기본적인 라우팅이 작동하는지 확인한다.
https://reactrouter.com/web/guides/quick-start
client에 App2.js 파일을 만들고 라우팅 예제 코드를 다음과 같이 입력했다.
import React from "react";
import {
  BrowserRouter as Router,
  Switch,
  Route,
  Link
} from "react-router-dom";

export default function App2() {
  return (
    <Router>
      <div>
        <nav>
          <ul>
            <li>
              <Link to="/">Home</Link>
            </li>
            <li>
              <Link to="/about">About</Link>
            </li>
            <li>
              <Link to="/users">Users</Link>
            </li>
          </ul>
        </nav>

        {/* A <Switch> looks through its children <Route>s and
            renders the first one that matches the current URL.
            */}
        <Switch>
          <Route path="/about">
            <About />
          </Route>
          <Route path="/users">
            <Users />
          </Route>
          <Route path="/">
            <Home />
          </Route>
        </Switch>
      </div>
    </Router>
  );
}

function Home() {
  return <h2>Home</h2>;
}

function About() {
  return <h2>About</h2>;
}

function Users() {
  return <h2>Users</h2>;
}-
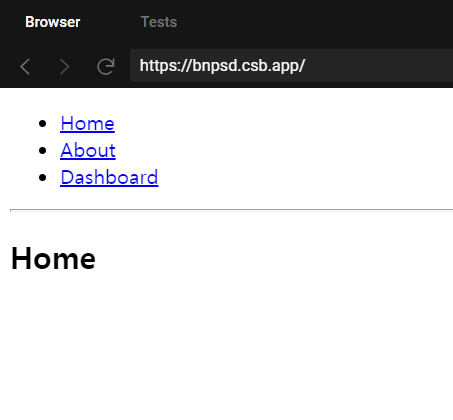
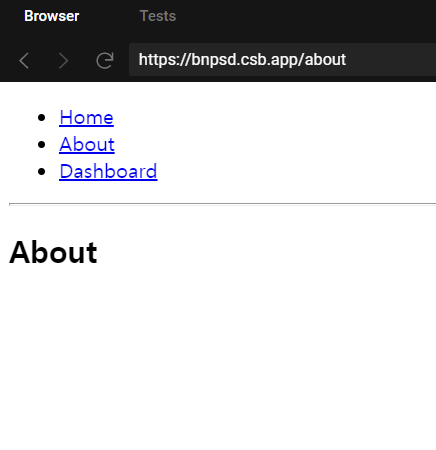
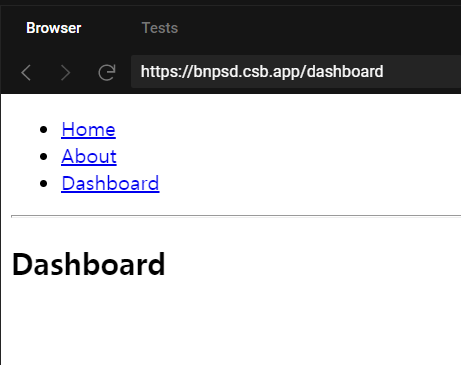
3개의 page를 router로 다룰 수 있다. (home, about, users)
-
Link 태그를 누를 때마다 router가 일치하는 Route 태그를 렌더링한다.
Link 태그는 href 절대경로를 가진 a 태그를 렌더링한다. -
Switch 태그는 하위 Route 태그를 살펴보고 현재 URL과 일치하는 path를 가진 태그의 컴포넌트(Home, about, users)를 렌더링한다.
-
여기서 중요한 점은 url(about, dashboard) 클라이언트에서 적용되는 url이다. 페이지의 앞, 뒤로 이동시켜주는 역할을 하게 한다.(About을 세 번 클릭하면 세 번 뒤로가기를 눌러야 처음 페이지로 돌아간다.)
서버사이드에 이 url 경로를 지정해주지 않으면 상태창에 url을 입력하여 접근할 수 없다.(404에러) -
이번에는 중첩되는 라우팅 페이지를 만든다. App3.js라는 파일을 만들어 다음과 같이 입력한다.
import React from "react";
import {
BrowserRouter as Router,
Switch,
Route,
Link,
useParams,
useRouteMatch
} from "react-router-dom";
/*
routes는 일반 React 구성 요소이므로
child element를 포함하여 앱의 모든 위치에서 렌더링 될 수 있습니다.
React Router 앱의 코드 분할은 다른 React 앱의 코드 분할과 동일하므로
앱을 여러 번들로 코드 분할 할 때 도움이됩니다.
*/
export default function App3() {
return (
<Router>
<div>
<ul>
<li>
<Link to="/">Home</Link>
</li>
<li>
<Link to="/topics">Topics</Link>
</li>
</ul>
<hr />
<Switch>
<Route exact path="/">
<Home />
</Route>
<Route path="/topics">
<Topics />
</Route>
</Switch>
</div>
</Router>
);
}
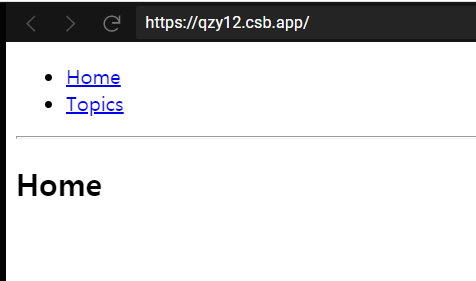
function Home() {
return (
<div>
<h2>Home</h2>
</div>
);
}
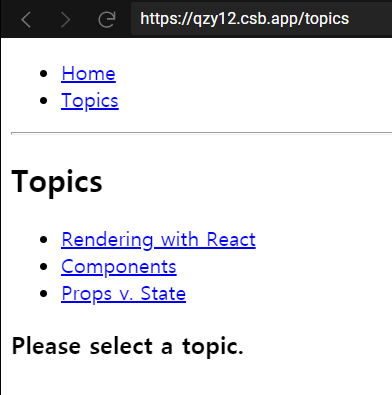
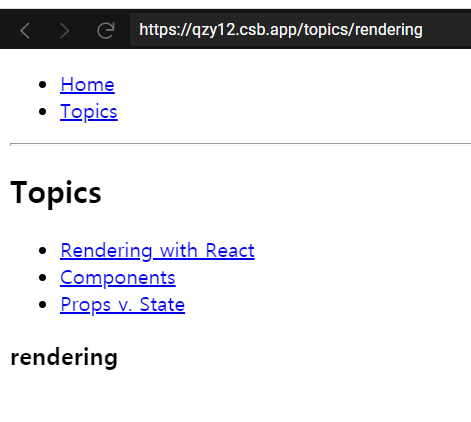
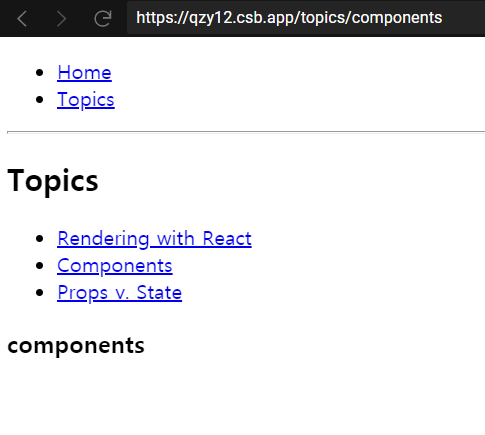
function Topics() {
/*
'path`를 사용하면 부모 경로에 상대적인 <Route> 경로를 만들 수 있고
ʻurl`을 사용하면 상대적 링크를 만들 수 있습니다.
*/
let { path, url } = useRouteMatch();
//console.log(url) => /topics
//console.log(path) => /topics
// ${url}을 paht로 바꾸거나 반대로 해도 작동한다.
return (
<div>
<h2>Topics</h2>
<ul>
<li>
<Link to={`${url}/rendering`}>Rendering with React</Link>
</li>
<li>
<Link to={`${url}/components`}>Components</Link>
</li>
<li>
<Link to={`${url}/props-v-state`}>Props v. State</Link>
</li>
</ul>
<Switch>
<Route exact path={path}>
<h3>Please select a topic.</h3>
</Route>
<Route path={`${path}/:topicId`}>
<Topic />
</Route>
</Switch>
</div>
);
}
function Topic() {
// The <Route> that rendered this component has a
// path of `/topics/:topicId`. The `:topicId` portion
// of the URL indicates a placeholder that we can
// get from `useParams()`.
let { topicId } = useParams();
return (
<div>
<h3>{topicId}</h3>
</div>
);
}
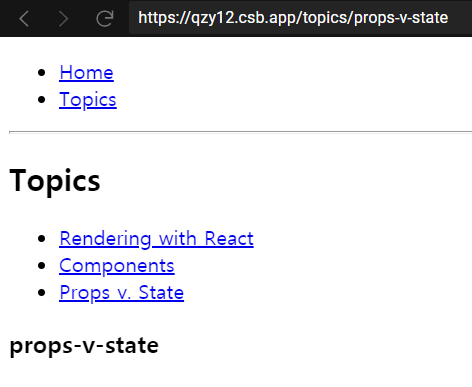
- route 태그 중 path="/topics"은 Topics 컴포넌트를 렌더링한다. Topics 안에는 Topic 컴포넌트가 3개가 있다.
- useRouteMatch()를 이용해서 route path의 경로를 변수에 담을 수 있다. 위에서는 path, url이란 이름으로 받았고, 둘 다 "/topics"경로를 가지고 있다.
- topics 안에서 Link와 switch-route 태그를 이용해 새로운 url 주소를 지정하여 Topic 컴포넌트를 렌더링 할 수 있다.
이 때 Route의 path로 ${url}/:topicId라고 입력하면 Link에서 요청한 ${url}/ooo 주소에서 /ooo을 /:topicId에 적용할 수 있다. - Topic 컴포넌트에서 useParam()으로 /:topicId 값을 받을 수 있다. topicId변수에 useParam()값을 담은 다음 그 값을 화면에 출력해준다.