✨ 1분코딩 사이트를 보고 정리한 글입니다.
Flex
- 레이아웃 배치 전용기능으로 고안되었다.
- 기본 구조
<div class="container">
	<div class="item">helloflex</div>
	<div class="item">abc</div>
	<div class="item">helloflex</div>
</div>
부모 요소인 div.container를 플렉스 컨테이너라고 부르고,
자식 요소인 div.item을 플렉스 아이템이라고 부른다.
👉🏻 컨테이너는 Flex의 영향을 받는 전체 공간이고, 각각의 아이템이 특정 형태로 배치된다.
Flex 속성
- 컨테이너에 적용하는 속성, 아이템에 적용하는 속성으로 나뉜다.
컨테이너 속성
1. display: flex
-
컨테이너에 flex를 적용하는 것이 시작이다.
-
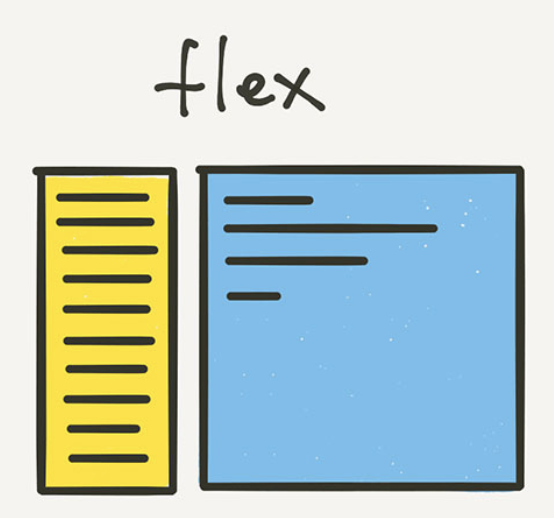
display를 flex로 하게되면 플렉스 아이템들은 가로 방향으로 배치되고, 자신의 width만큼만 공간을 차지하게 된다.
-
플렉스 아이템의 height는 컨테이너의 height만큼 늘어난다. ( 요런 컬럼 레이아웃 만들 때 유용 )
-
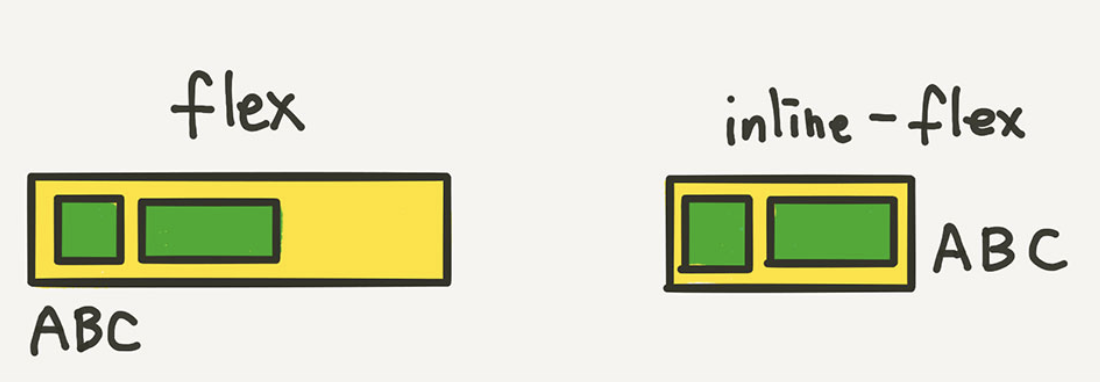
inline-flex?
inline-block과 동일하게 동작한다고 생각하면 된다.
-
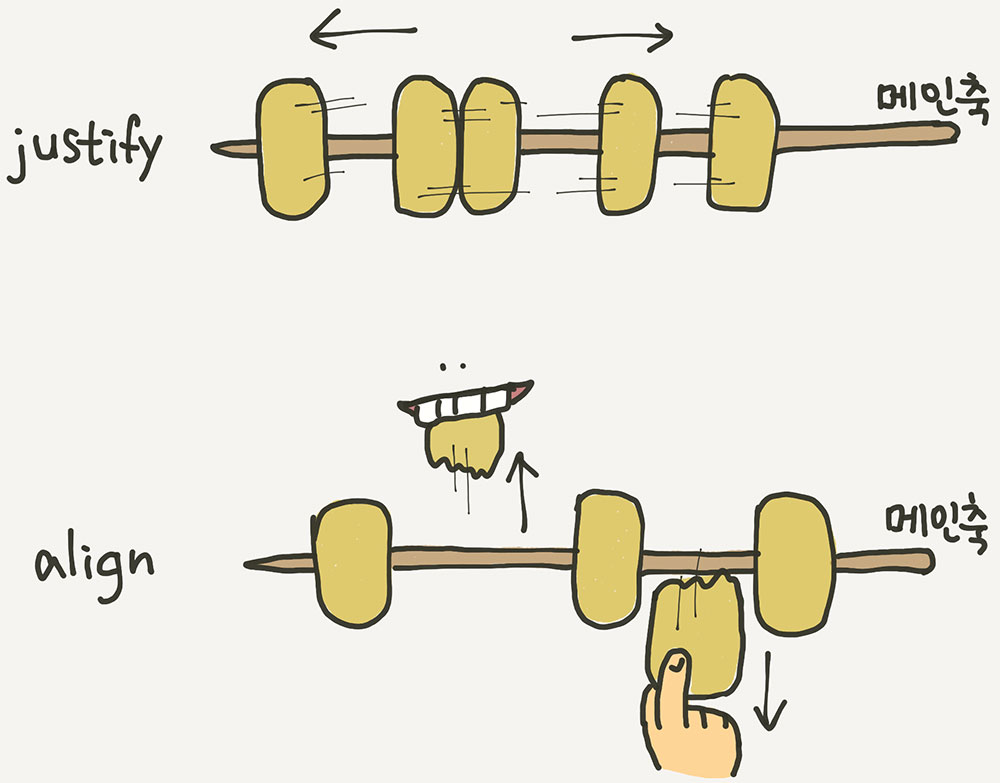
아이템들이 배치된 방향의 축을 메인축(오뎅꼬치), 메인축과 수직인 축을 수직축이라고 한다.
2. flex-direction ; 배치 방향 설정
- 아이템들이 배치되는 메인축의 방향을 결정하는 속성이다.
.container {
	flex-direction: row; -가로
	/* flex-direction: column; */ -세로
	/* flex-direction: row-reverse; */ -역순 가로
	/* flex-direction: column-reverse; */ -역순 세로
}
3. flex-wrap ; 줄넘김 처리
컨테이너가 아이템을 더 담을 공간이 없을 때, 줄바꿈을 어떻게 할지 결정해주는 속성이다.
.container {
	flex-wrap: nowrap; -삐져나감
	/* flex-wrap: wrap; */ - 아랫줄로 넘김
	/* flex-wrap: wrap-reverse; */ - 윗줄로 넘김
}
flex-flow ; flex-direction + flex-wrap
- flex-direction과 flex-wrap을 한꺼번에 지정할 수 있는 단축 속성이다.
.container {
	flex-flow: row wrap;
	/* 아래의 두 줄을 줄여 쓴 것 */
	/* flex-direction: row; */
	/* flex-wrap: wrap; */
}
정렬
“justify”는 메인축(오뎅꼬치) 방향으로 정렬
“align”은 수직축(오뎅을 뜯어내는) 방향으로 정렬
4. justify-content ; 메인축 방향 정렬
- 메인축 방향으로 아이템을 정렬하는 속성이다.
.container {
	justify-content: flex-start; -아이템을 시작점으로 정렬
	/* justify-content: flex-end; */ -아이템을 끝점으로 정렬
	/* justify-content: center; */ -아이템을 가운데로 정렬
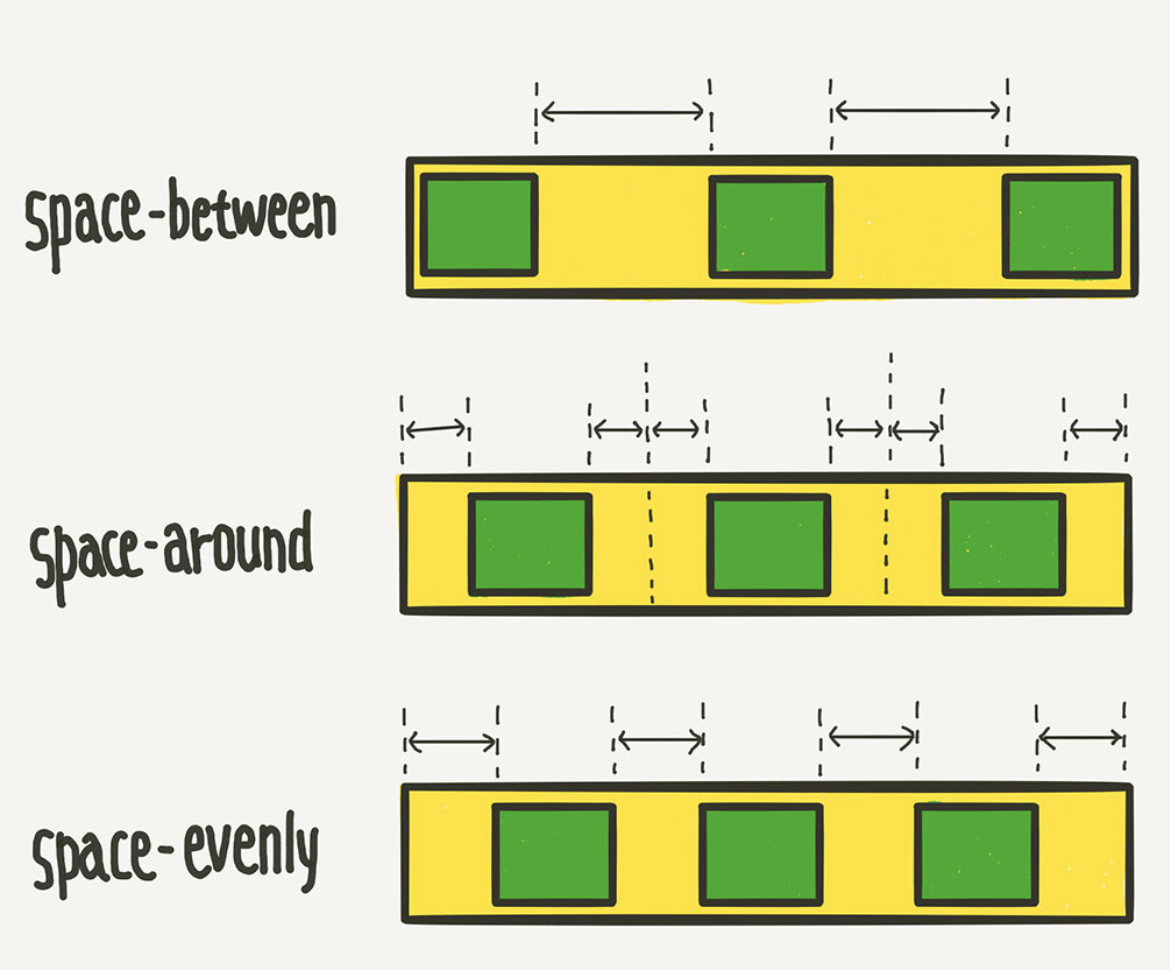
	/* justify-content: space-between; */ -아이템 사이에 균일한 간격
	/* justify-content: space-around; */ -아이템 둘레에 균일한 간격
	/* justify-content: space-evenly; */ -아이템 사이와 양끝에 균일한 간격
}
5. align-items ; 수직축 방향 정렬
- 수직축 방향으로 아이템을 정렬하는 속성이다.
.container {
	align-items: stretch;
    	-아이템이 수직축 방향으로 끝까지 쭉 늘어남

	/* align-items: flex-start; */
    	-아이템이 시작점에 맞춰 본인 높이에 맞도록 정렬
    	-천장에 붙어있는 모습

	/* align-items: flex-end; */
    	-아이템이 끝점에 맞춰 본인 높이에 맞도록 정렬
        -바닥에 떨어진 모습
	/* align-items: center; */
    	-아이템이 중앙에 맞춰 본인 높이에 맞도록 정렬

	/* align-items: baseline; */
    	- 텍스트 베이스라인 기준으로 정렬
        - ex) 3o.AB@! : 각자 높이가 다르지만 베이스라인에 맞게 정렬
}
6. align-content ; 여러 행 정렬
flex-wrap: wrap;일때 아이템 행이 2줄 이상일때 수직축 방향 정렬을 결정하는 속성
.container {
	flex-wrap: wrap;
	align-content: stretch;
	/* align-content: flex-start; */
	/* align-content: flex-end; */
	/* align-content: center; */
	/* align-content: space-between; */
	/* align-content: space-around; */
	/* align-content: space-evenly; */
}
아이템 속성
1. flex-basis ; 플렉스 아이템의 기본크기
- flex-direction이 row일때는 너비, column일때는 높이
.item {
	flex-basis: auto; /* 기본값 */
	/* flex-basis: 0; */
	/* flex-basis: 50%; */
	/* flex-basis: 300px; */
	/* flex-basis: 10rem; */
	/* flex-basis: content; */
}- width/height와 flex-direction의 다른 점?
flex-basis: 100px로 설정 시 100px을 넘는 요소는 그대로 유지됨
width: 100px로 설정 시 100px를 넘는 요소도 100px로 맞춰짐
2. flex-grow ; 유연하게 늘리기
- 아이템이 flex-basis의 값보다 커질 수 있는지 결정하는 속성이다.
- 0 보다 큰 값이 세팅되면, 원래의 값보다 크기가 커지면서 빈 공간을 채운다.
.item {
	flex-grow: 1; - 늘어나서 빈 공간 채움
	/* flex-grow: 0; */ /* 기본값 */
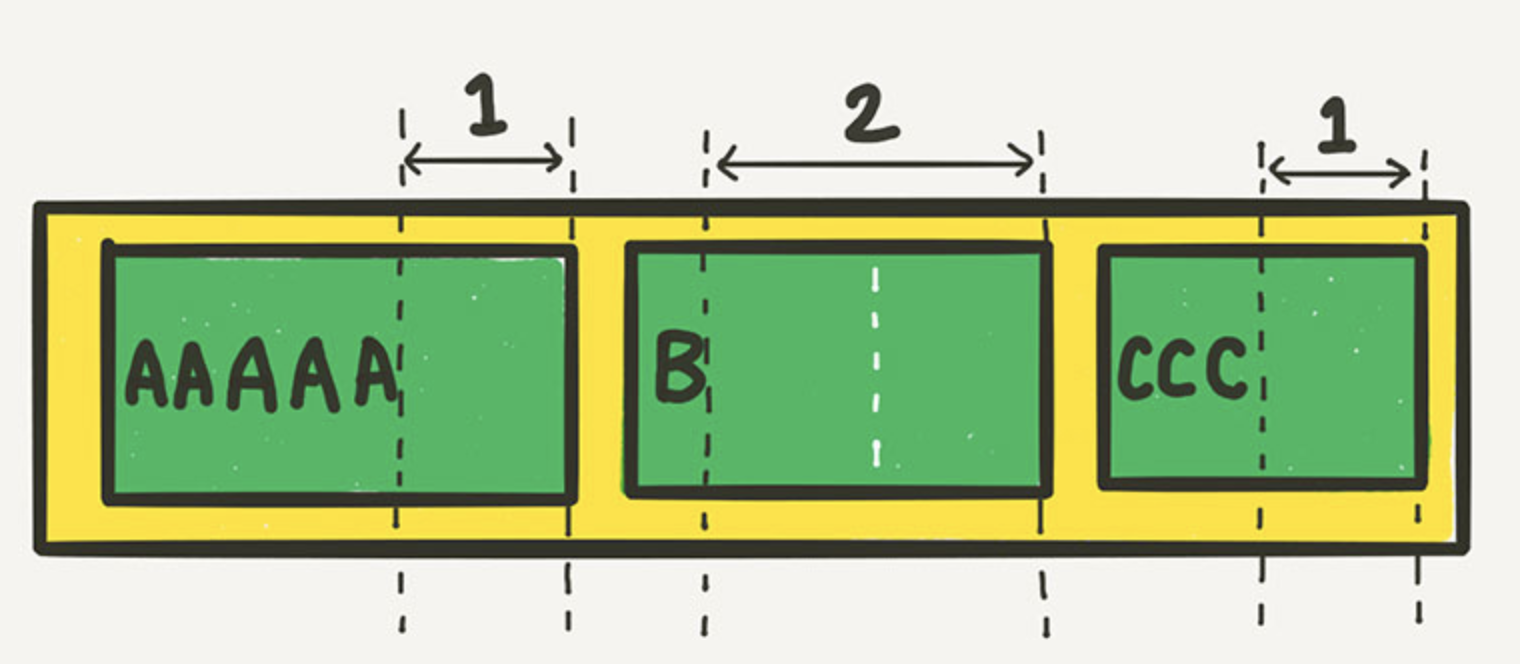
}- 단 flex-grow의 숫자는 flex-basis를 제외한 여백 부분의 비율이다.
/* 1:2:1의 비율로 세팅할 경우 */
.item:nth-child(1) { flex-grow: 1; }
.item:nth-child(2) { flex-grow: 2; }
.item:nth-child(3) { flex-grow: 1; }
3. flex-shrink ; 유연하게 줄이기
- 아이템이 flex-basis보다 더 작아질 수 있는지 결정하는 속성이다.
- 0 보다 큰 값이 세팅되면, flex-basis보다 작아진다.
- 기본값이 1이라 따로 세팅하지 않아도 아이템이 더 작아질 수 있다.
- 0으로 설정 시 더 작아질 수 없으므로 고정폭의 컬럼을 만들 때 유용하다.
.container {
	display: flex;
}
.item:nth-child(1) {
	flex-shrink: 0;
	width: 100px;
}
.item:nth-child(2) {
	flex-grow: 1;
}- 첫번째 아이템은 100px보다 작아지지않고, 두번째 아이템은 컨테이너 폭에 따라 여백을 채운다.
flex ; flex-grow + flex-shrink + flex-basis
- 축약성 속성
.item {
	flex: 1;
	/* flex-grow: 1; flex-shrink: 1; flex-basis: 0%; */
    	- flex-basis는 생략 시 0이 된다.
    	  그러면 여백의 비가 아닌 영역 자체의 비율로 분할할 수 있게 된다.

	flex: 1 1 auto;
	/* flex-grow: 1; flex-shrink: 1; flex-basis: auto; */

	flex: 1 500px;
	/* flex-grow: 1; flex-shrink: 1; flex-basis: 500px; */
}
4. align-self ; 수직축으로 아이템 정렬
- align-items의 아이템 버전
- align-items가 전체 아이템의 수직축 방향 정렬이라면,
align-self는 해당 아이템의 수직축 방향 정렬이다.
5. order ; 배치 순서
- 각 아이템의 시각적 나열 순서를 결정하는 속성이다.
.item:nth-child(1) { order: 3; } /* A */
.item:nth-child(2) { order: 1; } /* B */
.item:nth-child(3) { order: 2; } /* C */
- B C A 순서대로 배치된다.
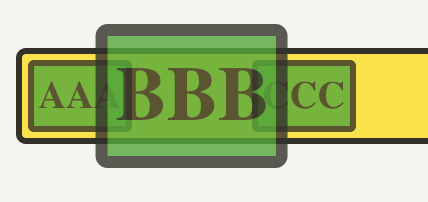
6. z-index ; z축 정렬
- 숫자가 클수록 위로 올라온다.
- 기본값이 0이므로, 1만 설정해도 나머지 아이템보다 위로 올라온다.
.item:nth-child(2) {
	z-index: 1;
	transform: scale(2);
}