1. 문자열 연결(String concatenation)
console.log('my' + ' cat'); // my cat
console.log('1'+ 2); // 12 String + Number === String + String
console.log(`string literals:

''''
1 + 2 = ${1 + 2}`); // 줄바꿈이 가능하다.
문자열을 연결하고자 할 시에 +를 사용하고, \n(줄바꿈), \t(탭) 등등이 있다.
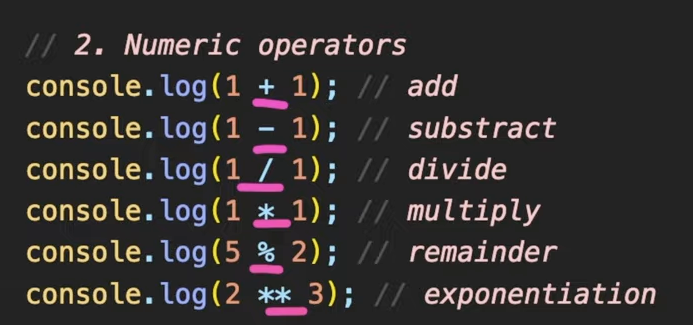
2. 숫자 연산자 (numeric operators)
3. increment, decrement operators
- preIncrements
++가 변수 앞에 붙어있는 것을 preIncrements라고 한다.
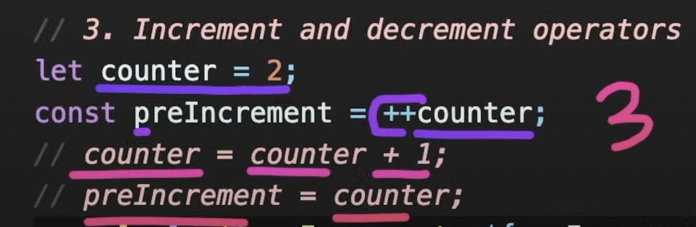
- +1을 한 후 변수 counter에 할당
- 이 할당한 값을 preIncrement라는 변수에 대입
- postIncrements
++가 변수 뒤에 붙어있는 것을 postIncrements라고 한다.

- 값을 먼저 대입한 후
- 그 값에 +1을 한다.
4. 할당 연산자 (Assignment operators)
let x = 3;
let y = 6;
x += y; // x = x + y
x -= y; // x = x - y
x *= y; // x = x * y
x /= y; // x = x / y
x와 y의 값 즉, 변수에 할당하는 것
5. 비교 연산자 (Comparison operators)
console.log( 10 < 6 ); // less than
console.log( 10 <= 6 ); // less than or equal
console.log( 10 > 6 ); // greater than
console.log( 10 >= 6 ); // greater than or equal
6. 논리 연산자 (logical operators: || (or), && (and), ! (not))
6-1) OR(||)
const value1 = false;
cosnt value2 = 4 < 2;

// ||(or), finds the first truthy value
// 값이 하나라도 true일 시, true를 반환하는데, 만약 맨 앞의 값의 true이면 이는 무조건 true이다.
console.log(`or: ${value1 || value2 || check()}`);
// false || false || true
function check() {
  for (let i = 0; i < 10; i++) {
    // wasting time
    console.log('!');
  }
  return true;
}
❗ 효율적인 코드 작성을 위해선 연산을 많이 하는 함수를 호출하거나, expression은 맨 뒤에 배치해야한다.
6-2) and(&&)
// && (and), finds the first falsy value
//
console.log(`and : ${value1 && value2 && check()}`);
7. 동등 연산자 (Equality)
const stringTwo = '2';
const numberTwo = 2;

// == 타입을 변경해서 검사를 진행한다. (타입 변환 비교, loose equality, with type conversion)
console.log(stringTwo == numberTwo); // true
console.log(stringTwo != numberTwo); // false

// === 타입이 다르면 같지 않다. (타입 변환이 없는 비교, strict equality, no type conversion)
console.log(stringTwo === numberTwo); // false
console.log(stringTwo !== numberTwo); // true

// 객체 비교 (object equality by reference)
// 객체(object)는 메모리에 탑재될 때, reference 형태로 탑재된다.
const ho1 = { name = 'ho' };
const ho2 = { name = 'ho' };
const ho3 = ho1;
// ho1과 ho2에는 같은 데이터가 들어있는 객체이지만 실제로는 각각 다른 reference가 들어있고, 이는 서로 다른 객체를 가리키고 있다. (쉽게 말해 ho1과 ho2는 가리키고 있는 주소가 다르다.)

console.log(ho1 == ho2); // 각각 다른 reference들이기 때문에 false
console.log(ho1 === ho2); // 타입과 상관없이 reference가 다르기 때문에 false
console.log(ho1 === ho3); // ho3의 값을 ho1에 할당했으므로, true

//연습
console.log(0 == false); // true
console.log(0 === false); // Boolean 타입이 아니기 때문에 false
console.log('' == false); // true
console.log('' === false); // false
console.log(null == undefined); // true
console.log(null === undefined); // false
8. 조건 연산자(conditional operators)
8-1) if
const name = 'kim';
if (name === 'kim') {
  console.log('Welcome, kim!');
} else if (name === 'park') {
  console.log('Welcome, park!');
} else {
  console.log('unknown');
}
9. 삼항 연산자(Ternary operator : ?)
// condition ? value1 : value2;
console.log(name === 'kim' ? 'yes' : 'no');
조건이 true이면 ? 다음이 출력 false이면 : 다음이 출력
10. Switch statement
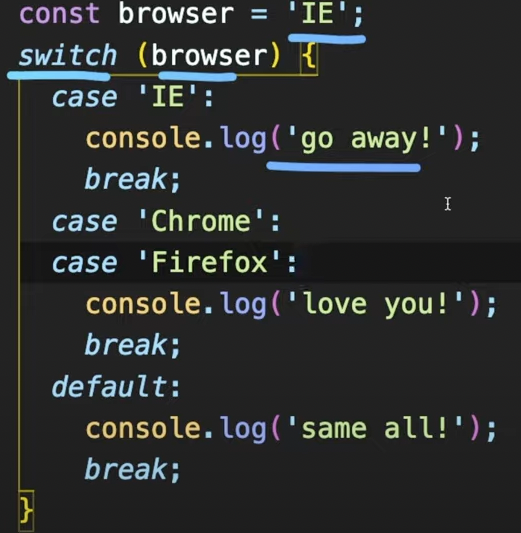
반복적인 else if가 있다면 if문 대신 switch문을 쓰는 것이 가독성 측면에서 더 낫다(use for multiple if checks)
11. 반복문(Loops)
11-1) while
조건이 false가 나오기 전까지 무한 반복된다.
let i = 3;
while (i > 0) {
  console.log(`while: ${i}`);
  i--;
}
// i가 3일때 i가 0보다 크다면 i를-- 감소하면서 반복해라
// i가 3일때 0보다 크니까 true가 되고 --감소하여 i는 2가되고 i가 0보다 크지 않을때까지 반복됨
do-while loop
괄호 안을 실행한 다음, 조건이 맞는지 안맞는지 확인
do {
  console.log(`do while: ${i}`);
  i--;
} while (i > 0);
11-2) for loop
// for(초기식(begin); 조건식(condition); 증감식(step)) {}
// 초기식을 처음에 한 번 호출하고, 블럭 안을 실행하기 전에 조건식에 부합하는지 확인한 후에 블럭이 실행이 되면 증감이 되는 구조

for (let i = 3; i > 0; i = i - 2) {
  console.log(`inline variable for: ${i}`);
}
// 블럭 안에 지역변수를 선언하는 것을 inline variable declaration
중첩 반복문(nested loops)
for (let i = 0; i < 10; i++) {
  for (let j = 0; i < 10; j++) { // i가 0일 때, j를 1부터 9까지 돌리고 ... 계속 반복하여 i가 9일때까지
    console.log(`i:${i}, j:${j}`);
  }
}
반복문 안에 반복문이 들어가 있는 형태이다.
이 반복문은 중첩이 가능한데 중첩의 횟수도 제한이 없다.
📌
예제1) 구구단 2단 ~ 9단 출력하기
for(int i = 2; i < 10; i++) {
  for(int j = 1; j < 10; j++) {
    console.log(`${i} + ${j} = ${i * j}`);
예제2) 1부터 10까지 센 후, 짝수만 콘솔에 출력하기
for(int i = 1; i < 11; i++) {
  if ( i % 2 === 0 ) {
    console.log(`Q2: {i}`);
예제3) 1부터 10까지 센 후, 8일 때 break
for(int i = 1; i < 11; i++) {
  if( i > 8 ) {
    break;
  }
  console.log(i);
}
프런트엔드 개발자로의 여정