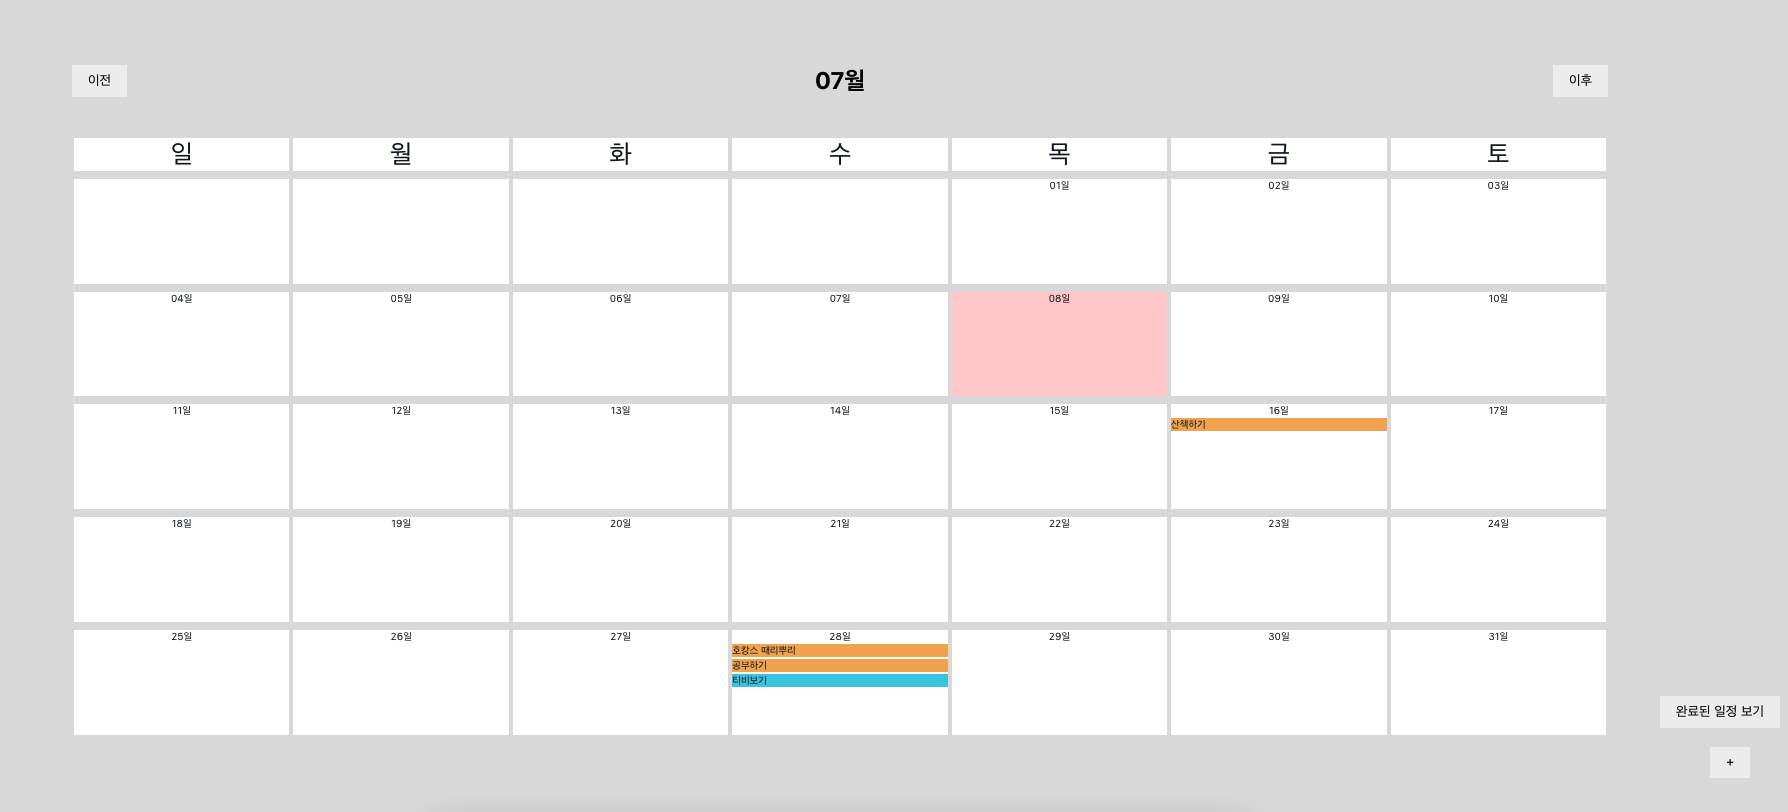
캘린더 만들기!
최소단위 컴포넌트
사용할 최소단위 컴포넌트 (ex_button, grid 등)를 모두 각각 파일로 만들수도 있겠지만 아래처럼 styles.js로 만들어서 styled 컴포넌트를 export해서 사용할수도 있다.
이 방법이 훨씬 정돈되어있고 깔끔하다!!
// styles.js
import React from "react";
import styled, { css } from "styled-components";

// 겉 껍데기 담당
/**
 * props
 *  - flex_direction : string ㅣ row = 가로로 쌓기, column = 세로로 쌓기 (만약 값 없다면?->가로가 기본이 됩니다.)
 *  - border : string | border 속성 넣기(ex: 1px solid #dddddd)
 *  - bg: string | #aaaaaa = # + 헥사코드 (ex: #ffffff)
 *  - width: string | 1em, 1px, 1% 등 넓이 값 (기본 값: 100%;)
 *  - height: string | 1em, 1px, 1% 등 높이 값 (기본 값: 100%;)
 *  - is_root : boolean | true = 최상위 div, false = 최상위 아님
 *  - margin : (default = false) string | margin 값
 */
const Grid = styled.div`
  box-sizing: border-box;
  display: flex;
  flex-direction: ${(props) =>
    props.flex_direction === "column" ? "column" : "row"};
  ${(props) => (props.border ? `border: ${props.border};` : "")}
  ${(props) => (props.bg ? `background-color: ${props.bg};` : "")}
  width: ${(props) => (props.width ? props.width : "100%")};
  min-width: 50px;
  height: ${(props) => (props.height ? props.height : "100%")};
  align-items: center;
  justify-content: ${(props) =>
    props.justify_contents ? props.justify_contents : "flex-start"};
  ${(props) => (props.margin ? `margin: ${props.margin};` : "")}
  ${(props) => (props.is_root ? `width: 100vw; height: 100vh;` : "")}
  ${(props) => (props.font_size ? `font-size: ${props.font_size}em` : "")}
`;

// 버튼
/**
 * props
 *  - flex_direction : string ㅣ row = 가로로 쌓기, column = 세로로 쌓기 (만약 값 없다면?->가로가 기본이 됩니다.)
 *  - bg : boolean | true = 배경색 있는 버전, false = 배경색 없는 버전
 */
const Button = styled.button`
  padding: 8px 16px;
  border: none;
  ${(props) => props.bg && "background-color: #453214; color: #fff;"}
  ${(props) => props.is_float && "position: fixed;"}
  bottom: ${(props) => props.bottom || "50px"};
  right: ${(props) => props.right || "50px"};
  margin: ${(props) => props.margin || "0px"};
`;

// Input
/**
 * props
 *  - type : string | text
 */
const Input = styled.input`
  ${(props) => props.width && `width: ${props.width};`}
`;

// text 담당
/**
 * props
 *  - type : string | title = 제목글(큰 글씨 + 볼드), contents = 내용글(중간 글씨), label = 라벨(작은 글씨)
 *  - bold : boolean | true면 볼드 줌, false면 볼드 안줌
 */
const Text = (props) => {
  if (props.type === "title") {
    return <H1 {...props}>{props.children}</H1>;
  }

  if (props.type === "contents") {
    return <P {...props}>{props.children}</P>;
  }

  if (props.type === "label") {
    return <Span {...props}>{props.children}</Span>;
  }

  return <React.Fragment>{props.children}</React.Fragment>;
};

const H1 = styled.h1`
  margin: 0px;
  font-size: 1.5em;
  text-align: center;
  ${(props) =>
    props.bold
      ? css`
          font-weight: bold;
        `
      : ""}
`;

const P = styled.p`
  margin: 0px;
  font-size: 1em;
`;

const Span = styled.span`
  margin: ${(props) => props.margin || "0px"};
  // 이 표현이 아주 깔끔하고 좋은것 같다!
  font-size: ${(props) => props.font_size || "0.4em"};
  color: #101820;
`;

export { Grid, Button, Text, Input };
시간순 정렬, 완료된 일정 소팅
모든 데이터를 페이지 로딩시에 1회 가져오고, 가져온 데이터를 redux 혹은 컴포넌트에서 소팅하면 DB 부하를 줄이면서 원하는 기능을 구현할 수 있다.
나는 컴포넌트에서 소팅했다. redux에서 하면 함수를 더 만들어야하기 때문에...
// Calendar.js
const week_arr = _week_arr.map((week_index) => {
  return (
    <Grid
      key={`${moment(today).format("MM")}_week_${week_index}`}
      margin="4px auto"
      flex_direction="row"
      >
      {/*한 주는 7일이니, 주에 7개씩 날짜 칸을 넣어줍니다. */}
      {Array.from({ length: 7 }, (v, i) => i).map((day_index) => {
        let _day = today
        .clone()
        .startOf("year")
        .week(week_index)
        .startOf("week")
        .add(day_index, "day");

        const is_today =
              moment().format("YYYY-MM-DD") === _day.format("YYYY-MM-DD");

        // todo_list(Main.js에서 props로 건네줬어요!)에 해당 일자 일정이 들어가 있나 보고, 추가해줍시다.
        const list_index = Object.keys(todo_list).indexOf(
          _day.format("YYYY-MM-DD")
        );

        // 주석풀고 데이터 확인해보기! :)!
        // console.log(list_index);
        // console.log(todo_list[_day.format("YYYY-MM-DD")]);
        // todo_list에 해당 일 일정이 있으면 일정을 list에 넣어주자! (없으면 null이나 빈배열로! 일단 빈배열로 해봅시다! :))
        const _list =
              list_index !== -1 ? todo_list[_day.format("YYYY-MM-DD")] : [];

        let sorted_list = _list.slice(0, _list.length);
        // 시간순 오름차순 정렬하기.
        sorted_list.sort(function (a, b) {
          return (
            moment(a["datetime"], "YYYY-MM-DD HH:mm") -
            moment(b["datetime"], "YYYY-MM-DD HH:mm")
          );
        });

        // 완료된 일정 필터링 하기.
        if (schedule_toggle) {
          sorted_list = sorted_list.filter((l, idx) => {
            return l.completed === true;
          });
        }

        const list = sorted_list.map((_l, idx) => {
          // 데이터 확인하기!
          // console.log(_l);
          // 일정을 뿌려줘요!

          return (
            <Grid
              bg={_l.completed ? "#48cae4;" : "#f2aa4c;"}
              height="auto"
              margin="1px 0px"
              key={`${_l.datetime}_${_l.id}`}
              onClick={() => handleOpen(_day.format("YYYY-MM-DD"), _l.id)}
              >
              <Text type="label">{_l.contents}</Text>
            </Grid>
          );
        });

        return (
          <Grid
            margin="0px 2px"
            key={`${moment(today).format(
              "MM"
            )}_week_${week_index}_day_${day_index}`}
            flex_direction="column"
            bg={is_today ? "#ffcece" : "#ffffff"}
            >
            {_day.format("MM") === moment(today).format("MM") && (
              <Text type="label">{_day.format("DD")}일</Text>
            )}

            {_list && list}
          </Grid>
        );
      })}
    </Grid>
  );
});
형식에 맞춰 날짜 받아오기
달력 데이터 특성 상 날짜의 input 값을 정해진 형태대로 받아야함.
작성을 받을때 셀렉트 박스나 달력 형식에서 날짜를 선택하는 방식으로 받으면 좋겠지만 일단은 텍스트로 받아왔다.
// reg_test.js
export const dateCheck = (date) => {
  // 입력받은 날짜 형식이 원하는 형식에 맞는지
  // YYYY-MM-DD HH:mm
  let _reg =
    /^(19|20)\d{2}-(0[1-9]|1[012])-(0[1-9]|[12][0-9]|3[0-1])\s([1-9]|[01][0-9]|2[0-3]):([0-5][0-9])$/;

  return _reg.test(date);
};
// Write.js
const submit = (date, contents) => {
if (!date || !contents) {
window.alert("입력값을 모두 채워주세요.");
return;
} else if (!dateCheck(date)) {
window.alert("날짜 형식이 올바르지 않습니다.");
return;
} else if (date && contents) {
dispatch(calendarActions.addTodoFB(date, contents));
}
};추가로 적용해보고 싶은것
- datepicker로 날짜와 시간을 예쁘게 받아오기.
- 쿠키로 현재 보고있는 달을 저장해서, 새로고침해도 이전에 보고있던 달로 보여주기.

빠굥