
View
View의 개념
- 안드로이드에서 눈에 보이는 모든 요소를 View라고 부른다.
- 개발자가 배치하는 모든 View들은 Class로 제공되는데 모두 View라는 클래스를 상속받고 있다
- View 클래스는 모든 UI 요소들의 부모 클래스로써 Widget과 Layout으로 나뉜다.
Layout
- Container, View Group이라고 부르기도 한다.
- 다른 View 들을 포함하고(Container) 내부의 View를 통합 관리하고(View Group) 내부 View들이 배치되는 모양을 결정(Layout) 한다.

Widget
- 문자열 입력, 문자열 출력 등 어떤 기능을 가지고 있는 사용자와 상호작용을 하는 View들을 통칭해서 Widget이라고 부른다.
화면 만들기
- 안드로이드는 화면에 layout을 배치하고 그 안에 다른 layout이나 widget을 배치하여 화면의 모양을 만든다.
- 이렇게 만들어진 화면은 모두 객체로 생성되므로 개발자는 이 객체들을 이용해 코드에서 필요한 작업을 할 수 있다.
View의 주요 속성
- id : xml이나 코드에서 View를 지칭하기 위해 사용하는 속성(필요한 경우만 갖고있으면 됨)
- layout_width : View의 가로 길이
- layout_height : View의 세로 길이
- layout_margin : View의 외부 여백
- padding : View의 내부 여백
- background : View의 배경 지정
View Binding
- Android Studio의 버전이 변경되면서 추가된 라이브러리
- 기존의 androidx를 통해 View의 주소값을 자동으로 받아오는 것은 Kotlin밖에 되질 않아 이를 자바에서 사용할 수 있도록 추가한 라이브러리
- view에 id를 설정하는건 view객체의 주소값을 얻어오겠다는 것
val a1 = findViewById(뷰의 id)- 처음에는 kotlin에서만 id와 동일한 이름의 프로퍼티가 자동으로 생성되고 프로퍼티에 View객체의 주소값이 담겨짐
- 지금은 해당 기능이 아예 없어지고 kotlin과 java에서 모두 ViewBinding 개념이 생김
View binding 객체 안에 View의 id와 동일한 이름의 프로퍼티가 생성되고 프로퍼티안에 View 객체의 주소값이 자동으로 담겨진다. - 나중에는 ViewBinding 말고 DataBinding 사용할 예정
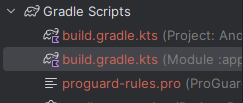
- ViewBinding을 사용하기 위해서는 app 수준의 gradle파일에 코드를 추가해준다.
자동세팅이 되어있는지 꼭 확인필요(자동세팅이 안되어있다면 추가해줘야함)
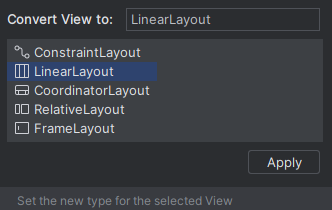
처음에 설정된 ConstraintLayout은 LinearLayout으로 convert
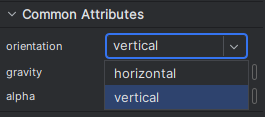
레이아웃별로 속성(attributes)이 다르다
LinearLayout은 가로,세로 방향으로 배치가능
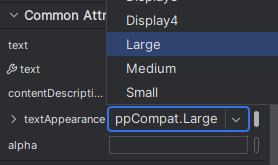
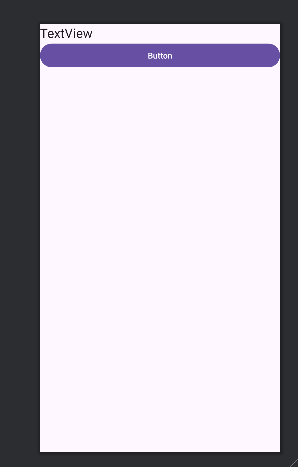
TextView의 textAppearance는 Large로 설정
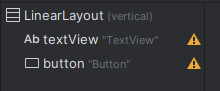
textView 밑에 button 추가
ViewBinding 셋팅 방법
- Module 수준의 build.gradle.kts 파일을 열어준다.
- build.gradle.kts 파일 내 kotlinOptions 밑에 buildFeatures를 추가해주고 ide 상단에 뜬 알림창에서 sync now를 눌러준다.
// build.gradle.kts
...
    kotlinOptions {
        jvmTarget = "1.8"
    }
    buildFeatures{
        viewBinding = true
    }
...
3. MainActivity의 기존 작성 내용은 주석처리하고 ViewBinding 객체를 얻어온다.
class MainActivity : AppCompatActivity() {
    override fun onCreate(savedInstanceState: Bundle?) {
        super.onCreate(savedInstanceState)
        // ViewBinding 사용 X
//        setContentView(R.layout.activity_main)
//
//        // View의 주소값을 가져온다.
//        val v1 = findViewById<TextView>(R.id.textView)
//        val v2 = findViewById<TextView>(R.id.button)
//
//        // Button에 버튼을 눌렀을때 동작할 리스너를 설정해준다.
//        v2.setOnClickListener(object : OnClickListener{
//            // 버튼을 누르면 호출되는 메서드
//            override fun onClick(p0: View?) {
//                // TextView에 문자열을 설정한다.
//                v1.text = "버튼을 눌렀습니다."
//            }
//        })
        // ViewBinding 사용
        // ViewBinding 객체를 얻어온다.
        // activity_main.xml을 관리하는 Viewbinding을 통해 UI 요소들의 객체를 생성한다.
        // ViewBinding 클래스의 이름은 layout폴더에 있는 xml 파일의 이름을 기초로 결정된다.
        // activity_main.xml -> ActivityMainBinding
        // activity_lion.xml -> ActivityLionBinding
        // layoutInflater : xml 파일을 통해서 View 객체를 생성할 수 있는 도구
        // xml 파일에 배치한 모든 View들의 객체를 생성하고 객체의 주소값을 담을 프로퍼티를
        // 만들어 객체의 주소값을 담아준다. 이러한 프로퍼티를 ViewBinding 객체가 가지고 있다.
        val activityMainBinding = ActivityMainBinding.inflate(layoutInflater)
        // ViewBinding이 관리하는 View들 중 최상위 View를 설정하여 화면에 보여준다
        // ViewBinding이 가지고 있는 root 프로퍼티는 가장 최상위에 있는 View를 지칭한다.
        // 지칭한 View를 화면에 보여준다.
        setContentView(activityMainBinding.root)

        // ViewBinding 객체에 id가 설정되어 있는 View 객체의 주소값이 담겨져 있는
        // 프로퍼티가 있기 때문에 프로퍼티를 이용해 View 객체에 접근한다.
        activityMainBinding.button.setOnClickListener(object : OnClickListener{
            // 버튼을 누르면 호출되는 메서드
            override fun onClick(p0: View?) {
                // TextView에 문자열을 설정한다.
                activityMainBinding.textView.text = "버튼을 눌렀습니다."
            }
        })
    }
}
여기서 activityMainBinding은 activity_main을 의미함

layout폴더에 xml파일을 만들면 파일 하나당 Viewbinding 객체를 하나 만들 수 있다.
activity_main.xml에 있는 View 객체들의 주소값을 activityMainBinding이 가지고 있게 됨
val activityMainBinding = ActivityMainBinding.inflate(layoutInflater)activityMainBinding이 가지고 있는 가장 최상위(.root)에 있는 View를 지칭해서 화면에 보여줌
setContentView(activityMainBinding.root)activityMainBinding에서 버튼으로 접근하여 기존과 동일한 코드를 넣어주면 됨
        activityMainBinding.button.setOnClickListener(object : OnClickListener{
            // 버튼을 누르면 호출되는 메서드
            override fun onClick(p0: View?) {
                // TextView에 문자열을 설정한다.
                activityMainBinding.textView.text = "버튼을 눌렀습니다."
            }
        })
이전에는 View객체를 매번 하나씩 변수에 담는 방법이라 객체가 천개 만개라면 어려움이 발생하겠지만 ViewBinding은 View객체를 한번에 가져오기 때문에 편리하다.
Layout
- 안드로이드 애플리케이션을 개발할 때 화면을 구성해야 한다.
- 안드로이드는 화면을 구성할 때 배치되는 뷰들이 어디에 배치된다는 좌표를 설정하지 않는다.
기기별로 화면 크기가 다르기 때문 - "어디"가 아니라 "어떻게" 배치할지?가 안드로이드 레이아웃임
- 안드로이드는 좌표가 아닌 배치되는 모양을 결정하게 된다.
- 개발자가 배치되는 모양을 결정하고 뷰들을 배치하면 안드로이드 OS가 단말기에 적합한 좌표를 계산하고 뷰들을 배치하게 된다.
Parent와 Child
- 안드로이드는 화면을 구성하기 위해 layout을 먼저 배치하고 그 위에 다른 View들을 배치하게 된다
- 이때 layout을 Parent라고 부르고 배치되는 View들을 Child라고 부른다.
- 모든 View들은 단 하나의 Parent를 가질 수 있으며 모든 layout은 다수의 Child를 가질 수 있다.
- layout을 통해 여러 view들을 가져와서 반복문 돌릴 때 주로 사용되는 개념
legacy
TableLayout, RelativeLayout은 이제 사용하지 않는다고 함
지금은 Linear, Frame, Constraint만 사용함
Linear Layout
- 방향성을 가지고 view를 배치하는 layout
- 가로 혹은 세로방향으로 배치할 수 있으며 한칸에 하나의 view만 배치할 수 있다.
- 안드로이드에서 가장 많이 사용하는 layout으로 여러 LinearLayout을 조합하여 다양한 모양을 만들 수 있다.
주요 속성
-
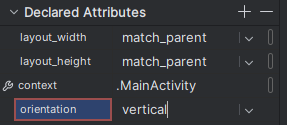
orientation : LinearLayout에서 view가 배치되는 방향을 결정한다.
vertical : 세로 방향
horizontal(기본값) : 가로 방향 -
layout_weight : LinearLayout에 배치되는 view가 차지할 공간 비율
layout이 아니라 view의 속성이다
전체의 몇퍼센트 비율이 아니라 view들을 배치하고 남은 공간을 얼마나 가져갈지를 정해줌
weight가 설정되어있는 view는 크기가 축소되고 설정되어있지 않은 view는 화면 밖으로 나감

-
Declared Attributes에서 +버튼으로 속성을 직접 추가해줄 수 있다.
- 참고 사항

스패너 아이콘(tools)은 디자인창에서만 보여지는 값으로 주석처럼 사용할 수 있다.
실제로 보여주는 내용은 스패너 아이콘 text(하하하하하)가 아닌 위에 있는 text 값(호호호호호)이 보여짐
안드로이드 스튜디오 xml 미리보기 기능은 오류가 많음
가급적이면 Componenet Tree 부분을 기준으로 작업하시길
계산기 Layout 구조
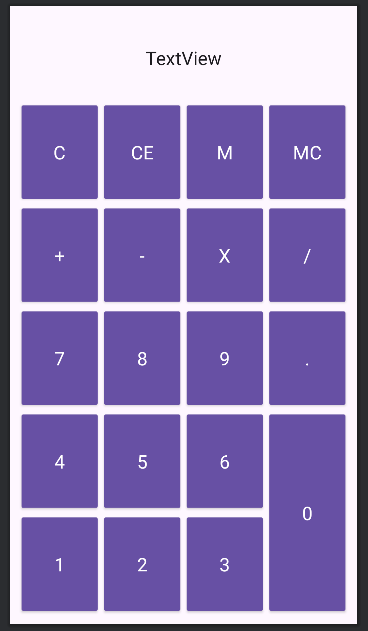
LinearLayout
orientation : vertical
|
----LinearLayout
|    orietation : vertical
|    layout_height : wrap_content
|    layout_weight : 1
|    |
|    ----TextView
|        text : TextView
|        gravity : center_vertical
|        textAlignment : center
|
----LinearLayout
|    orietation : horizontal
|    layout_height : wrap_content
|    layout_weight : 1
|    |
|    ----Button
|    |    text : C
|    |    textAppearance : Large
|    |
|    ----Button
|    |    text : CE
|    |    textAppearance : Large
|    |
|    ----Button
|    |    text : M
|    |    textAppearance : Large
|    |
|    ----Button
|         text : MC
|         textAppearance : Large
|
----LinearLayout
|    orietation : horizontal
|    layout_height : wrap_content
|    layout_weight : 1
|    |
|    ----Button
|    |    text : +
|    |    textAppearance : Large
|    |
|    ----Button
|    |    text : -
|    |    textAppearance : Large
|    |
|    ----Button
|    |    text : X
|    |    textAppearance : Large
|    |
|    ----Button
|         text : /
|         textAppearance : Large
|
----LinearLayout
|    orietation : horizontal
|    layout_height : wrap_content
|    layout_weight : 1
|    |
|    ----Button
|    |    text : 7
|    |    textAppearance : Large
|    |
|    ----Button
|    |    text : 8
|    |    textAppearance : Large
|    |
|    ----Button
|    |    text : 9
|    |    textAppearance : Large
|    |
|    ----Button
|         text : .
|         textAppearance : Large
|
----LinearLayout
    orietation : horizontal
    layout_height : wrap_content
    layout_weight : 2
    |
    ----LinearLayout
    |    orietation : vertical
    |    layout_width : wrap_content
    |    layout_height : match_parent
    |    layout_weight : 3
    |    |
    |    ----LinearLayout
    |    |    orietation : horizontal
    |    |    layout_height : wrap_content
    |    |    layout_weight : 1
    |    |    |
    |    |    ----Button
    |    |    |    text : 4
    |    |    |    textAppearance : Large
    |	 |	  |
    |    |    ----Button
    |    |    |    text : 5
    |    |    |    textAppearance : Large
    |    |    |
    |    |    ----Button
    |    |         text : 6
    |    |         textAppearance : Large
    |    |
    |    ----LinearLayout
    |         orietation : horizontal
    |         layout_height : wrap_content
    |         layout_weight : 1
    |    	  |
    |         ----Button
    |         |    text : 1
    |         |    textAppearance : Large
    |		  |
    |         ----Button
    |         |    text : 2
    |         |    textAppearance : Large
    |		  |
    |         ----Button
    |              text : 3
    |              textAppearance : Large
    |
    ----Button
         text : 0
         textAppearance : Large
         layout_width : wrap_content
         layout_height : match_parent
         layout_weight : 1
layout_width를 wrap_content로 하고 weight비율을 줬을 때 텍스트 길이가 길면 위젯이 깨지는 경우가 발생하는데, layout_width를 match_parent로 하고 weight 비율을 반대로 해주면 된다.
※ 출처 : 멋쟁이사자 앱스쿨 2기, 소프트캠퍼스 