안녕하세요, 주니어 개발자 Eon입니다.
이번 포스팅은 Docker를 이용한 웹 서버 구축과 웹 페이지 제작에 관한 내용입니다.
Docker 없이 웹 서버를 구축하려면 직접 apache, nginx 등을 설치해서 웹 페이지를 올려야 합니다.
이전 내용에도 다뤘듯이 VM자체의 환경을 어지럽히지 않고 우리가 사용하고 싶은 환경 튜닝을 격리된 Container 안에서 함으로써, 나중에 환경이 어지럽게 되는 것을 방지할 수 있습니다.
Web Server에 대해 알아보고, 직접 Web Server를 실행시키고, Web Page를 제작하고 접속해보는 순서로 진행하겠습니다.
Web Server
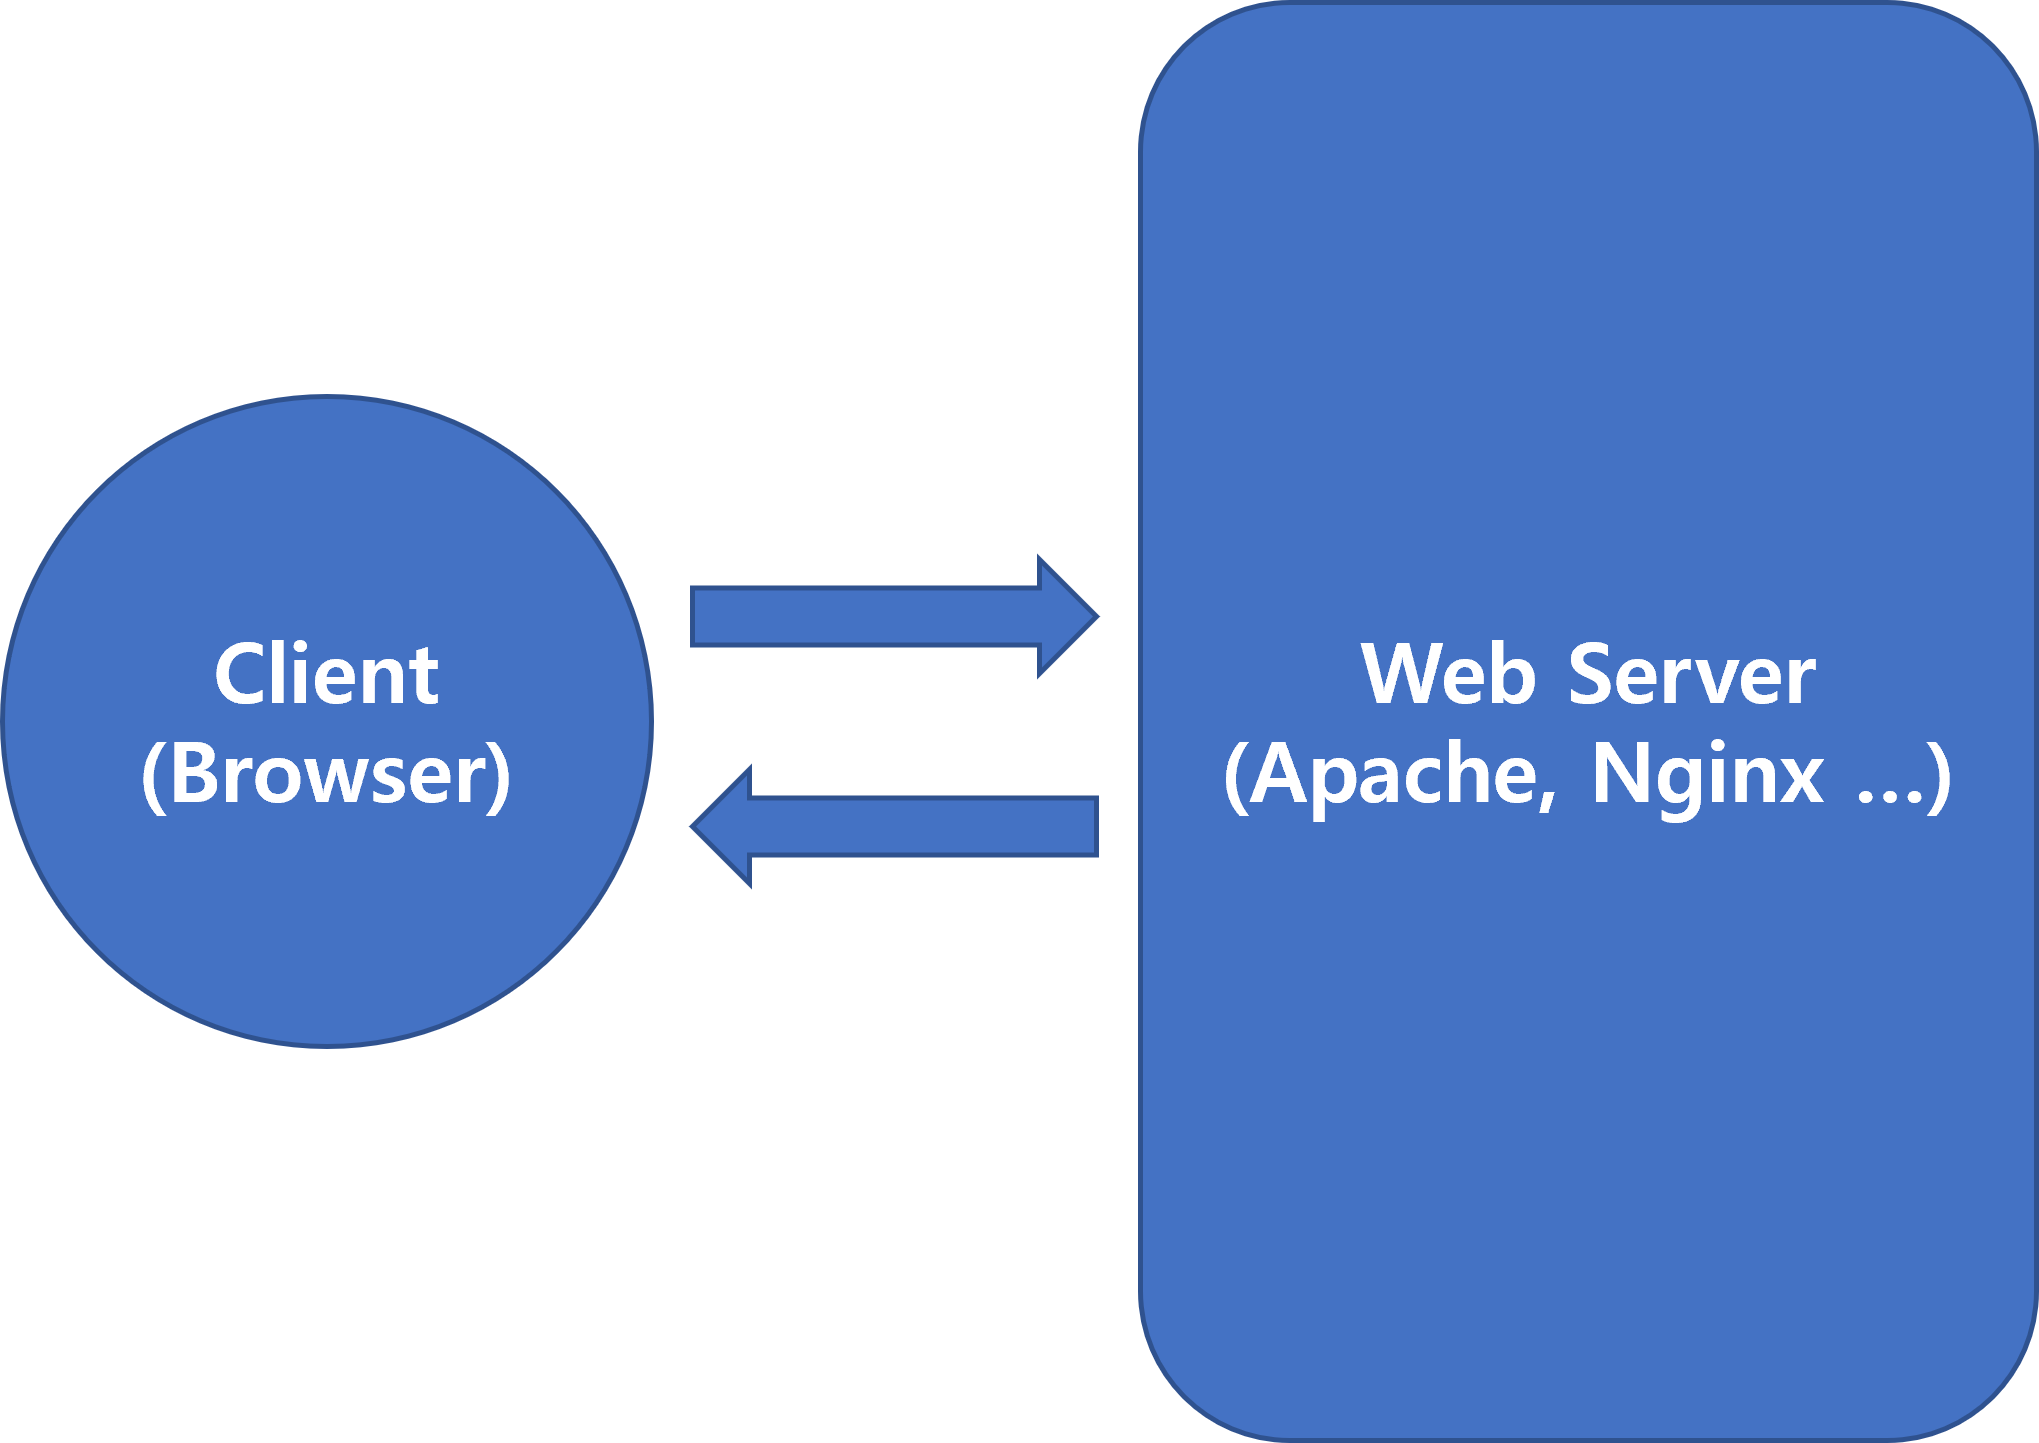
Web Server는 클라이언트와 서버가 http 통신을 할 수 있게 해주는 서버입니다.
웹 서버와의 http 통신으로 클라이언트에 웹 페이지를 전달하기도 하고, 데이터를 전송하기도 합니다.
웹 서버에는 종류가 여러 가지 있는데, 그 중에 Apache와 Nginx가 오픈 소스 웹 서버 중에 많이 쓰이는 편입니다.
웹 서버가 클라이언트의 요청을 받아 처리하고, 다시 전송하는 서버라고 했는데 서버가 약하면 금방 다운됩니다.
약하다는 것은 보안, 자원에 대한 이야기입니다.
Web Server 자체의 보안은 말할 것도 없이 중요하고, 자원도 마찬가지입니다.
아무나 이 웹 서버에 요청을 보낼 수 있고, 웹 서버는 그 요청을 무조건적으로 다 처리해 주어야 한다고 하면 DDOS와 같은 공격에 취약할 것입니다.
무수히 많은 요청에 일일이 응답하느라 서버 자원이 고갈될 것이고, 이는 서버 다운으로 이어집니다.
서비스하는 페이지의 사용자 수를 파악하고 그에 맞는 자원을 할당하는 것이 중요하며, 여러 보안 옵션을 추가하여 최대한 공격에 대한 방어를 해두는 것이 좋습니다.
공격자는 서버를 수동으로 공격하지 않습니다.
자동으로 탐색하고 스크립트 실행 등으로 아주 간편하게 공격을 수행합니다.
때문에 보안은 작은 서비스라도 중요하다는 것을 간과해선 안 됩니다.
Apache on Docker container
Apache 웹 서버를 위에서 짧게 소개했습니다.
이번엔 Docker Container에 Apache 웹 서버를 띄워보도록 하겠습니다.
Apache 웹 서버의 설치는 굉장히 간단합니다.
sudo apt-get install httpdUbuntu 환경에선 위의 명령어로 Apache 웹 서버를 설치하게 됩니다.
하지만 Docker를 사용하기로 했습니다.
Docker hub에 접속해서 찾아봅니다.
"apache"를 검색하시면 아래와 같은 image가 나타납니다.
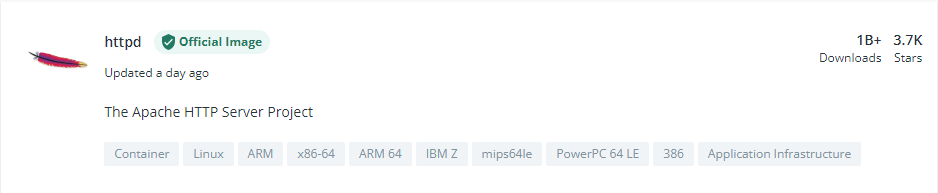
여기서 원하는 image tag를 검색해서 pull하시면 됩니다.
apache 버전에 따라서 제공되는 기능이 조금씩 다르니 이것 저것 찾아보면서 시도해 보실 분은 해보시면 좋을 듯합니다.
특히 1.x 버전과 2.x 버전의 차이는 꽤 큰 편의성의 차이가 있기 때문에 참고하시면 좋을 듯합니다.
저는 Alpine OS 기반의 apache image를 가져왔습니다.
image 크기에서 OS가 차지하는 부분이 상당하기 때문에 다른 OS들보다 상대적으로 크기가 작은 alpine OS를 많이 사용합니다.
docker pull httpd:alpine
docker pull httpd:2.4.51-alpine
둘 중 하나 골라서 사용하시면 됩니다.
둘 다 2.4.51 버전입니다. (2021-10-23 기준)
pull을 하는데 한 가지 문제가 발생합니다.
바로 권한이 없다는 것입니다.
Docker hub에 가입되어 있지 않아서 서비스 이용이 불가한 상태입니다.
링크를 통해 페이지 방문을 하고 회원 가입을 진행합니다.
회원 가입이 끝났으면 로그인을 해야 합니다.
Docker를 구동하는 터미널로 넘어와서 아래와 같이 명령어를 입력하고 로그인을 해줍니다.
docker login이후에 ID와 PWD를 순차적으로 입력하면 로그인이 완료됩니다.
로그인 이후에 위의 pull하는 파트를 진행하시면 됩니다.
Docker Compose
Docker Compose는 Docker를 좀 더 편하게 사용할 수 있게 해줍니다.
docker run -p <host_port>:<container_port> -v <host_volume_path>:<container_volume_path> <image>:<TAG>Docker Compose를 사용하지 않았을 때의 Container 생성 및 실행 방법
위와 같은 방법으로 container를 실행하면 커맨드가 굉장히 길어집니다.
물론 스크립트화해서 저장해두면 실행도 편하게 할 수 있으나, 저는 compose 사용을 선호합니다.
docker-compose 설치 방법은 아래와 같습니다.
Docker-Compose installation
이하 설치 과정을 따로 정리한 내용입니다.
설치 후, docker-compose 실행 에러가 발생할 수 있습니다.
기본 설정돼 있는 최신 패키지를 설치했을 때 발생했습니다.
1.26.x 버전으로 설치하는 걸 추천합니다.
제 VM은 1.25.5 버전을 사용하고 있습니다.
Upgrading (기존에 설치가 돼 있으신 분들만 해당됩니다.)
# If you’re upgrading from Compose 1.2 or earlier, remove or migrate your existing containers after upgrading Compose.
# This is because, as of version 1.3, Compose uses Docker labels to keep track of containers, and your containers need to be recreated to add the labels.
# If Compose detects containers that were created without labels, it refuses to run, so that you don’t end up with two sets of them.
# If you want to keep using your existing containers (for example, because they have data volumes you want to preserve), you can use Compose 1.5.x to migrate them with the following command:
$ docker-compose migrate-to-labels


# Alternatively, if you’re not worried about keeping them, you can remove them. Compose just creates new ones.
$ docker container rm -f -v myapp_web_1 myapp_db_1 ...
Uninstall Docker-Compose

# To uninstall Docker Compose if you installed using curl:
$ sudo rm /usr/local/bin/docker-compose
Install Compose on Linux systems (설치 파트입니다.)
# On Linux, you can download the Docker Compose binary from the Compose repository release page on GitHub.
# Follow the instructions from the link, which involve running the curl command in your terminal to download the binaries.
# These step-by-step instructions are also included below.

# Run this command to download the current stable release of Docker Compose:
# To install a different version of Compose, substitute 1.29.2 with the version of Compose you want to use.
# https://github.com/docker/compose/releases
$ sudo curl -L "https://github.com/docker/compose/releases/download/1.29.2/docker-compose-$(uname -s)-$(uname -m)" -o /usr/local/bin/docker-compose


# Apply executable permissions to the binary:
$ sudo chmod +x /usr/local/bin/docker-compose


# Note: If the command docker-compose fails after installation, check your path.
# You can also create a symbolic link to /usr/bin or any other directory in your path.
# For example:
$ sudo ln -s /usr/local/bin/docker-compose /usr/bin/docker-compose


# Optionally, install command completion for the bash and zsh shell.
# Test the installation.
$ docker-compose --version
# // docker-compose version 1.29.2, build 1110ad01
이렇게 docker-compose 설치가 마무리됐습니다.
Apache Web Server with docker-compose
docker-compose의 사용법은 아래와 같습니다.
- docker-compose.yml 작성
- docker-compose up / down 으로 서비스 제어
docker-compose.yml
container를 실행하기 위한 옵션을 담은 파일입니다.
docker 서비스마다 directory를 분리해서 docker-compose.yml을 각각 따로 작성하고 관리하는 게 좋습니다.
한 yml 파일에 여러 서비스를 묶어서 한 번에 실행할 수도 있습니다.
docker-compose.yml 파일을 작성할 directory를 만들고, 그 안에서 작성합니다.
아래와 같이 작성합니다.
version: "3.8"
services:
   web_server:
      user: "root"
      image: httpd:alpine
      restart: always
      ports:
         - 80:80
      volumes:
         - ./var/www/html:/usr/local/apache2/htdocs
version: "3.8"
Docker Engine 릴리즈 버전에 맞추어 사용해야 합니다.
https://docs.docker.com/compose/compose-file/compose-versioning/#compatibility-matrix
services:
docker로 실행할 services에 대한 내용이 안에 담깁니다.
web_server:
service 이름(web_server)으로, 원하는 이름을 지정할 수 있습니다.
user: "root"
container 안에서 사용할 계정이며, 권한 문제가 발생할 수 있어서 root로 설정했습니다.
image: httpd:alpine
사용할 image입니다. pull한 적 없는 image라면 docker hub에서 해당 image를 pull한 후에 사용하게 됩니다.
restart : always
해당 서비스가 어떤 문제로 인해 내려갔을 때, restart를 합니다.
ports:
-80:80
Host의 80번 포트와 Container의 80번 포트를 바인딩합니다.
Host의 80번 포트로 접속하면 Container의 80번 포트로 연결됩니다.
volumes:
-./var/www/html:/usr/local/apache2/htdocs
Host의 ./var/www/html path를 Container의 /usr/local/apache2/htdocs에 마운트합니다.
/usr/local/apache2/htdocs/ path가 해당 image의 root path directory입니다.
config 변경으로 path는 수정 가능합니다.
index.html 작성
작업 중인 directory에서 ./var/www/html/ path에 맞게 directory를 생성합니다.
가장 안 쪽인 html directory에서 index.html 파일을 작성합니다.
index.html은 root path에서 표시할 페이지입니다.
아래와 같이 작성합니다.
<!DOCTYPE html>
<html>
    <h1>Hello Docker!!</h1>
</html>
docker-compose up
이제 웹 페이지 작성도 끝났고, compose 작성도 끝났으니 웹 서버를 올릴 차례입니다.
docker-compose.yml로 작성한 세팅은 아래의 명령어로 구동합니다.
docker-compose up
docker-compose up -d
docker-compose down
docker-compose restart
- docker-compose 서비스를 올립니다.
- docker-compose 서비스를 detached 상태로 올립니다
- docker-compose 서비스를 내립니다.
- docker-compose 서비스를 다시 시작합니다.
웹 서버 확인
웹 서버가 올라갔습니다.
접속해서 확인하도록 합니다.
Virtual Box의 경우 포트 포워딩 과정에 로컬 IP 세팅을 할 수가 있는데, 보통 127.0.0.1 : host local IP address 로 바인딩해서 사용합니다.
VMWare의 경우, 별도의 local IP를 생성해서 사용합니다. VM 내에서 ifconfig를 통해 확인하면 됩니다.
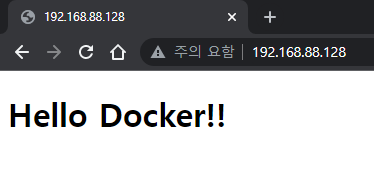
위와 같이 웹 페이지가 나타나면 성공입니다.
오늘 포스트는 docker-compose를 이용한 Apache Web Server를 올리는 방법에 대한 내용이었습니다.
이것으로 포스팅 마치겠습니다.
감사합니다.👍