무엇을 공부하였는가 🤔
예외 필터
- 예외필터란?
- 각 라우터에 대해 예외필터 적용
- 적용하고 싶은 라우터 앞에 예외필터 데코레이터 달기

- 적용하고 싶은 라우터 앞에 예외필터 데코레이터 달기
- 각 컨트롤러에 대해 예외 필터 적용
@UseFilters(HttpExceptionFilter)를 라우터에 달지 않고 CatsController에 달아두면 CatsController의 모든 라우터에 대해 적용된다.
- 글로벌하게 예외필터 적용
- main.ts에서 App인스턴스에 직접 필터 등록
파이프
-
파이프란?
-
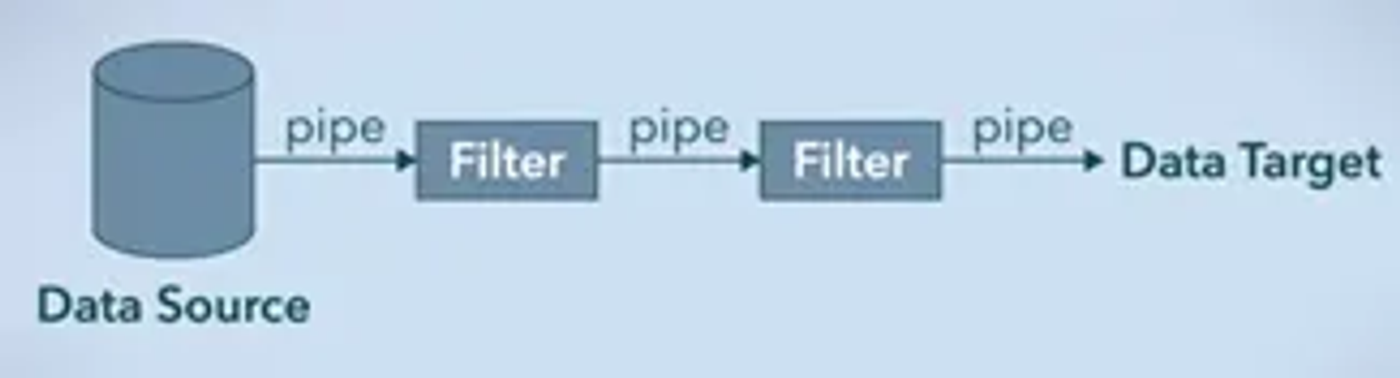
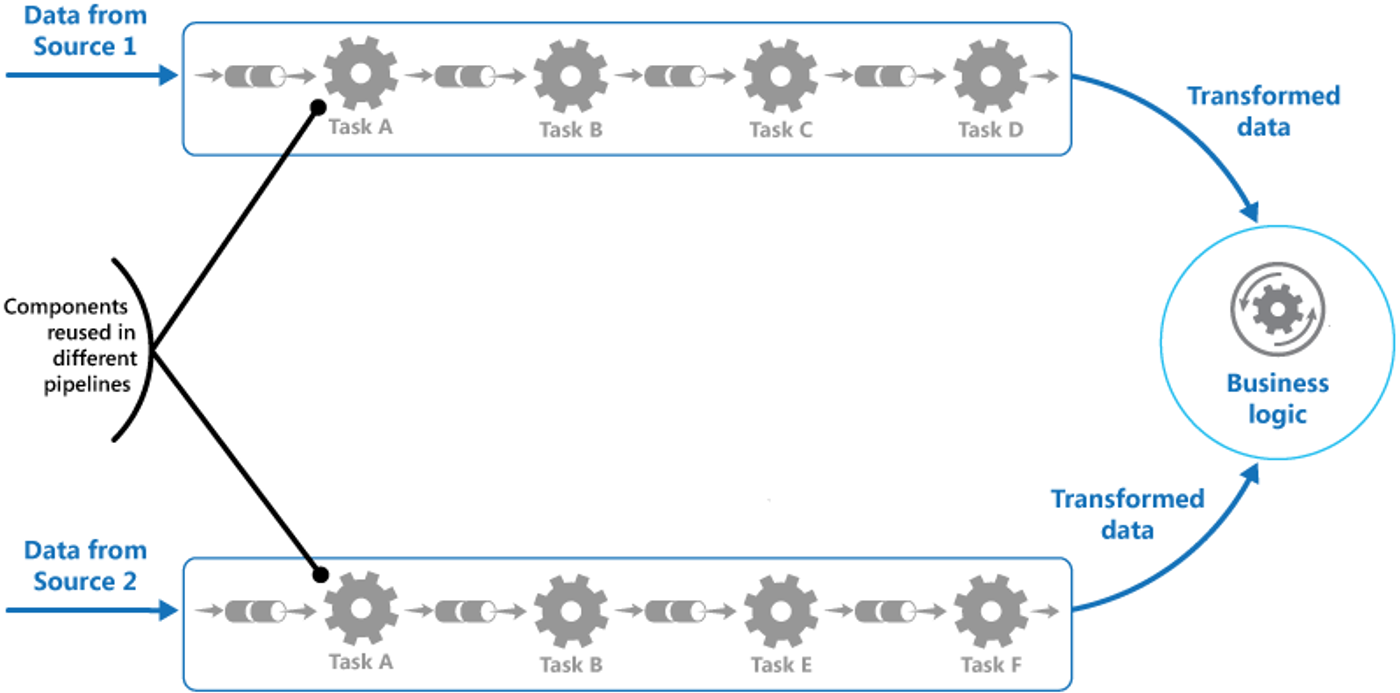
아래 그림과 같이 하나의 데이터 변환 과정을 하는 필터(오른쪽 그림에서의 Task A,B,C,D)를 거쳐, 하나의 목적 데이터를 만들어 내는 과정이다.
NestJS의 파이프 유형이 조오오옹나 많다… 이건 공식문서를 보고 간간히 참고하면서 익혀봐야겠다….
살짝 어지러울 정도..
-
-
필터 :: 파라미터로 넘어오는 값에 대한 처리
- 타입 강제화(혹은 변환)
- 유효성 검사
-
여러 필터를 형성하여 하나의 파이프 스트림 형성 :: 커스텀 파이프라인
-
여러 필터 형성
💡 커스텀 파이프를 형성하기 위해서는 아래 구조에 따라 하나의 클래스를 형성하여 export해줘야 한다.- must implement the
transform()method to fulfill thePipeTransforminterface contract
1. 인자값 value : 입력 data값
2. 인자값 metadata : 입력 data값의 메타데이터
말 그대로 입력data의 메타데이터. 크게 신경 안 써도 된다
- must implement the
import { Injectable, PipeTransform, ArgumentMetadata } from '@nestjs/common'; @Injectable() export class TrimPipe implements PipeTransform<string, string> { transform(value: string, metadata: ArgumentMetadata): string { if (typeof value !== 'string') { return value; } return value.trim(); } } @Injectable() export class LowercasePipe implements PipeTransform<string, string> { transform(value: string, metadata: ArgumentMetadata): string { if (typeof value !== 'string') { return value; } return value.toLowerCase(); } } -
-
여러 필터에 대한 파이프를 컨트롤러에 붙이기
import { Controller, Get, Param, UsePipes } from '@nestjs/common';

@Controller('users')
export class UserController {
  @Get(':id')
  @UsePipes(new TrimPipe(), new LowercasePipe())
  async getUser(@Param('id') id: string) {
    // ...
  }
}
TrimPipe() 필터를 먼저 거친 뒤, LowecasePipe() 필터를 거쳐 getUser()로 데이터가 넘어간다.
어떻게 쓰는가 ☝️
예외필터 적용해보기
- 우선 어떤 순서와 프로세스로 요청이 처리되는지, request lifecycle을 알아야한다.
- Incoming request
- Globally bound middleware
- Module bound middleware
- Global guards
- Controller guards
- Route guards
- Global interceptors (pre-controller)
- Controller interceptors (pre-controller)
- Route interceptors (pre-controller)
- Global pipes
- Controller pipes
- Route pipes
- Route parameter pipes
**14. Controller (method handler) - Service (if exists)**
- Route interceptor (post-request)
- Controller interceptor (post-request)
- Global interceptor (post-request)
- Exception filters (route, then controller, then global)
- Server response
예외처리에 대해서는 6 가지 단계로 분류할 수 있다.
아래와 같이 여러 계층에서 여러 종류의 예외를 발생시킬 수 있다.
- 컨트롤러
- 서비스
- 검증 파이프
요청처리에 이후의 예외 발생에 대해 다루겠다.
- 예외 발생
컨텍스트발생 :: services and validation pipes- 컨텍스트에 따른
담당자(컨트롤러 혹은 서비스)가 예외를 던짐 :: interceptor에 의한 예외 매핑(캐스팅)
- 요청 응답에 따른 예외
- 예외 재정의
- 예외처리
핸들러호출 :: controller가 데코레이터 호출- 예외처리 핸들러
내부 구현에 따라 예외처리 :: exception filter- 처리된
결과값을 반환:: exception filter
각 단계 별로 실제 비즈니스 로직 상에서는 어떻게 예외필터링이 처리되는지 알아보자.
예외 발생 컨텍스트 발생 :: services and validation pipes
우선 어떻게 예외 발생 컨텍스트를 감지할까??
어느 조건에 언제 예외를 발생시킬 것이냐가 중점인데, 서비스와 검증 파이프 측면에서는 두 가지로 나뉠 수 있다.
- 각각의 services와 validation pipes가
throw new Error()를 한다. 컨트롤러는 이를 catch하고, HttpException의 종류에 따른 예외를 던진다. - 컨트롤러가 비즈니스 로직에 따른 서비스 혹은 검증 파이프를 호출하여, 적합한
HttpException을 던진다.
아래 예제를 살펴보자. 사용자 인스턴스가 없다면, 예외를 발생하는 서비스 코드이다.
import { Injectable, NotFoundException } from '@nestjs/common';
import { Cat } from './cat.entity';

@Injectable()
export class CatsService {
  private readonly cats: Cat[] = [];

  create(cat: Cat) {
    this.cats.push(cat);
  }

  findAll(): Cat[] {
    return this.cats;
  }

  findOne(id: number): Cat {
    const cat = this.cats.find((cat) => cat.id === id);
    if (!cat) {
      throw new NotFoundException(`Cat with ID ${id} not found`);
    }
    return cat;
  }
}
아래는 " or ""=” 문자열 입력이 들어오면 예외를 발생시키는 검증 파이프이다.
import { PipeTransform, Injectable, BadRequestException } from '@nestjs/common';

@Injectable()
export class ValidationPipe implements PipeTransform<any> {
  transform(value: any) {
    if (typeof value === 'string' && (value.includes('"') || value.includes('"='))) {
      throw new BadRequestException('Invalid input');
    }
    return value;
  }
}
그렇다면 어떤 로직의 실행 결과에 따라 service/pipe에서 예외발생을 했다면, 이제 예외처리를 해야할 것이다.
예를 들어 찾고자 하는 리소스가 없는 경우일 때는 어떠한가?
typeORM을 통해 DB에 해당 인스턴스가 없을 때 예외를 던지고 싶다면 말이다.
컨텍스트에 따른 담당자(컨트롤러 혹은 서비스)가 예외를 던짐 :: interceptor에 의한 예외 매핑(캐스팅)
컨틀롤러 앞에 @UseInterceptors데코레이터를 붙인다. 이렇게 함으로서 각 서비스가 던진 예외를 인터셉터가 예외 매핑(캐스팅)을 할 수 있다
import { Controller, Get, Param, Post, UseInterceptors } from '@nestjs/common';
import { CatsService } from './cats.service';
import { Cat } from './cat.entity';
import { ErrorHandlingInterceptor } from './error-handling.interceptor';

@Controller('cats')
export class CatsController {
  constructor(private readonly catsService: CatsService) {}

  @Get()
  @UseInterceptors(ErrorHandlingInterceptor)
	@UseFilters(HttpExceptionFilter)
  findAll(): Cat[] {
    return this.catsService.findAll();
  }

  @Get(':id')
  @UseInterceptors(ErrorHandlingInterceptor)
	@UseFilters(HttpExceptionFilter)
  findOne(@Param('id') id: number): Cat {
    return this.catsService.findOne(id);
  }

  @Post()
  create(@Body() cat: Cat) {
    this.catsService.create(cat);
  }
}
인터셉터는 아래와 같이 작성될 수 있다.
import { CallHandler, ExecutionContext, Injectable, NestInterceptor } from '@nestjs/common';
import { Observable, throwError } from 'rxjs';
import { catchError } from 'rxjs/operators';
import { NotFoundException } from '@nestjs/common';

@Injectable()
export class ErrorHandlingInterceptor implements NestInterceptor {
  intercept(context: ExecutionContext, next: CallHandler): Observable<any> {
    return next.handle().pipe(
      catchError((err) => {
        if (err instanceof NotFoundException) {
          return throwError({
            statusCode: 404,
            message: err.message,
          });
        } else {
          return throwError({
            statusCode: 500,
            message: 'Internal server error',
          });
        }
      }),
    );
  }
}
예외처리 핸들러 호출 :: controller가 데코레이터 호출
예외처리 핸들러 내부 구현에 따라 예외처리 :: exception filter
@UseInterceptors를 통해 예외 재정의(각 상황과 예외 타입에 맞는 예외로 캐스팅)@UseFilters를 통해 재정의된 예외를 받아 예외 필터(=예외처리)
@Get()
@UseInterceptors(ErrorHandlingInterceptor)
@UseFilters(HttpExceptionFilter)
findAll(): Cat[] {
  return this.catsService.findAll();
}
위와 각 서비스와 검증 파이프에 대해 예외 필터를 각각 다르게 설정할 수 있지만, 아래와 같이 예외필터를 글로벌하게 설정할 수 도 있다.
import { ErrorHandlingInterceptor } from './error-handling.interceptor';
import { AllExceptionsFilter } from './all-exceptions.filter';

async function bootstrap() {
  const app = await NestFactory.create(AppModule);
  app.useGlobalInterceptors(new ErrorHandlingInterceptor());
  app.useGlobalFilters(new AllExceptionsFilter());
  await app.listen(3000);
}
bootstrap();
처리된 결과값을 반환 :: exception filter
import { Catch,ArgumentsHost, HttpException, HttpStatus} from '@nestjs/common';
import { BaseExceptionFilter } from '@nestjs/core';

@Catch()
export class AllExceptionsFilter extends BaseExceptionFilter {
  catch(exception: unknown, host: ArgumentsHost) {
    const ctx = host.switchToHttp();
    const response = ctx.getResponse();

    if (exception instanceof HttpException) {
      // If the exception is already an HttpException, just pass it through
      super.catch(exception, host);
    } else {
      // If the exception has been transformed or mapped by an interceptor, it may be of a different type
      // In this example, we assume that the interceptor has transformed the exception into a string message
      const status = HttpStatus.INTERNAL_SERVER_ERROR;
      const message = `Internal server error: ${exception}`;

      response.status(status).json({
        statusCode: status,
        message: message,
      });
    }
  }
}
왜 쓰는가 ❓
예외필터의 목적
- 각각 반복되는 예외처리를 예외처리 핸들러 하나로 해결하여 코드 중복을 줄이기 위해
- 아니면 아래와 같은 불상사가…
@Get('/cats/:id')
getCatById() {
	// 해당 id가 없으면 예외처리
	throw new HttpException('Forbidden', HttpStatus.FORBIDDEN);
}
@Get('/cats/:name')
getCatByName() {
	// 해당 name이 없으면 예외처리
	throw new HttpException('Forbidden', HttpStatus.FORBIDDEN);
}
@Get('/cats/:nation')
getCatByNation() {
	// 해당 nation이 없으면 예외처리
	throw new HttpException('Forbidden', HttpStatus.FORBIDDEN);
}
- 아니면 아래와 같은 불상사가…
- 예외처리 레이어를 완전 제어하기 위해서
레퍼런스 🔍
- 예외 필터
- 파이프
- 커스텀 파이프
- 예외처리 사항 :: SQL 인젝션 문자열 입력