
Why? 왜 배움?
중요한 로직에 대해 처리량 및 정상 수행 여부를 확인하려면 e2e 테스트 혹은 통합 테스트가 필요하다.
또한 성능 저하 로직들은 시스템을 멈출 수 있다.
대규모 트래픽 서비스인지 여부를 떠나서 이러한 점들을 위해 테스트가 필요하다.
더불어 사내에서 정부과제를 위한 성능지표로 부하 테스트 및 스모크 테스트 지표를 요구하고 있다.
이를 위해 테스트 기법과 k6 사용법에 대해 간략히 소개하고자 한다.
What? 뭘 배움?
테스트 종류
☝
대부분의 테스트 기법들이 영문인데, 일부러 안 바꿨다.
나름 쉽게 한답시고 용어 자체를 바꾸면 읽는 독자로 하여금 헷갈리기도하고,
다른 개발자들 간에 소통이 어려울 것 같다.
(나 또한 추후에 이 포스트를 보고 테스트를 할 수 있으니,,,)
용어 자체는 의미 그대로이니 그대로 따라가자
Smoke testing
목표
- 애플리케이션의 기본 기능 검증
- 스모크 테트 결과는 다른 테스트의 기준점(baseline) 으로 사용
- 스모크 테스트 실행시간 vs Load Test 1000명 실행시간
테스트 방법
- 최소한의 요청을 통해 기능을 수행해보고 결과값을 저장한다.
- 1명의 가상 사용자
- 최소한의 요청값
- 최소한의 요청시간
Load testing
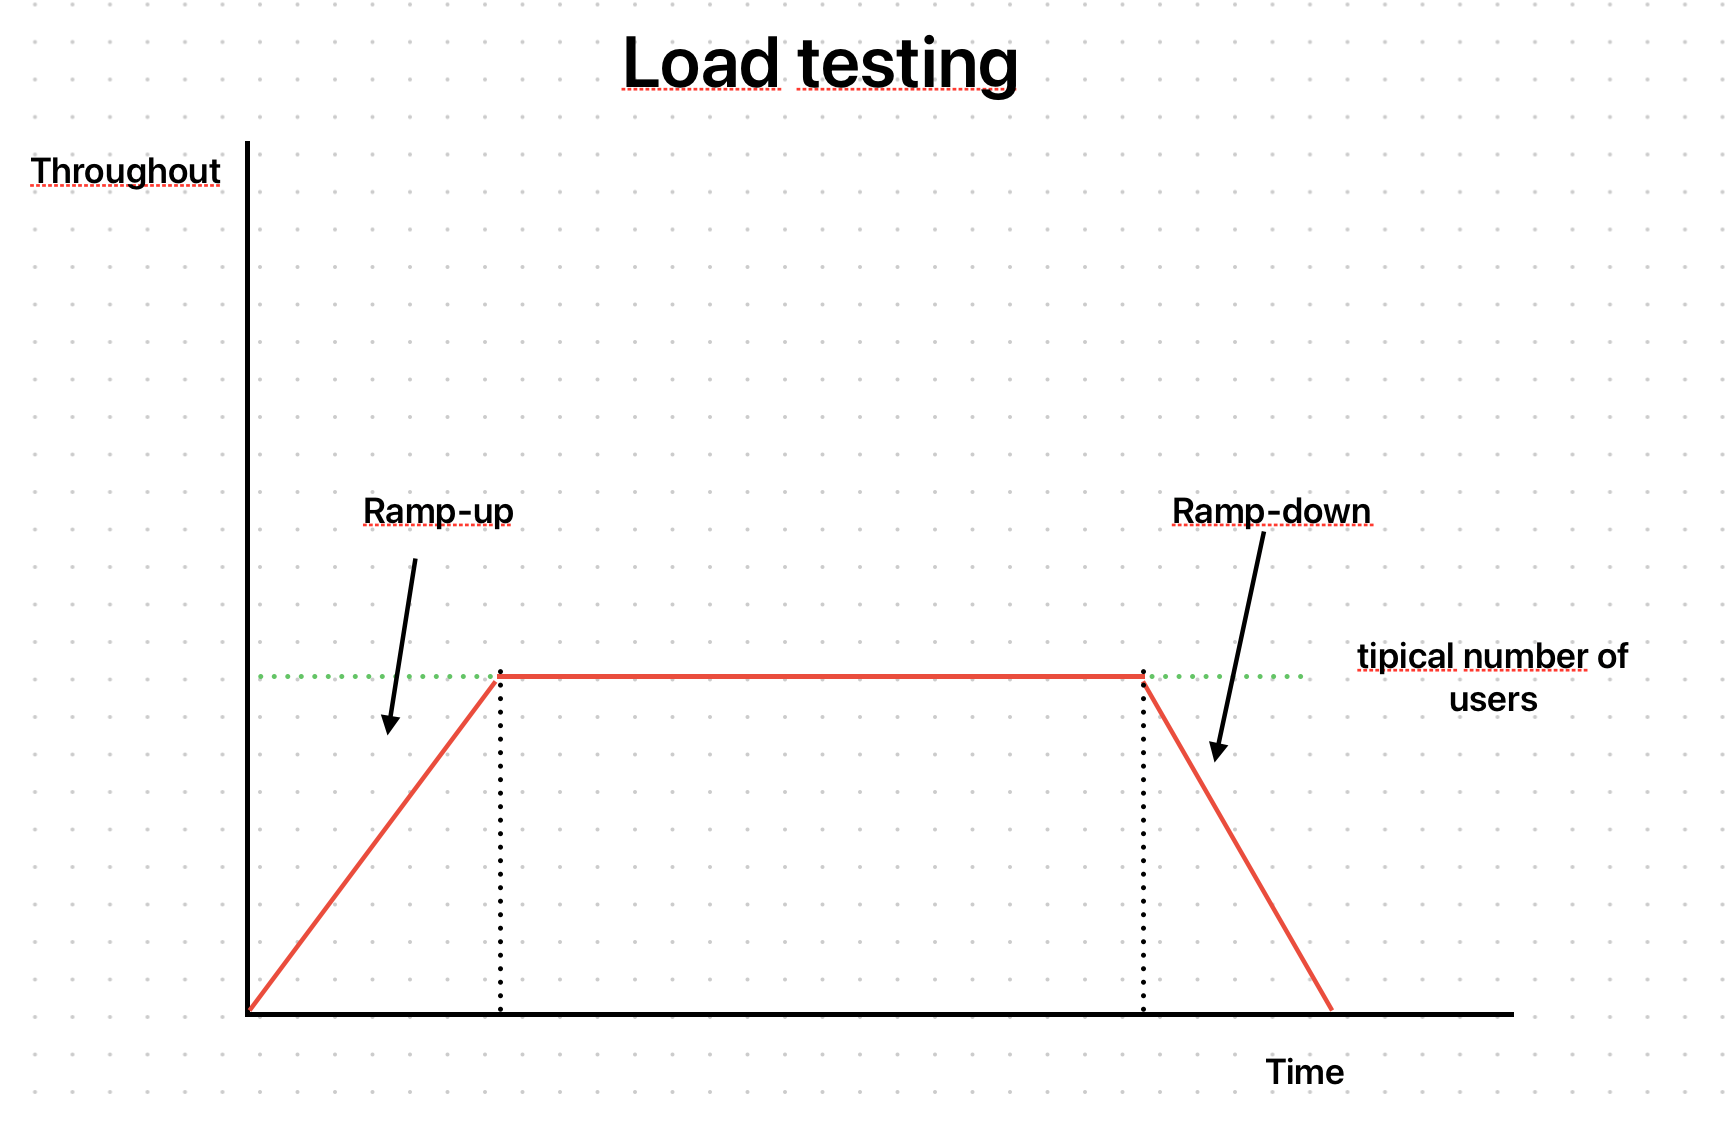
목표
- 예상되는 시스템 부하를 검증
- API에 1000명의 사용자가 접근할 것으로 예상된다면, 1000 명을 기준으로 테스트 수행
- 최소한의 성능이 항상 기대치만큼 나오는지 확인
- 스모크 테스트 결과를 기준점으로 삼아 시스템 제한사항 및 개선사항을 분석
테스트 방법
- N 명의 사용자에 대해 행동을 시뮬레이션하여 호출
- 부하를 점진적으로 늘렸다가 줄이는 단계를 거침
- 램프업(ramp-up) 단계(부하를 점진적으로 늘리는 단계
- 램프다운(ramp-down) 단계(부하를 점진적으로 줄이는 단계)
- 운동에서의 점진적 과부하 & 드롭세트 라고 생각하면 됨
- 이러한 과정을 통해 시스템 리소스를 얼만큼 조정할 것인지를 분석 (System Elasticity)
Stress Test
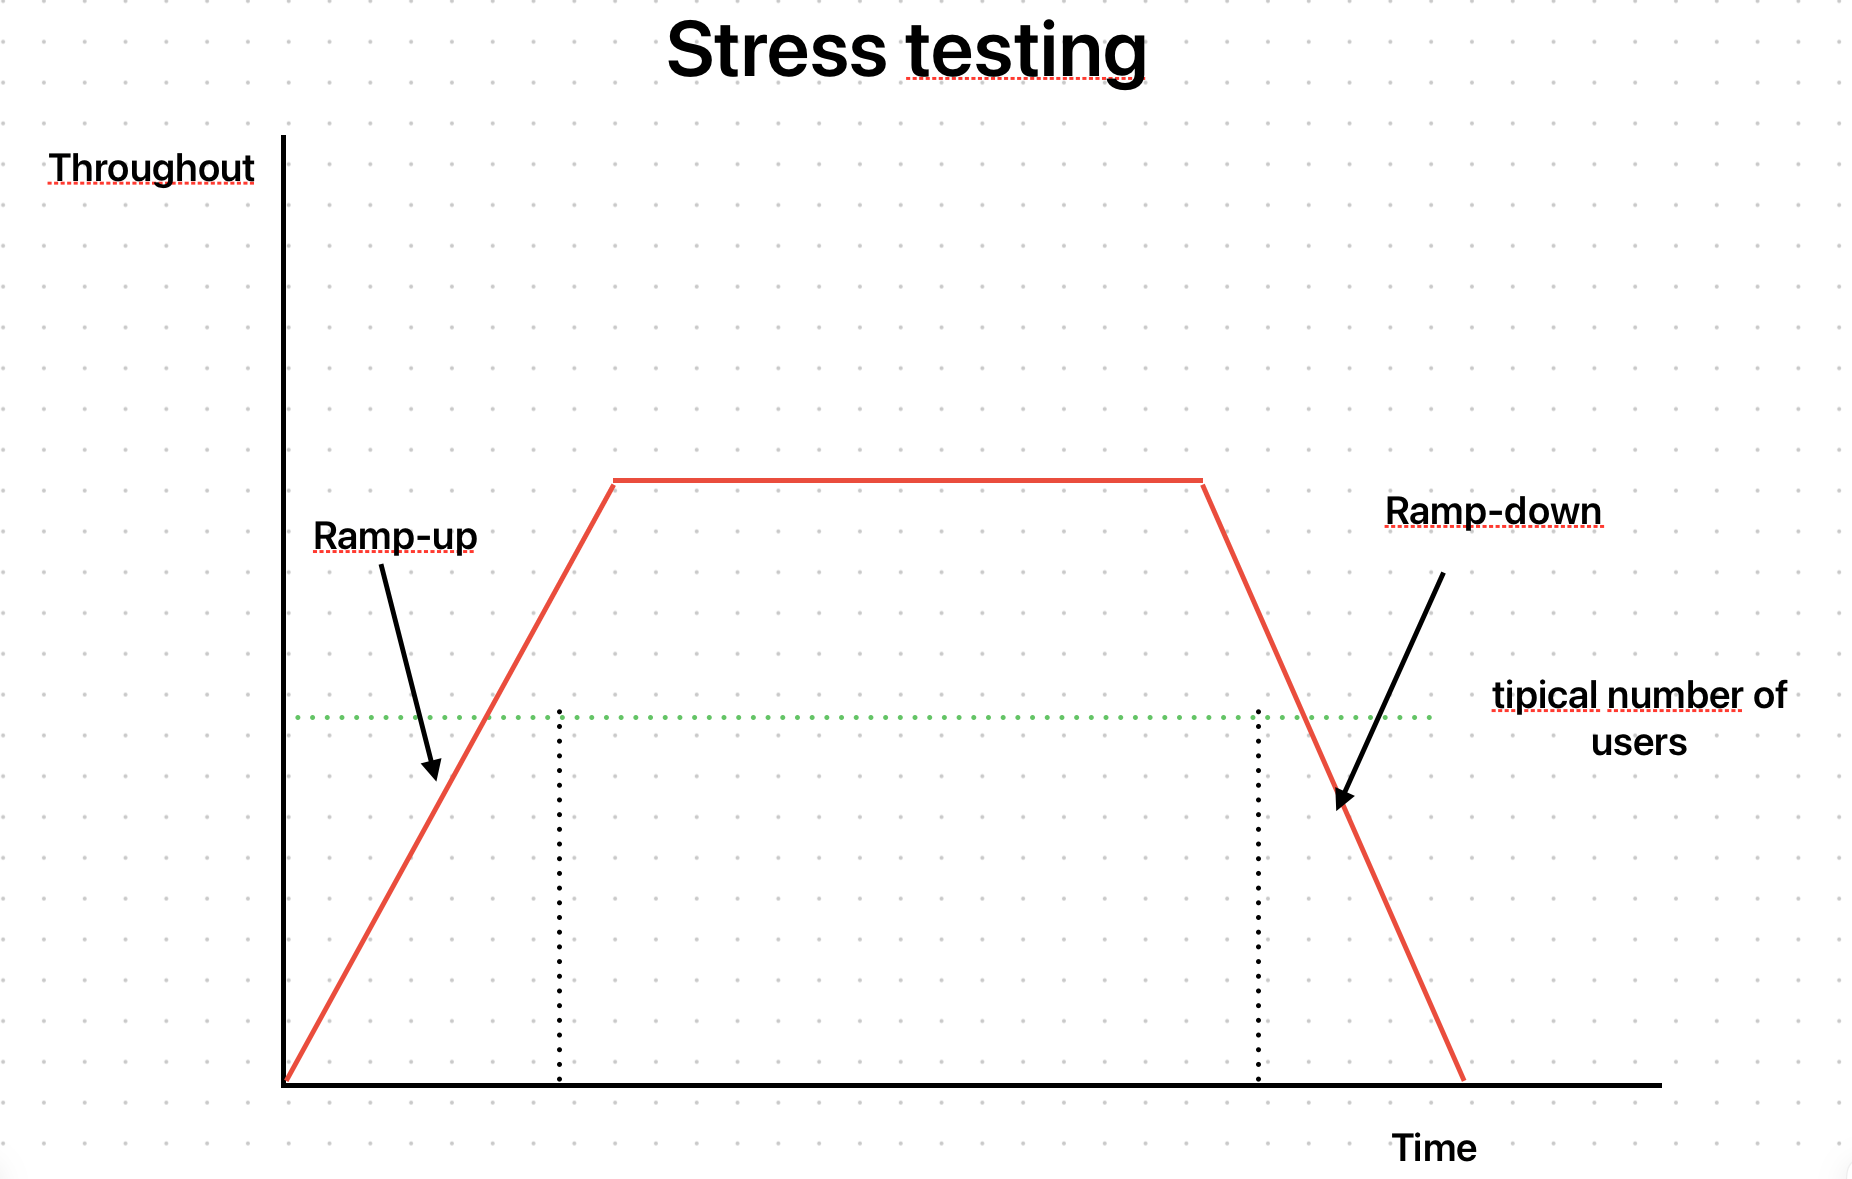
목표
- 예상요청 기대치보다 일부러 부하를 계속 걸어보는 테스트
- Load Test 는 기대되는 사용자의 수만큼 테스트
- 반면 Stress Test 는 기대치보다 더 걸어보는 테스트
테스트 방법
- Load Test 와 방법은 똑같다.
- 램프업과 램프다운 단계는 똑같이 가져되, 기대치를 더욱 늘린다.
Spike Test

목표
- 순간적으로 부하가 폭증하는 상황을 테스트해본다.
- 이를 통해 시스템의 스케일 업/스케일 다운을 관찰할 수 있다.
테스트 방법
- 순간적인 부하 급증 — 부하 증감의 속도는 같다 — 을 시뮬레이션하여 기능을 호출한다.
Breakpoint Test
목표
- 장애 발생 지점 (BreakPoint) 를 체크하는 테스트
- 시스템에 장애가 날 때까지 부하를 계속 부어본다.
테스트 방법
- 장애를 일으키기 직전까지 점진적으로 트래픽 부하를 높임
- 시스템의 장애 지점(breaking point) 을 식별
Soak Test
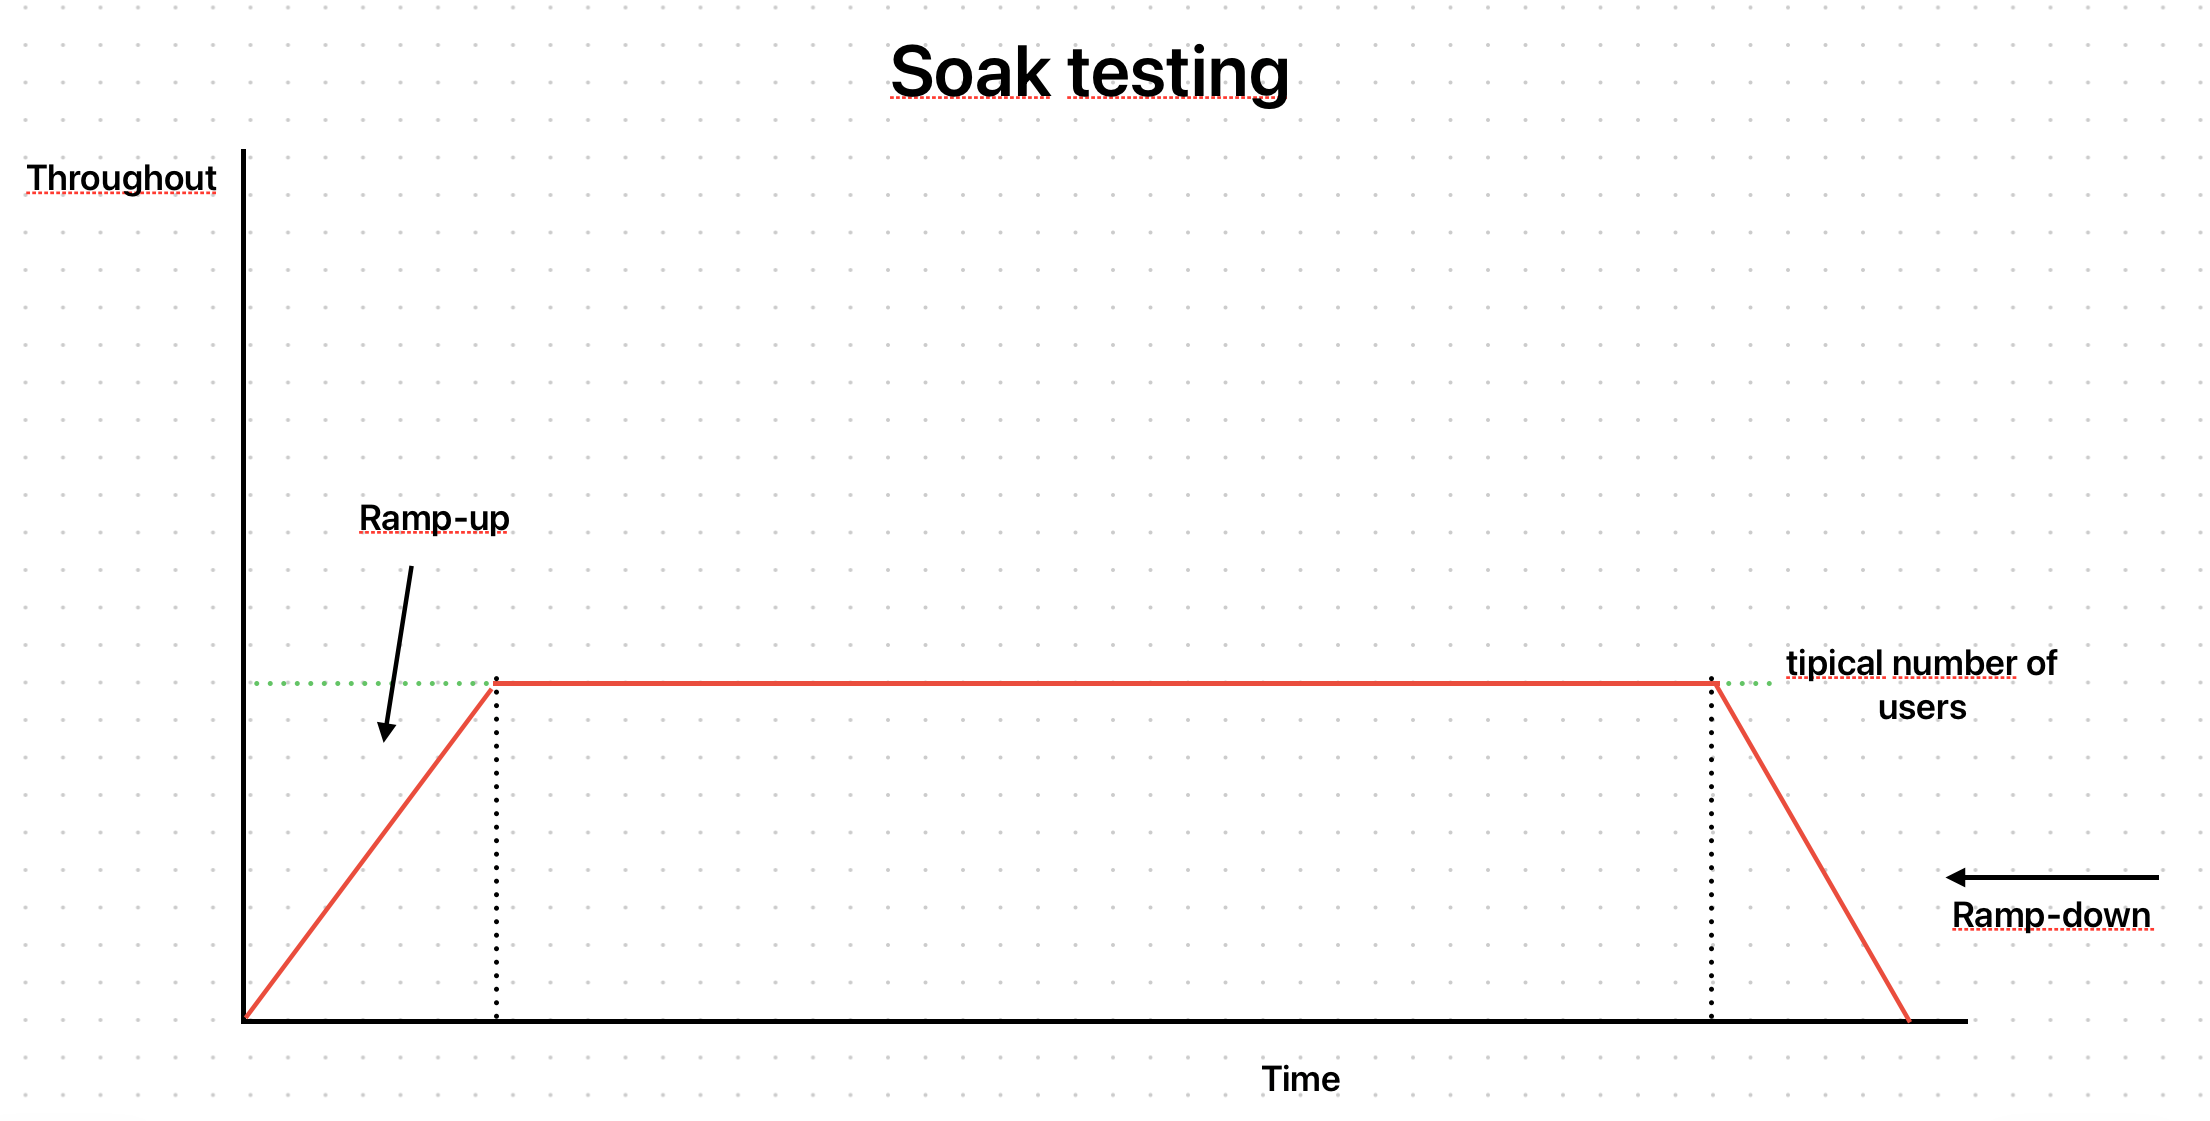
목표
- 장시간 일정한 부하를 지속적으로 걸었을 때 시스템이 어떻게 동작하는지 확인
- 메모리 누수나, 메모리·디스크·데이터베이스 등의 리소스 고갈 시 시스템이 어떻게 반응하는지 식별
테스트 방법
- 수시간~수일에 걸쳐 일정한 수준의 트래픽을 부하
- CPU·메모리 사용량, 디스크 I/O, DB 연결 상태 등을 지속적으로 모니터링
- 장기간 운영 후 메모리 누수(leak), 커넥션 풀 고갈(conn pool exhaustion), 디스크 공간 부족(disk full) 등이 발생하는지 확인
k6
기본 활용법
- Grafana Labs에서 관리하는 오픈 소스 테스트 툴
- Go로 작성되었으며 내부적으로 Js 엔진을 활용
- 부하 테스트 스크립트를 Js 로 구성할 수 있음
- 옵션을 통해 시나리오 및 테스트 시간 지정 가능
가장 기본적으로 어떻게 호출하는지 알아보고, 옵션 활용법에 대해 알아보도록 하겠다.
우선 테스트 대상을 만들기 위해 아래와 같이 카운팅 Go 모듈을 작성해보았다.
package main

import (
	"encoding/json"
	"fmt"
	"log"
	"net/http"
	"strconv"
)

var count int = 0

func main() {
	/** POST : Increase count */
	http.HandleFunc("/count", func(w http.ResponseWriter, r *http.Request) {
		switch r.Method {
		case http.MethodPost:
			var previousCount = count
			count++
			fmt.Fprintf(w, "Previous count : %d -> Current count : %d\n", previousCount, count)
			return
		default:
			http.Error(w, "Method not allowed", http.StatusMethodNotAllowed)
		}
	})

	/** PUT : Update count by input value */
	http.HandleFunc("/count/update", func(w http.ResponseWriter, r *http.Request) {
		switch r.Method {
		case http.MethodPut:
			var countUpdate struct {
				Value *int `json:"value"`
			}
			err := json.NewDecoder(r.Body).Decode(&countUpdate)
			if err != nil {
				http.Error(w, "Invalid request body"+err.Error(), http.StatusBadRequest)
			}
			count = *countUpdate.Value
			fmt.Fprintln(w, "Count has updated as : "+strconv.Itoa(count))
			return
		default:
			http.Error(w, "Method not allowed", http.StatusMethodNotAllowed)
		}
	})

	if err := http.ListenAndServe(":8080", nil); err != nil {
		log.Fatal(err)
	}
}
실제로 curl 을 통해 제대로 작동하는지 확인해보았다.
// POST : count 증가
curl -X POST localhost:8080/count
// PUT : count 값 수정
curl -d '{"value":32}' -X PUT -H "Content-Type: application/json" http://localhost:8080/count/update
이후에 k6 를 통해 아래와 같이 호출할 수 있다.
import http from 'k6/http';
import { sleep } from 'k6';

const domain  = 'localhost';
const port    = '8080';
const postUrl = `http://${domain}:${port}/count`;
const putUrl  = `http://${domain}:${port}/count/update`;

export default function () {
  // POST : count 증가
  let postData = {};
  let resPost  = http.post(postUrl, JSON.stringify(postData), {
    headers: { 'Content-Type': 'application/json' },
  });
  // Log the status code and body so you can confirm behavior:
  console.log(`POST /count → status ${resPost.status}, body: ${resPost.body.trim()}`);

  // PUT : count 값 수정
  const putData = { value: 42 }; // for example, set “count” to 42
  let resPut = http.put(putUrl, JSON.stringify(putData), {
    headers: { 'Content-Type': 'application/json' },
  });
  console.log(`PUT /count/update → status ${resPut.status}, body: ${resPut.body.trim()}`);

  sleep(1);
}

다른 http method 에 대해 호출하고자 한다면 아래 예제들을 따라서 호출할 수 있다.
- GET
import http from 'k6/http'; import { sleep } from 'k6'; export default function () { http.get('https://test.k6.io'); sleep(1); } - POST
import http from 'k6/http'; const url = 'https://quickpizza.grafana.com/api/json'; const logoBin = open('./logo.png', 'b'); export default function () { let data = { name: 'Bert' }; // Using a JSON string as body let res = http.post(url, JSON.stringify(data), { headers: { 'Content-Type': 'application/json' }, }); console.log(res.json().json.name); // Bert // Using an object as body, the headers will automatically include // 'Content-Type: application/x-www-form-urlencoded'. res = http.post(url, data); console.log(res.json().form.name); // Bert // Using a binary array as body. Make sure to open() the file as binary // (with the 'b' argument). http.post(url, logoBin, { headers: { 'Content-Type': 'image/png' } }); // Using an ArrayBuffer as body. Make sure to pass the underlying ArrayBuffer // instance to http.post(), and not the TypedArray view. data = new Uint8Array([104, 101, 108, 108, 111]); http.post(url, data.buffer, { headers: { 'Content-Type': 'image/png' } }); } - DELETE
import http from 'k6/http'; const url = 'https://quickpizza.grafana.com/api/delete'; export default function () { const params = { headers: { 'X-MyHeader': 'k6test' } }; http.del(url, null, params); } - PUT
import http from 'k6/http'; const url = 'https://quickpizza.grafana.com/api/put'; export default function () { const headers = { 'Content-Type': 'application/json' }; const data = { name: 'Bert' }; const res = http.put(url, JSON.stringify(data), { headers: headers }); console.log(JSON.parse(res.body).name); } - PATCH
import http from 'k6/http';

const url = 'https://quickpizza.grafana.com/api/patch';

export default function () {
  const headers = { 'Content-Type': 'application/json' };
  const data = { name: 'Bert' };

  const res = http.patch(url, JSON.stringify(data), { headers: headers });

  console.log(JSON.parse(res.body).name);
}
k6 옵션 활용법
k6 는 옵션을 지정하여 어떻게 test 를 구성할 지 지정할 수 있다.
대표적인 설정은 아래와 같고, 부가적인 설정을 하고자 한다면 k6 options reference 를 참고해보자.
- vus
-
An integer value specifying the number of VUs to run concurrently, used together with the iterations or duration options. If you’d like more control look at the
stagesoption or scenarios. -
동시에 실행할 가상 사용자의 수를 지정
-
iteration 과 duration 과 함께 사용
-
Available in
k6 runandk6 cloudcommands.export const options = { vus: 10, duration: '1h', };
-
- iterations
-
테스트 실행에서 실행할 기본 함수의 총 반복 횟수
-
여기서 횟수는 함수 호출 횟수의 총 합
- 각 vu 마다 횟수 X
- 각각의 vu 가 전체 횟수를 나눠서 진행 O
- 빠르게 끝나는 vu 가 더 많은 횟수를 실행 O
- vu 가 공유하여 호출 →반복횟수를 만족할 때까지 각각의 vu 가 나뉘어 실행되는 shared iteration
-
각 vu 별로 반복횟수를 동일하게 가져가려면 per-vu iterations executor 를 지정
// 5명의 가상 사용자가 다른 실행횟수 호출 -> 10 번을 채움
export const options = {
  vus: 5,
  iterations: 10,
};
-
- duration
-
테스트 실행이 실행될 총 기간을 지정
export const options = {
  vus: 100,
  duration: '3m',
};
-
- stages
-
stages 는 테스트 부하가 주입되는 단계를 설정할 수 있다.
-
일반적으로 테스트는 RampUp --> Load --> RampBackDown 의 순서로 수행이 된다.
-
아래 예시는 램프업, 플래스, 램프다운을 실행
export const options = {
  stages: [
	  // RampUp : 1->10 for 3m
    { duration: '3m', target: 10 },
	  // Flat : 10 for 5m
    { duration: '5m', target: 10 },
	  // RampDown : 35->1 for 3m
    { duration: '3m', target: 0 },
  ],
};
-
- maxRedirects
-
요청을 포기하고 오류를 발생시키기 전에 k6가 따를 최대 HTTP 리디렉션 횟수
export const options = {
  maxRedirects: 10,
};
-
- scenarios
-
유스케이스 맞는 실행 환경을 조정
- Executor 설정
- VU 설정
- Stage 서정
- ,,,
-
Scenarios 를 참조하면 더 자세하게 볼 수 있다.
export const options = {
  scenarios: {
    my_api_scenario: {
      // arbitrary scenario name
      executor: 'ramping-vus',
      startVUs: 0,
      stages: [
        { duration: '5s', target: 100 },
        { duration: '5s', target: 0 },
      ],
      gracefulRampDown: '10s',
      env: { MYVAR: 'example' },
      tags: { my_tag: 'example' },
    },
  },
};
-
- hosts
-
DNS 테이블을 선언하여 다양한 URL 들을 매핑
- 리눅스의
/etc/hosts혹은 윈도우의C:\Windows\System32\drivers\etc\hosts와 유사
- 리눅스의
-
"domain" : "ip:port" 형태로 호스트를 지정할 수 있다.
-
v0.42.0 부터 asterisk 사용 가능하다.
export const options = {
  hosts: {
    'test.k6.io': '1.2.3.4',
    'test.k6.io:443': '1.2.3.4:8443',
    '*.grafana.com': '1.2.3.4',
  },
};
-
- threshold
-
테스트 종료 조건을 지정하고, 해당 종료조건을 넘어서게 되면 테스트를 종료하게 된다.
export const options = {
  thresholds: {
    'http_req_duration': ['avg<100', 'p(95)<200'],
    'http_req_connecting{cdnAsset:true}': ['p(95)<100'],
  },
};
-
- noConnectionReuse
-
기본값은 false이며, true인경우 커넥션을 재사용하지 않으므로 keepalive를 유지하게 된다.
export const options = {
  noConnectionReuse: true,
};
-
- userAgent
-
http 요청을 보낼때 사용자 agent 정보를 지정한다.
-
이렇게 지정하고 테스트를 수행하면 워크로드 요청시 agent를 실어서 전송하게 된다.
export const options = {
  userAgent: 'MyK6UserAgentString/1.0',
};
-
각 테스트 기법에 따른 k6 활용
이제 k6 옵션을 활용하여 각기 다른 테스트 기법을 적용해볼 수 있다.
시나리오와 같이 사용하면 토큰도 활용할 수 있고, 조금 더 자세한 유스케이스 테스트를 해볼 수 있으니
k6 를 활용하고자한다면 추가적으로 참고해보면 좋을 거 같다.
Smoke testing
- 기능이 제대로 정상 작동하는지만 확인
import http from 'k6/http';
import { sleep } from 'k6';

export default function () {
    http.get('http://192.168.68.108:3000');
    sleep(1);
}
Load testing
- 기준치 → 100 명
- 램프업 : 1명 → 100 명
- 플랫 : 100 명 유지
- 램프다운 : 100명 → 0명
import http from 'k6/http';
import { sleep } from 'k6';

export const options = {
    stages: [
        {
            duration: '10s',
            target: 100
        },
        {
            duration: '30s',
            target: 100
        },
        {
            duration: '10s',
            target: 0
        }
    ]
}

export default function () {
    http.get('http://192.168.68.108:3000');
    sleep(1);
}
Stress Test
- 기준치였던 100명을 넘어서 200명을 부하
- 램프업 : 1명 → 200 명
- 플랫 : 200 명 유지
- 램프다운 : 200명 → 0명
import http from 'k6/http';
import { sleep } from 'k6';

export const options = {
    stages: [
        {
            duration: '10s',
            target: 200
        },
        {
            duration: '30s',
            target: 200
        },
        {
            duration: '10s',
            target: 0
        }
    ]
}

export default function () {
    http.get('http://192.168.68.108:3000');
    sleep(1);
}
Spike Test
- 순간적인 부하 급증 — 부하 증감의 속도는 같다 — 을 시뮬레이션
- 부하 증감 : 1명 → 1000명 for 1분
- 부하 감소 : 1000명 → 0명 for 1분
import http from 'k6/http';
import { sleep } from 'k6';

export const options = {
    stages: [
        {
            duration: '1m',
            target: 10000
        },
        {
            duration: '1m',
            target: 0
        }
    ]
}

export default function () {
    http.get('http://192.168.68.108:3000');
    sleep(1);
}
Breakpoint Test
- 장애가 나는 지점까지 점진적으로 부하
- 2시간 동안 100000 명이 될 때까지 점진적으로 vu 를 늘림
import http from 'k6/http';
import { sleep } from 'k6';

export const options = {
    stages: [
        {
            duration: '2h',
            target: 100000
        }
    ]
}

export default function () {
    http.get('http://192.168.68.108:3000');
    sleep(1);
}
Soak Test
- 장시간 일정한 부하를 지속적으로 걸었을 때 시스템이 어떻게 동작하는지 확인
- 이를 위해 램프업, 램프다운 사이의 플랫 구간을 24 시간 동안 걸어놓음
- 램프업 : 0 →1000 for 5m
- 플랫 : 1000 유지 for 24h
- 램프다운 : 1000 →0 for 5m
import http from 'k6/http';
import { sleep } from 'k6';

export const options = {
    stages: [
        {
            duration: '5m',
            target: 1000
        },
        {
            duration: '24h',
            target: 1000
        },
        {
            duration: '5m',
            target: 0
        }
    ]
}

export default function () {
    http.get('http://192.168.68.108:3000');
    sleep(1);
}
Further work 📝
- k6 cloud
- k6 grafana dashboard
Reference 📚
https://eltonminetto.dev/en/post/2024-01-05-load-test-types/
https://dev.to/eminetto/load-testing-using-k6-57ph
https://grafana.com/docs/k6/latest/examples/
https://medium.com/@ravipatel.it/step-by-step-guide-to-load-testing-with-k6-5afb625e231a
https://devocean.sk.com/blog/techBoardDetail.do?ID=164303
https://devocean.sk.com/blog/techBoardDetail.do?ID=164310
https://grafana.com/docs/k6/latest/using-k6/k6-options/how-to/
https://grafana.com/docs/k6/latest/using-k6/k6-options/reference/