[NestJS] 게시물 CRUD/검색 필터/페이징
자, 이제 Auth 시스템은 구현이 됐다. 이제 사전 과제 연습의 핵심 부분인 Potss를 CRUD를 설계해보자!
다음 단계의 과정은 이러하다.
- Post Entity
- PostService (CRUD)
- PostController
- 검색/정렬/페이징
- 권한 관리
Post CRUD 작성
Entity/ DTO 설정
1. Post Entity 생성
import { Entity, PrimaryGeneratedColumn, Column, CreateDateColumn, UpdateDateColumn, ManyToOne, JoinColumn } from 'typeorm';
import { User } from './user.entity';

@Entity('posts')
export class Post {
  @PrimaryGeneratedColumn()
  id: number;

  @Column({ length: 200 })
  title: string;

  @Column('text')
  content: string;

  @Column({ nullable: true })
  thumbnail: string;

  @Column({ default: 0 })
  viewCount: number;

  @Column({ default: 0 })
  likeCount: number;

  @ManyToOne(() => User, { onDelete: 'CASCADE' })
  @JoinColumn({ name: 'userId' })
  user: User;

  @Column()
  userId: number;

  @CreateDateColumn()
  createdAt: Date;

  @UpdateDateColumn()
  updatedAt: Date;
}
2. Post DTO 생성
- CreatePostDto (src/dto/posts/create-post.dto.ts)
import { ApiProperty } from '@nestjs/swagger';
import {
  IsNotEmpty,
  IsOptional,
  IsString,
  MaxLength,
  MinLength,
} from 'class-validator';

export class CreatePostDto {
  @ApiProperty({
    example: 'NestJS로 블로그 만들기',
    description: '게시글 제목',
  })
  @IsNotEmpty({ message: '제목을 입력해주세요.' })
  @MinLength(1, { message: '제목은 최소 1자 이상이어야 합니다.' })
  @MaxLength(200, { message: '제목은 최대 200자까지 가능합니다.' })
  @IsString()
  title: string;

  @ApiProperty({
    example: 'NestJS로 블로그 내용입니다...',
    description: '게시글 내용',
  })
  @IsNotEmpty({ message: '내용을 입력해주세요.' })
  @MinLength(1, { message: '내용은 최소 1자 이상이어야 합니다.' })
  @IsString()
  content: string;

  @ApiProperty({
    description: '게시글 썸네일 이미지 URL',
    example:
      'https://miniblog-uploads-1.s3.ap-southeast-2.amazonaws.com/uploads/thumbnail-1234567890.jpg',
    required: false,
  })
  @IsString()
  @IsOptional()
  thumbnail?: string;
}
thumbnail은 없어도되는 property이기 떄문에 IsOptional() 데코레이터를 사용해줘야한다.
- UpdatePostDto (src/dto/posts/update-post.dto.ts)
import { PartialType } from '@nestjs/swagger';
import { CreatePostDto } from './create-post.dto';

export class UpdatePostDto extends PartialType(CreatePostDto) {}
UpdatePostDto는 CreatePostDto와 같기 떄문에 extends로 CreatePostDto를 상속 받고 PartialType으로 ?(Optional)하게 만들어준다.
- QueryPostDto 생성(검색/정렬/페이징)
import { ApiProperty } from '@nestjs/swagger';
import { Transform } from 'class-transformer';
import {
  IsIn,
  IsNumber,
  IsOptional,
  IsString,
  Max,
  Min,
} from 'class-validator';

export class QueryPostDto {
  @ApiProperty({
    description: '검색어(제목, 내용)',
    example: 'NestJS',
    required: false,
  })
  @IsOptional()
  @IsString()
  search?: string;

  @ApiProperty({
    description: '정렬 기준(createdAt, updatedAt)',
    example: 'createdAt',
    required: false,
  })
  @IsOptional()
  @IsIn(['latest', 'oldest', 'popular'])
  sortBy?: string;

  @ApiProperty({
    example: 1,
    description: '페이지 번호',
    required: false,
  })
  @IsOptional()
  @Transform(({ value }) => parseInt(value))
  @IsNumber()
  @Min(1)
  page?: number = 1;

  @ApiProperty({
    example: 10,
    description: '페이지 당 게시글 수',
    required: false,
  })
  @IsOptional()
  @Transform(({ value }) => parseInt(value))
  @IsNumber()
  @Min(1)
  @Max(50)
  limit?: number = 10;
}
여기서 중요한 점은 page, limit의 필드에 Transform 데코레이터를 써서 정수로 변환해야한다는 것이다.
클라이언트가 전달하는 쿼리 스트링은 항상 문자열(string)이기 때문이다.
또, sortBy 필드에 @IsIn 데코레이터를 써서 값의 범위를 제한할 수 있다.
만약 다른 값이 들어오면 유효성 검사에서 오류를 발생 시킨다.
3. Post Module 생성
nest generate module posts
nest generate service posts
nest generate controller posts
PostService CRUD 로직 구현
1. Post Service 로직 구현
import { Get, Injectable, NotFoundException } from '@nestjs/common';
import { InjectRepository } from '@nestjs/typeorm';
import { CreatePostDto } from 'src/dto/posts/create-post.dto';
import { UpdatePostDto } from 'src/dto/posts/update-post.dto';
import { Post } from 'src/entities/post.entity';
import { Repository } from 'typeorm';

@Injectable()
export class PostsService {
  constructor(
    @InjectRepository(Post)
    private postsRepository: Repository<Post>,
  ) {}

  async create(createPostDto: CreatePostDto, userId: number): Promise<Post> {
    const post = this.postsRepository.create({
      ...createPostDto,
      userId,
    });

    return await this.postsRepository.save(post);
  }

  async update(
    id: number,
    updatePostDto: UpdatePostDto,
    userId: number,
  ): Promise<Post> {
    const post = await this.findOne(id);
    if (post.userId !== userId) {
      throw new NotFoundException('게시글을 수정할 권한이 없습니다.');
    }

    Object.assign(post, updatePostDto);
    return await this.postsRepository.save(post);
  }

  async remove(id: number, userId: number): Promise<void> {
    const post = await this.findOne(id);
    if (post.userId !== userId)
      throw new NotFoundException('삭제 권한이 없습니다.');
    await this.postsRepository.delete(id);
  }

  async findOne(id: number): Promise<Post> {
    const post = await this.postsRepository.findOne({ where: { id } });

    if (!post) {
      throw new NotFoundException('게시글을 찾을 수 없습니다.');
    }

    return post;
  }

  async findAll(): Promise<Post[]> {
    return await this.postsRepository.find({ order: { createdAt: 'DESC' } });
  }
}
2. PostController에 엔드포인트 구현
import {
  Body,
  Controller,
  Delete,
  Get,
  Param,
  Patch,
  Post,
  Request,
  UseGuards,
} from '@nestjs/common';
import { PostsService } from './posts.service';
import { CreatePostDto } from 'src/dto/posts/create-post.dto';
import { AuthRequest } from 'src/dto/auth/auth-request.dto';
import { JwtAuthGuard } from 'src/auth/strategies/jwt-auth.guard';
import { UpdatePostDto } from 'src/dto/posts/update-post.dto';
import { ApiBearerAuth } from '@nestjs/swagger';

@Controller('posts')
export class PostsController {
  constructor(private readonly postsService: PostsService) {}

  @UseGuards(JwtAuthGuard)
  @ApiBearerAuth('access-token')
  @Post()
  async create(
    @Body() createPostDto: CreatePostDto,
    @Request() req: AuthRequest,
  ) {
    console.log('req.user:', req.user); // 이 부분 로그 찍어보세요!
    return await this.postsService.create(createPostDto, req.user.id);
  }

  @UseGuards(JwtAuthGuard)
  @ApiBearerAuth('access-token')
  @Patch(':id')
  async update(
    @Param('id') id: number,
    @Body() updatePostDto: UpdatePostDto,
    @Request() req: AuthRequest,
  ) {
    return await this.postsService.update(id, updatePostDto, req.user.id);
  }

  @UseGuards(JwtAuthGuard)
  @ApiBearerAuth('access-token')
  @Delete(':id')
  async remove(@Param('id') id: number, @Request() req: AuthRequest) {
    return await this.postsService.remove(id, req.user.id);
  }

  @Get()
  async findAll() {
    return await this.postsService.findAll();
  }

  @Get(':id')
  async findOne(@Param('id') id: number) {
    return await this.postsService.findOne(Number(id));
  }
}
@ApiBearerAuth('access-token')를 잘 적어줘야 Authorization 헤더가 자동으로 API 요청에 추가된다!
3. PostsModule에 TypeOrmModule.forFeature([Post]) 추가
import { Module } from '@nestjs/common';
import { TypeOrmModule } from '@nestjs/typeorm';
import { PostsService } from './posts.service';
import { PostsController } from './posts.controller';
import { Post } from '../entities/post.entity';

@Module({
  imports: [TypeOrmModule.forFeature([Post])],
 ...
})
export class PostsModule {}
postsModule에 TypeOrmModule을 추가해야 PostRepository가 DI 컨테이너에 등록되어 사용할 수 있게 된다.
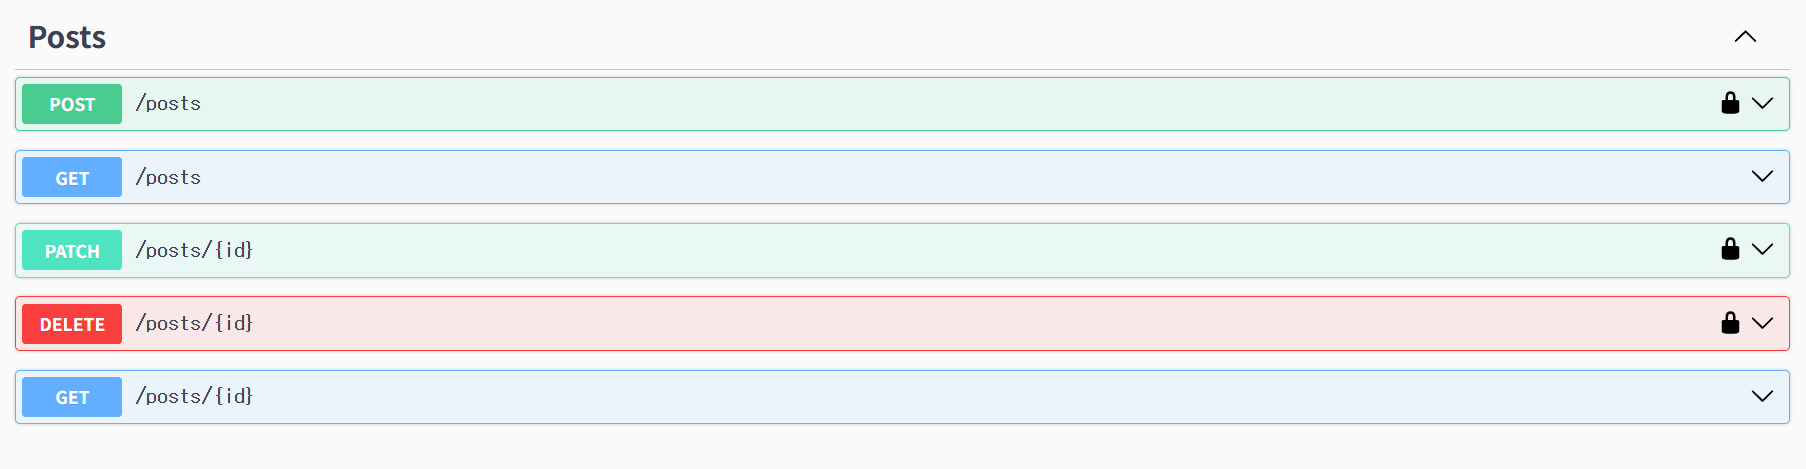
Swagger UI에 잘 추가가됐고, Post의 CRUD도 잘되는 것으로 확인이 된다. 추카추카포카!!!
게시물 목록 조회(검색, 정렬, 페이징)
자, 이제 검색과 정렬 그리리고 페이징 작업을 진행해보자!
목표 기능
- 검색: 제목/내용/작성자명 등으로 검색
- 정렬: 최신순, 오래된순, 인기순 등
- 페이징: page, limit 파라미터로 페이지네이션
진행 순서
- Query DTO 설계
- src/dto/posts/query-post.dto.ts에 검색/정렬/페이징 DTO 추가
- PostsService에 검색/정렬/페이징 로직 구현
- PostsController에서 GET /posts에 Query DTO 적용
- Swagger 문서화
- query Post DTO
import { ApiProperty } from '@nestjs/swagger';
import { Transform } from 'class-transformer';
import {
  IsIn,
  IsNumber,
  IsOptional,
  IsString,
  Max,
  Min,
} from 'class-validator';

export class QueryPostDto {
  @ApiProperty({
    description: '검색어(제목, 내용)',
    example: 'NestJS',
    required: false,
  })
  @IsOptional()
  @IsString()
  search?: string;

  @ApiProperty({
    required: false,
    description: '정렬기준',
    example: 'latest',
    enum: ['latest', 'oldest', 'popular'],
  })
  @IsOptional()
  @IsIn(['latest', 'oldest', 'popular'])
  sortBy?: string;

  @ApiProperty({
    example: 1,
    description: '페이지 번호',
    required: false,
  })
  @IsOptional()
  @Transform(({ value }) => parseInt(value))
  @IsNumber()
  @Min(1)
  page?: number = 1;

  @ApiProperty({
    example: 10,
    description: '페이지 당 게시글 수',
    required: false,
  })
  @IsOptional()
  @Transform(({ value }) => parseInt(value))
  @IsNumber()
  @Min(1)
  @Max(50)
  limit?: number = 10;
}
- PostController에 QueryPostDto 적용
@Get()
  async findAll(@Query() query: QueryPostDto) {
    return await this.postsService.findAll(query);
  }
localhost:3001/posts?search=테스트&sortBy=latest
이런 식으로 쿼리스트링으로 클라이언트에서 요청을 보내면 @Query로 값을 전달받게된다.
- PostService에 동적 쿼리 구현
async findAll(query: QueryPostDto) {
  const { search, sortBy, page = 1, limit = 10 } = query;
  const qb = this.postsRepository.createQueryBuilder('post');

  if (search) {
    qb.andWhere('post.title ILIKE :search OR post.content ILIKE :search', { search: `%${search}%` });
  }

  if (sortBy === 'oldest') {
    qb.orderBy('post.createdAt', 'ASC');
  } else if (sortBy === 'popular') {
    qb.orderBy('post.likeCount', 'DESC');
  } else {
    qb.orderBy('post.createdAt', 'DESC');
  }

  qb.skip((page - 1) * limit).take(limit);

  const [items, total] = await qb.getManyAndCount();
  return {
    total,
    page,
    limit,
    items,
  };
}- 필더 및 페이징 테스트!!!!
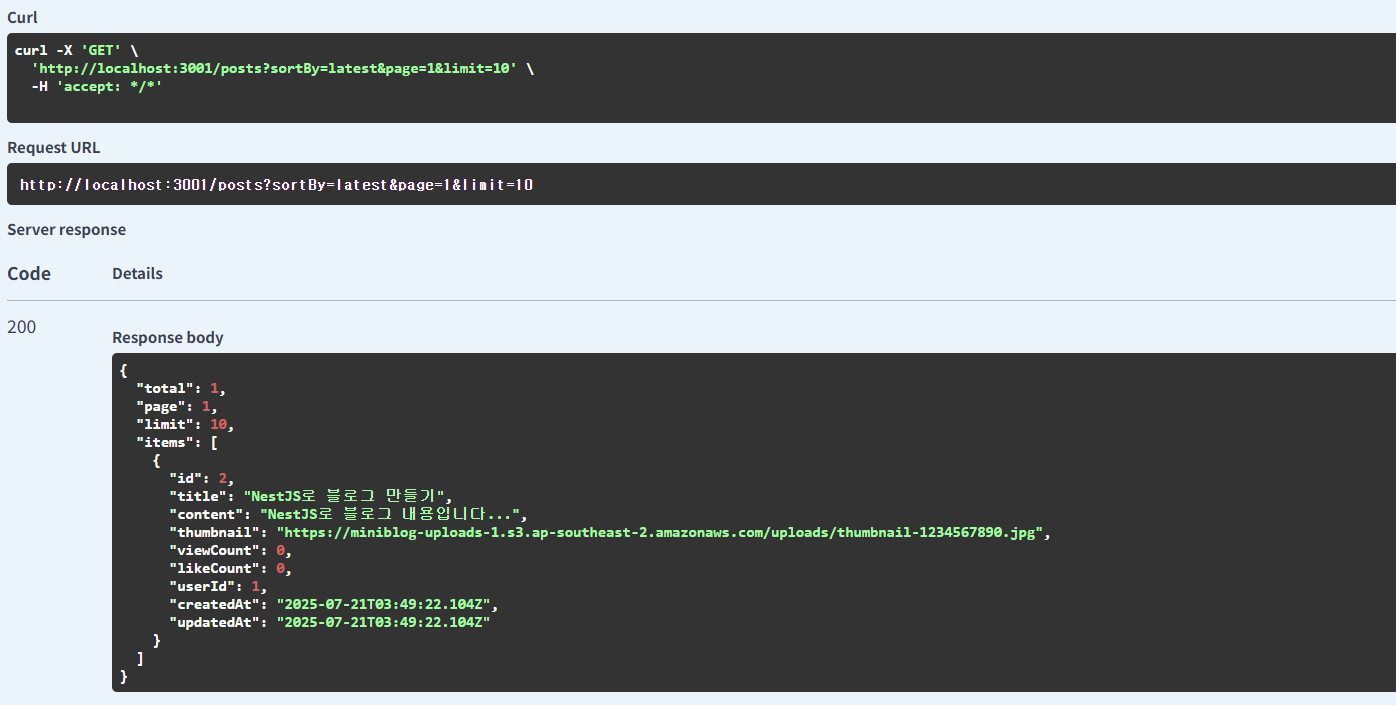
아주 잘 되는 것으로 확인이 된다! 이제 다음으로 파일 업로드 기능과 댓글/답글, 좋아요.팔로우 기능 순으로 구현을 해보자! 다음 게시물에서 공략해보자!