4.1 서버 템플릿 엔진과 머스테치 소개
템플릿 엔진
지정된 템플릿 양식과 데이터가 합쳐져 HTML 문서를 출력하는 소프트웨어
서버 템플릿 엔진
서버에서 Java 코드로 문자열을 만든 뒤 이 문자열을 HTML로 변환하여 브라우저로 전달
ex) JSP, Freemarker
클라이언트 템플릿 엔진
브라우저에서 화면을 생성, 서버에서 이미 코드가 벗어난 상태
서버는 Json이나 Xml 형식의 데이터만 전달하고 클라이언트에서 조립
ex) React, Vue
머스테치
수많은 언어를 지원하는 가장 심플한 템플릿 엔진이며 루비, JS, Java, 파이썬, PHP 등 현존하는 대부분의 언어를 지원한다
JSP 등은 스프링 부트에서 권장하지 않는 템플릿 엔진이다
머스테치의 장점
- 문법이 다른 엔진보다 간결하다
- 로직 코드를 사용할 수 없어 View와 서버의 역할이 명확하게 분리된다
- Mustach.java와 Mustach.js가 모두 있어 하나의 문법으로 클라이언트/서버 템플릿을 모두 사용 가능하다
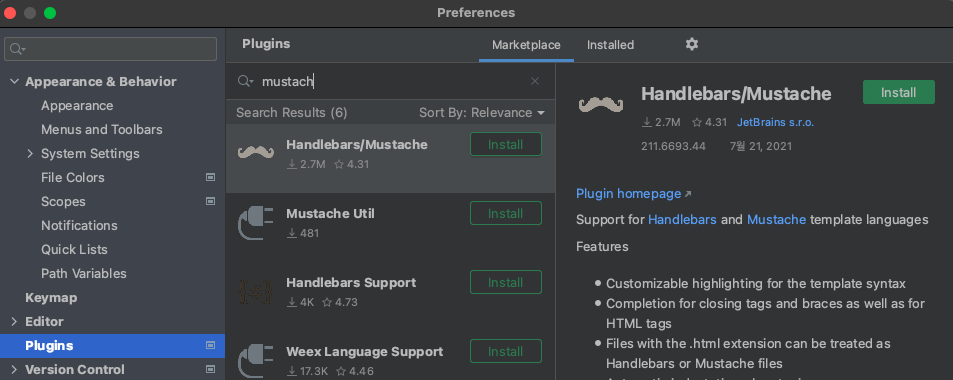
머스테치 플러그인 설치
인텔리제이에서 플러그인으로 제공하고 있다
4.2 기본 페이지 만들기
머스테치 스타터 의존성을 build.gradle에 등록한다
compile('org.springframework.boot:spring-boot-starter-mustache')머스테치는 스프링 부트에서 공식 지원하는 템플릿 엔진이다
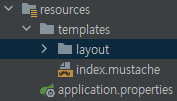
머스테치의 기본 위치는 src/main/resources/templates이며 이 위치에 머스테치 파일을 두면 스프링 부트에서 자동으로 로딩한다
기본 페이지 생성
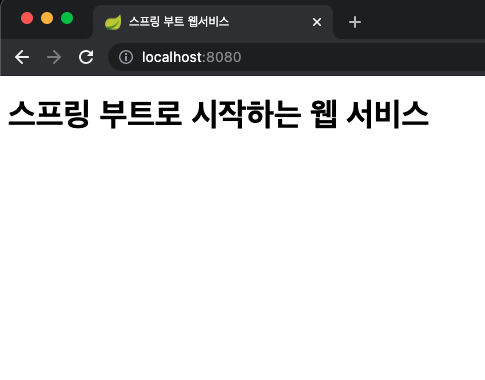
index.mustache
<!DOCTYPE HTML>
<html>
<head>
    <title>스프링 부트 웹서비스</title>
    <meta http-equiv="Content-Type" content="text/html;charset=UTF-8"/>
</head>
<body>
<h1>스프링 부트로 시작하는 웹 서비스</h1>
</body>
</html>
이 머스테치에 URL을 매핑하는건 컨트롤러가 담당한다
IndexController
package com.vencott.dev.springboot.web;

import org.springframework.stereotype.Controller;
import org.springframework.web.bind.annotation.GetMapping;

@Controller
public class IndexController {

    @GetMapping("/")
    public String index() {
        return "index";
    }
}
머스테치 스타터 덕분에 컨트롤러에서 문자열 반환 시 앞의 경로와 파일 확장자는 자동으로 지정된다
src/main/resources/templates/index.mustache
IndexControllerTest
package com.vencott.dev.springboot.web;

import org.junit.Test;
import org.junit.runner.RunWith;
import org.springframework.beans.factory.annotation.Autowired;
import org.springframework.boot.test.context.SpringBootTest;
import org.springframework.boot.test.web.client.TestRestTemplate;
import org.springframework.test.context.junit4.SpringRunner;

import static org.assertj.core.api.Assertions.assertThat;
import static org.springframework.boot.test.context.SpringBootTest.WebEnvironment.RANDOM_PORT;

@RunWith(SpringRunner.class)
@SpringBootTest(webEnvironment = RANDOM_PORT)
public class IndexControllerTest {

    @Autowired
    private TestRestTemplate restTemplate;

    @Test
    public void 메인페이지_로딩() {
        //when
        String body = this.restTemplate.getForObject("/", String.class);

        //then
        assertThat(body).contains("스프링 부트로 시작하는 웹 서비스");
    }
}
테스트가 성공한다면, Application의 main 메소드를 실행해 index 페이지를 확인해본다
4.3 게시글 등록 화면 만들기
부트스트랩을 이용하여 게시글 등록 화면 개발한다
라이브러리 추가
프론트엔드 라이브러리 사용 방법
- 외부 CDN 사용
- 직접 라이브러리를 받아서 사용
여기선 외부 CDN을 활용할 예정이나, 실제 프로젝트에선 직접 라이브러리를 받는 방식을 선택한다 → 외부 CDN에 의존하게 되면 그곳에 문제가 생겼을 때 프로젝트에도 영향을 끼치기 때문
레이아웃 방식
부트스트랩, 제이쿼리를 매번 머스테치 파일에 추가하지 않고 공통 영역을 별도의 파일로 분리하여 필요한 곳에서 가져다 쓰는 방식
src/main/resources/templates에 layout 디렉토리 추가
header.mustache
<!DOCTYPE HTML>
<html>
<head>
    <title>스프링부트 웹서비스</title>
    <meta http-equiv="Content-Type" content="text/html; charset=UTF-8"/>

    <link rel="stylesheet" href="https://stackpath.bootstrapcdn.com/bootstrap/4.3.1/css/bootstrap.min.css">
</head>
<body>
footer.mustache
<script src="https://code.jquery.com/jquery-3.3.1.min.js"></script>
<script src="https://stackpath.bootstrapcdn.com/bootstrap/4.3.1/js/bootstrap.min.js"></script>

</body>
</html>
페이지 로딩속도를 높이기 위해 css는 header에, js는 footer에 위치
- HTML은 위에서부터 코드가 실행되기 때문에 head가 다 실행되고서야 body가 실행
- head가 다 불러지지 않으면 사용자 쪽에선 백지 화면만 노출되기 때문에 js는 body 하단에 두는것이 좋다
- css는 화면을 그리는 역할이므로 head에 위치하는 것이 좋다
- 그렇지 않으면 사용자가 css가 적용되지 않은 화면을 볼 수 있다
bootstrap.js는 제이쿼리가 꼭 있어야하기 때문에 jquery보다 뒤에 위치(의존)
게시글 등록 기능
index.mustache
{{>layout/header}}

<h1>스프링 부트로 시작하는 웹 서비스 Ver.2</h1>
<div class="col-md-12">
    <div class="row">
        <div class="col-md-6">
            <a href="/posts/save" role="button" class="btn btn-primary">글 등록</a>
        </div>
    </div>
</div>

{{>layout/footer}}
이제 index에는 필요한 코드만 남게 되었다
{{>}} 문법은 현재 머스테치 파일을 기준으로 다른 파일을 가져온다
<a> 태그를 이용해 /posts/save로 이동하는 글 등록 버튼을 생성했다
이 주소에 해당하는 컨트롤러를 생성한다
IndexController
    @GetMapping("/posts/save")
    public String postsSave() {
        return "posts-save";
}/posts/save주소로 Get 요청이 들어왔을 경우, posts-save.mustache를 리턴해주는 컨트롤러가 생성되었다
posts-save.mustache
{{>layout/header}}

<h1>게시글 등록</h1>

<div class="col-md-12">
    <div class="col-md-4">
        <form>
            <div class="form-group">
                <label for="title">제목</label>
                <input type="text" class="form-control" id="title" placeholder="제목을 입력하세요">
            </div>
            <div class="form-group">
                <label for="author"> 작성자 </label>
                <input type="text" class="form-control" id="author" placeholder="작성자를 입력하세요">
            </div>
            <div class="form-group">
                <label for="content"> 내용 </label>
                <textarea class="form-control" id="content" placeholder="내용을 입력하세요"></textarea>
            </div>
        </form>
        <a href="/" role="button" class="btn btn-secondary">취소</a>
        <button type="button" class="btn btn-primary" id="btn-save">등록</button>
    </div>
</div>

{{>layout/footer}}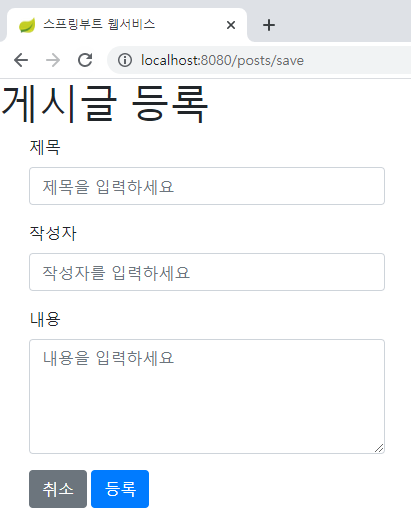
글 등록 버튼에 API를 호출하는 기능을 JS로 구현한다
index.js
var main = {
    init: function () {
        var _this = this;
        $('#btn-save').on('click', function () {
            _this.save();
        });
    },
    save: function () {
        var data = {
            title: $('#title').val(),
            author: $('#author').val(),
            content: $('#content').val()
        };

        $.ajax({
            type: 'POST',
            url: '/api/v1/posts',
            dataType: 'json',
            contentType: 'application/json; charset=utf-8',
            data: JSON.stringify(data)
        }).done(function () {
            alert('글이 등록되었습니다.');
            window.location.href = '/';
        }).fail(function (error) {
            alert(JSON.stringify(error));
        });
    },
};

main.init();
index.js 의 첫문장에 var main = {...} 코드를 사용하여 main 변수의 속성으로 init, save 등의 함수를 가지고 있다
만약 index.js를 사용하는 index.mustache에서 다른 js 파일도 사용한다면 init, save 등의 함수명이 중복될 수 있다
브라우저의 스코프는 공용 공간으로 쓰이기 때문에 나중에 로드된 js의 함수들이 먼저 로드된 js의 함수들을 덮어쓰게 된다
따라서 index.js만의 유효범위를 만들어 사용한다
footer.mustache
<!--index.js 추가-->
<script src="/js/app/index.js"></script>
생성된 index.js를 머스테치 파일이 쓸 수 있게 footer.mustache에 추가한다
index.js 호출 부분을 보면 절대 경로(/)로 바로 시작하는데, 스프링 부트는 기본적으로 src/main/resources/static에 위치한 JS, CSS, 이미지 등 정적 파일들은 URL에서 /로 설정된다
등록 화면 테스트
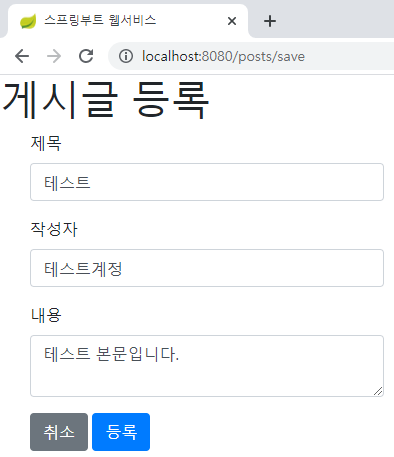
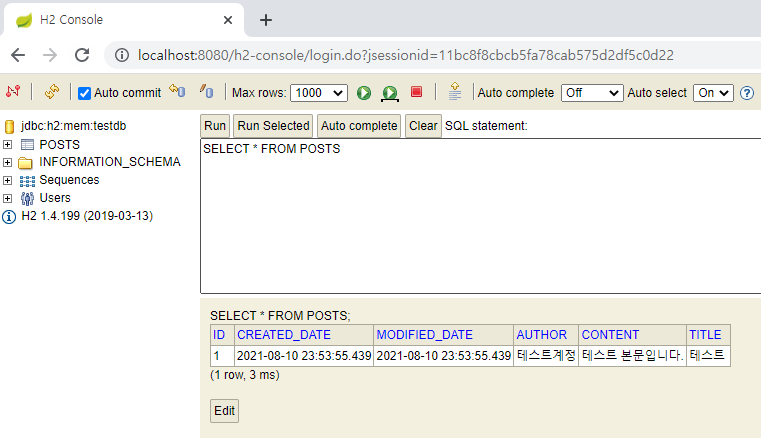
localhost:8080/h2-console에 접속해서 실제로 DB에 데이터가 등록되었는지 확인한다
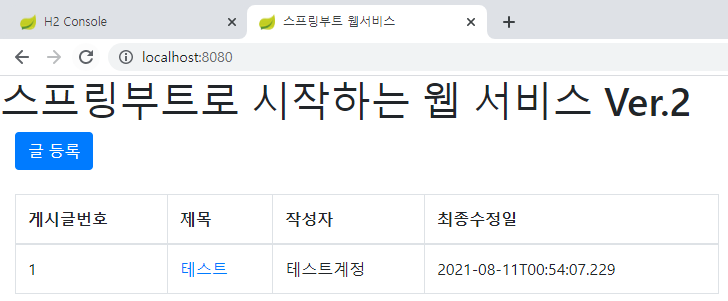
4.4 전체 조회 화면 만들기
전체 데이터 조회를 위해 index.mustache의 UI를 수정한다
index.mustache
{{>layout/header}}

<h1>스프링부트로 시작하는 웹 서비스 Ver.2</h1>
<div class="col-md-12">
    <div class="row">
        <div class="col-md-6">
            <a href="/posts/save" role="button" class="btn btn-primary">글 등록</a>
        </div>
    </div>
    <br>
    <!-- 목록 출력 영역 -->
    <table class="table table-horizontal table-bordered">
        <thead class="thead-strong">
        <tr>
            <th>게시글번호</th>
            <th>제목</th>
            <th>작성자</th>
            <th>최종수정일</th>
        </tr>
        </thead>
        <tbody id="tbody">
        {{#posts}}
            <tr>
                <td>{{id}}</td>
                <td>{{title}}</a></td>
                <td>{{author}}</td>
                <td>{{modifiedDate}}</td>
            </tr>
        {{/posts}}
        </tbody>
    </table>
</div>

{{>layout/footer}}
mustache의 문법이 처음으로 사용된다
{{#posts}}
- posts라는 리스트를 순회
- Java의 for문과 동일
{{id}} 등 {{변수명}}
- Lists에서 뽑아낸 객체의 필드를 사용
이제 Controller, Service, Repository 코드를 작성한다
PostsRepository
public interface PostsRepository extends JpaRepository<Posts, Long> {

    @Query("SELECT p FROM Posts p ORDER BY p.id DESC ")
    List<Posts> findAllDesc();
}
SpringDataJpa에서 제공하지 않는 메소드는 위처럼 쿼리로 작성해도 된다
Querydsl
- 규모가 있는 프로젝트에서 데이터 조회 시 FK의 조인, 복잡한 조건 등으로 인해 Entity 클래스만으로 처리가 어려워 조회용 프레임워크를 사용한다(Querydsl, jooq, MyBatis...)
- 이러한 프레임워크로 조회를 하고, 등록/수정/삭제 등은 SpringDataJpa를 통해 처리한다
- 이 중 타입의 안정성, 범용성, 레퍼런스가 많은 이점을 이유로 Querydsl을 추천한다
PostsService
    @Transactional(readOnly = true)
    public List<PostsListResponseDto> findAllDesc() {
        return postsRepository.findAllDesc().stream()
                .map(PostsListResponseDto::new)
                .collect(Collectors.toList());
    }
@Transactional(readOnly = true)
- 위 어노테이션은 트랜잭션 범위는 유지하되, 조회 기능만 남겨두어 조회 속도가 개선된다
.map(PostsListResponseDto::new)
- 위 코드는 람다 문법으로 다음과 같은 의미이다
.map(posts -> new PostsListResponseDto(posts)) - postsRepository 결과로 넘어온 Posts의 Stream을 map을 통해 PostsListResponseDto로 변환 → List로 반환하는 메소드
PostsListResponseDto
package com.vencott.dev.springboot.web.dto;

import com.vencott.dev.springboot.domain.posts.Posts;
import lombok.Getter;

import java.time.LocalDateTime;

@Getter
public class PostsListResponseDto {
    private Long id;
    private String title;
    private String author;
    private LocalDateTime modifiedDate;

    public PostsListResponseDto(Posts entity) {
        this.id = entity.getId();
        this.title = entity.getTitle();
        this.author = entity.getAuthor();
        this.modifiedDate = entity.getModifiedDate();
    }
}
IndexController
    private final PostsService postsService;

    @GetMapping("/")
    public String index(Model model) {
        model.addAttribute("posts", postsService.findAllDesc());
        return "index";
    }
테스트
애플리케이션을 재시작한 후, 글 등록을 한다
Index 화면에서 데이터 조회가 되는지 확인한다

4.5 게시글 수정, 삭제 화면 만들기
게시글 수정
게시글 수정 API는 PostsApiController에 만들어두었다
해당 API를 호출하는 화면을 작성한다
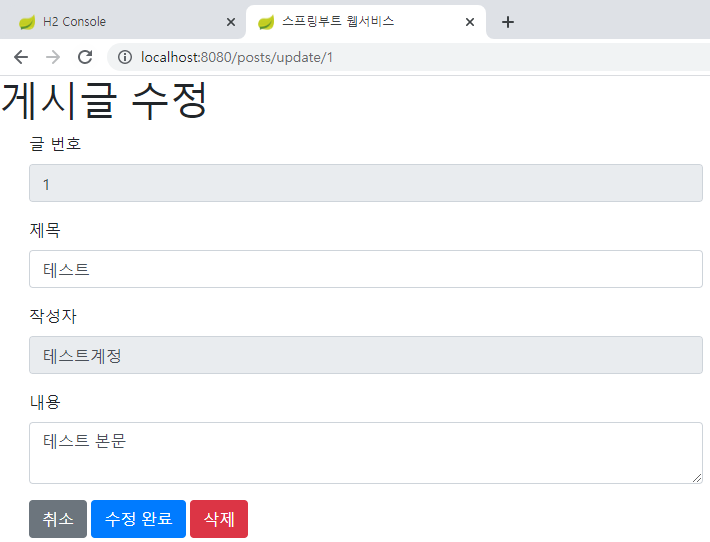
posts-update.mustache
{{>layout/header}}

<h1>게시글 수정</h1>

<div class="col-md-12">
    <div class="col-md-4">
        <form>
            <div class="form-group">
                <label for="title">글 번호</label>
                <input type="text" class="form-control" id="id" value="{{post.id}}" readonly>
            </div>
            <div class="form-group">
                <label for="title">제목</label>
                <input type="text" class="form-control" id="title" value="{{post.title}}">
            </div>
            <div class="form-group">
                <label for="author"> 작성자 </label>
                <input type="text" class="form-control" id="author" value="{{post.author}}" readonly>
            </div>
            <div class="form-group">
                <label for="content"> 내용 </label>
                <textarea class="form-control" id="content">{{post.content}}</textarea>
            </div>
        </form>
        <a href="/" role="button" class="btn btn-secondary">취소</a>
        <button type="button" class="btn btn-primary" id="btn-update">수정 완료</button>
        <button type="button" class="btn btn-danger" id="btn-delete">삭제</button>
    </div>
</div>

{{>layout/footer}}
{{post.id}}
- 머스테치는 객체의 필드 접근 시 점으로 구분
readonly
- Input 태그에 읽기 기능만 허용하는 속성
index.js
index.js에 update 함수를 추가한다
init: function () {
        var _this = this;
        $('#btn-save').on('click', function () {
            _this.save();
        });
        $('#btn-update').on('click', function () {
            _this.update();
        });
    },
update: function () {
        var data = {
            title: $('#title').val(),
            content: $('#content').val()
        };

        var id = $('#id').val();

        $.ajax({
            type: 'PUT',
            url: '/api/v1/posts/' + id,
            dataType: 'json',
            contentType: 'application/json; charset=utf-8',
            data: JSON.stringify(data)
        }).done(function () {
            alert('글이 수정되었습니다.');
            window.location.href = '/';
        }).fail(function (error) {
            alert(JSON.stringify(error));
        });
    }
type: 'PUT'
- PostsApiController에 있는 API에서 이미
@PutMapping으로 선언했기 때문에 PUT을 사용한다 - REST의 CRUD는 다음과 같이 HTTP Method에 매핑된다
- 생성(C) - POST
- 읽기(R) - GET
- 수정(U) - PUT
- 삭제(D) - DELETE
index.mustache
마지막으로 index.mustache에 수정 페이지로 이동하는 버튼을 추가한다
<td><a href="/posts/update/{{id}}">{{title}}</a></td>IndexController
    @GetMapping("/posts/update/{id}")
    public String postsUpdate(@PathVariable Long id, Model model) {
        PostsResponseDto dto = postsService.findById(id);
        model.addAttribute("post", dto);

        return "posts-update";
    }
테스트
게시글 삭제
index.js
init: function () {
        var _this = this;
        $('#btn-save').on('click', function () {
            _this.save();
        });
        $('#btn-update').on('click', function () {
            _this.update();
        });
        $('#btn-delete').on('click', function () {
            _this.delete();
        });
    },
delete: function () {
        var id = $('#id').val();

        $.ajax({
            type: 'DELETE',
            url: '/api/v1/posts/' + id,
            dataType: 'json',
            contentType: 'application/json; charset=utf-8',
        }).done(function () {
            alert('글이 삭제되었습니다.');
            window.location.href = '/';
        }).fail(function (error) {
            alert(JSON.stringify(error));
        });
    }
PostsService
    @Transactional
    public void delete(Long id) {
        Posts posts = postsRepository.findById(id).orElseThrow(() -> new IllegalArgumentException("해당 게시글이 없습니다. id=" + id));
        postsRepository.delete(posts);
    }
PostsApiController
    @DeleteMapping("/api/v1/posts/{id}")
    public Long delete(@PathVariable Long id) {
        postsService.delete(id);
        return id;
    }
출처: 이동욱 저, 『스프링 부트와 AWS로 혼자 구현하는 웹 서비스』, 프리렉(2019)