Airflow Core Concepts
Airflow는 Workflow를 관리하기 위해 만들어졌다
Workflow : 일련의 작업 흐름
DAG(Directed Acyclic Graph) : 방향성 비순환 그래프. Workflow를 정의할 때 사용
Task : DAG 내의 작업 단위이며 DAG 그래프에서 Node로 표시. Python으로 작성
Operator : Task가 특정 작업을 달성하기 위해 사용하는 메소드. Task는 Operator를 구현한 것
💡 Airflow는 워크플로우를 관리하기 위해 만들어졌으며 DAG로 워크플로우를 정의한다.
💡 DAG는 Task로 구성되어 있으며 Task간 흐름을 관리한다.
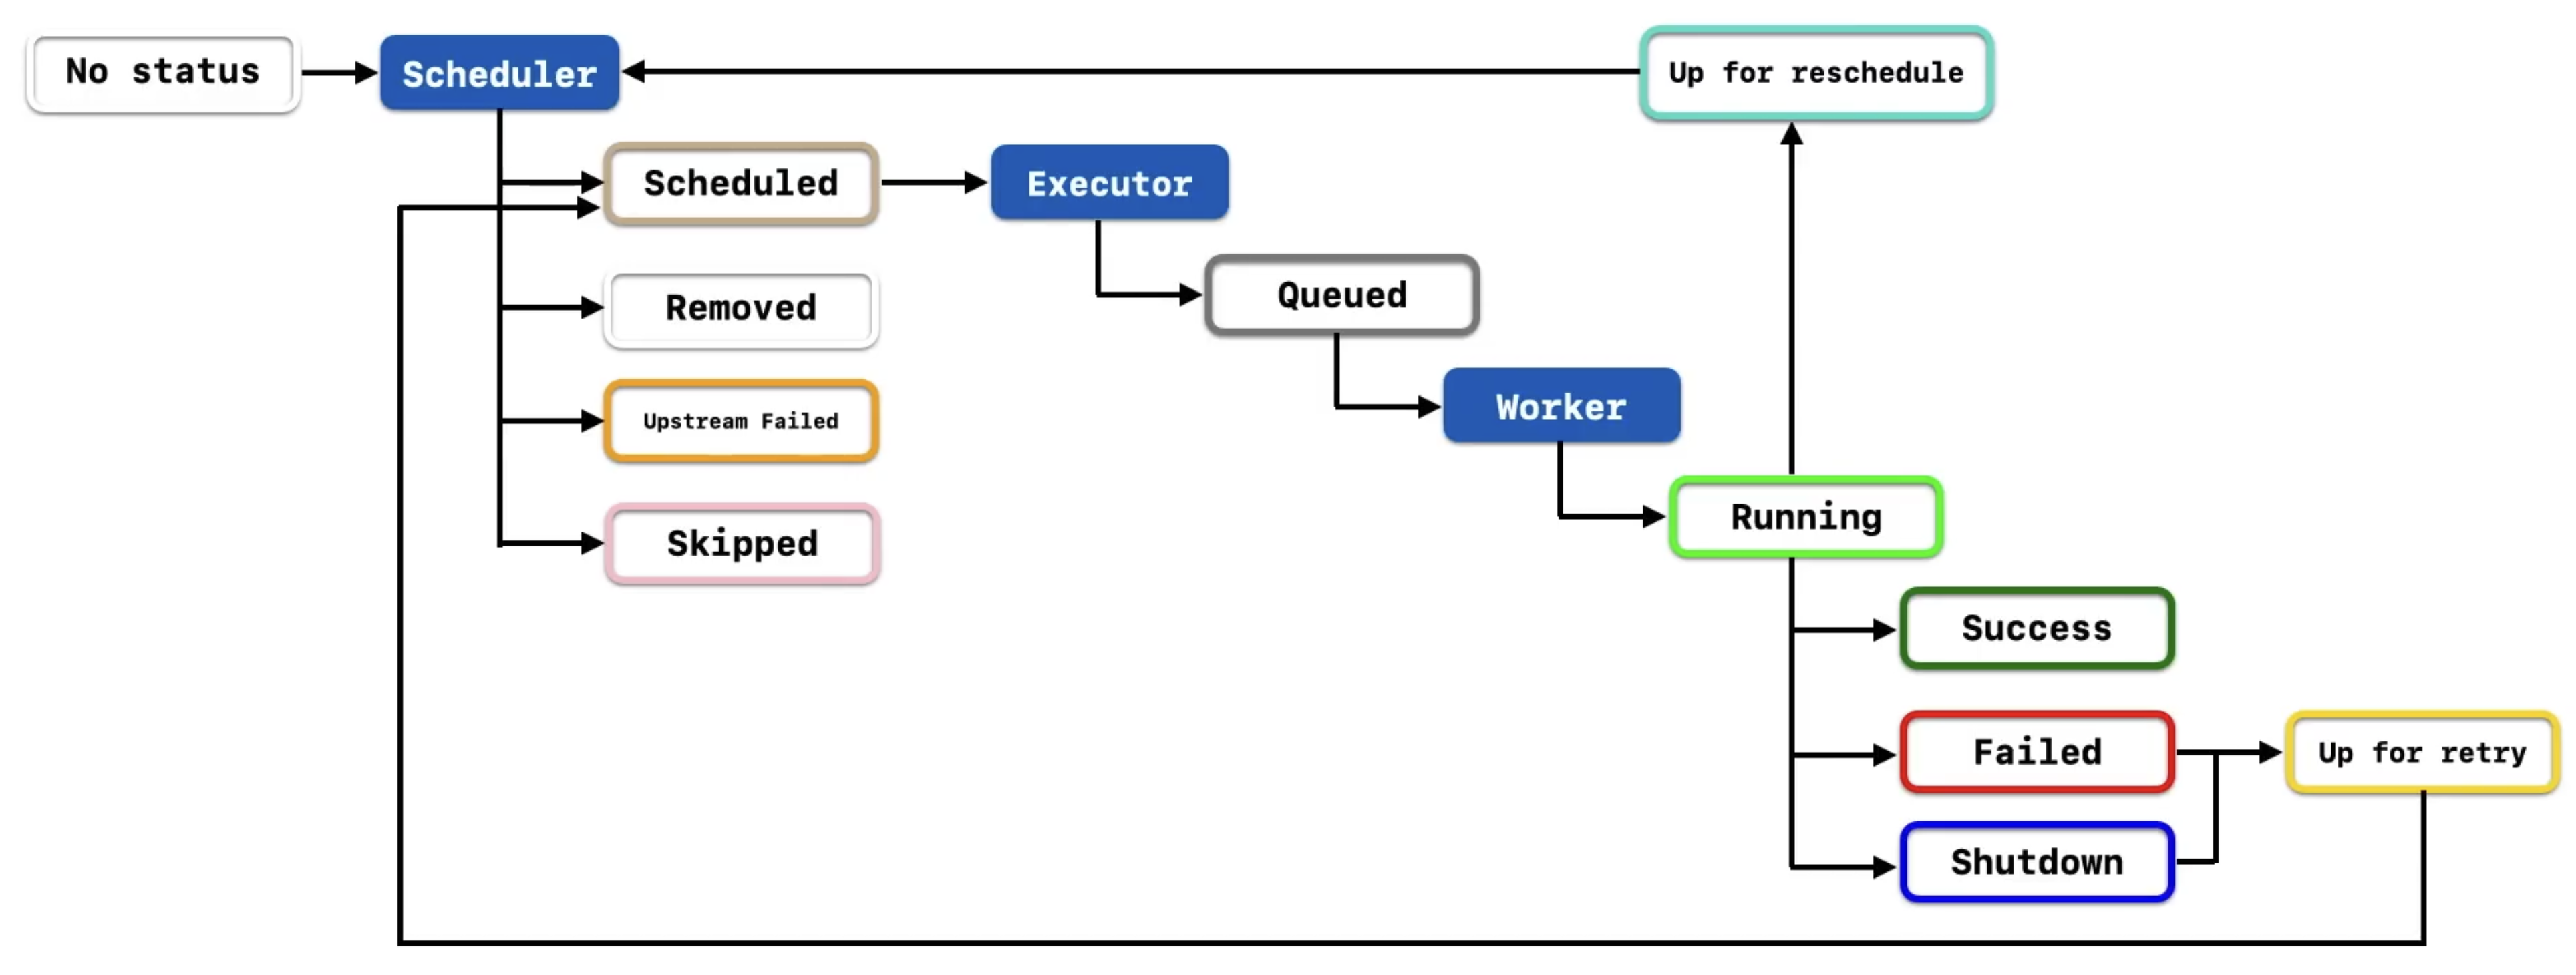
Airflow Task Lifecycle
Task는 작업의 진행 상태에 따라 Stage를 가지고 있다
Airflow에는 총 11개의 Stage가 있다 (queued, running, success…)
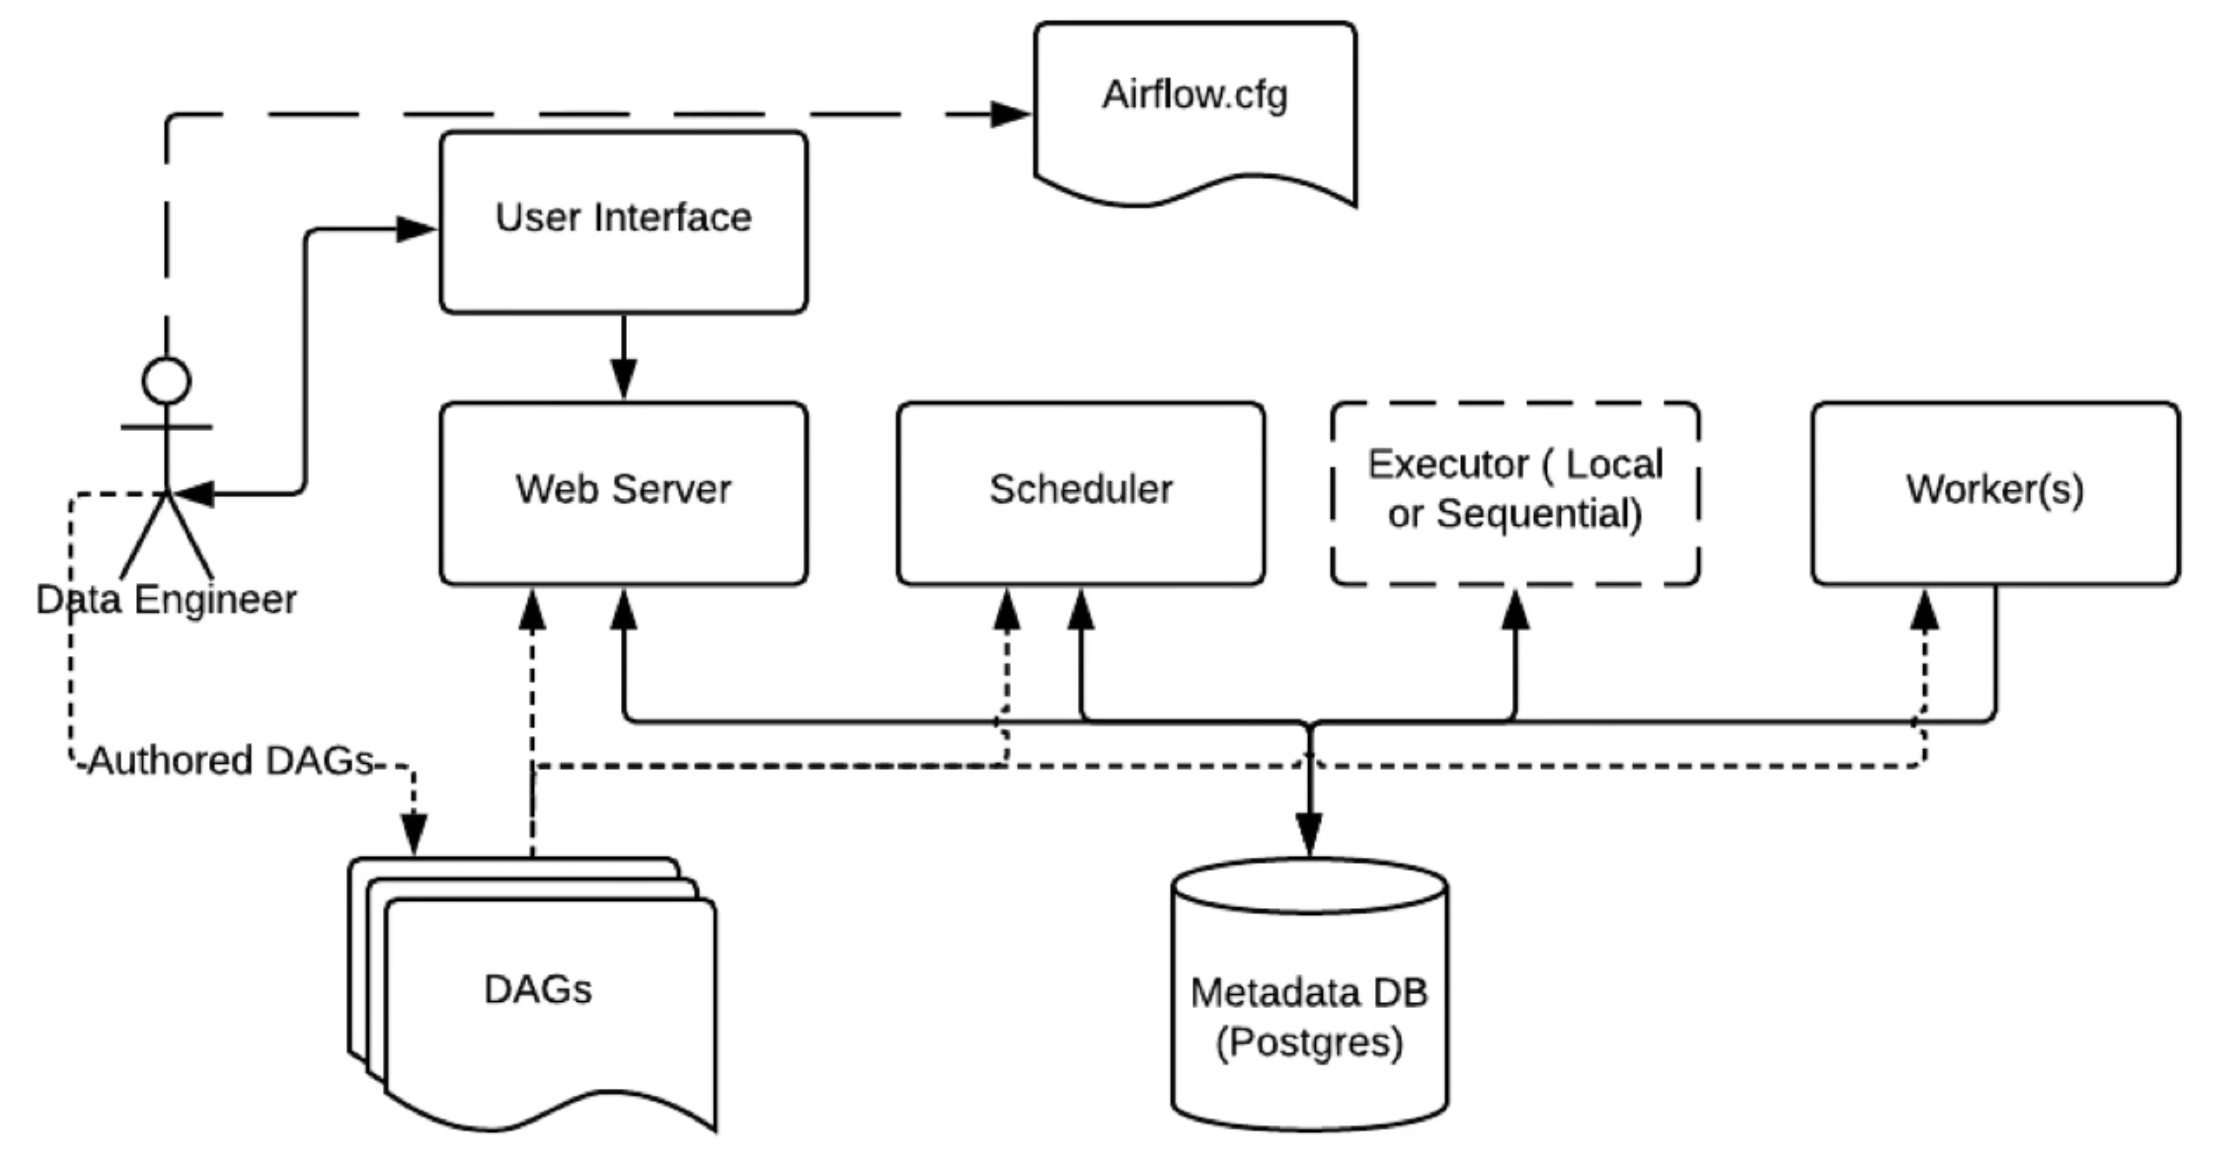
Airflow Basic Architecture
Bash Operator
from datetime import datetime, timedelta

from airflow import DAG
from airflow.operators.bash import BashOperator

default_args = {
    'owner': 'vencott',
    'retries': 5,
    'retry_delay': timedelta(minutes=2)
}

with DAG(
    dag_id='our_first_dag_v5',
    default_args=default_args,
    description='This is our first dag that we write',
    start_date=datetime(2023, 6, 23, 2),
    schedule_interval='@daily'
) as dag:
    task1 = BashOperator(
        task_id='first_task',
        bash_command='echo hello world, this is the first task!'
    )

    task2 = BashOperator(
        task_id='second_task',
        bash_command='echo hey, I am task2 and will be runnign after task1'
    )

    task3 = BashOperator(
        task_id='third_task',
        bash_command='echo hey, I am task3 and will be runnign after task1 at the same time as task2'
    )

    # Task dependency method 1
    # task1.set_downstream(task2)
    # task1.set_downstream(task3)

    # Task dependency method 2
    # task1 >> task2
    # task1 >> task3

    # Task dependency method 3
    task1 >> [task2, task3]
Python Operator
from datetime import datetime, timedelta

from airflow import DAG
from airflow.operators.python import PythonOperator

default_args = {
    'owner': 'vencott',
    'retries': 5,
    'retry_delay': timedelta(minutes=5)
}

def greet(name, age):
    print(f"Hello World! My name is {name}, "
          f"and I am {age} years old!")

with DAG(
    default_args=default_args,
    dag_id='our_dag_with_python_operator_v02',
    description='Our first dag using python operator',
    start_date=datetime(2023, 6, 25),
    schedule_interval='@daily'
) as dag:
    task1 = PythonOperator(
        task_id='greet',
        python_callable=greet,
        op_kwargs={'name': 'Tom', 'age': 20}
    )
Airflow XComs
서로 다른 Task 간에 데이터를 공유하는 방법
한 Task에서 XComs에 데이터를 push 하고, 다른 Task에서 pull 하여 사용하는 방식
- Python function에 리턴값이 있다면 자동으로 return_value 라는 키로 XComs에 push 된다
- ti(task instance) 라는 변수를 사용해 원하는 곳에서 pull 하여 사용한다
from datetime import datetime, timedelta

from airflow import DAG
from airflow.operators.python import PythonOperator

default_args = {
    'owner': 'vencott',
    'retries': 5,
    'retry_delay': timedelta(minutes=5)
}

# ti : task instance
def greet(age, ti):
    name = ti.xcom_pull(task_ids='get_name')
    print(f"Hello World! My name is {name}, "
          f"and I am {age} years old!")

def get_name():
    return 'Jerry'

with DAG(
    default_args=default_args,
    dag_id='our_dag_with_python_operator_v04',
    description='Our first dag using python operator',
    start_date=datetime(2023, 6, 25),
    schedule_interval='@daily'
) as dag:
    task1 = PythonOperator(
        task_id='greet',
        python_callable=greet,
        op_kwargs={'age': 20}
    )

    task2 = PythonOperator(
        task_id='get_name',
        python_callable=get_name,
    )

    task2 >> task1
하나의 함수에서 여러개의 값을 XComs에 push 하고 싶다면, ti.xcom_push 를 이용한다
def greet(age, ti):
    first_name = ti.xcom_pull(task_ids='get_name', key='first_name')
    last_name = ti.xcom_pull(task_ids='get_name', key='last_name')
    print(f"Hello World! My name is {first_name} {last_name}, "
          f"and I am {age} years old!")

def get_name(ti):
    ti.xcom_push(key='first_name', value='Jerry')
    ti.xcom_push(key='last_name', value='Fridman')
하지만 XComs의 최대 사이즈는 48KB 이기 때문에 큰 사이즈의 데이터를 공유하는 데 사용하기엔 적합하지 않다
Airflow Task Flow API
Decorator를 사용해서 DAG를 작성할 수 있다
Task Flow API를 활용하면 코드의 수를 효율적으로 줄일 수 있다
from datetime import datetime, timedelta

from airflow.decorators import dag, task

default_args = {
    'owner': 'vencott',
    'retries': 5,
    'retry_delay': timedelta(minutes=5)
}

@dag(dag_id='dag_with_taskflow_api_v02',
     default_args=default_args,
     start_date=datetime(2023, 6, 27),
     schedule_interval='@daily')
def hello_world_etl():

    @task(multiple_outputs=True)
    def get_name():
        return {
            'first_name': 'Jerry',
            'last_name': 'Fridman'
            }

    @task()
    def get_age():
        return 30

    @task()
    def greet(first_name, last_name, age):
        print(f"Hello World! My name is {first_name} {last_name} "
              f"and I am {age} years old!")

    name_dict = get_name()
    age = get_age()
    greet(first_name=name_dict['first_name'], last_name=name_dict['last_name'], age=age)

greet_dag = hello_world_etl()
Airflow Catch-Up and Backfill
Catch-up
Catch-Up 기능을 통해 start_date 부터 연속적으로 DAG를 실행한다
from datetime import datetime, timedelta

from airflow import DAG
from airflow.operators.bash import BashOperator

default_args = {
    'owner': 'vencott',
    'retries': 5,
    'retry_delay': timedelta(minutes=5)
}

with DAG(
    dag_id='dag_with_catchup_backfill_v01',
    default_args=default_args,
    start_date=datetime(2023, 6, 1),
    schedule_interval='@daily',
    catchup=True # catchup 옵션은 default로 True 이다
) as dag:
    task1 = BashOperator(
        task_id='task1',
        bash_command='echo This is a simple bash command!'
    )
Backfill
만약 catchup=False 로 설정하면 실행일로부터 바로 전날의 DAG만 실행한다
Backfill 기능을 통해 시작일, 종료일을 지정해 과거의 DAG들을 실행할 수 있다
# Airflow Scheduler Bash 접속
# **docker exec -it [container_id_of_airflow_scheduler] bash**
docker exec -it 7d6dfa08d468 bash

# backfill
**# airflow dags backfill -s [start_date] -e [end_date] [dag_id]**
airflow dags backfill -s 2023-06-01 -e 2023-06-27 dag_with_catchup_backfill_v02
Airflow Scheduler with Cron Expression
DAG를 작성할 때 schedule interval을 지정하는 방법에는 2가지가 있다
- datetime.timedelta 이용
- Cron Expression 이용
Cron Expression은 5개의 필드를 공백으로 구분한 문자열로 시간을 나타낸다
Airflow는 @daily, @weekly 등의 preset을 제공한다
from datetime import datetime, timedelta

from airflow import DAG
from airflow.operators.bash import BashOperator

default_args = {
    'owner': 'vencott',
    'retries': 5,
    'retry_delay': timedelta(minutes=5)
}

with DAG(
    dag_id='dag_with_cron_expression_v02',
    default_args=default_args,
    start_date=datetime(2023, 6, 1),
    # schedule_interval='@daily'
    schedule_interval='0 0 * * *'
) as dag:
    task1 = BashOperator(
        task_id='task1',
        bash_command='echo Dag with cron expression!'
    )
Cron Expression을 쉽게 생성하기 위해선 crontab.guru 사이트를 이용한다