프로그램 작성하기
- index.html파일을 생성하고 아래 코드를 입력해주세요
<!DOCTYPE html>
<html lang="en">
<head>
    <meta charset="UTF-8">
    <meta name="viewport" content="width=device-width, initial-scale=1.0">
    <title>Calculator</title>
    <link rel="stylesheet" href="styles.css">
</head>
<body>
    <div class="calculator">
        <div class="display" id="display"></div>
        <div class="buttons">
            <button class="button AC" onclick="clearDisplay()">AC</button>
            <button class="button" onclick="deleteLast()">DEL</button>
            <button class="button sign" onclick="appendToDisplay('/')">/</button>
            <button class="button" onclick="appendToDisplay('7')">7</button>
            <button class="button" onclick="appendToDisplay('8')">8</button>
            <button class="button" onclick="appendToDisplay('9')">9</button>
            <button class="button sign" onclick="appendToDisplay('*')">*</button>
            <button class="button" onclick="appendToDisplay('4')">4</button>
            <button class="button" onclick="appendToDisplay('5')">5</button>
            <button class="button" onclick="appendToDisplay('6')">6</button>
            <button class="button sign" onclick="appendToDisplay('+')">+</button>
            <button class="button" onclick="appendToDisplay('1')">1</button>
            <button class="button" onclick="appendToDisplay('2')">2</button>
            <button class="button" onclick="appendToDisplay('3')">3</button>
            <button class="button sign" onclick="appendToDisplay('-')">-</button>
            <button class="button zero" onclick="appendToDisplay('0')">0</button>
            <button class="button" onclick="appendToDisplay('.')">.</button>
            <button class="button sign" onclick="calculateResult()">=</button>
        </div>
    </div>
    <script src="script.js"></script>
</body>
</html>
이력 남기기
- 첫번째 이력 만들기
-
git status
- On branch main : 연속적으로 커밋을 기록하는 연결체를 브랜치라고 합니다. 처음에 저장소를 생성하면 한 개의 기본 브랜치가 만들어지는데, 이것을 메인 브랜치라고 합니다. ‘On branch main’은 현재 main 브랜치에서 작업 중이라는 뜻입니다.
- No commits yet : 현재 커밋이 없음을 나타냅니다.
- Untracked files : 추적(관리) 중인 파일 외에, 새로 추가된 파일을 표시합니다.(main.py) 해당 파일을 커밋하려면 git add를 실행하라고 힌트도 주고 있습니다.
- nothing add to commit ~ : 커밋할 파일이 없다고 설명합니다. 현재 스테이징 영역(Staging Area)에 파일이 없기 때문입니다.
-
git add [파일명]
-
git add index.html
-
git status
- Changes to be committed : 스테이징된(커밋한) 파일이 있음을 알려줍니다. 이 파일은 당연히 index.html입니다.
-
git commit
- vim 모드로 진입합니다.
- i 키를 눌러서 문서 편집 모드로 진입합니다.
- ESC 키를 눌러서 문서 편지 모드에서 나옵니다.
- :wq 키를 차례대로 입력한 후, 엔터 키를 입력합니다. wq는 메시지를 저장하고(write) 편집을 종료(quit)하는 vim 단축키입니다.
- 상단 메시지 작성 후 저장하면 커밋 메시지로 남겨짐
-
git status
- nothing to commit, working tree clean : 커밋할 파일이 없다는 뜻입니다. Working Directory의 파일들이 Unmodified 상태임을 나타냅니다. index.html 파일을 만들고 코드를 작성한 내역을 기록했기 때문입니다.Git 3가지 작업 영역
-
프로그램 작성하기
- index.html파일을 생성하고 아래 코드를 입력해주세요
<!DOCTYPE html>
<html lang="en">
<head>
    <meta charset="UTF-8">
    <meta name="viewport" content="width=device-width, initial-scale=1.0">
    <title>Calculator</title>
    <link rel="stylesheet" href="styles.css">
</head>
<body>
    <div class="calculator">
        <div class="display" id="display"></div>
        <div class="buttons">
            <button class="button AC" onclick="clearDisplay()">AC</button>
            <button class="button" onclick="deleteLast()">DEL</button>
            <button class="button sign" onclick="appendToDisplay('/')">/</button>
            <button class="button" onclick="appendToDisplay('7')">7</button>
            <button class="button" onclick="appendToDisplay('8')">8</button>
            <button class="button" onclick="appendToDisplay('9')">9</button>
            <button class="button sign" onclick="appendToDisplay('*')">*</button>
            <button class="button" onclick="appendToDisplay('4')">4</button>
            <button class="button" onclick="appendToDisplay('5')">5</button>
            <button class="button" onclick="appendToDisplay('6')">6</button>
            <button class="button sign" onclick="appendToDisplay('+')">+</button>
            <button class="button" onclick="appendToDisplay('1')">1</button>
            <button class="button" onclick="appendToDisplay('2')">2</button>
            <button class="button" onclick="appendToDisplay('3')">3</button>
            <button class="button sign" onclick="appendToDisplay('-')">-</button>
            <button class="button zero" onclick="appendToDisplay('0')">0</button>
            <button class="button" onclick="appendToDisplay('.')">.</button>
            <button class="button sign" onclick="calculateResult()">=</button>
        </div>
    </div>
    <script src="script.js"></script>
</body>
</html>
이력 남기기
-
첫번째 이력 만들기
-
git status
- On branch main : 연속적으로 커밋을 기록하는 연결체를 브랜치라고 합니다. 처음에 저장소를 생성하면 한 개의 기본 브랜치가 만들어지는데, 이것을 메인 브랜치라고 합니다. ‘On branch main’은 현재 main 브랜치에서 작업 중이라는 뜻입니다.
- No commits yet : 현재 커밋이 없음을 나타냅니다.
- Untracked files : 추적(관리) 중인 파일 외에, 새로 추가된 파일을 표시합니다.(main.py) 해당 파일을 커밋하려면 git add를 실행하라고 힌트도 주고 있습니다.
- nothing add to commit ~ : 커밋할 파일이 없다고 설명합니다. 현재 스테이징 영역(Staging Area)에 파일이 없기 때문입니다.
-
git add [파일명]
-
git add index.html
-
git status
- Changes to be committed : 스테이징된(커밋한) 파일이 있음을 알려줍니다. 이 파일은 당연히 index.html입니다.
-
git commit
- vim 모드로 진입합니다.
- i 키를 눌러서 문서 편집 모드로 진입합니다.
- ESC 키를 눌러서 문서 편지 모드에서 나옵니다.
- :wq 키를 차례대로 입력한 후, 엔터 키를 입력합니다. wq는 메시지를 저장하고(write) 편집을 종료(quit)하는 vim 단축키입니다.
- 상단 메시지 작성 후 저장하면 커밋 메시지로 남겨짐
-
git status
- nothing to commit, working tree clean : 커밋할 파일이 없다는 뜻입니다. Working Directory의 파일들이 Unmodified 상태임을 나타냅니다. index.html 파일을 만들고 코드를 작성한 내역을 기록했기 때문입니다.Git 3가지 작업 영역

-
Working Directory(물리적 공간)
- 파일 추가 및 수정 될 때마다 Git이 자동으로 변경 사항을 감지합니다.
-
Staging Area(가상 공간)
- 파일이 추가되거나 변경된 이력을 저장하고 싶다면, 대상 파일을 선택하고 Staging Area로 이동시켜야 합니다.
- Staging Area로 이동시키는 작업을 스테이징이라고 합니다.
- 스테이징을 위한 명령어는 git add라는 명령어를 사용합니다.
-
Repository(가상 공간)
- 이력을 기록하려면 Staging Area에 있는 파일들을 Repository라고 하는 공간으로 이동시켜야 마무리됩니다.
- 이 동작은 git commit 명령을 통해 실행됩니다.
-
정리
- 수정, 추가 이력을 기록하기 위해 스테이징(git add)과 commit 두 단계를 거쳐야 합니다.Git이 관리하는 3가지 파일 상태
-
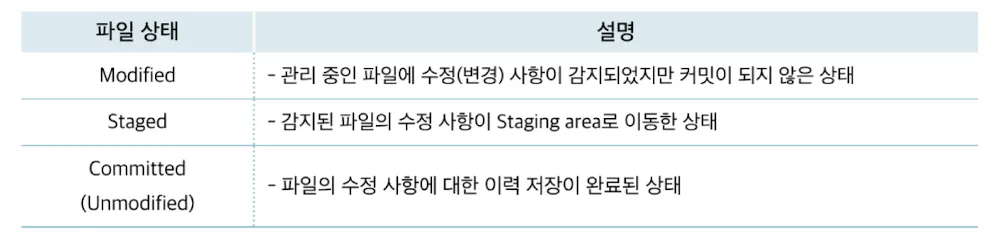
- Untracked : 저장소에서 관리하지 않는 파일들의 상태
    - 저장소에 새로운 파일이 추가된 경우
- Tracked : Git이 추척하는 파일
    - commit 명령어로 이력이 생긴 파일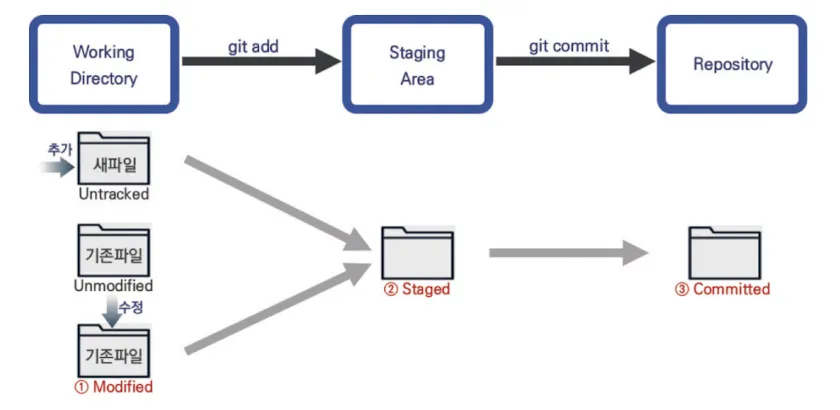
- Staging Area이 필요한 이유는?
    - 일부 파일만 커밋할 때
    - 충돌을 수정할때
    - 커밋을 수정할 때

### 정리

- Git의 작업 영역 : Working Directory, Staging Area, Repository
- Git 파일의 상태 : Modified, Staged, Committed- 두번째 이력 남기기
- styles.css에 코드를 추가로 작성합니다.
body { display: flex; justify-content: center; align-items: center; height: 100vh; background-color: #f7f7f7; margin: 0; font-family: 'Arial', sans-serif; } .calculator { background-color: #fff; border-radius: 10px; box-shadow: 0 0 20px rgba(0, 0, 0, 0.1); width: 300px; } .display { background-color: #222; color: #fff; font-size: 2em; padding: 20px; text-align: right; height: 40px; } .buttons { display: grid; grid-template-columns: repeat(4, 1fr); grid-gap: 1px; } .button { background-color: #f0f0f0; border: none; padding: 20px; font-size: 1.5em; cursor: pointer; transition: background-color 0.2s; } .button:hover { background-color: #ddd; } .AC { grid-column: span 2; } .zero { grid-column: span 2; } .sign { background-color: #4caf50; color: #fff; } .equal:hover { background-color: #45a049; } - git status로 이력 살펴보기
- styles.css에 코드를 추가로 작성합니다.
- 세번째 이력 남기기
- script.js에 코드를 추가로 작성합니다.
const display = document.getElementById('display'); function clearDisplay() { display.innerText = ''; } function deleteLast() { display.innerText = display.innerText.slice(0, -1); } function appendToDisplay(value) { display.innerText += value; } function calculateResult() { try { display.innerText = eval(display.innerText); } catch { display.innerText = 'Error'; } } - git add .
- git commit -m “[메시지]”
- git commit -am “[메시지]”
- script.js에 코드를 추가로 작성합니다.
정리
-
git status : 저장소의 상태 정보 출력
-
git add [파일 이름] : 해당 파일을 Staging Area에 올리기
-
git add [디렉터리 이름] : 해당 디렉터리 안에 수정된 모든 파일을 Staging Area에 올리기
-
git add . : Working Directory 안에 추가, 수정된 모든 파일을 Staging Area에 올리기
-
git commit : 이력 저장, 커밋
-
git commit -m “[메시지]” : vim을 사용하지 않고 인라인으로 메시지를 추가하여 커밋
-
git commit -am “[메시지]” : git add와 git commit을 한꺼번에 명령(Untracked 파일은 제외)
-
Working Directory(물리적 공간)
- 파일 추가 및 수정 될 때마다 Git이 자동으로 변경 사항을 감지합니다.
-
Staging Area(가상 공간)
- 파일이 추가되거나 변경된 이력을 저장하고 싶다면, 대상 파일을 선택하고 Staging Area로 이동시켜야 합니다.
- Staging Area로 이동시키는 작업을 스테이징이라고 합니다.
- 스테이징을 위한 명령어는 git add라는 명령어를 사용합니다.
-
Repository(가상 공간)
- 이력을 기록하려면 Staging Area에 있는 파일들을 Repository라고 하는 공간으로 이동시켜야 마무리됩니다.
- 이 동작은 git commit 명령을 통해 실행됩니다.
-
정리
- 수정, 추가 이력을 기록하기 위해 스테이징(git add)과 commit 두 단계를 거쳐야 합니다.Git이 관리하는 3가지 파일 상태

-
Untracked : 저장소에서 관리하지 않는 파일들의 상태
- 저장소에 새로운 파일이 추가된 경우
-
Tracked : Git이 추척하는 파일
- commit 명령어로 이력이 생긴 파일
-
Staging Area이 필요한 이유는?
- 일부 파일만 커밋할 때
- 충돌을 수정할때
- 커밋을 수정할 때정리
-
Git의 작업 영역 : Working Directory, Staging Area, Repository
-
Git 파일의 상태 : Modified, Staged, Committed
-
-
두번째 이력 남기기
- styles.css에 코드를 추가로 작성합니다.
body { display: flex; justify-content: center; align-items: center; height: 100vh; background-color: #f7f7f7; margin: 0; font-family: 'Arial', sans-serif; } .calculator { background-color: #fff; border-radius: 10px; box-shadow: 0 0 20px rgba(0, 0, 0, 0.1); width: 300px; } .display { background-color: #222; color: #fff; font-size: 2em; padding: 20px; text-align: right; height: 40px; } .buttons { display: grid; grid-template-columns: repeat(4, 1fr); grid-gap: 1px; } .button { background-color: #f0f0f0; border: none; padding: 20px; font-size: 1.5em; cursor: pointer; transition: background-color 0.2s; } .button:hover { background-color: #ddd; } .AC { grid-column: span 2; } .zero { grid-column: span 2; } .sign { background-color: #4caf50; color: #fff; } .equal:hover { background-color: #45a049; } - git status로 이력 살펴보기
- styles.css에 코드를 추가로 작성합니다.
-
세번째 이력 남기기
- script.js에 코드를 추가로 작성합니다.
const display = document.getElementById('display'); function clearDisplay() { display.innerText = ''; } function deleteLast() { display.innerText = display.innerText.slice(0, -1); } function appendToDisplay(value) { display.innerText += value; } function calculateResult() { try { display.innerText = eval(display.innerText); } catch { display.innerText = 'Error'; } } - git add .
- git commit -m “[메시지]”
- git commit -am “[메시지]”
- script.js에 코드를 추가로 작성합니다.
정리
- git status : 저장소의 상태 정보 출력
- git add [파일 이름] : 해당 파일을 Staging Area에 올리기
- git add [디렉터리 이름] : 해당 디렉터리 안에 수정된 모든 파일을 Staging Area에 올리기
- git add . : Working Directory 안에 추가, 수정된 모든 파일을 Staging Area에 올리기
- git commit : 이력 저장, 커밋
- git commit -m “[메시지]” : vim을 사용하지 않고 인라인으로 메시지를 추가하여 커밋
- git commit -am “[메시지]” : git add와 git commit을 한꺼번에 명령(Untracked 파일은 제외)