현 프로젝트에 스프링 시큐리티와 jwt을 통한 회원가입/로그인 과정의 전반적인 프로세스를 살펴보고자 한다.
Config 파일
@EnableWebSecurity
@Configuration
@RequiredArgsConstructor
public class SecurityConfig{

    private final JwtTokenProvider jwtTokenProvider;

    @Bean
    public SecurityFilterChain filterChain(HttpSecurity http) throws Exception {
        return http
                .csrf(AbstractHttpConfigurer::disable)
                //폼 로그인 안함
                .formLogin(AbstractHttpConfigurer::disable)
                //세션 안씀
                .sessionManagement((httpSecuritySessionManagementConfigurer ->
                        httpSecuritySessionManagementConfigurer.sessionCreationPolicy(SessionCreationPolicy.STATELESS)))
                .authorizeHttpRequests((authorizeRequests) -> {

                    /**
                     * 1) ROLE_ 은 붙이면 안 된다. hasAnyRole()을 사용할 때 자동으로 ROLE_ 이 붙기 때문
                     * 2) ADMIN과 WORKER 로 나누어서, 등록은 ADMIN만 되고 WORKER는 조회만 되게끔 설정하기
                    **/

                    authorizeRequests.requestMatchers(HttpMethod.POST,"/api/login").permitAll();

              //      authorizeRequests.requestMatchers(HttpMethod.POST,"/api/**").hasRole("ADMIN");
                    authorizeRequests.requestMatchers(HttpMethod.PUT,"/api/**").hasRole("ADMIN");
                    authorizeRequests.requestMatchers(HttpMethod.DELETE,"/api/**").hasRole("ADMIN");
                    authorizeRequests.requestMatchers(HttpMethod.GET,"/api/**").hasRole("ADMIN");

                    authorizeRequests.requestMatchers(HttpMethod.GET,"/api/**").hasRole("WORKER");


                    authorizeRequests.anyRequest().permitAll(); // 그 외의 요청은 다 허용
                })

                .addFilterBefore(jwtAuthenticationFilter,UsernamePasswordAuthenticationFilter.class)
                .addFilterBefore(exceptionHandlerFilter,JwtAuthenticationFilter.class)
                .build();
    }
    @Bean
    PasswordEncoder passwordEncoder() {
        return new BCryptPasswordEncoder();
    }
}
회원가입
회원의 id,password를 저장할 Account table에 저장
-> password는 BCryptPasswordEncoder를 이용하여 인코딩 해준다.
@Operation(summary = "직원 계정 생성")
@PostMapping("/worker/{workerId}/account")
public ApiResponse<?> addUser(@PathVariable Long workerId, @RequestBody UserRequestDto userRequestDto) {

       accountService.addUser(workerId, userRequestDto);

       return successResponseNoContent();
 }

public void addUser(Long workerId, UserRequestDto userRequestDto) {

        Worker worker = workerService.find(workerId);

        if(!isAccountPresent(userRequestDto.getAccountId())){

            Account account = Account.builder()
                    .accountId(userRequestDto.getAccountId())
                    .password(passwordEncoder.encode(userRequestDto.getPassword()))
                    .roles(userRequestDto.getRoles())
                    .build();

            account.setWorker(worker);

            accountRepository.save(account);
        }
        else {
            throw new DuplicateIdException();
        }
    }
로그인
 @Operation(summary = "계정 로그인")
 @PostMapping("/login")
 public ApiResponse<TokenDto> login(@RequestBody LoginRequestDto loginRequestDto) {

        TokenDto token = loginService.login(loginRequestDto);

        return successResponse(token);
}

public TokenDto login(LoginRequestDto loginRequestDto) {

        // 1. Login ID/PW 를 기반으로 Authentication 객체 생성
        UsernamePasswordAuthenticationToken authenticationToken = new UsernamePasswordAuthenticationToken(loginRequestDto.getAccountId(), loginRequestDto.getPassword());

        // 2. 실제 검증 (사용자 비밀번호 체크)이 이루어지는 부분
        Authentication authentication = authenticationManagerBuilder.getObject().authenticate(authenticationToken);

        // 3. 인증 정보를 기반으로 JWT 토큰 생성
        return jwtTokenProvider.generateToken(authentication);

}

@Service
@RequiredArgsConstructor
public class SecurityService implements UserDetailsService {

    private final AccountRepository accountRepository;

    @Override
    public UserDetails loadUserByUsername(String accountId){
        return accountRepository.findByAccountId(accountId)
                .map(this::createUserDetails)
                .orElseThrow(DuplicateIdException::new);
    }

    // 스프링 시큐리티는 User 객체를 통해 User 정보를 저장한다
    private UserDetails createUserDetails(Account account) {
        return User.builder()
                .username(account.getAccountId())
                .password(account.getPassword())
                .roles(account.getRoles().get(0))
                .build();
    }

}-
로그인할 id,password를 가지고 인증이 되지 않은
UsernamePasswordAuthenticationToken토큰 반환
-> UserName 토큰은 Authentication의 구현체 -
해당 토큰을 이용하여 인증된
Authentication을 반환
-> DaoAuthenticationProvider 객체에 retrieveUser가 실행
-> createSuccessAuthentication() 비밀번호 확인
-> UserDetailService 에 loadByUsername 메서드를 실행 시키며 인증
//user 확인
@Override
protected final UserDetails retrieveUser(String username, UsernamePasswordAuthenticationToken authentication)throws AuthenticationException {
		prepareTimingAttackProtection();
		try {
        //loadUserByUserName으로 User 확인
			UserDetails loadedUser = this.getUserDetailsService().loadUserByUsername(username);
			if (loadedUser == null) {
				throw new InternalAuthenticationServiceException(
						"UserDetailsService returned null, which is an interface contract violation");
			}
			return loadedUser;
		}
		catch (UsernameNotFoundException ex) {
			mitigateAgainstTimingAttack(authentication);
			throw ex;
		}
		catch (InternalAuthenticationServiceException ex) {
			throw ex;
		}
		catch (Exception ex) {
			throw new InternalAuthenticationServiceException(ex.getMessage(), ex);
	}
}

@Override
protected Authentication createSuccessAuthentication(Object principal, Authentication authentication,UserDetails user) {
		boolean upgradeEncoding = this.userDetailsPasswordService != null
				&& this.passwordEncoder.upgradeEncoding(user.getPassword());
		if (upgradeEncoding) {
			String presentedPassword = authentication.getCredentials().toString();
			String newPassword = this.passwordEncoder.encode(presentedPassword);
			user = this.userDetailsPasswordService.updatePassword(user, newPassword);
		}
		return super.createSuccessAuthentication(principal, authentication, user);
}- jwt 토큰 생성
토큰 생성
 public TokenDto generateToken(Authentication authentication) {

            // role 가져오기
            String authorities = authentication.getAuthorities().stream()
                    .map(GrantedAuthority::getAuthority)
                    .collect(Collectors.joining(","));

            long now = (new Date()).getTime();
            // Access Token 생성
            // 토큰 유효기간 하루
            Date accessTokenExpiresIn = new Date(now + 86400000);
            String accessToken = Jwts.builder()
                    .setSubject(authentication.getName())
                    .claim("auth", authorities)
                    .setExpiration(accessTokenExpiresIn)
                    .signWith(key, SignatureAlgorithm.HS256)
                    .compact();

            return TokenDto.builder()
                    .grantType("Bearer")
                    .accessToken(accessToken)
                    .build();
    }
JWT를 통한 인가
Config 파일에서
.addFilterBefore(new JwtAuthenticationFilter(jwtTokenProvider), UsernamePasswordAuthenticationFilter.class)을 통해 JwtAuthenticationFilter를 적용 시켰다.
Filter에서 jwt 인증,인가 과정을 거친다.
JwtFilter 구현
@RequiredArgsConstructor
public class JwtAuthenticationFilter extends GenericFilterBean {

    private final JwtTokenProvider jwtTokenProvider;

    @Override
    public void doFilter(ServletRequest request, ServletResponse response, FilterChain chain) throws IOException, ServletException {

        // 1. Request Header에서 JWT 토큰 추출
        String token = resolveToken((HttpServletRequest) request);

        // 2. validateToken 으로 토큰 유효성 검사
        if (token != null) {
            jwtTokenProvider.validateToken(token);
            // 토큰이 유효할 경우 토큰에서 Authentication 객체를 가져와 SecurityContext에 저장
            Authentication authentication = jwtTokenProvider.getAuthentication(token);
            SecurityContextHolder.getContext().setAuthentication(authentication);
        }
        chain.doFilter(request, response);
    }

    // Request Header에서 토큰 정보 추출
    private String resolveToken(HttpServletRequest request) {
        String bearerToken = request.getHeader("Authorization");
        if (StringUtils.hasText(bearerToken) && bearerToken.startsWith("Bearer")) {
            return bearerToken.substring(7);
        }
        return null;
    }
}
중간에 SecurityContextHoler에 set하는 부분이 나오는데
SecurityContextHoler의 역할을 알아보자
SecurityContextHolder
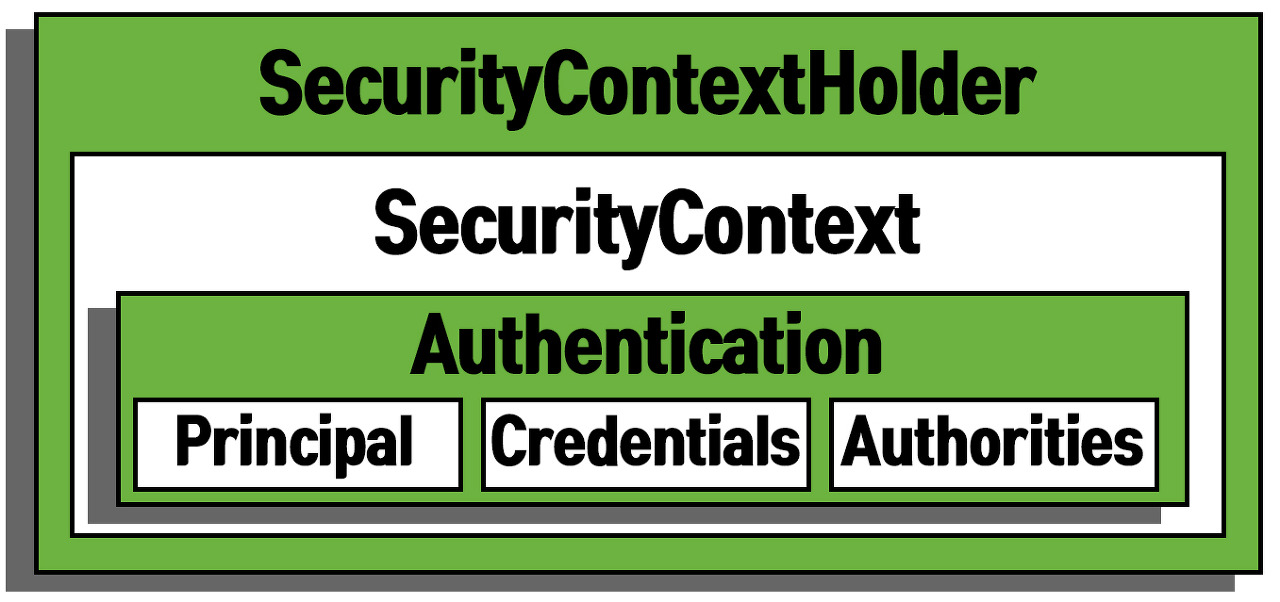
SecurityContextHolder의 구조는 위에 그림 처럼 생겼다.
-
Authentication
인증 객체이며 현재 프로젝트는 id,password를 통한 인증 방식인UsernamePasswordAuthenticationToken로 구현되어있다. 그 외에 쿠키를 통한 인증방식인RememberMeAuthenticationToken익명사용자에 대한 인증인AnonymousAuthenticationToken등의 구현체를 시큐리티에선 제공한다.
- Principal
User 객체
- Crednetials
사용자 비밀번호
- Authoritites
ROLE
-
SecurityContext
Authentication 객체가 저장되는 보관소. 필요 시 언제든지 Authentication 객체를 꺼내어 쓸 수 있도록 제공되는 클래스 -
SecurityContextHolder
SecurityContext 객체 저장 방식을 지정하거나 저장 정보를 초기화 할 수 있다.
-> 기본적으론ThreadLocal로 설정되어있어,한 Thread인 한 요청에 대한 응답 까지 과정에서 공유 가능
-> SecurityContextHolder는 세션에 저장된다.
jwt 토큰 검증
각 상황에 따른 jwt 해석 결과에 대한 예외처리를 한다.
public void validateToken(String token){
    try {
        Jwts.parserBuilder().setSigningKey(key).build().parseClaimsJws(token);
    }
    catch (ExpiredJwtException e){
        throw new JwtException("유효기간이 만료된 토큰입니다.");
    }
    catch (UnsupportedJwtException e){
        throw new JwtException("지원되지 않는 JWT 토큰입니다.");
    }
    catch (IllegalArgumentException e){
        throw new JwtException("JWT 토큰이 잘못 되었습니다.");
    }
    catch (io.jsonwebtoken.security.SecurityException | MalformedJwtException e){
        throw new JwtException("잘못된 Jwt 서명입니다");
    }
}
예외처리 handler 필터
필터는 Dispatcher Servlet 이전에 작동되기 떄문에 Spring Context안에 있는 controller 단에서 실행되는 @RestControllerAdvice로 예외처리를 할 수 없다.
그래서 따로 필터를 만들어서 예외처리를 해준다.
@Component
public class ExceptionHandlerFilter extends OncePerRequestFilter {
    @Override
    protected void doFilterInternal(HttpServletRequest request, HttpServletResponse response, FilterChain filterChain) throws ServletException, IOException {

        try {
            filterChain.doFilter(request,response);
        }catch (JwtException e){
            jwtExceptionHandler(response,e.getErrorApiResponse());
        }catch (AccessDeniedException e){
            accessDeniedExceptionHandler(response);
        }
    }

    public void accessDeniedExceptionHandler(HttpServletResponse response) throws IOException {

        response.setContentType("application/json");
        response.setCharacterEncoding("UTF-8");

        ObjectMapper objectMapper = new ObjectMapper();
        objectMapper.registerModule(new JavaTimeModule());
        objectMapper.disable(SerializationFeature.WRITE_DATES_AS_TIMESTAMPS);
        String jsonResponse = objectMapper.writeValueAsString(errorResponse(ACCESS_DENIED));

        PrintWriter writer = response.getWriter();
        writer.write(jsonResponse);
    }

    public void jwtExceptionHandler(HttpServletResponse response, ErrorApiResponse errorApiResponse) throws IOException {

        response.setContentType("application/json");
        response.setCharacterEncoding("UTF-8");

        ObjectMapper objectMapper = new ObjectMapper();
        objectMapper.registerModule(new JavaTimeModule());
        objectMapper.disable(SerializationFeature.WRITE_DATES_AS_TIMESTAMPS);
        String jsonResponse = objectMapper.writeValueAsString(errorResponse(errorApiResponse));

        PrintWriter writer = response.getWriter();
        writer.write(jsonResponse);
    }
}
사용자 정보 가져오기
jwt에 정보를 통해서 SecurityContext에 있는 사용자 정보를 넣고 Controller에서 @AuthenticationPrincipal를 통해 정보를 가져온다.
UserDetails를 따로 구현했으면 해당 객체를 가져올 수도 있다.
@Operation(summary = "내 정보 수정")
@PutMapping("/worker")
public ApiResponse<?> updateMe(@AuthenticationPrincipal UserDetails userDetails, @RequestBody ReqWorkerDto reqWorkerDto) {
    workerService.editMe(userDetails.getUsername(),reqWorkerDto);
    return successResponseNoContent();
}